xpCirclePacker
xpCirclePacker implements a circle-packing routine, which will pack as many particles as possible into a defined space without them overlapping.
You can use any Emitter Shape, but some work better than others; the Rectangle, Circle, and Ellipse settings pack the particles into the space defined by the emitter boundary.
If you use a Sphere or Box setting, the particles are packed into the volume defined by the emitter.
You can use the xpCirclePacker when emitting from the Object setting, so you can use all the modes available there, but Emit From the Polygon Center and Points modes are not very useful.
Best results are obtained with Polygon Area or Texture emission.
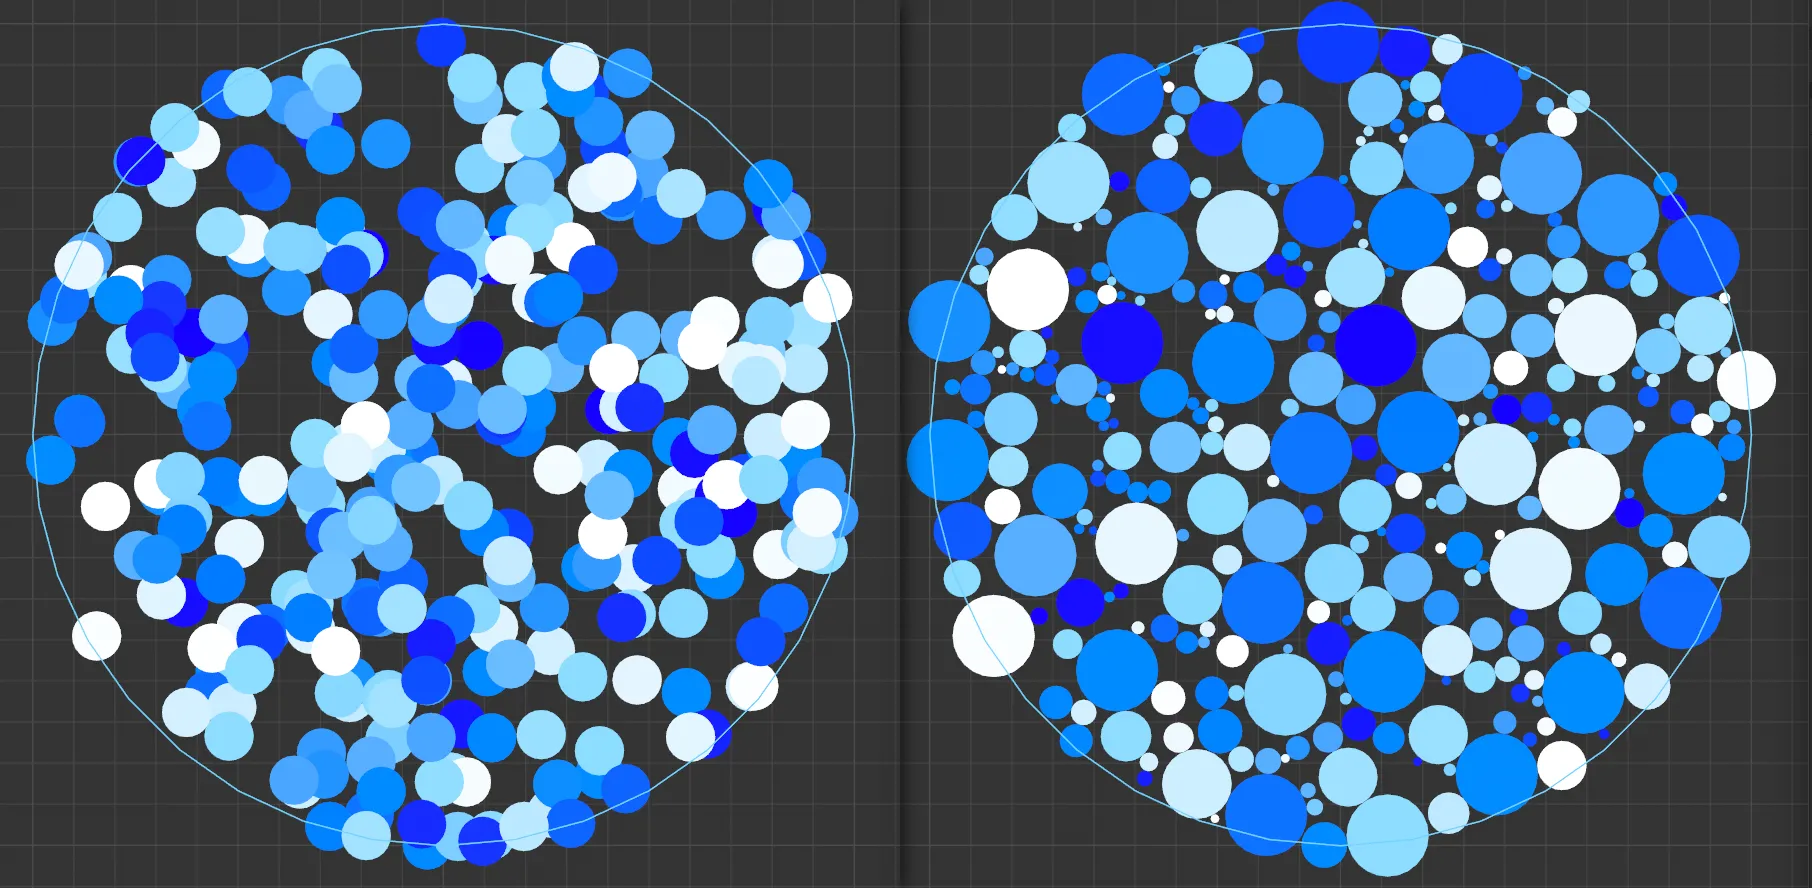
The image on the left has a collection of particles from xpEmitter, whilst the right-hand image has xpCirclePacker added, with the Display Mode is set to Filled Circles.
Be aware that the object will delete any particles which can’t be fitted into the space at the point where they are generated.
This has an effect on the number of generated particles, which becomes more and more apparent as the space becomes filled.
For example, if you have a Birthrate value of 1000 and a frame rate of 25 frames per second, you would normally expect to see 1000 particles after 25 frames.
The xpCirclePacker, however, may have to delete some of them, so you may end up with far fewer.
For this reason, to pack a space in reasonable time may require that you increase the Birthrate value substantially.
You can use any modifier with these particles but, of course, anything which changes the particle scale or speed will destroy the pattern created.
You can render the result by using the X-Particles material in the usual way, which will render the particles as Spheres - which is ideal for this purpose.
Or you can use geometry from an xpGenerator or xpSprite object.
If you do that, the best results will be obtained if you use a Sphere as the object to be generated (or you can generate a Circle spline, if desired).
If you use anything non-circular, some of the generated objects will overlap.
General tab
Section titled “General tab”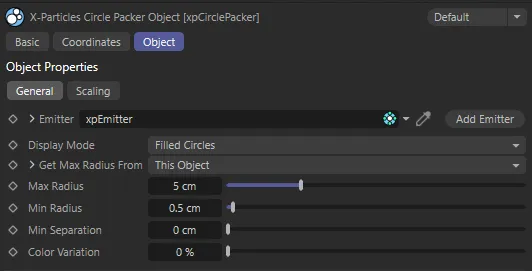
xpCirclePacker General tab menu settings.
Emitter
Section titled “Emitter”The emitter to use.
When you drop an xpEmitter into this field, the following changes are automatically made to it:
- the particle Speed and speed Variation values are set to zero
- Subframe Emit parameter is disabled
- the maximum number of particles is set to the value in the Max Particles parameter
- the particle display type is set to Circle (Filled), with 12 segments.
You can change any of these if desired, but the packing effect is best seen with circles of some kind.
You can change between those from the Editor Display drop-down menu.
If you want to change the maximum number of particles, you can do so in the xpEmitter or with the Max Particles parameter.
Add Emitter
Section titled “Add Emitter”Click this button to create an emitter and add it to the Emitter field.
Display Mode
Section titled “Display Mode”Set as Filled Circles, by default, this selects the particle display mode used in the editor.
The menu offers the additional choices of Circles, Spheres or As Emitter.
These are exactly the same as the options in the emitter’s Display tab; this menu can be used instead, for convenience.
Get Max Radius From
Section titled “Get Max Radius From”Set as This Object, by default, this determines where the maximum particle radius will be obtained from.
The alternative option is Particle.
This Object
Section titled “This Object”This setting means that the maximum radius is controlled by the Max Radius setting; in this case, the initial radius given to the particle by the emitter is ignored.
Particle
Section titled “Particle”The maximum possible radius is then determined by the particle’s initial radius setting.
The xpCirclePacker may reduce that radius, to make the particle fit, but it will never increase the radius.
With this option you can (for example) set the initial radius from a texture and the xpCirclePacker will try to keep the radius as close to that value as possible.
If you set this menu to Particle, you have additional options, which can be seen by clicking the little arrow next to the text Get Max Radius From.
These options allow you to alter the radius of the generated particle before the xpCirclePacker fits them into place.
You can use these controls to alter the radius of particles, depending on their existing radius.
For example, suppose you are emitting particles from a texture where the brightest particles have a radius of 5 and the darkest a radius of 1.
You’d really like the brightest (i.e. largest) to be much larger in proportion, so you would increase the Scale Multiplier to a suitable value, then adjust the spline so that only the largest particles were affected by the multiplier.
Radius Scale
Section titled “Radius Scale”The spline which affects the value of the Scale Multiplier, depending on the existing particle radius.
Scale Range Max, Scale Range Min
Section titled “Scale Range Max, Scale Range Min”The existing particle radius values between which the spline will apply.
The particle radius is first checked to see if it falls in the range bounded by the Scale Range Max and Scale Range Min settings.
If it is less than Scale Range Min, the value at the extreme left of the spline is taken.
If the radius is greater than Scale Range Max, the value at the extreme right of the spline is used.
For values within the range, the value at the appropriate point along the spline is taken.
Scale Multiplier
Section titled “Scale Multiplier”A value which is multiplied with the value from the spline and then multiplied with the particle’s current radius to give a final radius value.
Max Radius
Section titled “Max Radius”The maximum particle radius to set.
Only available if Get Max Radius From is set to This Object.
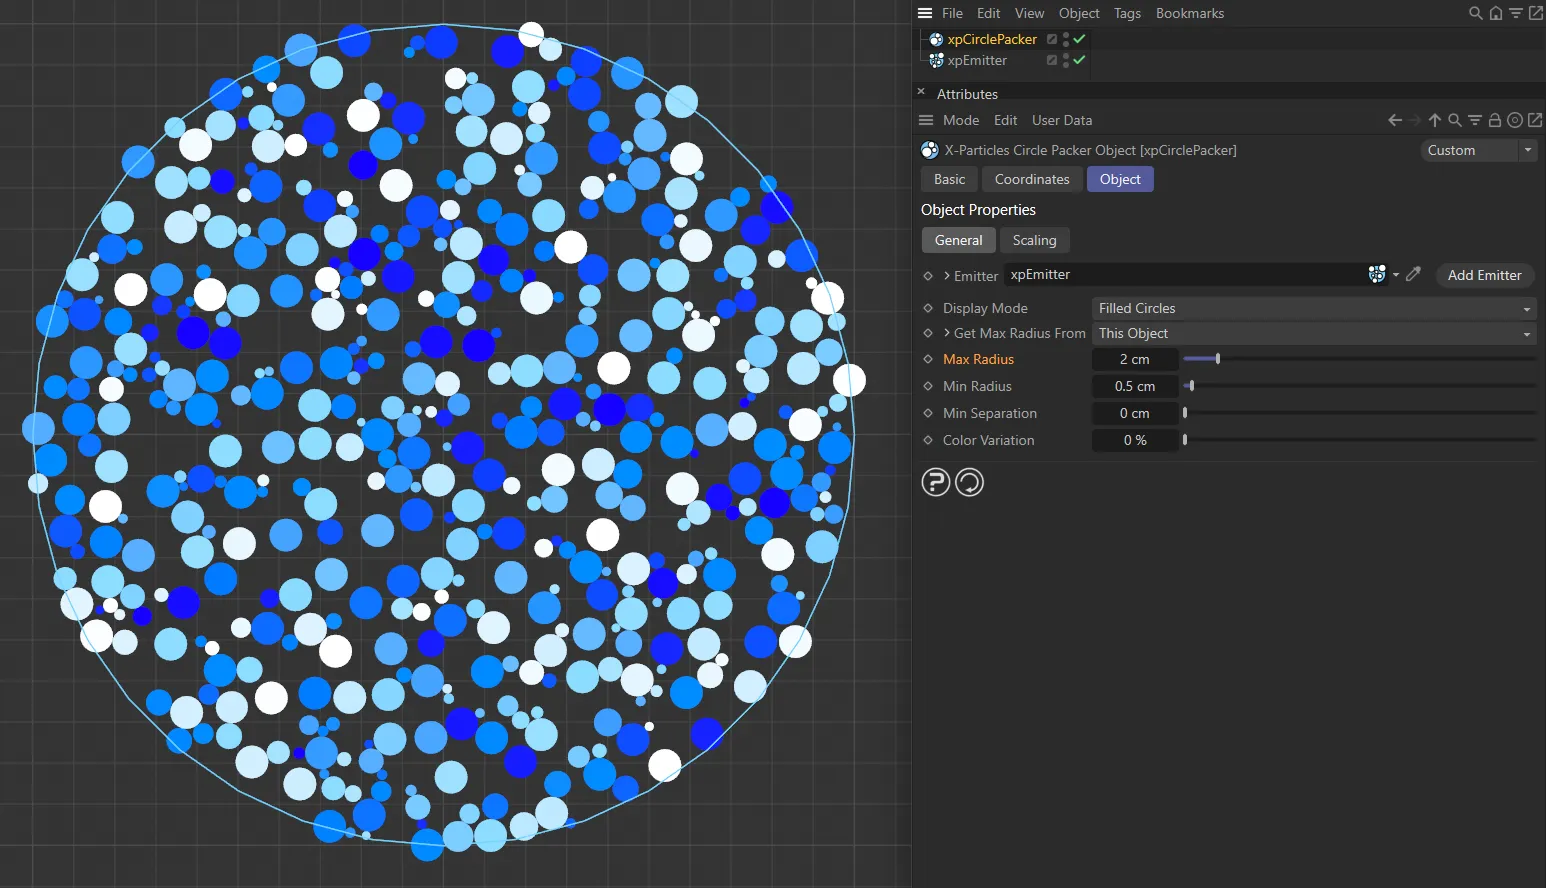
The Max Radius is set at 2cm, in this first image.
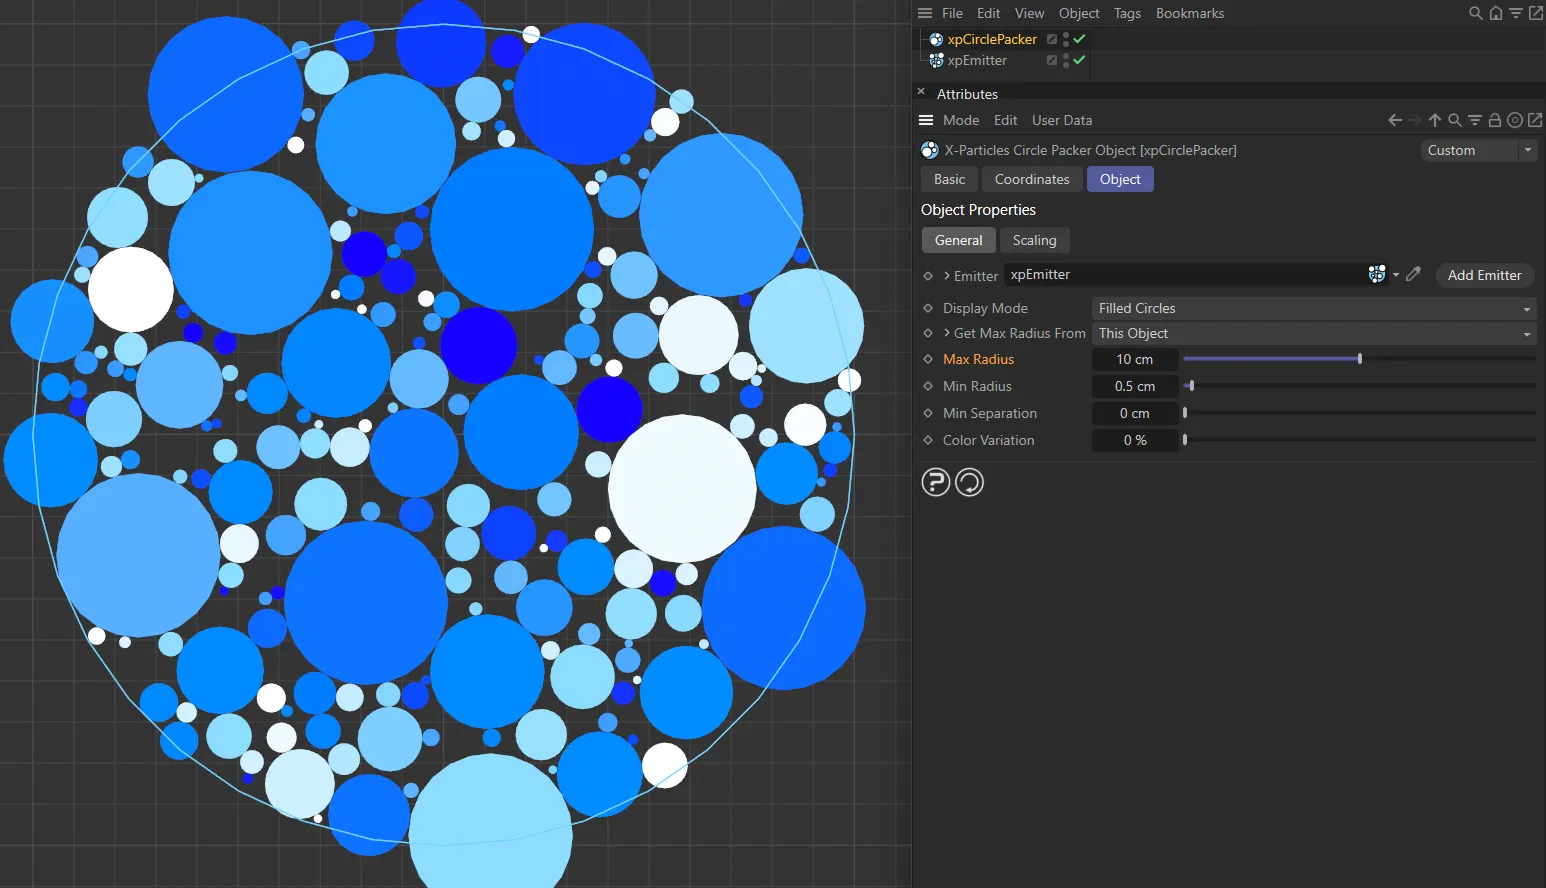
Max Radius raised to 10cm, creating Filled Circles up to that radius size.
Min Radius
Section titled “Min Radius”The minimum particle radius.
The xpCirclePacker will try to fit the particle into the position at which it is generated and, if necessary, will reduce the radius until it fits.
However, if the final radius is less than this value, the particle will not fit and will be deleted.
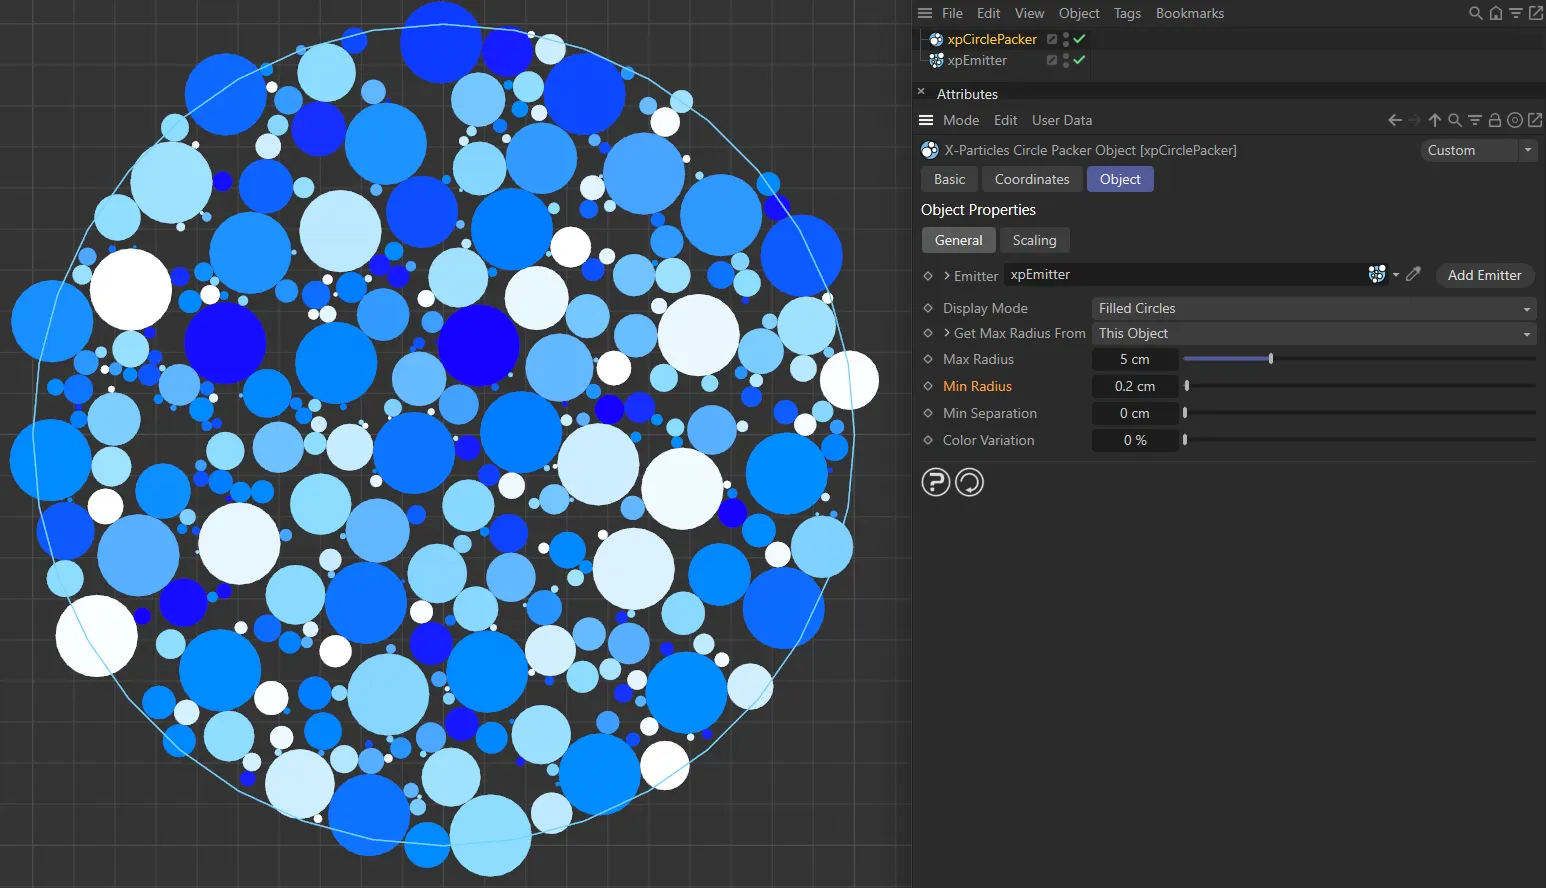
The Min Radius is 0.2cm, establishing the smallest circle sizes (the Max Radius is set at 5cm).
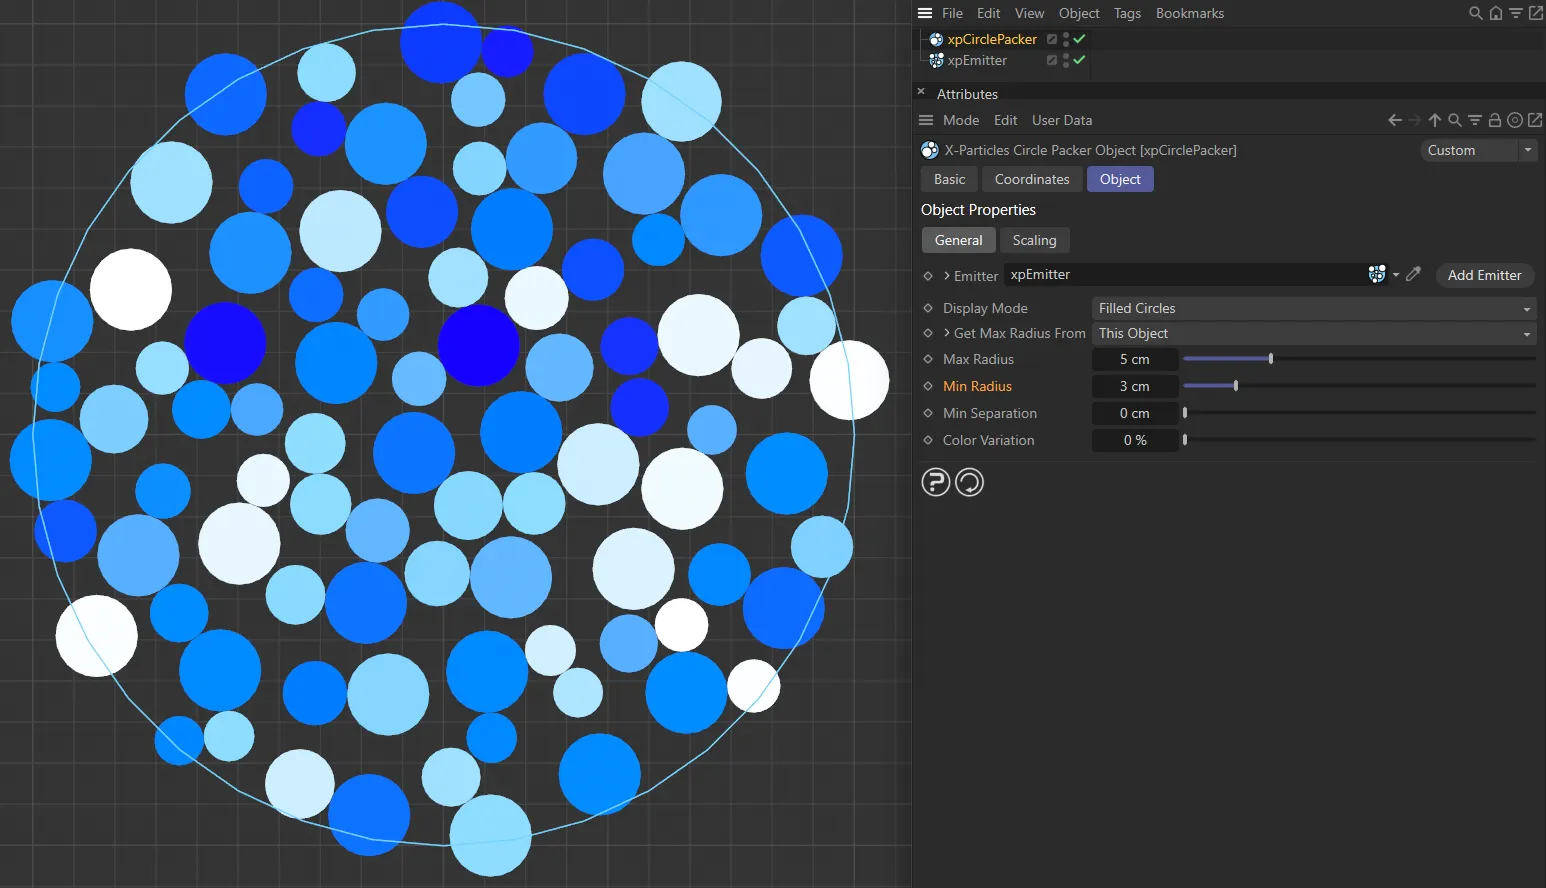
With the same Max Radius setting, the Min Radius has been increased to 3cm here, only allowing circles between the two radius values.
Min Separation
Section titled “Min Separation”Normally a new particle will be touching at least one other existing particle.
You can set a slight gap between them by altering this value.
It is recommended that this value is kept small (e.g. 0.25 screen units) for best results.
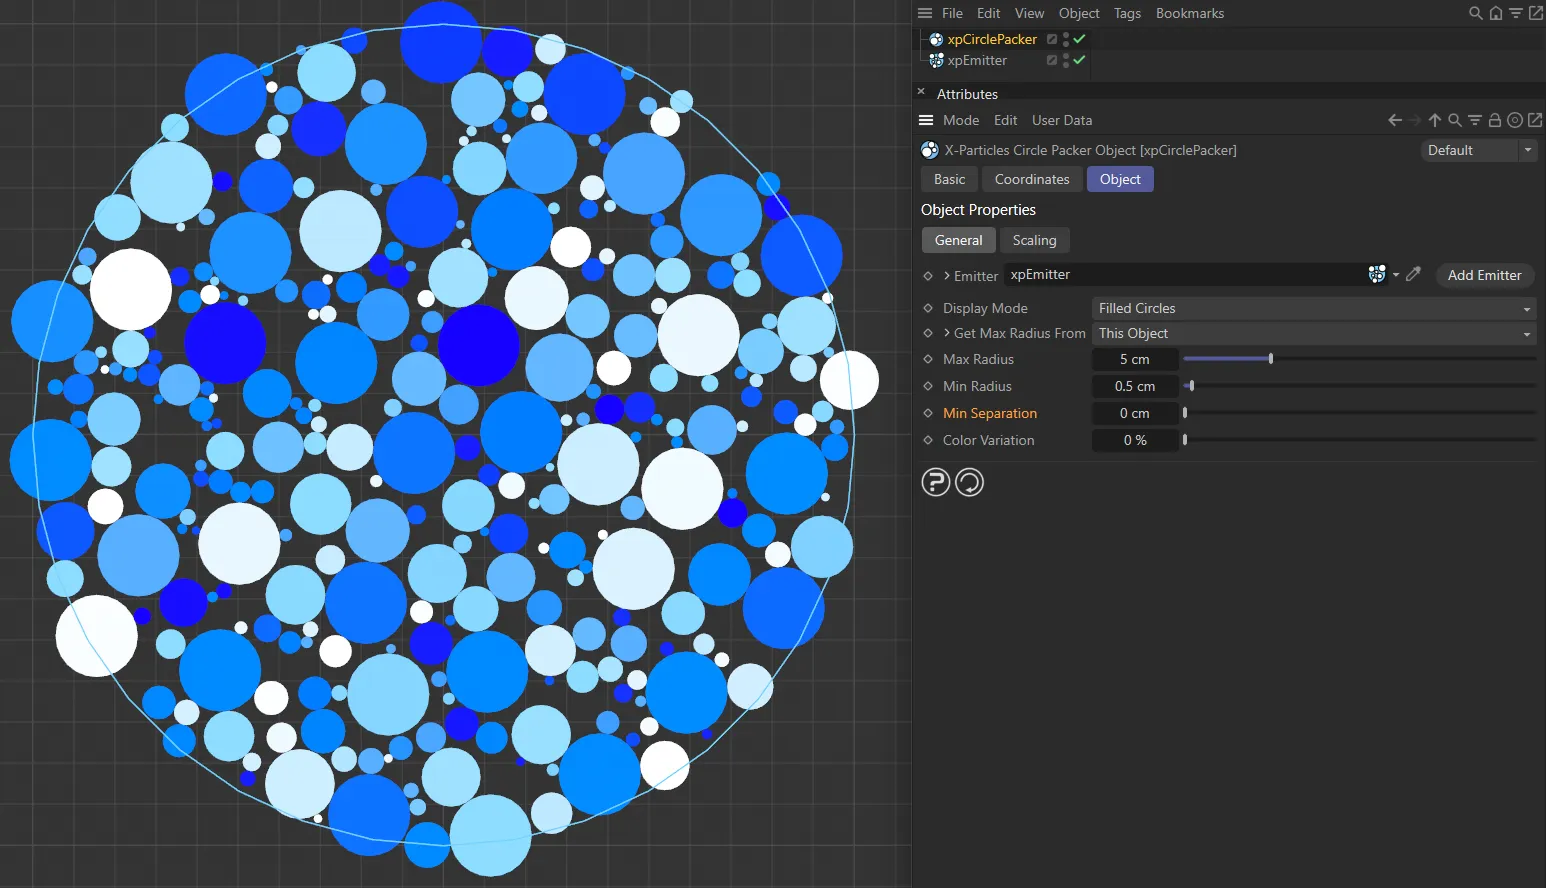
With the Min Separation set at 0 (zero) cm, circles can touch.
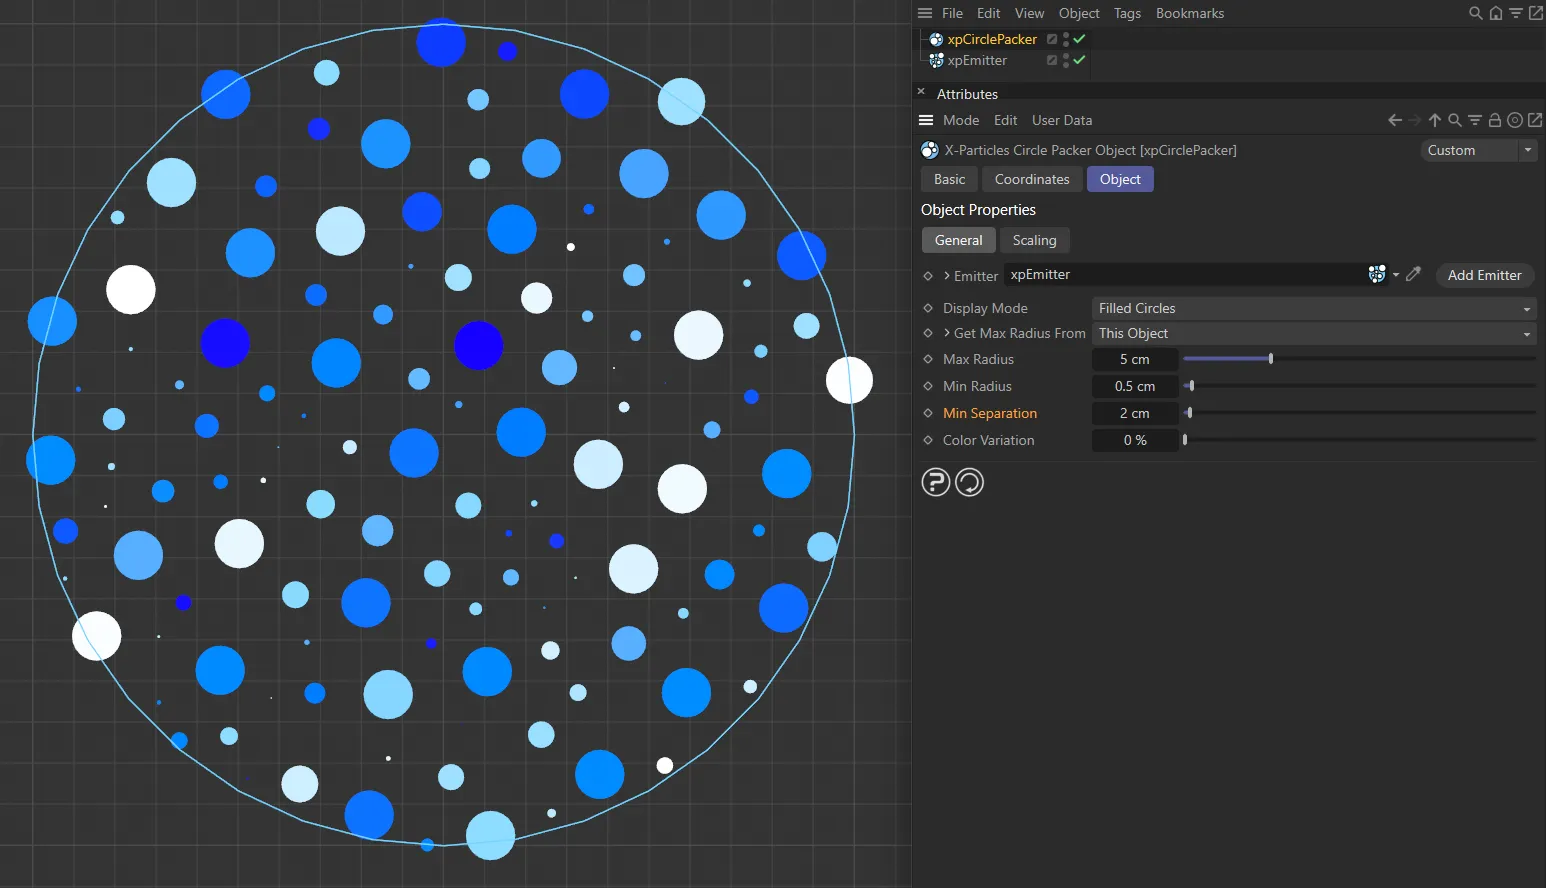
Min Separation is set at 2cm here, not allowing any circles closer than that distance from each other.
Color Variation
Section titled “Color Variation”By default this is set to zero, so the particles will retain their original color.
Increasing this value will add some variation into the color.
Scaling tab
Section titled “Scaling tab”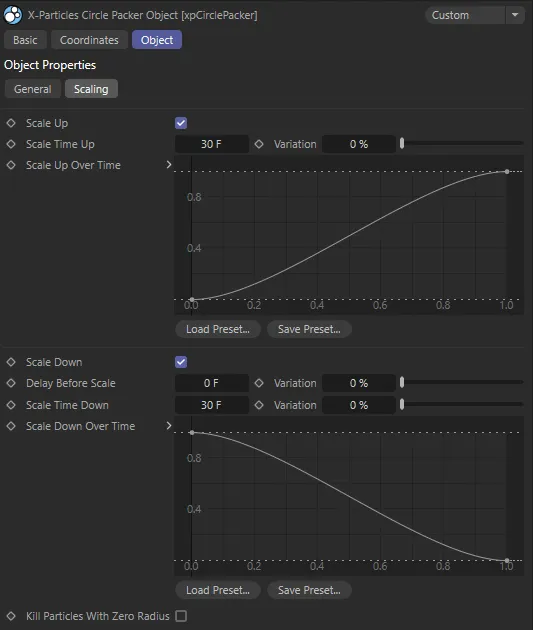
xpCirclePacker General tab menu settings.
The xpCirclePacker can scale particles up and down and the change in radius is controlled by spline controls so allowing the changes to ease in and out.
The available controls are as follows.
Scale Up
Section titled “Scale Up”If checked, the xpCirclePacker will set the initial particle radius to zero then scale it up over time to the maximum possible value for that particle.
The time taken to scale up to its maximum is determined by the Scale Time Up setting.
Scale Time Up
Section titled “Scale Time Up”The time taken for a particle radius to be scaled up to its maximum radius, if Scale Up is checked.
Variation
Section titled “Variation”By increasing this value above zero, there will be some variation in the rate at which particles scale up.
So if Scale Time Up is set to 30 frames and Variation to 10%, the actual scale time for each particle will be somewhere in the range 27 to 33 frames.
Scale Up Over Time
Section titled “Scale Up Over Time”This spline controls how the particle radius scales up.
The default spline will scale up the radius from zero to the maximum for the particle, over the time set by the Scale Time Up and Variation settings.
However, they are not deleted when the radius is zero so if you do this you may end up with a lot of invisible particles.
In addition, they are not removed from the internal list of circles maintained by the xpCirclePacker so new particles will not be generated to replace them.
Also note: If you set the spline to a straight line at the top of the control, the particles will not scale up at all, but will immediately take their maximum radius, which is identical to not checking the Scale Up setting in the first place.
Scale Down
Section titled “Scale Down”If checked, the xpCirclePacker will scale the particle radius down over time to zero.
The time taken to scale down to zero is determined by the Scale Time Down setting.
Delay Before Scale, Variation
Section titled “Delay Before Scale, Variation”This is the time which must pass between the particle reaching its maximum radius and starting to scale down.
The default is zero, so the particle will start to scale down as soon as the maximum radius is reached.
If Scale Up is unchecked, the particles are created with their maximum radius, so will start to scale down as soon as they are created.
The variation setting adds some individual variation in the delay for each particle.
Scale Time Down
Section titled “Scale Time Down”The time taken for a particle radius to be scaled down to zero, if Scale Down is checked.
Variation
Section titled “Variation”By increasing this value above zero there will be some variation in the rate at which particles scale down.
So if Scale Time Down is set to 30 frames and Variation to 10%, the actual scale time for each particle will be somewhere in the range 27 to 33 frames.
Scale Down Over Time
Section titled “Scale Down Over Time”This spline controls how the particle radius scales down.
The default spline will scale down the radius to zero, over the time set by the Scale Time Down and Variation settings.
Kill Particles With Zero Radius
Section titled “Kill Particles With Zero Radius”When scaling down, you may end up with particles which have a radius of zero; they still exist, but you cannot see them.
In addition, they are not removed from the internal list of ‘occupied’ circles maintained by the xpCirclePacker, so no new particles are generated to replace them.
To avoid this, check this box.
Particles with zero radius are then deleted and new ones will be generated to replace them.
Copyright © 2026 INSYDIUM LTD. All rights reserved.