nxTurbulence
nxTurbulence uses noises to apply turbulence to particle movement.
nxTurbulence uses a layer-based system, allowing multiple turbulence noise fields to be stacked and blended together. Each layer has its own noise type, parameters, blend mode, and per-layer falloff.
Object Properties
Section titled “Object Properties”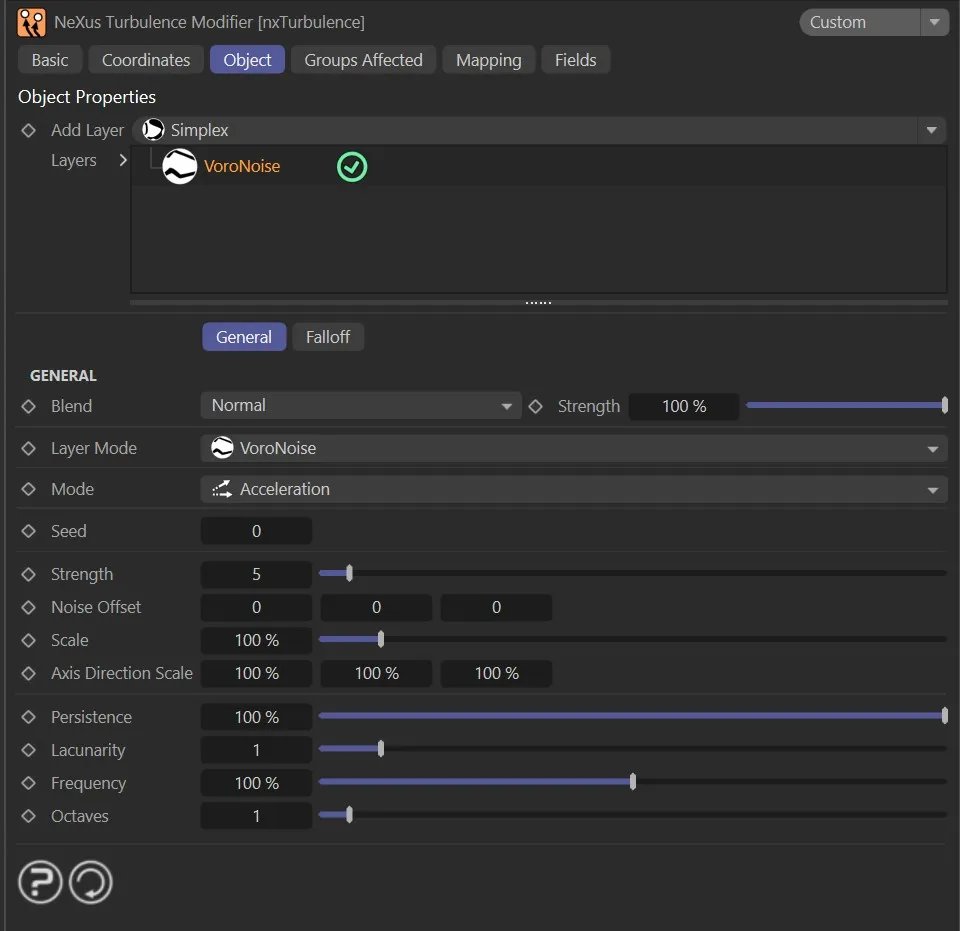
nxTurbulence Object tab.
Add Layer
Section titled “Add Layer”Adds a new turbulence layer to the stack.
Each layer can use a different noise type and be blended with the layers below it.
Layers
Section titled “Layers”The layer stack.
Layers can be enabled or disabled using the toggle on the left of each entry.
Layers are processed from bottom to top.
Layer Settings
Section titled “Layer Settings”When a layer is selected in the Layers tree, its settings are shown below.
Each layer has a General tab and a Falloff tab.
General tab
Section titled “General tab”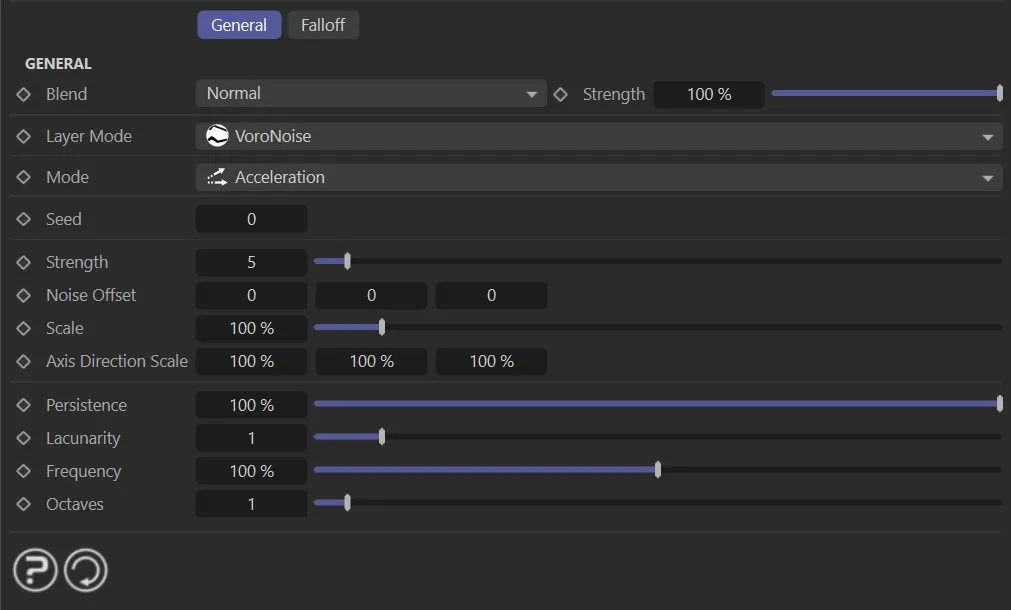
Sets how this layer is blended with the result of the layers below it.
The available blend modes are Normal, Add, Subtract, Multiply, Difference, Screen, Overlay, Min and Max.
Strength
Section titled “Strength”The blend strength of this layer.
Falloff tab
Section titled “Falloff tab”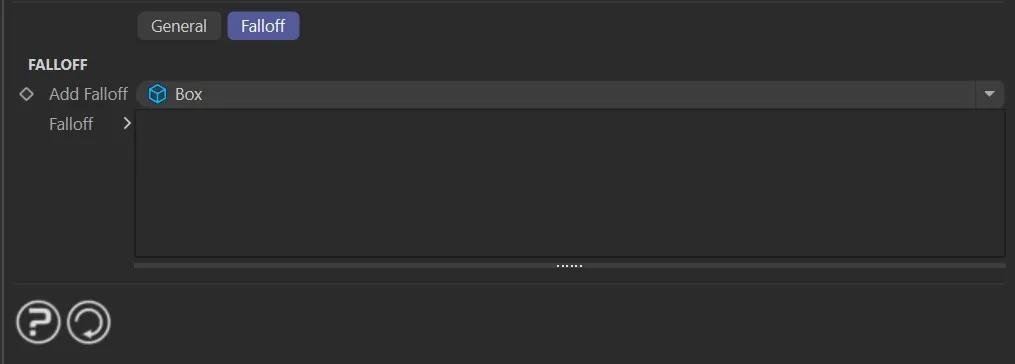
Each turbulence layer has a Falloff tab. This restricts where the layer’s effect applies in space.
Add Falloff
Section titled “Add Falloff”Adds a falloff to this layer.
A quick-select button allows choosing a built-in falloff shape (Box, Linear, Sphere, or Noise) directly on the layer, without needing a separate nxFalloff object.
For more complex or reusable falloffs, an nxFalloff object can be dragged from the scene into the layer’s falloff tree.
Falloff
Section titled “Falloff”The falloff stack for this layer.
Multiple falloffs can be added and combined.
Turbulence layer parameters
Section titled “Turbulence layer parameters”The following parameters are set per layer in the General tab.
Noise Type
Section titled “Noise Type”Set as Simplex, by default.
The other options are: Curl, Turbulence, Wavy Turbulence, VoroNoise, FBM (Fractional, or Fractal, Brownian Motion) and Cubic.
Simplex
Section titled “Simplex”This is an advanced version of the original Perlin noise.
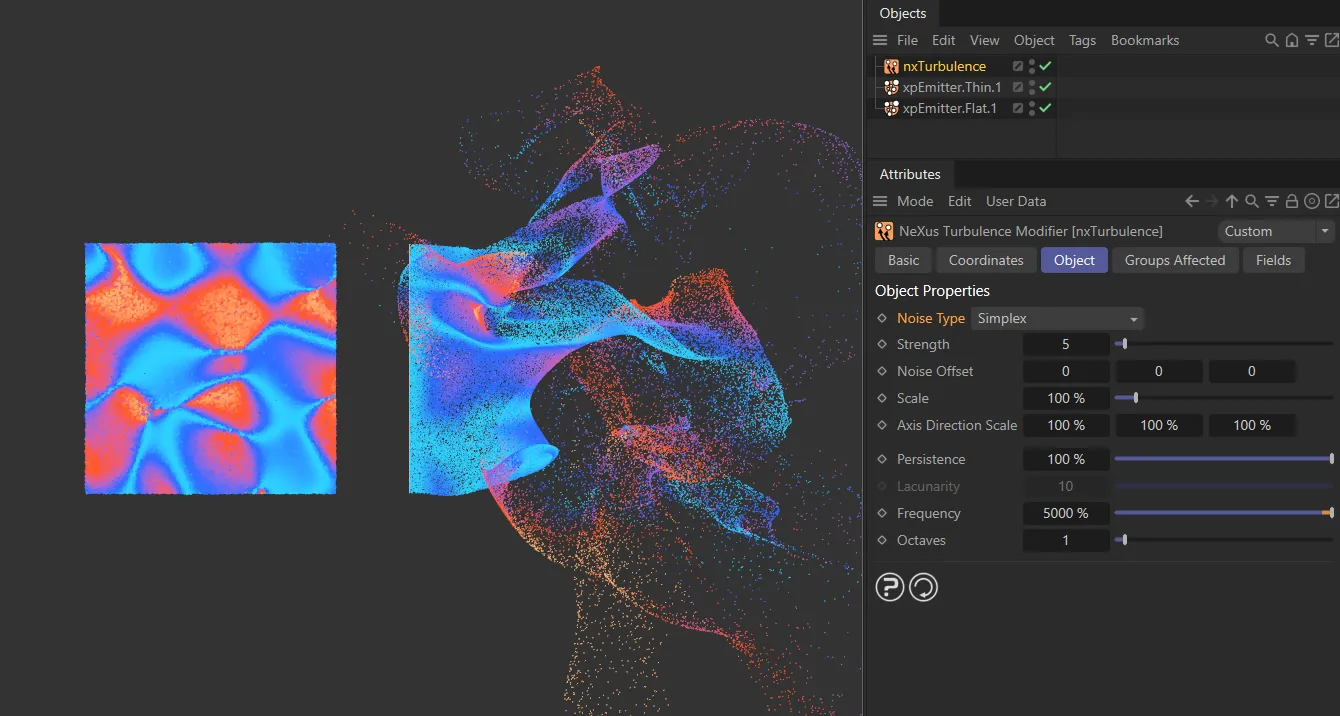
Noise Type set to Simplex noise pattern on the left and the resulting particle force on the right.
The Curl setting will produce a curling motion in the turbulence.
Selecting Curl will open up the following two additional Curl parameters.
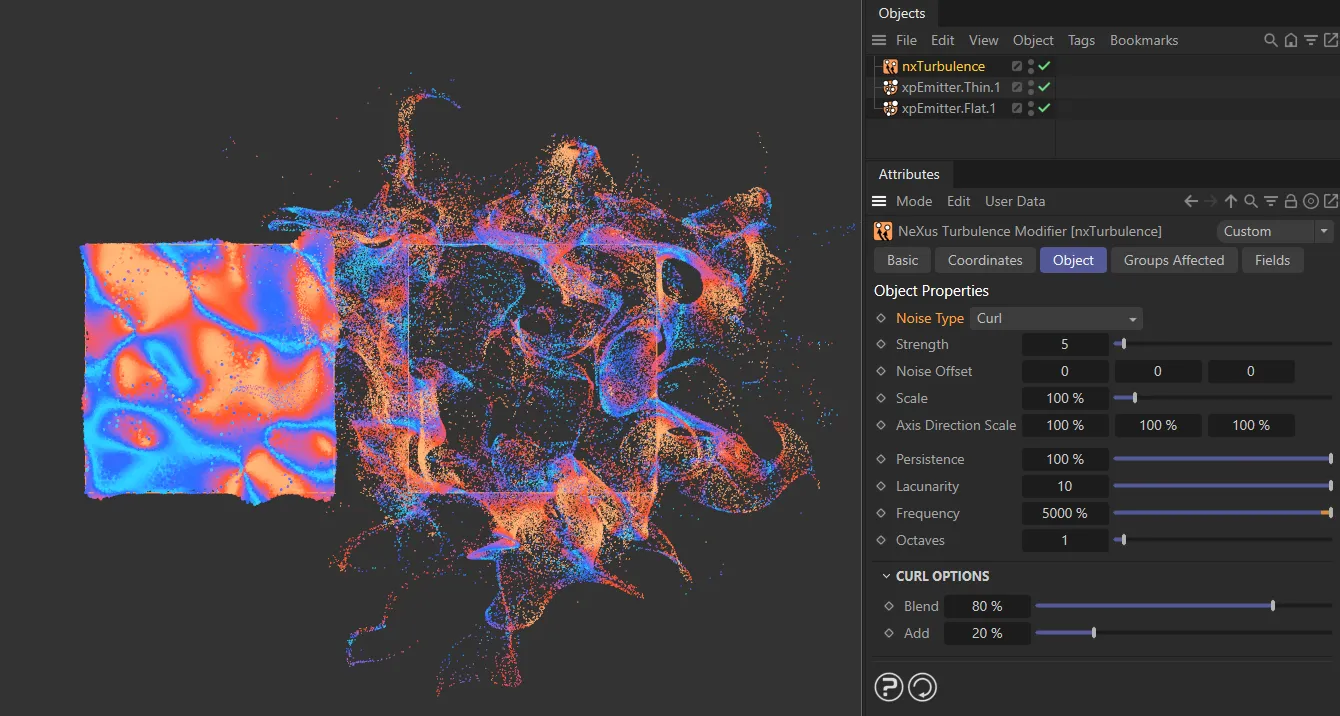
Noise Type set to the Curl noise pattern on the left and the resulting particle force on the right.
Curl Options
Section titled “Curl Options”This parameter allows you to blend the particles’ velocity through other modifiers with the Curl velocity.
Animation to illustrate how lowering the Blend value blends between the curl velocity and the particles’ velocity.
This is the percentage of the Curl velocity to add to the blend of the particles’ velocity from other modifiers.
This is most effective when adding at a lower percentage to the Blend setting, when you can see the effect of the different modifiers.
Animation demonstrating the use of the Add slider, adding the curl velocity to the particles’ velocity.
Turbulence/Wavy Turbulence/VoroNoise/FBM/Cubic
Section titled “Turbulence/Wavy Turbulence/VoroNoise/FBM/Cubic”These add different types of turbulence to the particle stream.
Generally, Wavy Turbulence gives a smoother effect, but this and Turbulence are fairly similar.
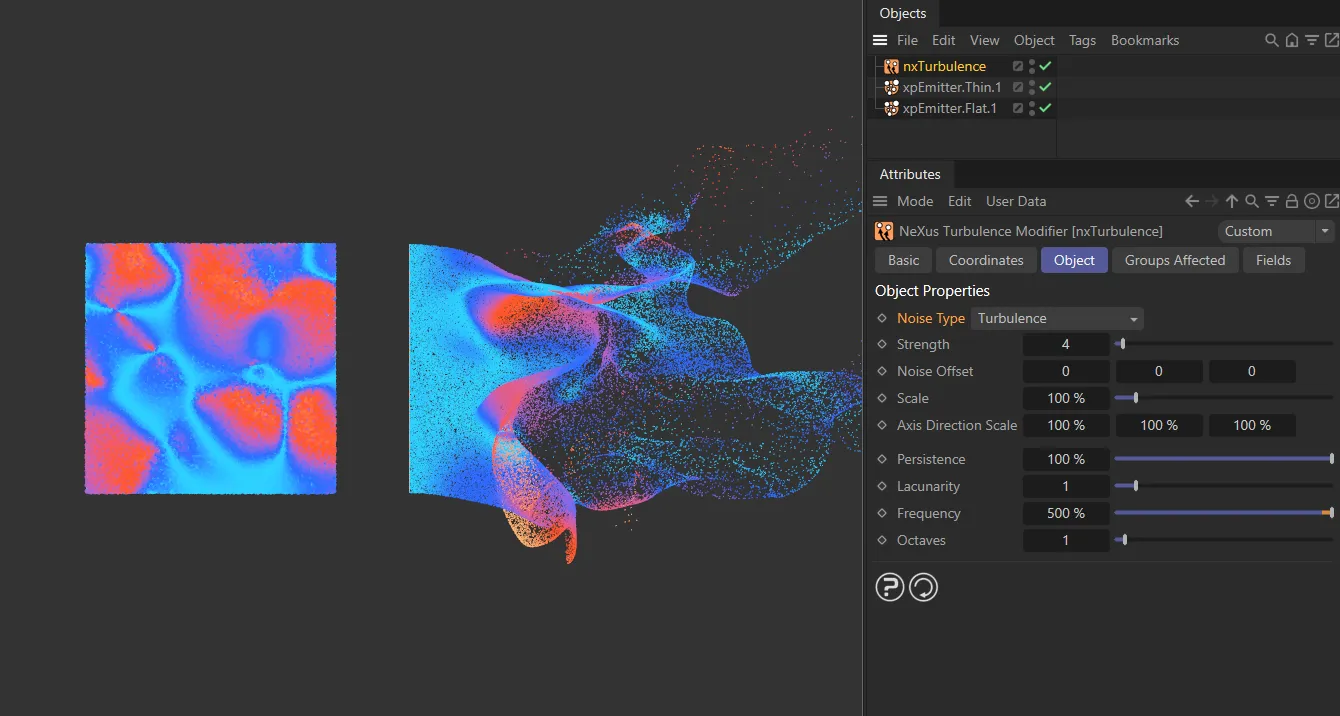
Noise Type set to the Turbulence noise pattern on the left and the resulting particle force on the right.
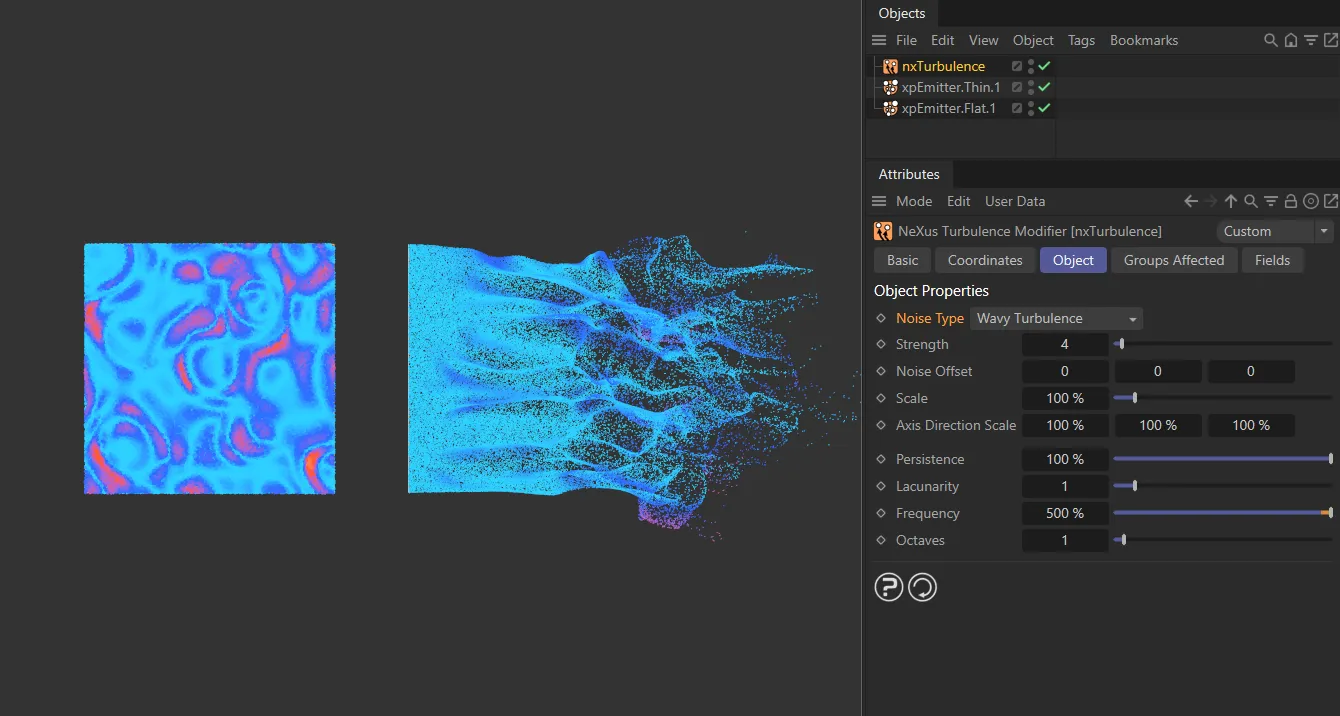
Noise Type set to the Wavy Turbulence noise pattern on the left and the resulting particle force on the right.
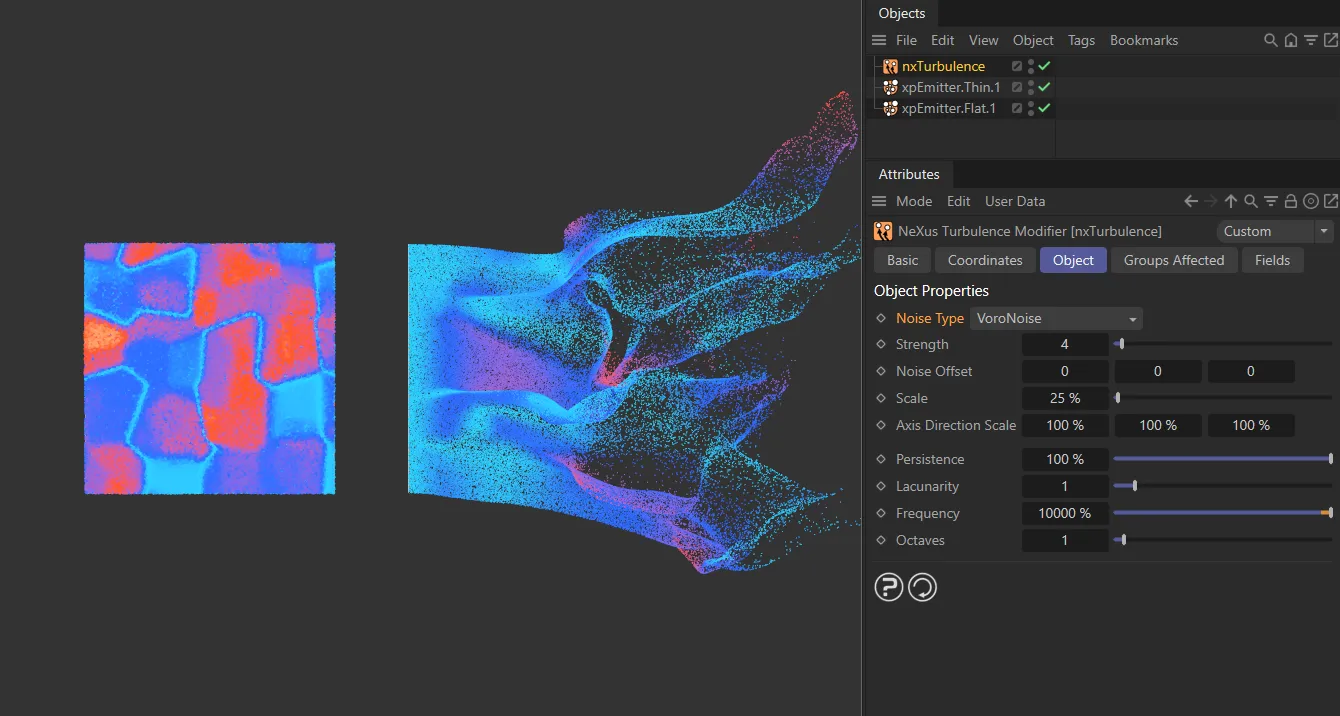
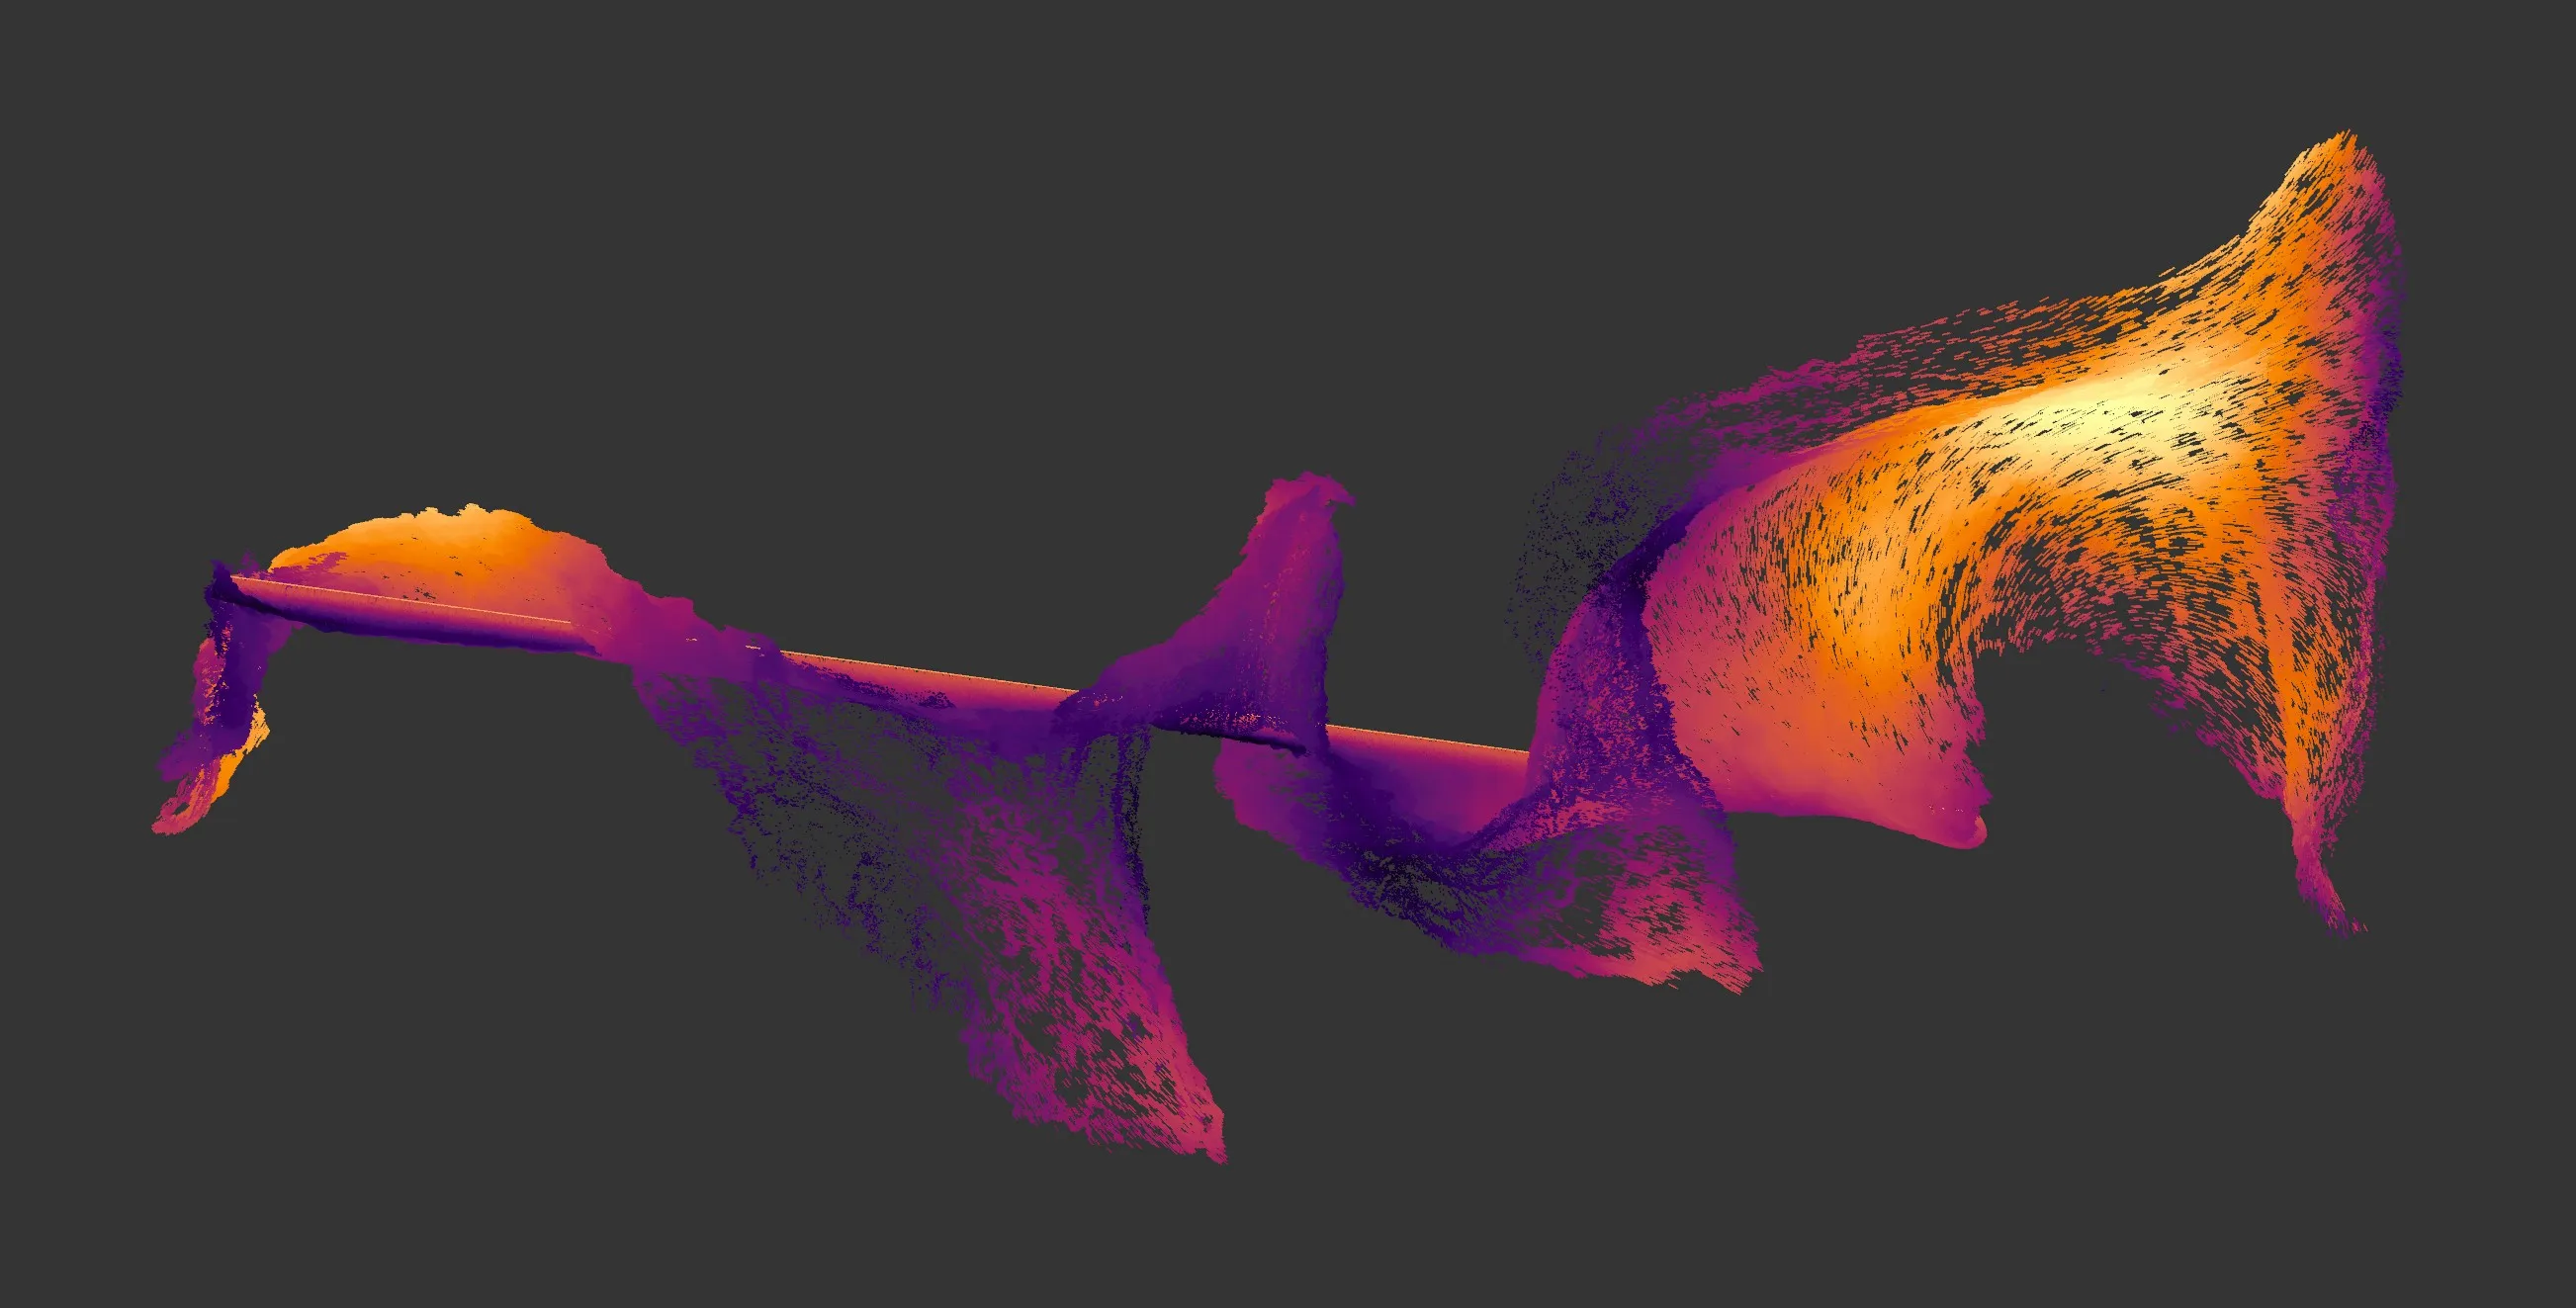
Noise Type set to the Voronoise pattern on the left and the resulting particle force on the right.
FBM produces a more irregular, chaotic movement, especially at lower scale and higher octaves.
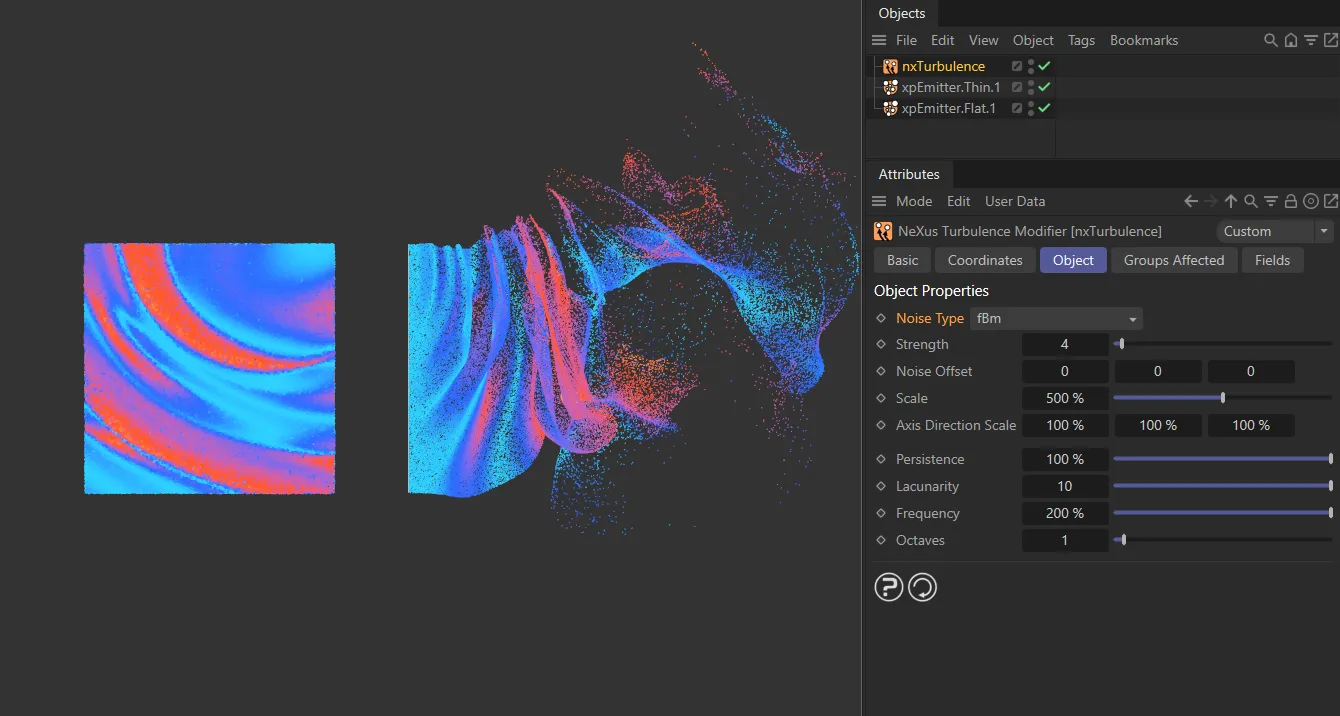
Noise Type set to the FBM noise pattern on the left and the resulting particle force on the right.
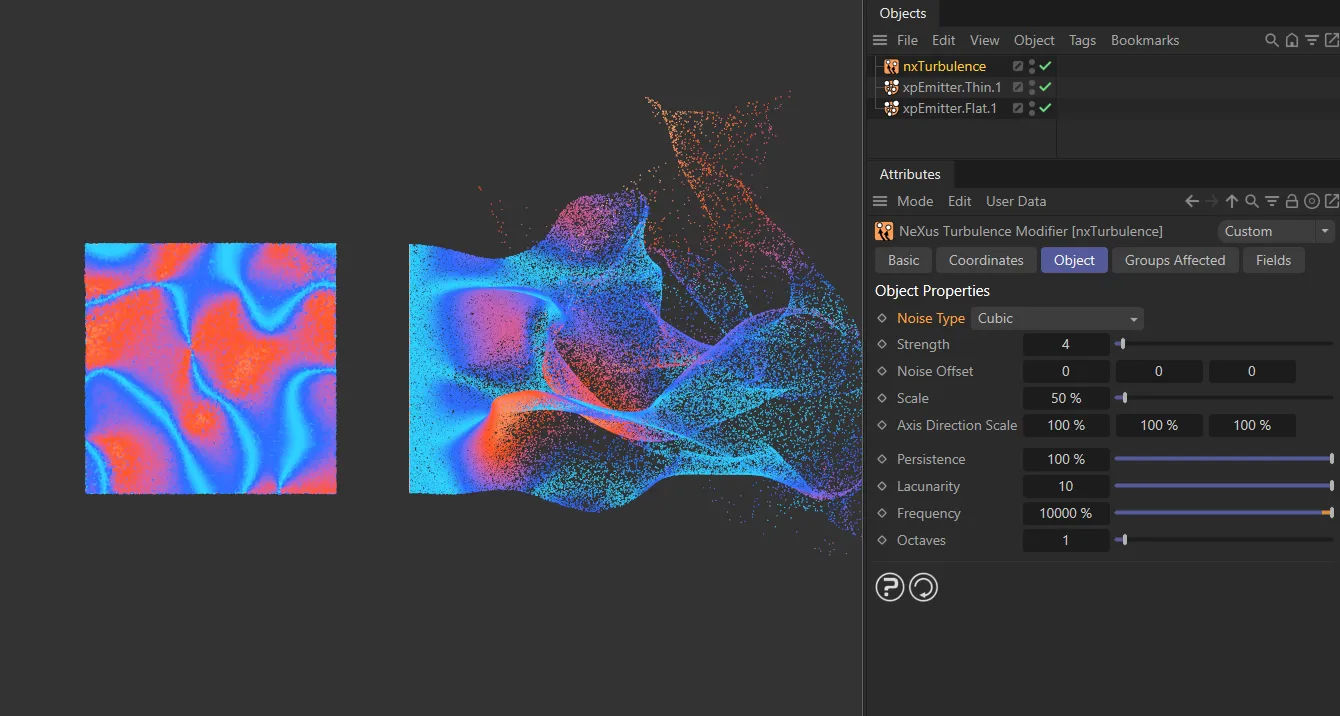
Noise Type set to the Cubic noise pattern on the left and the resulting particle force on the right.
Randomises the noise pattern while keeping all other settings the same.
This is useful for adding variation across multiple systems that share the same turbulence settings.
Turbulence Strength
Section titled “Turbulence Strength”The higher the strength value, the greater the effect; the greater the change in particle velocity (speed and direction).
Animation showing an increase in the Turbulence Strength value, from 0 (zero) to 10.
Noise Offset
Section titled “Noise Offset”This setting offsets the noise field in the different axes.
In this animation, increasing the Noise Offset is moving the global force in 3D space.
Larger scales tend to damp down the movement of particles, giving smoother movement.
By contrast, a smaller scale will produce more detailed, chaotic movement.
Animation showing how reducing the Scale value results in a much more detailed particle simulation.
Axis Direction Scale
Section titled “Axis Direction Scale”Very useful at restricting particle movement.
By default, there is 100% turbulence in all three axes.
Lowering these sliders will reduce, or remove entirely, the scale of turbulence in the relevant axis.
This animation shows restriction of the particle movement, using the Axis Direction Scale settings, to move only on the X and Z-axes.
Persistence
Section titled “Persistence”The Persistence slider is used to regulate how the turbulence strength persists through multiple octaves.
When set to 100%, each octave will have the same strength.
This can create so much fine detail that the larger curls are lost.
Reducing the Persistence value incrementally decreases the strength through the octaves.
This means you can create fine detail, using multiple octaves, without it overriding the original large curls.
Animation demonstrating how increasing the Persistence value over time adds noise detail, while preserving the core turbulence features.
Lacunarity
Section titled “Lacunarity”Not available in the Simplex mode, the Lacunarity parameter also works in conjunction with the Octave setting.
Similar to Persistence, it dictates how much of the Frequency is passed on through multiple octaves.
With Lacunarity set at 0 (zero), only the original octave will have any frequency.
Increasing the Lacunarity will add frequency, first to the lower octaves, then up to the Octave setting.
Animation illustrating an increase in the Lacunarity setting, to control the frequency amount of the secondary noise octaves.
Frequency
Section titled “Frequency”The frequency is the speed at which the noise is animating and evolving.
This parameter changes the frequency of the internal noise generator used by the modifier so the higher the value, the more rapidly the noise changes.
In this animation, increasing the Frequency setting adds constant change in the global turbulence.
Octaves
Section titled “Octaves”By default, this is set to 1.
This parameter influences the frequency of the turbulence, creating more detail.
A value of 0 (zero) will result in no changes in direction; lower values will give fine detail, but larger values can result in more frequent and dramatic changes and a loss of detail (this can be offset by the Persistence setting).
Animation demonstrating the effect of increasing noise Octaves over time.
Groups Affected tab
Section titled “Groups Affected tab”Groups
Section titled “Groups”To specify the group, drag and drop the desired Group object into this field.
This setting is useful if you want to ensure that the spawned particles are, or are not, affected by nxTurbulence.
Mapping tab
Section titled “Mapping tab”The modifier’s settings can be mapped to particle data.
Use the dedicated manual page, below, for instructions on how this works.
Fields tab
Section titled “Fields tab”You can use the Fields options to control where nxTurbulence operates.
Copyright © 2026 INSYDIUM LTD. All Rights Reserved.