xpSpriteShaderControl
xpSpriteShaderControl works in conjunction with the Sprite Shader to produce effects, such as fading out sprites over time (or fading them back in again).
You can use it to alter any channel which has a Texture field in it, including Color, Bump, Reflection, Alpha, etc.
This modifier has the following requirements:
- a material with a Sprite Shader in at least one channel
- the Sprite Shader Mode setting must be set to Modifier Sets Value
- an xpSprite object, with the above material applied to it
As a particle passes through the modifier, the modifier changes an internal color value held by the particle; the rate of change depends on the settings in the modifier - the higher the values, the more rapid the change.
This value is then used by the xpSpriteShaderControl, at render time, to alter the color returned by the material channel.
If you cache a scene with an xpSprite object and a Sprite shader, you will find that you can render any frame to the viewport and it will render correctly.
However, if you render a frame to the picture viewer, it will appear that the sprite shader has no effect.
This is inherent in the way modifiers work in X-Particles; once cached, internal modifier values are not updated if you render a single frame to the picture viewer partway through the animation.
There are two possible solutions to this.
Firstly, to render a frame to the picture viewer in this case, you can render all preceding frames as well, so the modifier can update the required values in the particle.
If you are using internal caching, this is the only available solution, but it may be slow if you need to render many frames which you don’t need.
If you are using external caching, there is a better solution: in the Cache object, disable the Skip Render Pre-Roll parameter.
This will force X-Particles to run through all frames before the one you want to render, thereby updating the modifier values, but it will not render those frames.
This can be much faster than rendering all the preceding frames.
Object Properties
Section titled “Object Properties”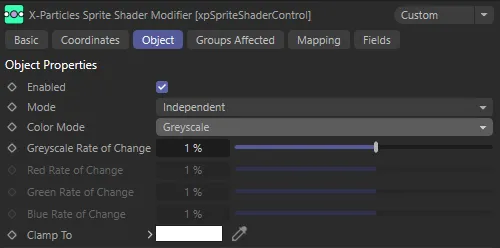
xpSpriteShaderControl Object tab menu.
![]()
The xpSprite generator is generating these Pyramid sprites and will be controlled by the xpSpriteShaderControl modifier in the following scenes.
Enabled
Section titled “Enabled”Chcking this box activates xpSpriteShaderControl.
Set at Independent, by default.
You can change this to Action-Controlled.
Independent Mode
Section titled “Independent Mode”In this mode, particles will be affected if they come into the field of effect of the modifier.
Action-Controlled Mode
Section titled “Action-Controlled Mode”When in the Action-Controlled Mode setting, the modifier will only act on a particle when told to do so by an action.
Color Mode
Section titled “Color Mode”Set as Greyscale, by default.
The alternative is RGB.
Greyscale mode
Section titled “Greyscale mode”The color value returned by the xpSpriteShaderControl will be increased or decreased by the same amount in the red, green, and blue components of the color.
This is most useful when you need a greyscale value to affect something like transparency or reflection.
This mode opens up the Greyscale Rate of Change parameter, below.
![]()
Viewport shot of the xpSpriteShaderControl, with Color Mode set as Greyscale, clamping to black, with the Greyscale Rate of Change set to -5%.
![]()
The Cinema 4D material used in the scene on the left, with the xpSpriteShader shader in the Color channel.
![]()
Render view of the above scene, showing the particles changing to black as they pass through the field.
![]()
In this image, you can see the viewport and the Material Editor, with the xpSpriteShaderControl set in the Alpha channel.
![]()
Here is the render view, showing how, with Greyscale Rate of Change set to -2% and Clamp To set to black, transparency is added to the Alpha Channel.
Greyscale Rate of Change
Section titled “Greyscale Rate of Change”The change in value each frame.
RGB mode
Section titled “RGB mode”The red, green and blue components of the returned color will be altered independently of one another.
This is used when you want to alter a real color value such as in the Color channel of a material.
This mode opens up the Red Rate of Change, the Green Rate of Change and the Blue Rate of Change parameters.
Red Rate of Change, Green Rate of Change, Blue Rate of Change
Section titled “Red Rate of Change, Green Rate of Change, Blue Rate of Change”The change in values each frame are given in these parameters.
![]()
With Red Rate of Change set at 5% and both the Green Rate of Change and Blue Rate of Change at -5%, the particles here are blending to red.
Clamp To
Section titled “Clamp To”The color set by the modifier will be clamped to this color value.
By default this is 100% white.
Groups Affected tab
Section titled “Groups Affected tab”Groups
Section titled “Groups”To specify the group, drag and drop the desired Group object into this field.
This setting is useful if you want to ensure that the spawned particles are, or are not, affected by xpSpriteShaderControl.
Mapping tab
Section titled “Mapping tab”The modifier’s settings can be mapped to particle data.
Use the dedicated manual page, below, for instructions on how this works.
Fields tab
Section titled “Fields tab”You can use the Fields options to control where xpSpriteShaderControl operates.
Copyright © 2026 INSYDIUM LTD. All rights reserved.