xpSplineFlow
xpSplineFlow enables particles to move along the path of a spline, with less rigidity than the NonexpFollowSpline modifier.
xpSplineFlow is more suited to fluid simulations.
This modifier draws particles along the spline by a series of circular ‘handles’ which exert various forces.
When a spline is placed in the modifier, five handles are automatically created, which appear as child objects in the Objects Manager; these can be deleted or duplicated to reduce or increase the handle count.
Each handle has its own settings for position, size (Distance) and the various forces it can exert on particles.
These settings are accessed by selecting a handle in the Objects Manager.
They are explained further down the page.
There are also global controls for the various forces which can be accessed via the modifier’s Object tab.
General tab
Section titled “General tab”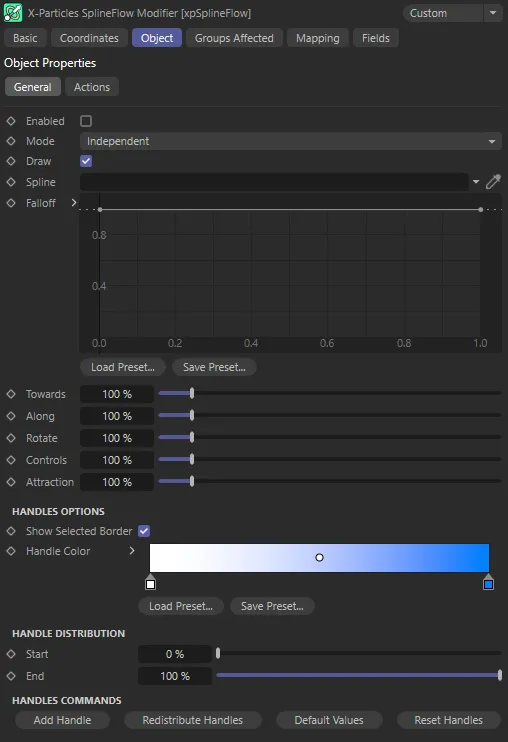
xpSplineFlow General tab settings.
Enabled
Section titled “Enabled”Checking this box activates xpSplineFlow.
Set at Independent, by default.
You can change this to Action-Controlled.
Independent Mode
Section titled “Independent Mode”In this mode, particles will be affected if they come into the field of effect of the modifier.
Action-Controlled Mode
Section titled “Action-Controlled Mode”When in the Action-Controlled Mode setting, the modifier will only act on a particle when told to do so by an action.
This setting controls the drawing of the handles.
Disable it to turn off their screen display; this does not remove any effect of the handle, it only affects the screen appearance.
It is not possible to draw or not draw handles individually, only all or none.
Spline
Section titled “Spline”Drag a spline object into this link field.
Particles will then move around the spline, controlled by the parameters in the handles.
Animation to demonstrate the default settings, with a Helix spline linked, having been dropped into the Spline field.
Falloff
Section titled “Falloff”This is not the same as the standard modifier falloff, which this modifier also possesses.
It is a falloff in strength from each handle towards the particle.
As you change the falloff, by altering the spline, the particles may be more, or less, strongly attracted to the nearest handle.
If you lower the strength too far, the particles may not be attracted to the handle at all.
You can use this to vary the curves, which the particles move in, when changing direction towards the handle.
This animation uses the custom Falloff spline, reducing the strength of attraction, releasing particles that are further away from the spline.
Towards, Along, Rotate, Controls, Attraction
Section titled “Towards, Along, Rotate, Controls, Attraction”Each individual handle possesses an equivalent property to these settings.
In the modifier, these values act as a multiplier for all the handles.
They are all initially set at 100%, which means that the properties are managed entirely by the handles themselves.
If you set the Towards value in the modifier to 200%, for example, you would be doubling the equivalent value from each handle.
Handles Options
Section titled “Handles Options”Show Selected Border
Section titled “Show Selected Border”If this is enabled, when a handle object is selected in the Objects Manager, it will turn orange and will be drawn with a square orange border.
If you prefer not to see a border around selected handles, uncheck this box.
Handle Color
Section titled “Handle Color”This gradient assigns a color to each handle object, depending on its Position setting.
The Position ranges from 0 (zero) % to 100% and is the distance of the handle along the spline.
A handle with Position 0 (zero) % is drawn in the color from the left of the gradient, while one with a Position of 100% is drawn with the color at the right of the gradient.
Handle Distribution
Section titled “Handle Distribution”Start, End
Section titled “Start, End”These two values refer to the distribution of handles along the spline.
The default settings are a start of 0 (zero) % and an end of 100%, so the first handle is located at the start of the spline and the last one at the end of the spline.
You can use these values to distribute the handles along only part of the spline, if required.
Handles Commands
Section titled “Handles Commands”Add Handle
Section titled “Add Handle”Click this button to add another handle object.
This new handle will always be positioned at 50% along the spline.
Redistribute Handles
Section titled “Redistribute Handles”If you click this button, the handles will be distributed equally between the Start and End points.
The Start and End points themselves are not changed.
Default Values
Section titled “Default Values”This button will reset all handles to their default values, except their position.
No handles are deleted.
Reset Handles
Section titled “Reset Handles”If you click this button and confirm you want to do this in the question box, which subsequently appears, all the current handle objects will be deleted and the five default handles will be generated instead.
None of the parameters in the modifier itself will be changed, however.
Individual handle control parameters
Section titled “Individual handle control parameters”Each handle can be controlled individually, with its own interface, which can be accessed by clicking on the + menu to the left of the xpSplineFlow modifier inside the Objects Manager.
This will open up all five handles.
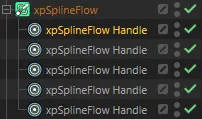
The five individual handles, as children of xpSplineFlow in the Objects Manager.
Clicking on one of the xpSplineFlow handles, highlighting it, will reveal its own set of parameters (below).
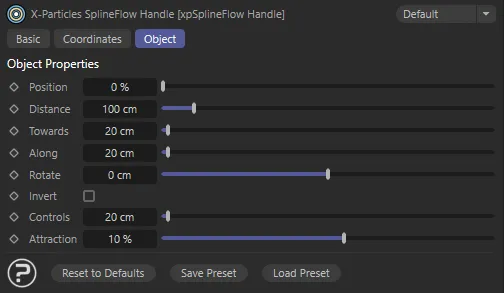
Individual handle parameter menu.
Position
Section titled “Position”This is the distance the handle is located along the spline.
0 (zero) % is the start of the spline and 100% its end.
Distance
Section titled “Distance”This parameter is the range of influence of the handle.
Particles beyond this distance are not drawn to the handle to the same degree and if they are too far away, may not be affected by it at all.
As the Distance parameter decreases, the particles which are further away are not influenced, or are influenced to a lesser degree, by the handle.
Towards
Section titled “Towards”This is the amount of ‘pull’ the handle exerts on the particle.
This parameter can be used to prevent particles from escaping the handles and no longer flowing along the spline.
This is the strength with which the particles are moved along the spline by the handle.
Increasing it will increase particle speed; if the particles move too fast, they may escape from the modifier altogether.
Rotate
Section titled “Rotate”This parameter will cause the particles to rotate around the spline as they move along it.
Negative values are possible and will rotate the particles in the opposite direction.
Invert
Section titled “Invert”If this is enabled, the rotation direction is inverted.
Controls
Section titled “Controls”This parameter affects the change in the particle’s direction and speed, once the Along, Towards and Rotate parameters have been applied.
Increasing this value will increase particle speed and may make them so fast that they escape from the handle and stop flowing along the spline.
Attraction
Section titled “Attraction”This setting controls how closely the particles are attracted to the spline itself.
At high values they will travel along the spline very closely.
This will have the effect of reducing the speed and they may even come to a halt.
If that happens, the Along parameter can be increased to force the particles to move along the spline.
In this scene, individual handles have been manipulated to add specific controls along the spline. The handle properties for the highlighted handle are visible here in the Attributes Manager.
Actions tab
Section titled “Actions tab”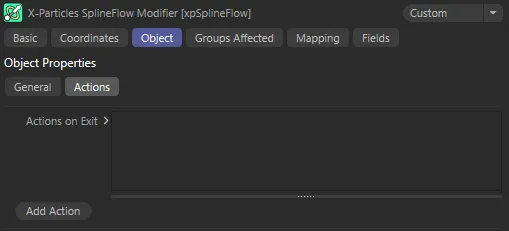
xpSplineFlow Actions tab settings.
Actions on Exit
Section titled “Actions on Exit”You can drag any action, or multiple actions, into the Action list.
These actions will be carried out when a particle has passed through the final active handle.
Add Action
Section titled “Add Action”Clicking this button will add an action to the scene and drop it into the Actions on Exit list.
Groups Affected tab
Section titled “Groups Affected tab”Groups
Section titled “Groups”To specify the group, drag and drop the desired Group object into this field.
This setting is useful if you want to ensure that the spawned particles are, or are not, affected by xpSplineFlow.
Mapping tab
Section titled “Mapping tab”The modifier’s settings can be mapped to particle data.
Use the dedicated manual page, below, for instructions on how this works.
Fields tab
Section titled “Fields tab”You can use the Fields options to control where xpSplineFlow operates.
Copyright © 2026 INSYDIUM LTD. All rights reserved.