xpInfectio
xpInfectio simulates growth patterns.
It is modeled on the idea of an infection spreading from one particle to another, but you can use it for any kind of growth.
General tab
Section titled “General tab”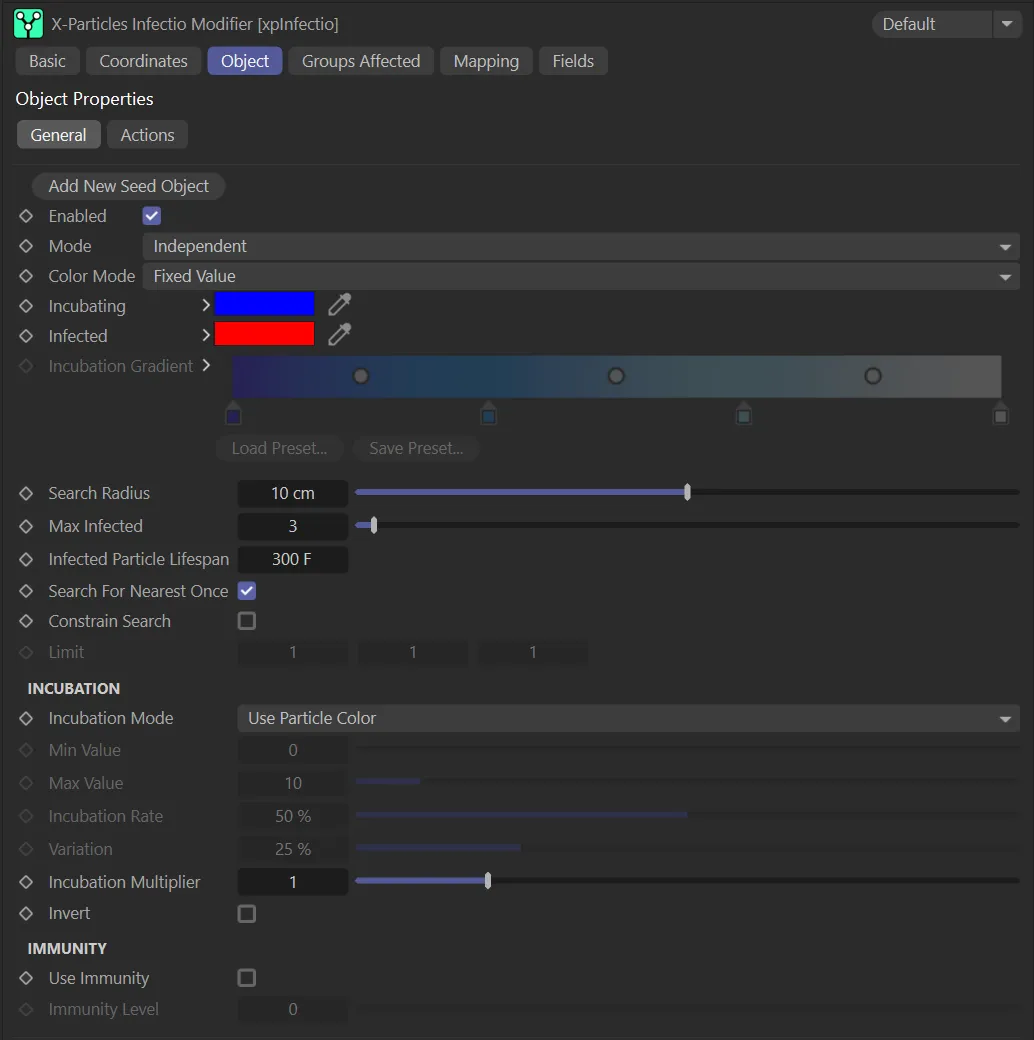
xpInfectio General tab.
In this animation, nxInfectio starts operating from the two Seed Objects, which have been added to the scene (see parameter description on this page) and continues its life cycle, determined by the settings chosen.
Add New Seed Object
Section titled “Add New Seed Object”Click this button to create a new Seed Object and add it to the scene as a child object of the xpInfectio modifier.
Enabled
Section titled “Enabled”Checking this box enables the xpInfectio modifier.
Set at Independent, by default.
You can change this to Action-Controlled.
Independent Mode
Section titled “Independent Mode”In this mode, particles will be affected if they come into the field of effect of the modifier.
Action-Controlled Mode
Section titled “Action-Controlled Mode”When in the Action-Controlled setting, the modifier will only act on a particle when told to do so by an action.
Until that point, the particle will not be affected, but once activated for a particular particle, the modifier will influence the particle - that is, it will play back the history.
Color Mode
Section titled “Color Mode”Set as Fixed Value, by default, this drop-down menu controls what will happen to the particle color when it changes from the uninfected to incubating and from incubating to infected.
The other options are: Gradient, Use Groups and No Color Change.
Fixed Value
Section titled “Fixed Value”In this mode, the particle colors will change to the colors shown in the Incubating (if the particle is now in the incubating state) and Infected color fields (if the particle is now in the infected state).
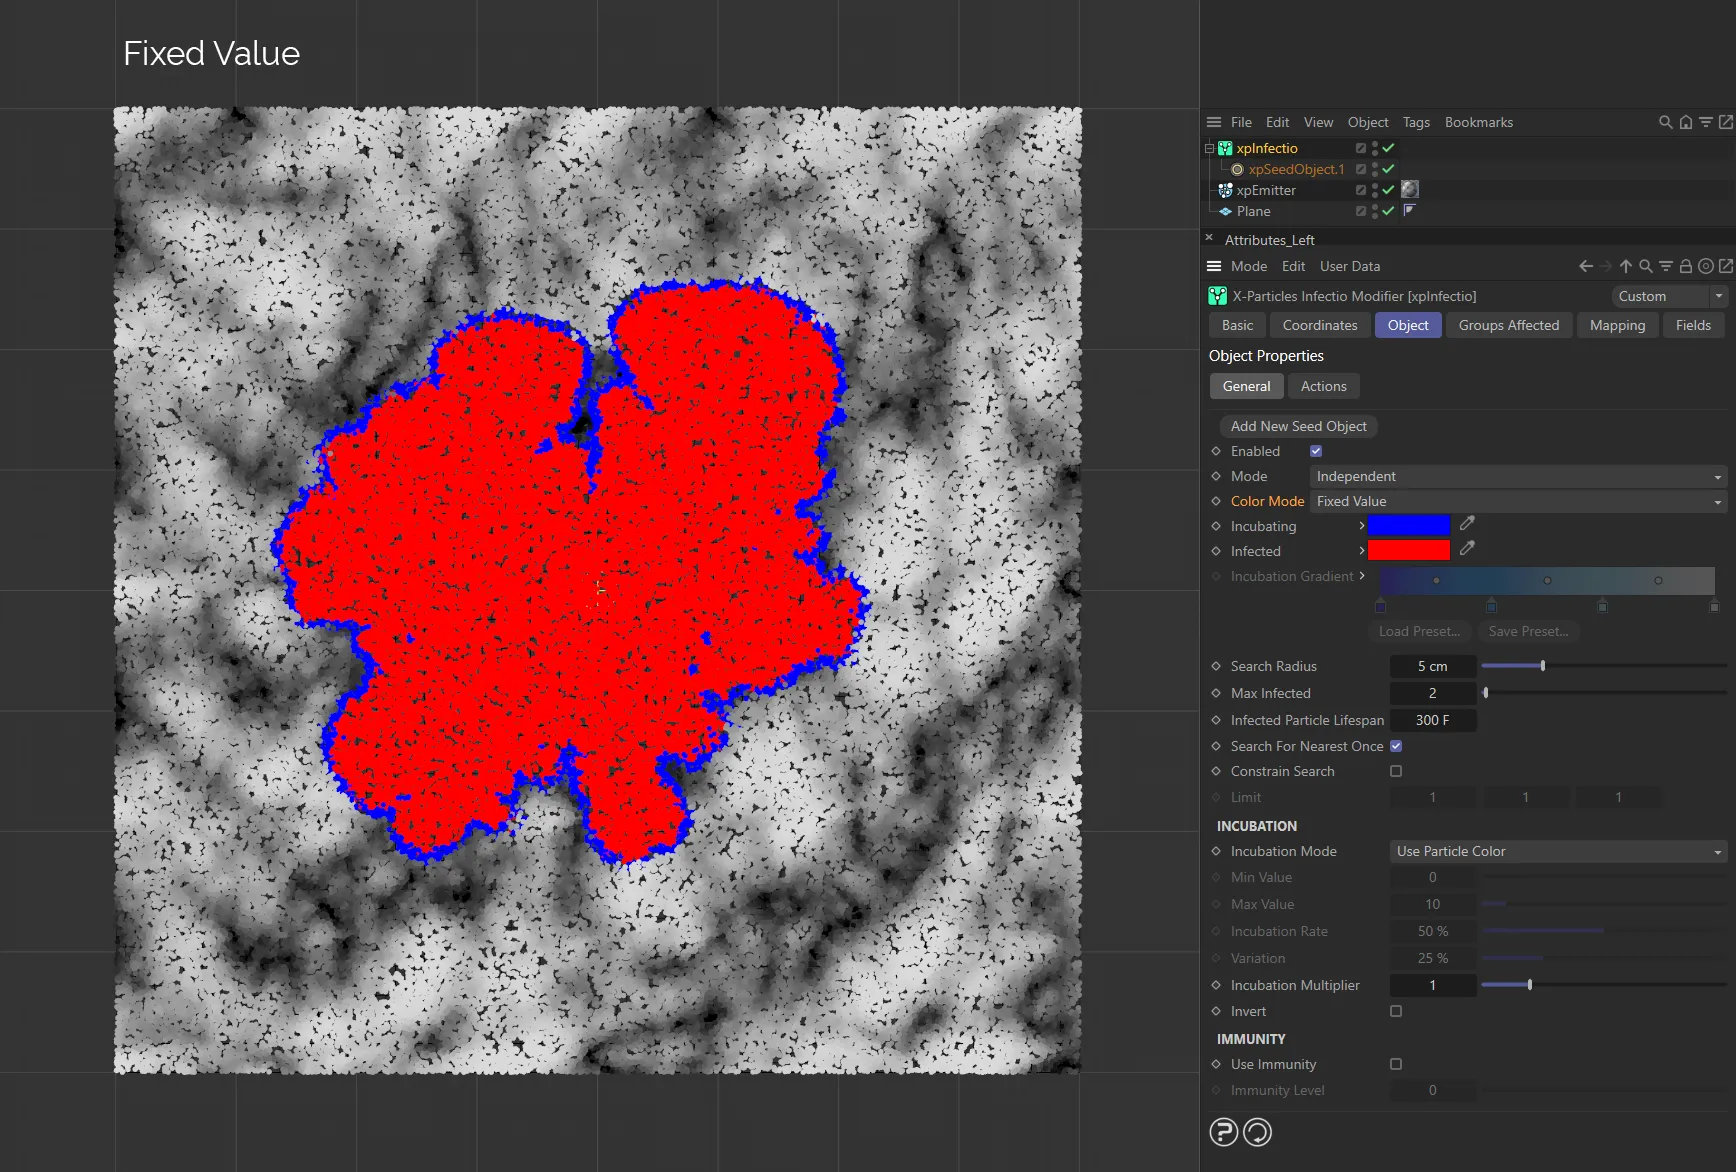
With the Color Mode as Fixed Value, the Incubating and Infected particles can be colored using their individual parameters.
Gradient
Section titled “Gradient”With this option, infected particles will use the color from the right of the Incubation Gradient parameter.
Particles which have just changed from uninfected to incubating will use the color from the left of the gradient.
Particles which are in the process of incubating will use a color from somewhere along the gradient, depending on how close they are to becoming infected.
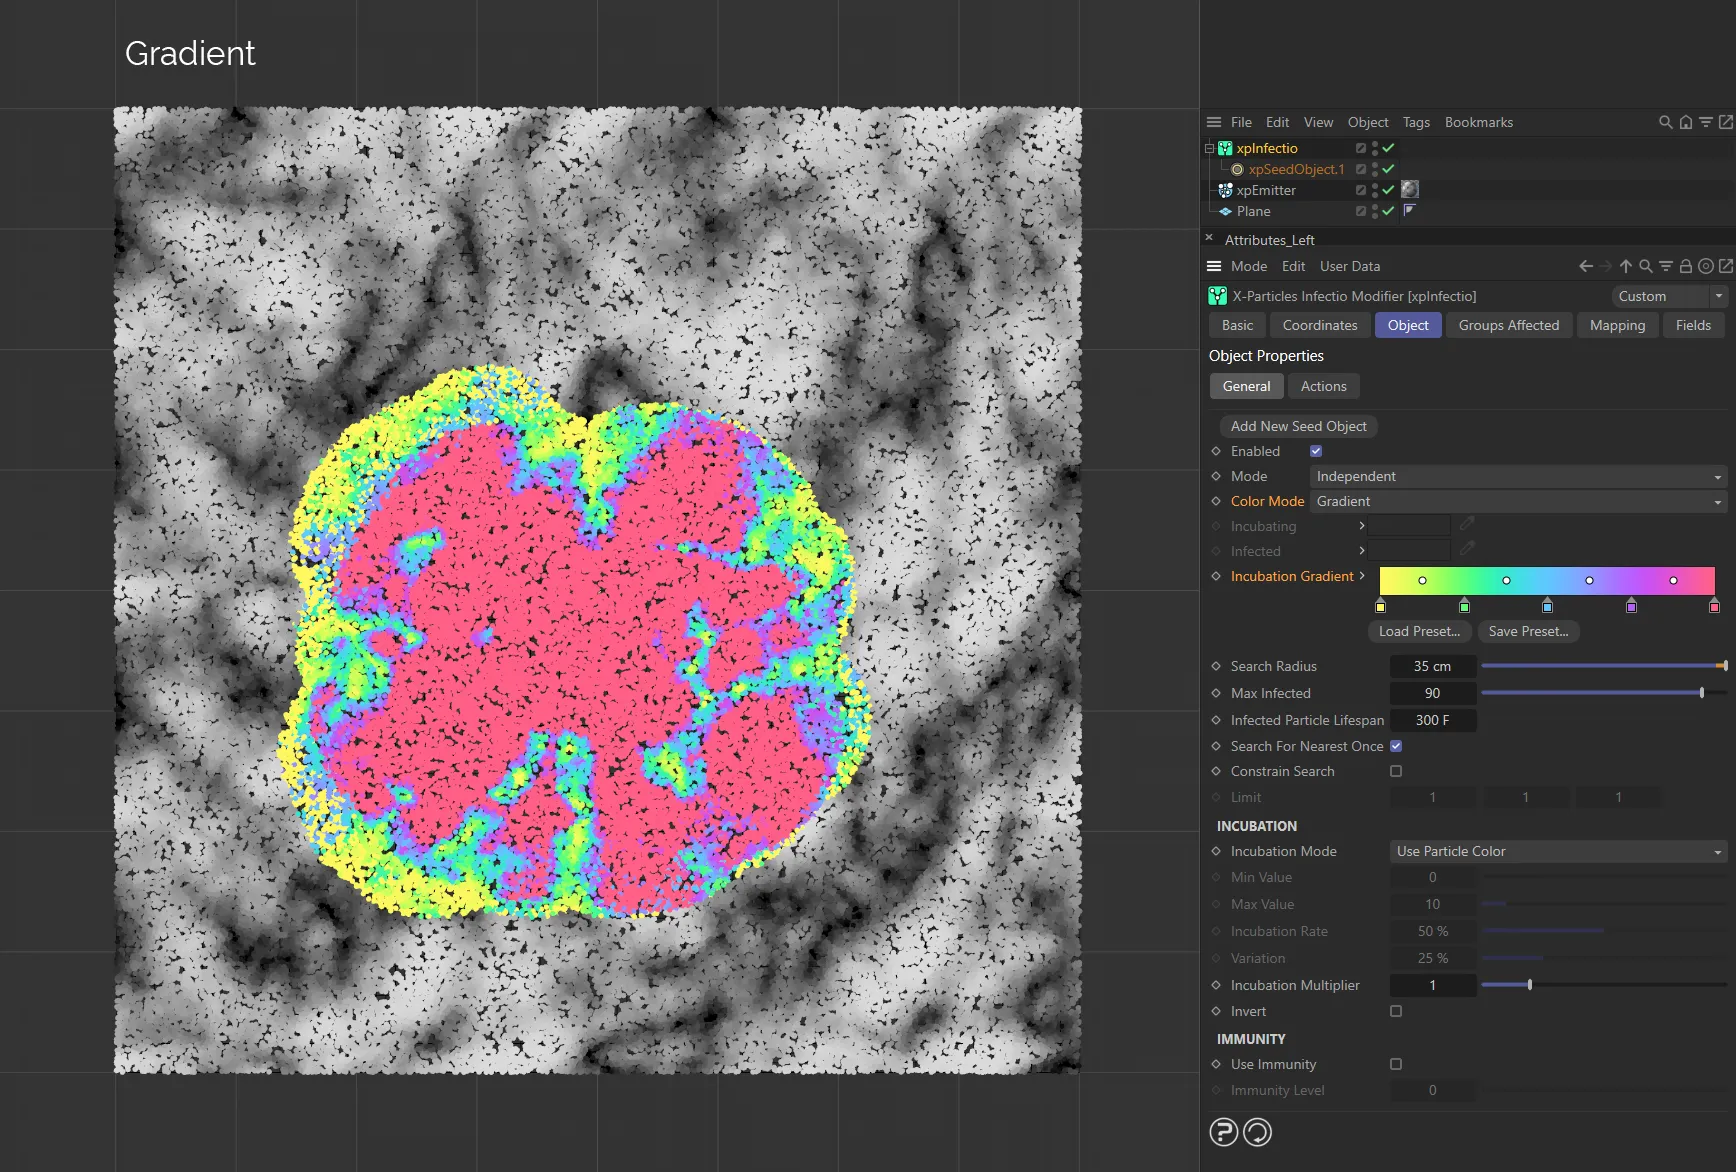
Here, the Color Mode is Gradient, with the infected particles taking their color from the Incubation Gradient setting.
Use Groups
Section titled “Use Groups”If you use this option, instead of colors, the particles will change particle group when changing from uninfected to incubating and again when changing state from incubating to infected.
With this option, the interface will change slightly, giving additional parameter settings.
Drag the groups to use into the two fields or use the Add Group buttons to create new groups.
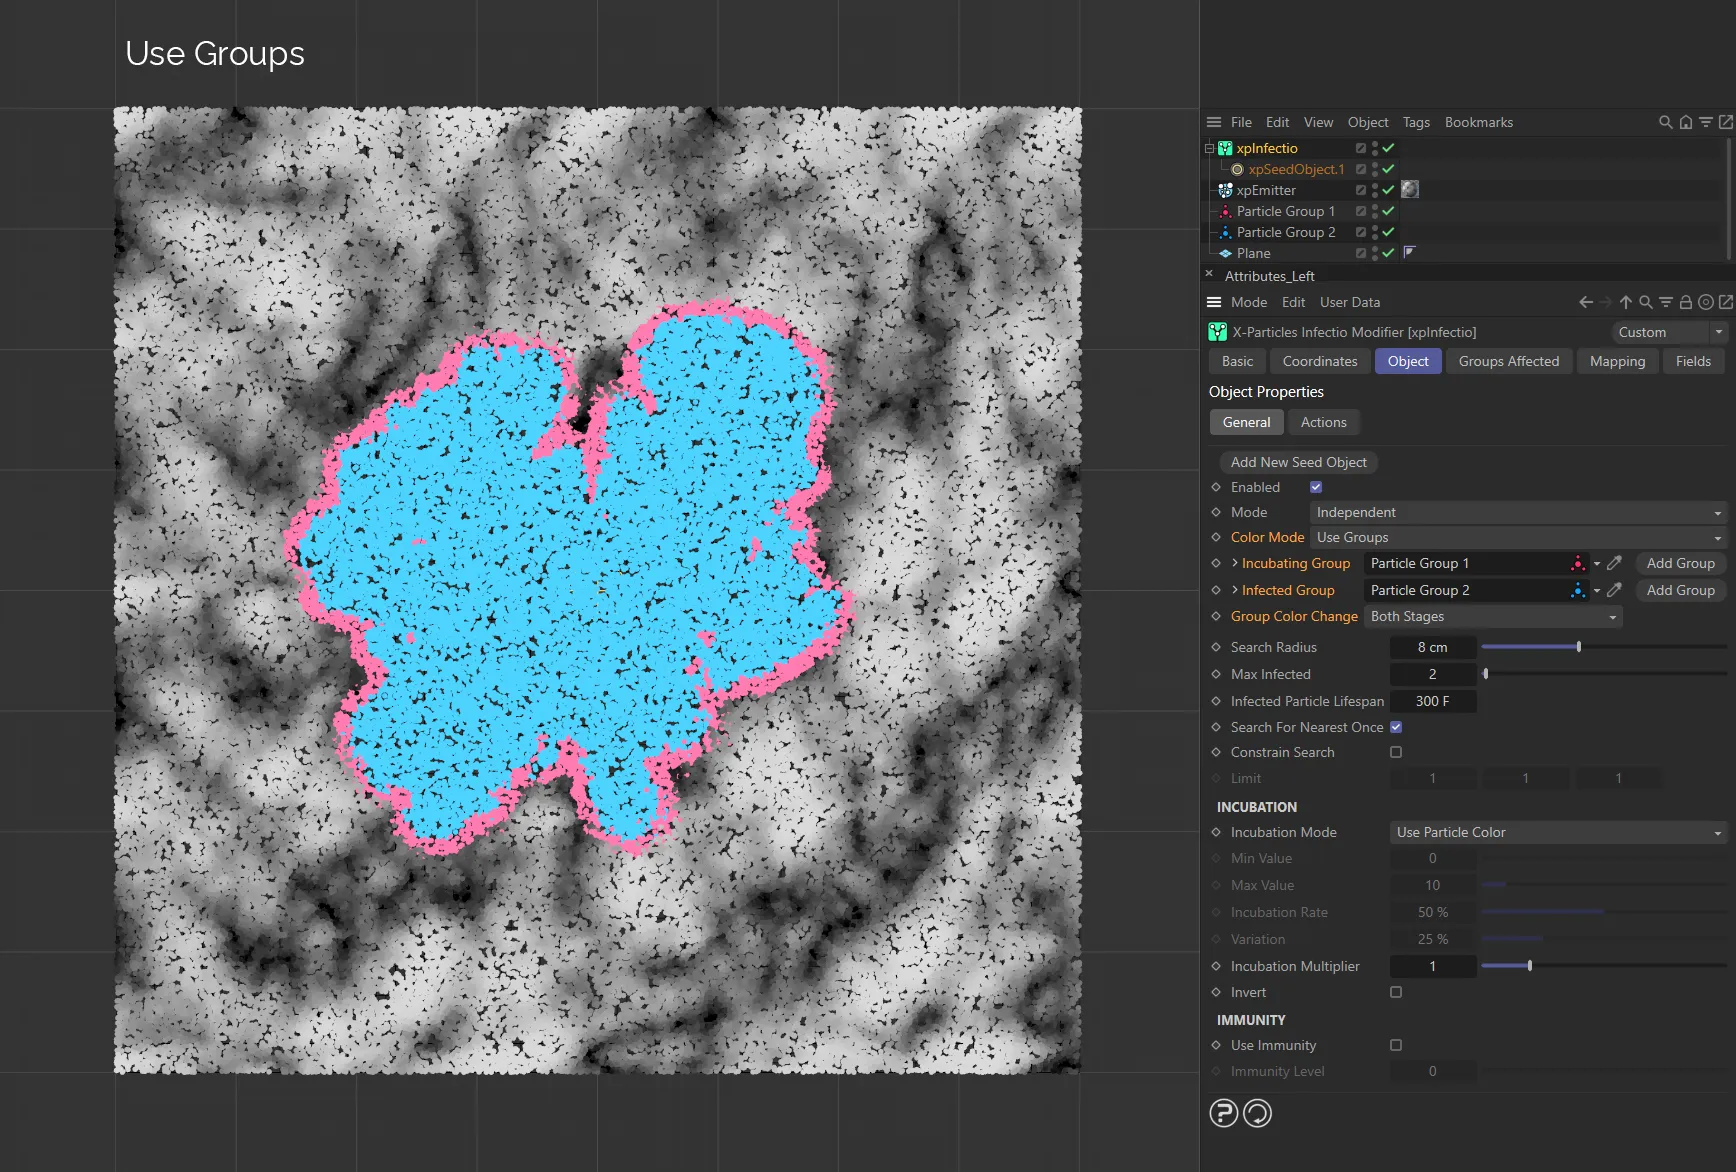
Color Mode is set as Use Groups, in this image. The different particle groups are set in the Incubating Group and Infected Group fields.
No Color Change
Section titled “No Color Change”The color will not change.
Therefore particles die when infected, despite not changing color.

With Color Mode set as No Color Change, particles do not change color.
Incubating
Section titled “Incubating”The color to use for particles in the incubating phase when Color Mode is set to Fixed Value.
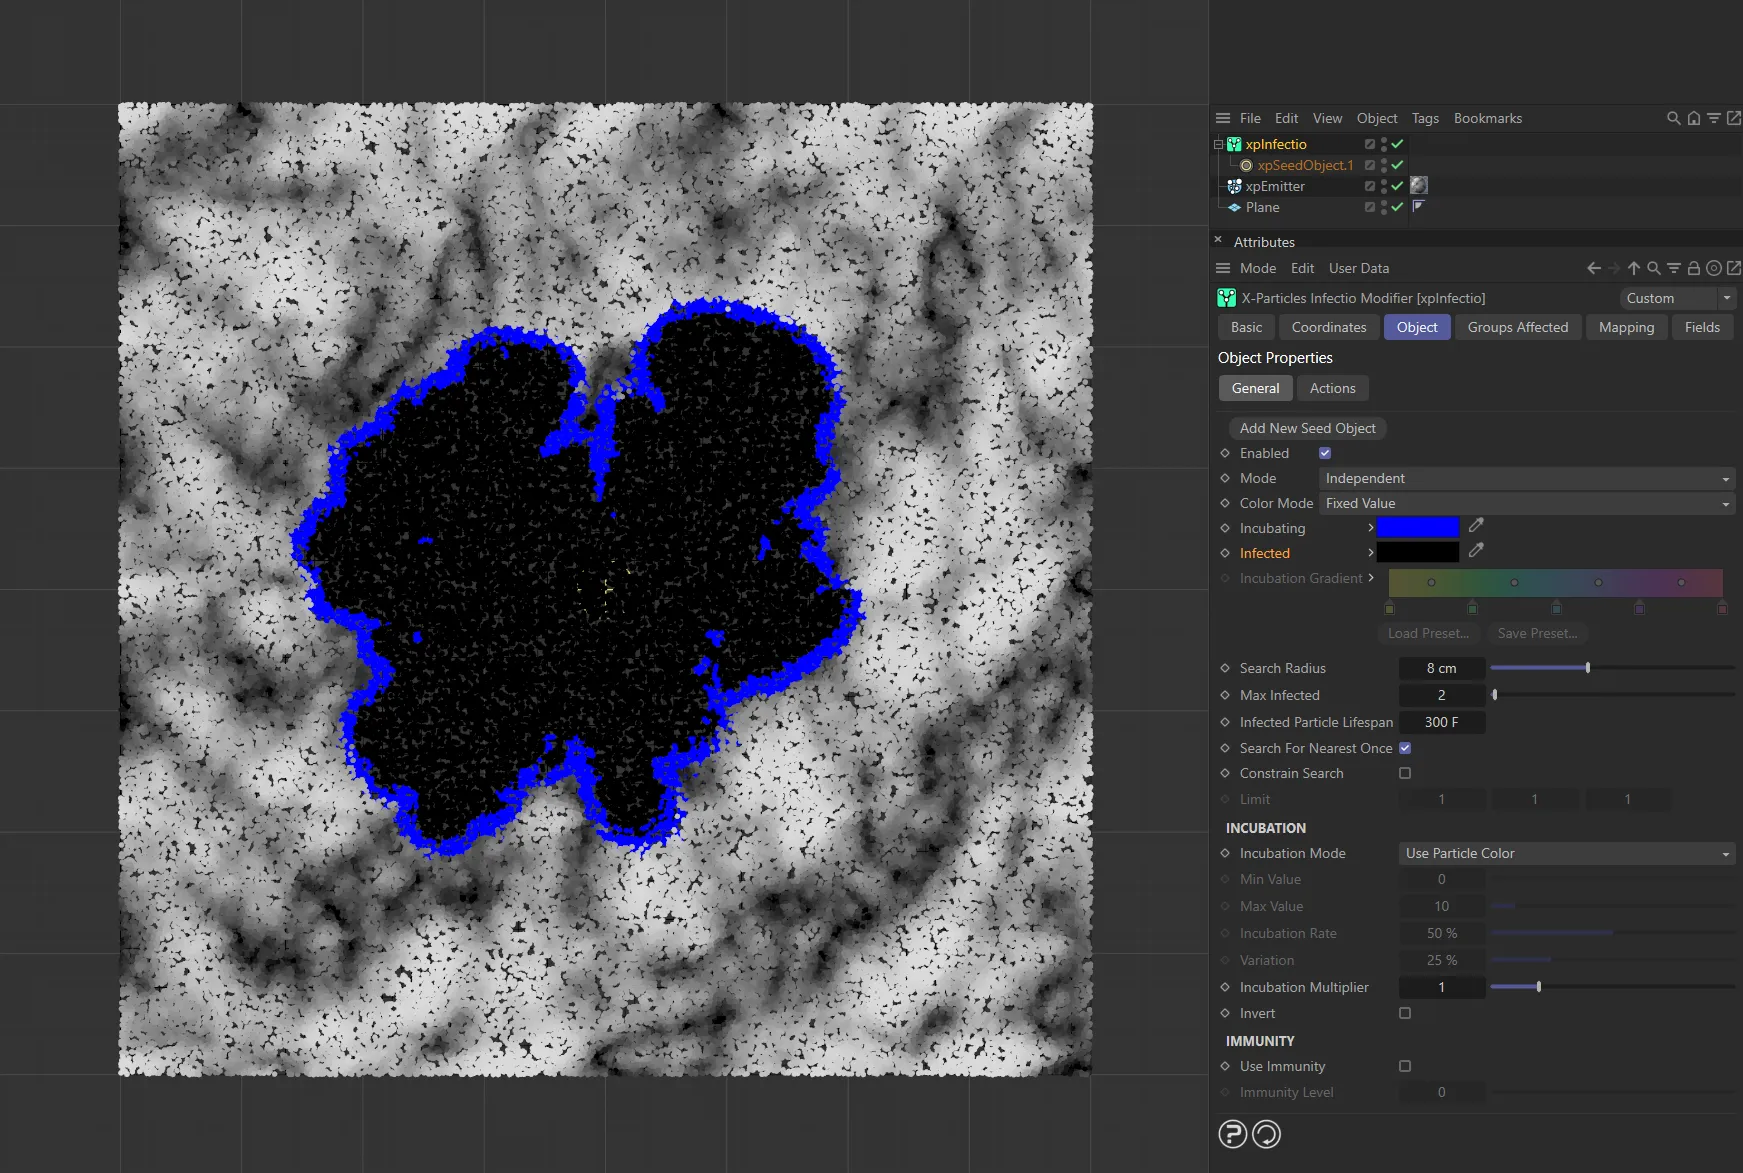
Here, the Incubating particles are colored blue.
Infected
Section titled “Infected”The color to use for particles in the infected phase when Color Mode is set to Fixed Value.
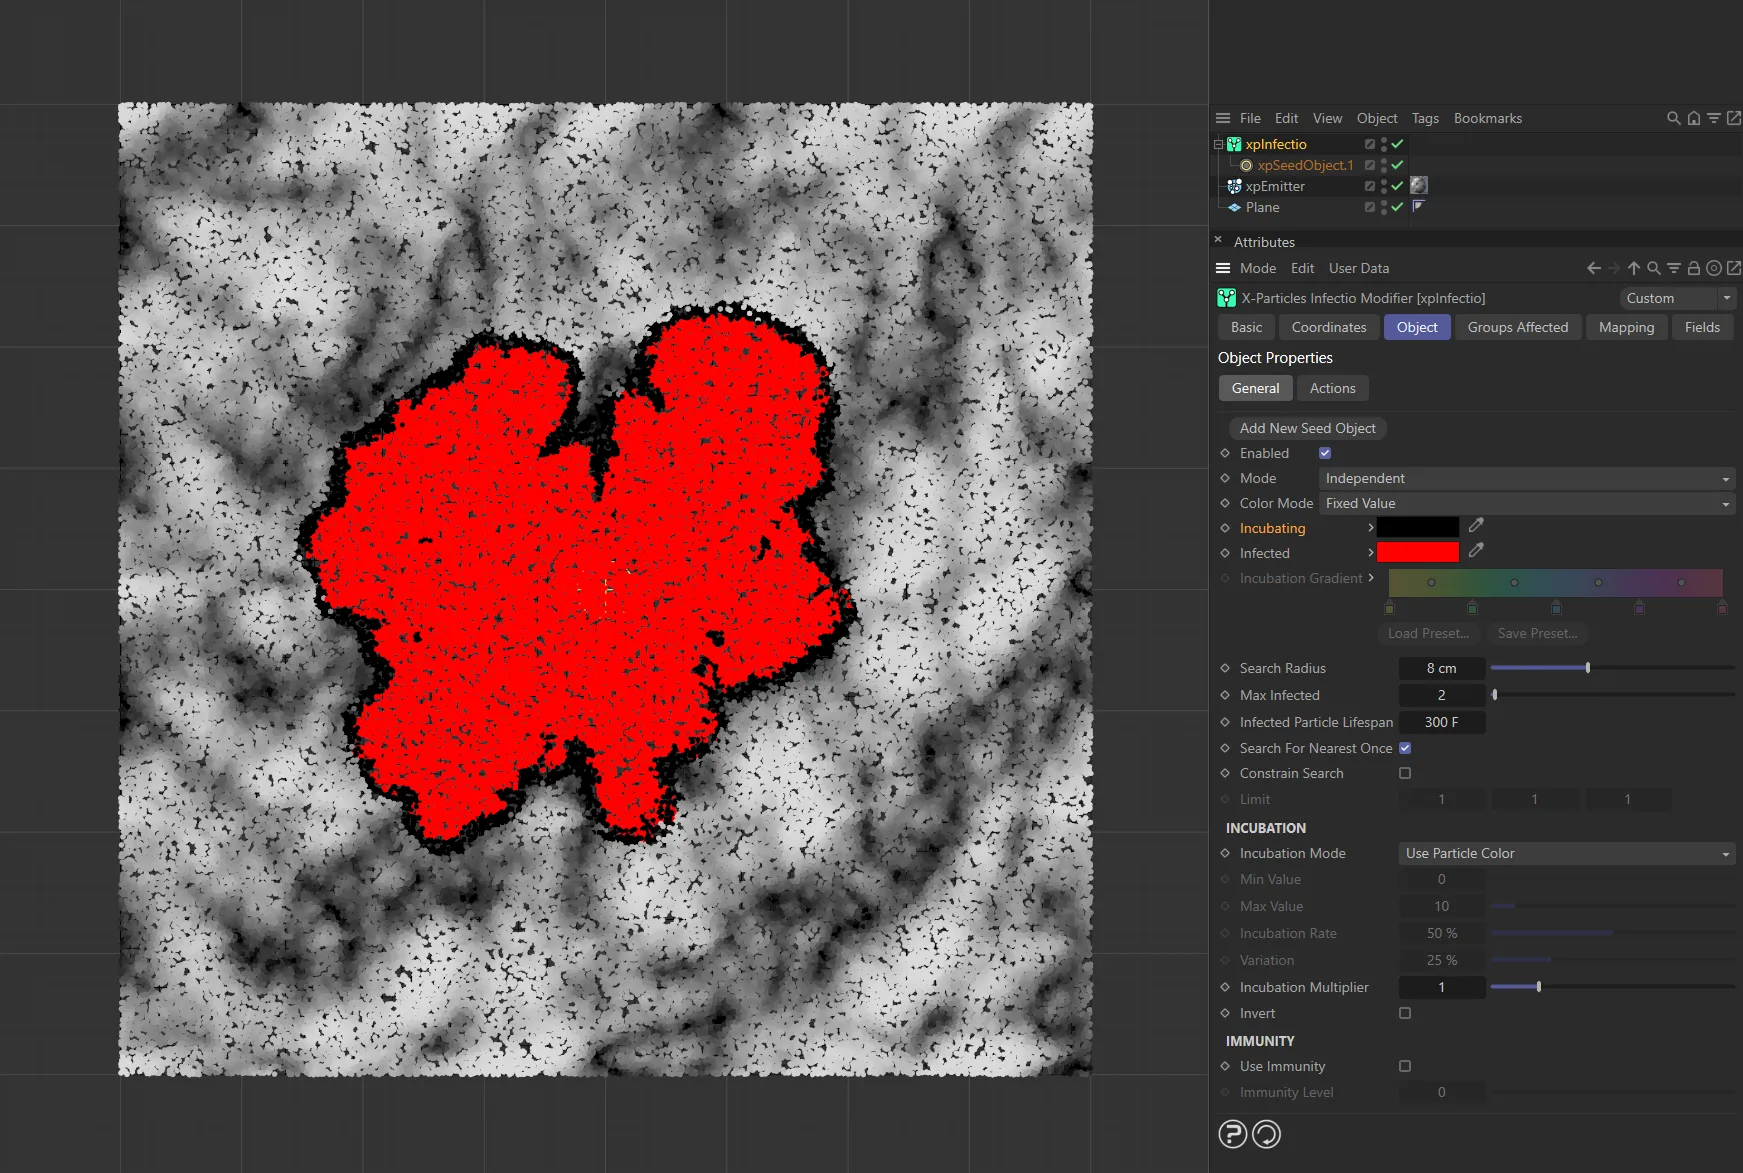
Infected particles are colored red now, with the Incubating changed to black.
Incubation Gradient
Section titled “Incubation Gradient”The gradient to use when Color Mode is set to Gradient.
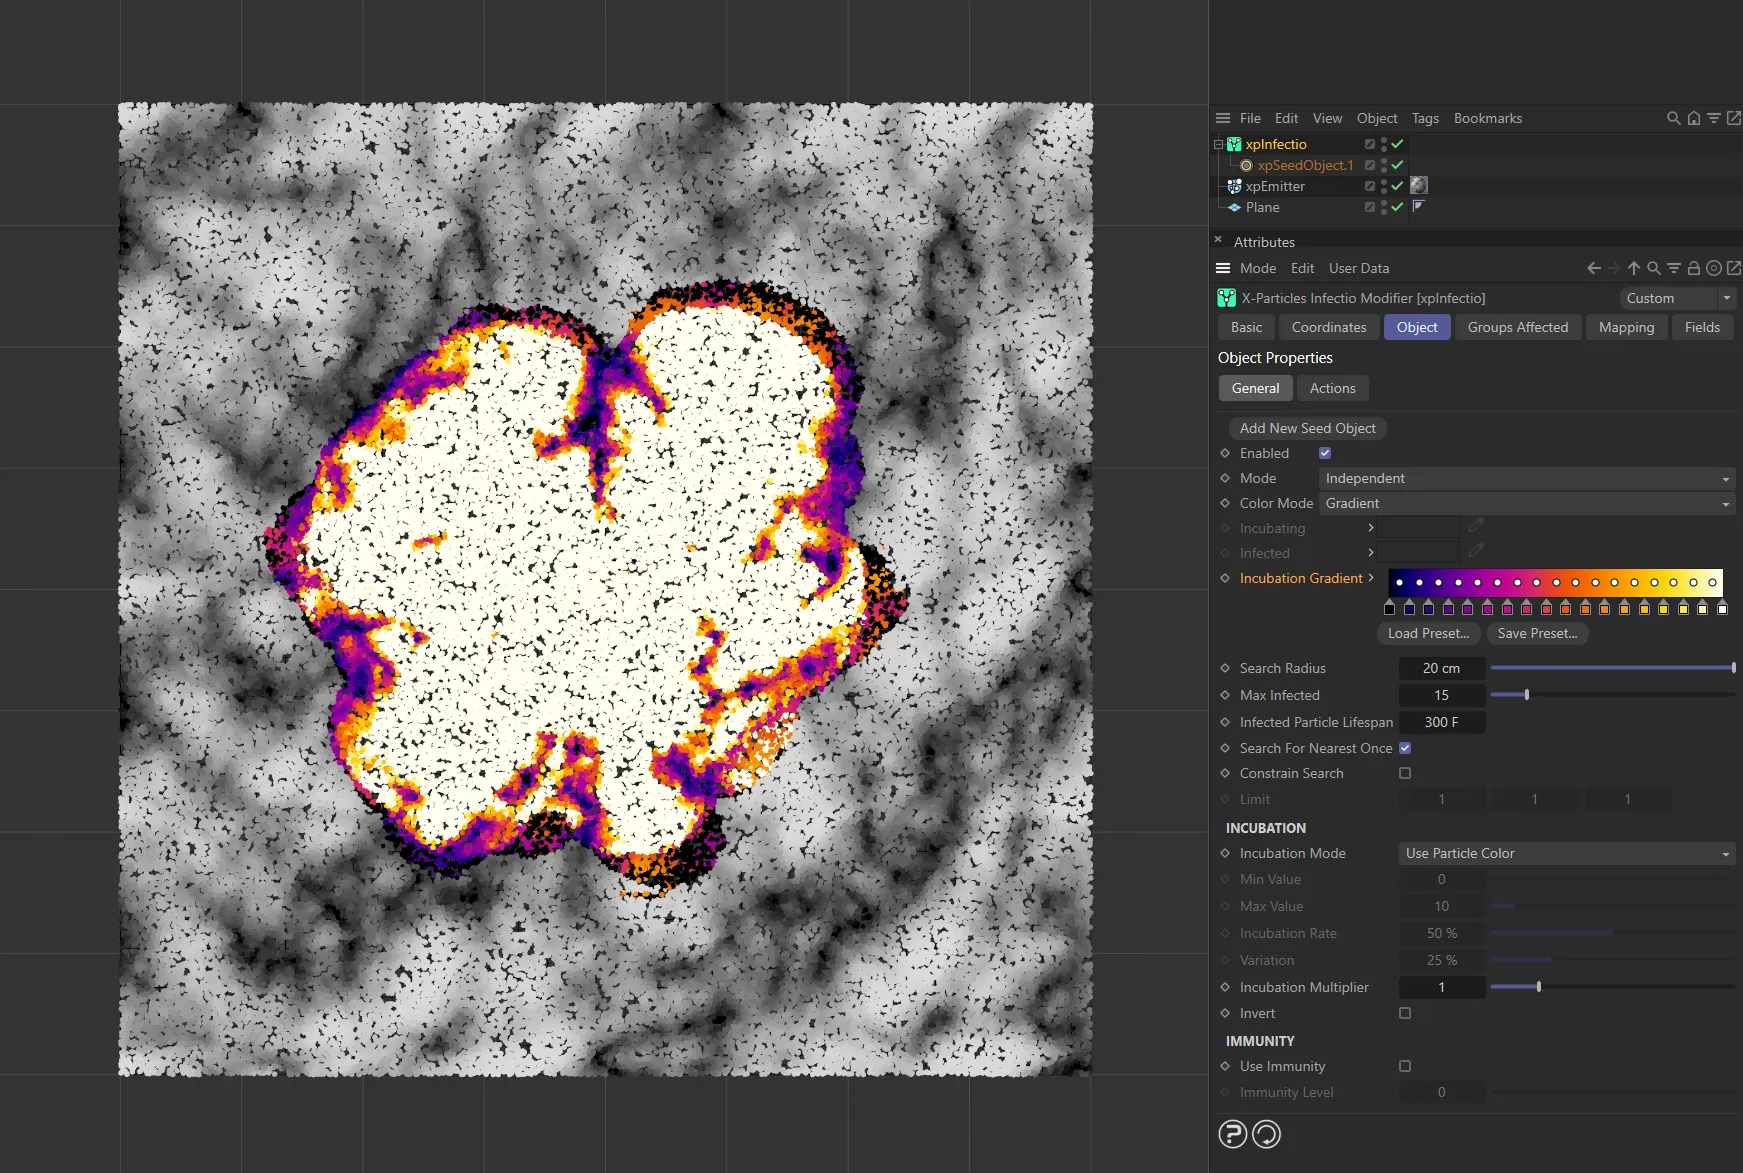
The Color Mode is set to Gradient, in this image.
Incubating Group
Section titled “Incubating Group”The group to use for particles in the incubating phase when Color Mode is set to Use Groups.
Infected Group
Section titled “Infected Group”The group to use for particles in the infected phase when Color Mode is set to Use Groups.
Group Color Change
Section titled “Group Color Change”Set as Both Stages, by default, this controls the color change which normally occurs when a particle’s group is changed.
The other options are: Uninfected to Incubating Stage, Incubating to Infected Stage and No Color Changes.
Both Stages
Section titled “Both Stages”The color will always change when a particle’s group is changed.
Uninfected to Incubating Stage
Section titled “Uninfected to Incubating Stage”A color change will only occur when a particle changes group on changing from uninfected to incubating.
Incubating to Infected Stage
Section titled “Incubating to Infected Stage”A color change will only occur when a particle changes group on changing from incubating to infected.
No Color Changes
Section titled “No Color Changes”Even when a group changes, the color will not change.
Search Radius
Section titled “Search Radius”This is the radius to search around an infected particle for more uninfected particles.
If there are none, the spread of infection will stop.
If this value is small, you are more likely to fail to find any uninfected particles but, if it is too large, the growth may occur too quickly.

The Search Radius is 5cm here, with the infected particle searching 5cm around.
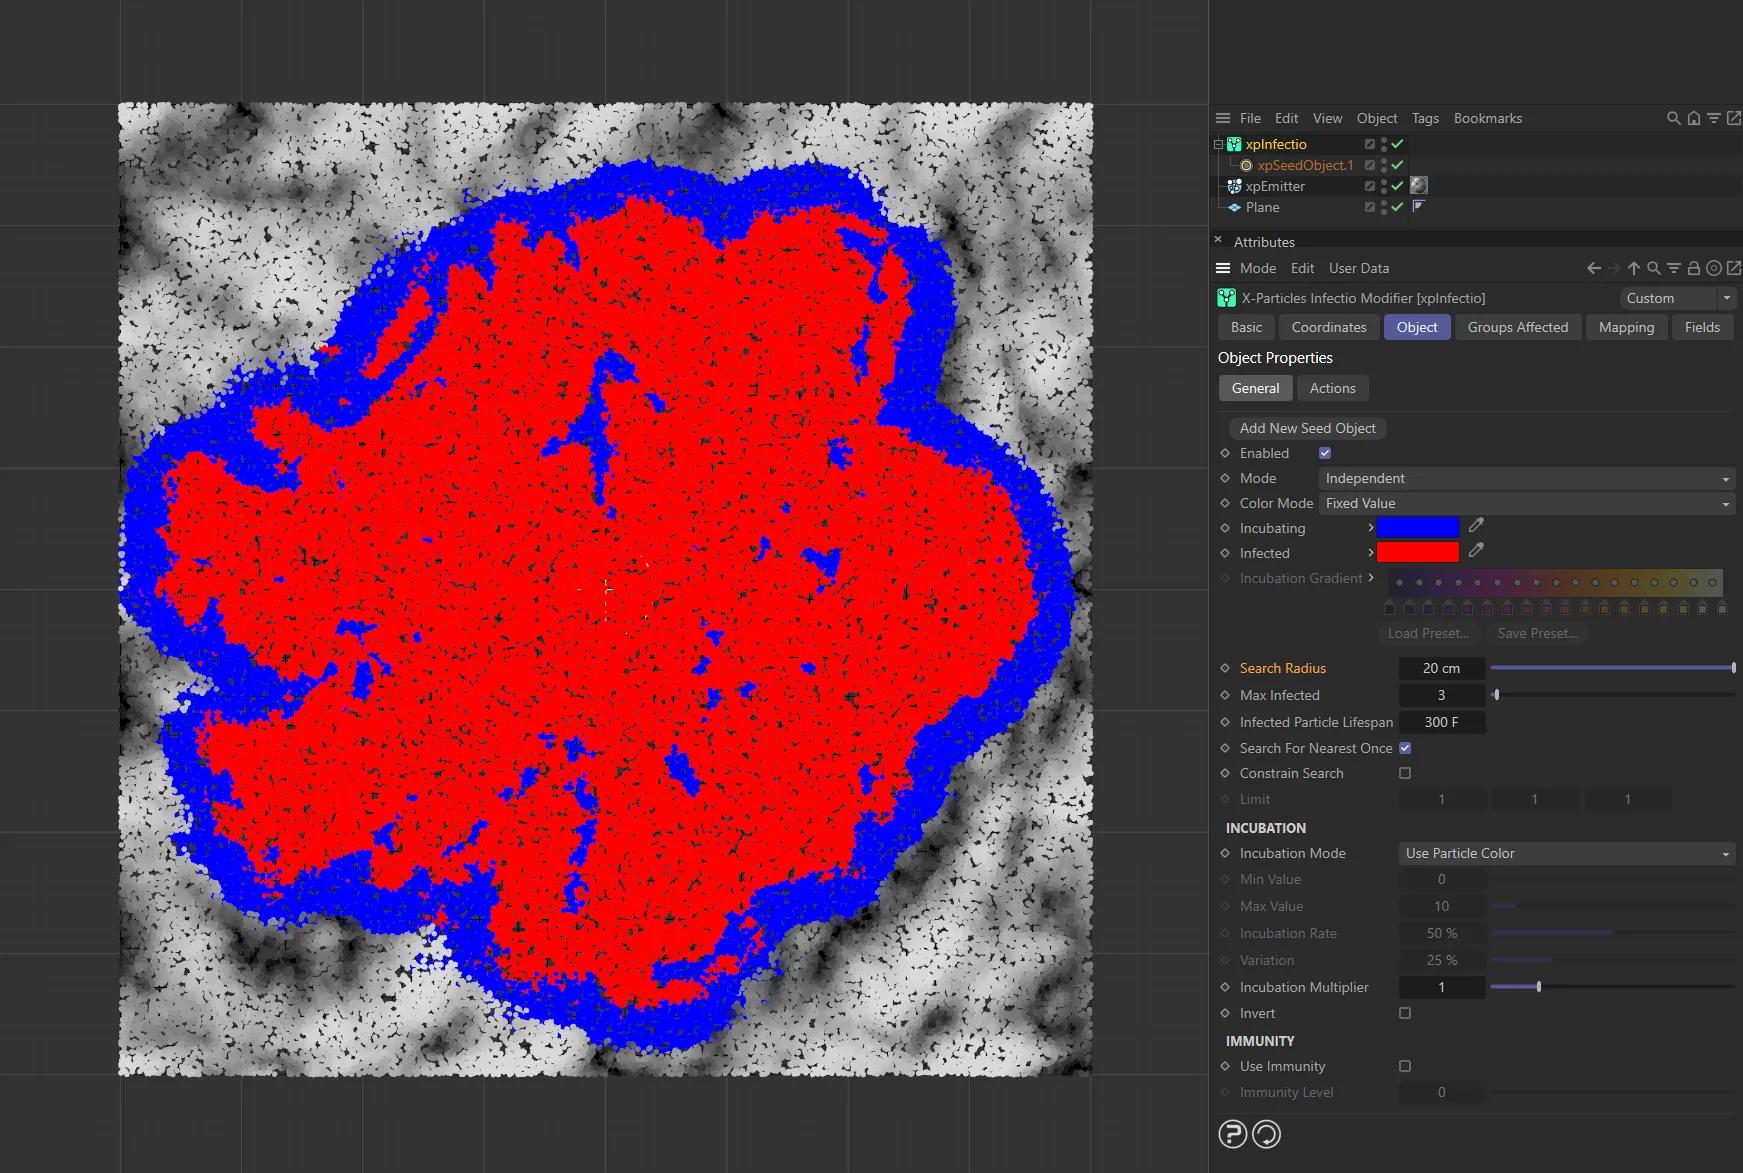
When the Search Radius is increased to 20cm, the infection spreads to many more particles.
Max Infected
Section titled “Max Infected”The maximum number of uninfected particles an infected particle can infect.
The higher this value, the faster the infection will spread.
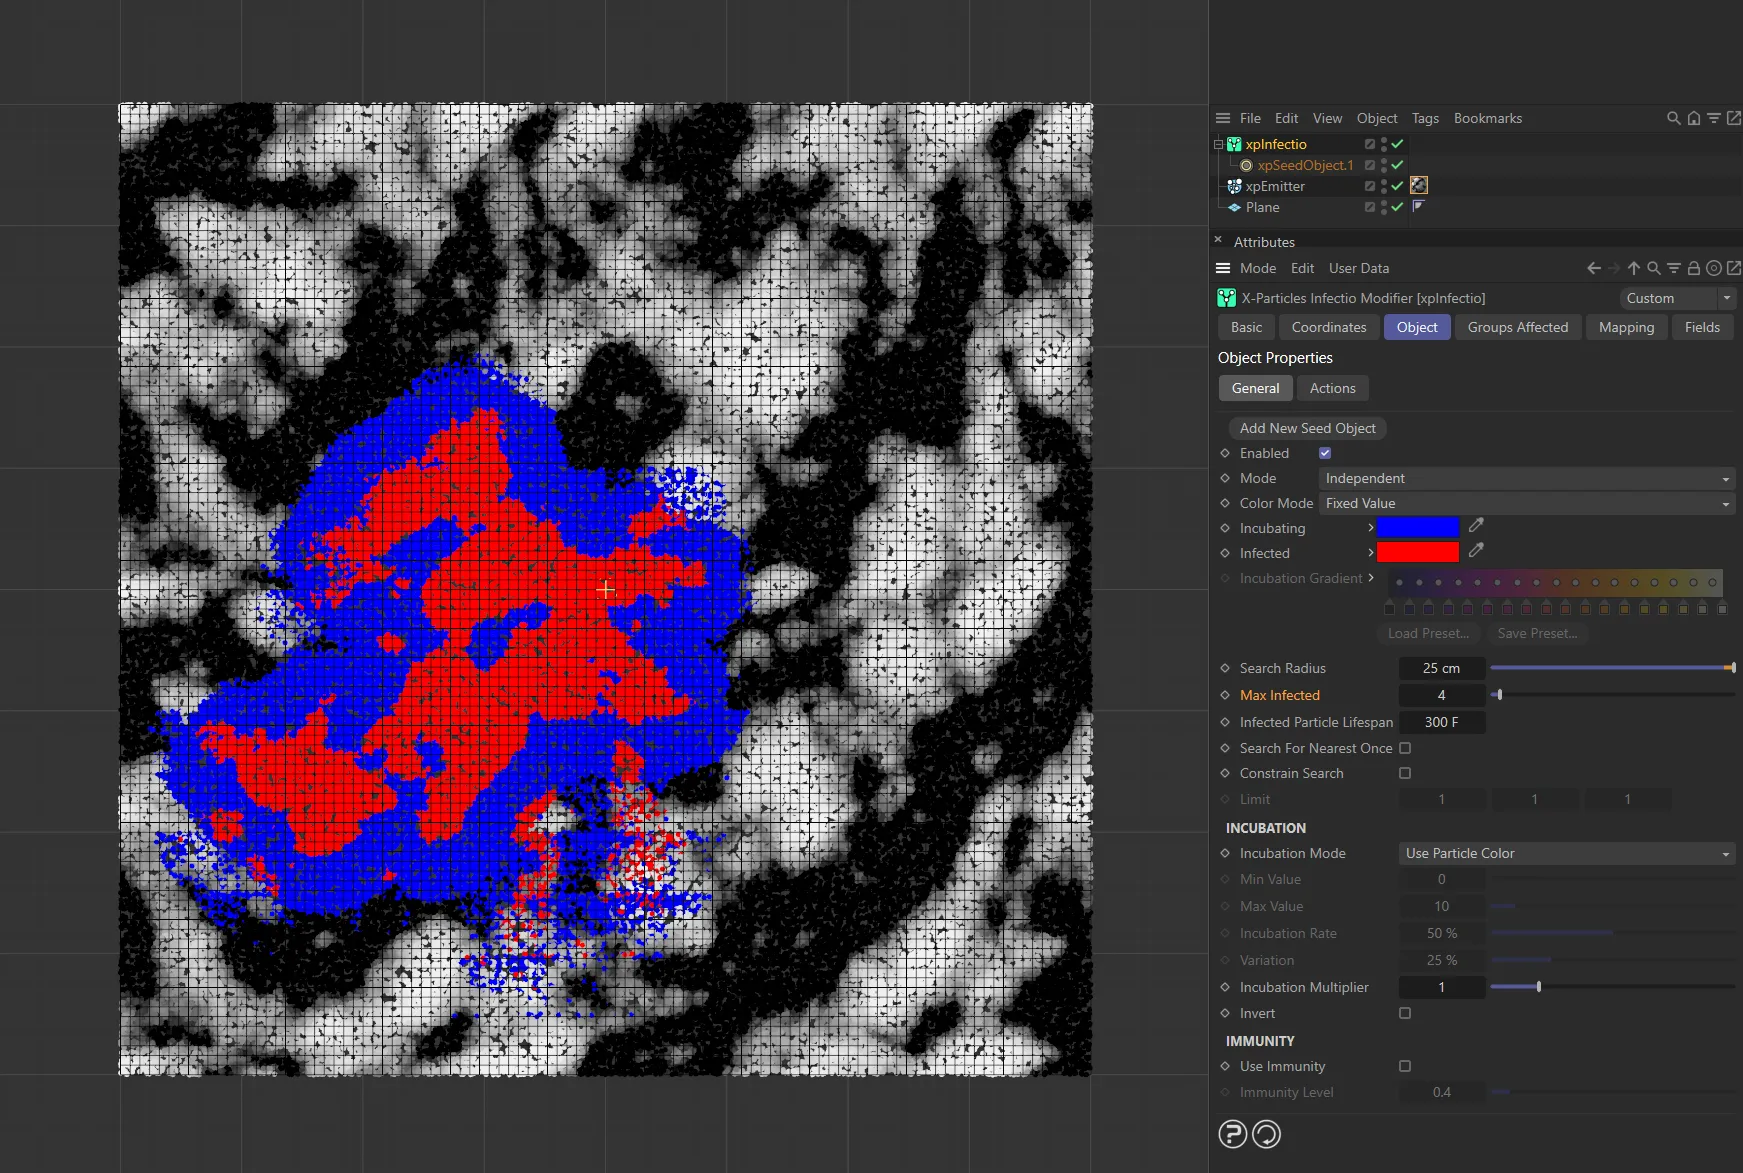
Max Infected value of 4, only infecting 4 particles.
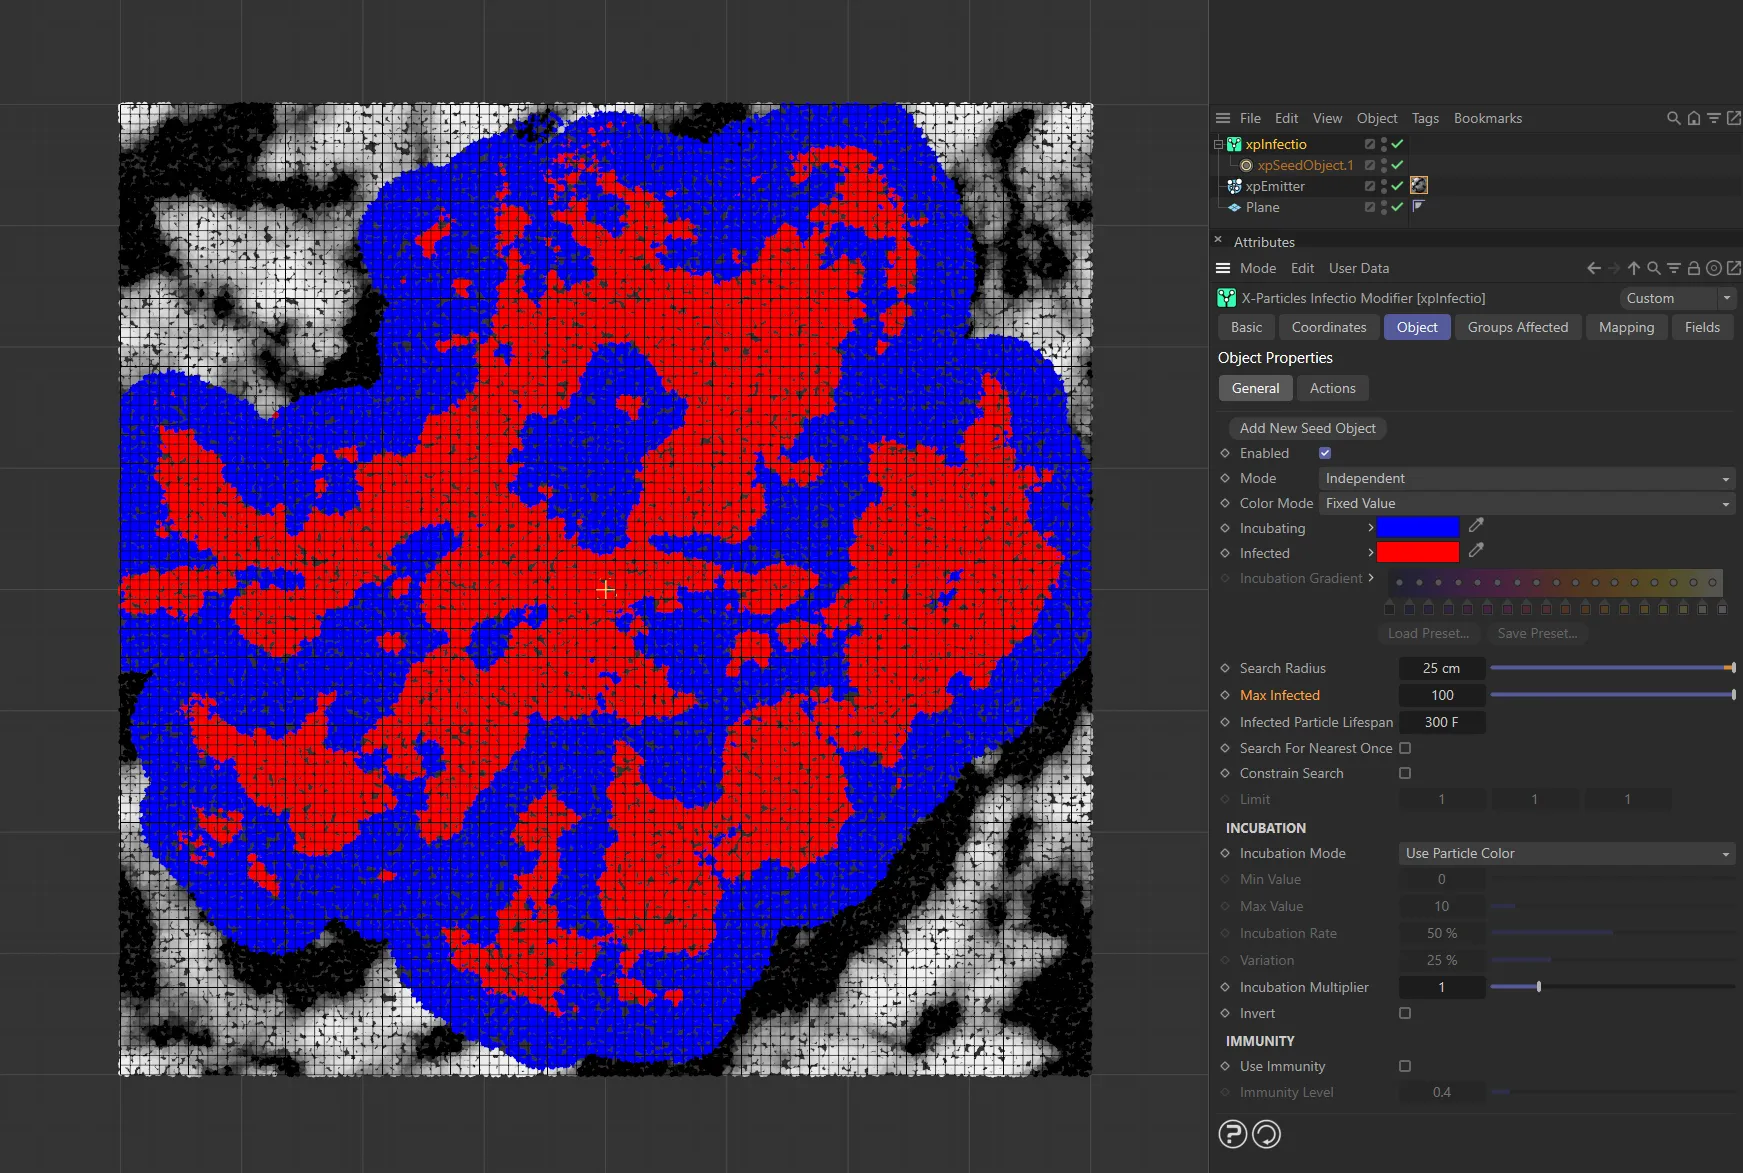
The Max Infected is increased to 100, here, infecting 100 particles.
Infected Particle Lifespan
Section titled “Infected Particle Lifespan”When a particle becomes infected, its lifespan will be set to this value.
You can use this to kill infected particles after they become infected, which can lead to some interesting effects.
The default is 10 seconds (300 frames at 30 fps), which is longer than many scenes.
You may need to increase this for lengthy scenes, if you don’t want the particles to die, or decrease it if you do want them to die.
This animation shows the default, Infected Lifespan of 300 frames.
The Infected Lifespan is reduced to 100 frames, here, killing particles earlier.
Infected Lifespan value of 15, particles are killed after only 15 frames, in this final animation.
Search For Nearest Once
Section titled “Search For Nearest Once”If this is enabled, a search for uninfected particles will only take place once around each infected particle, speeding up the simulation considerably.
It is the best choice for static, non-moving particles, since when a search has been performed once, there is no need to search again.
But if the particles are moving, you may want to disable this, since uninfected particles which were previously further away than the search radius may have become closer.
Constrain Search
Section titled “Constrain Search”By default, the search for uninfected particles takes place in all directions around an infected particle.
If you check this box, the Limit setting becomes available.
Only available if Constrain Search is enabled.
Use this setting to restrict the search for uninfected particles along the X, Y and Z axes.
The default is a value of 1 for each axis, which represents no limit.
Smaller values restrict the search along that axis.
In this animation, there are no limits, with a value of 1 on each axis.
Here, the Limit setting is 0.25 on the X axis, restricting the search on that axis.
Animation demonstrating a Limit setting on the Y axis (with a value of 0.25).
Incubation
Section titled “Incubation”Incubation Mode
Section titled “Incubation Mode”Set as Use Particle Color, by default, this determines how the incubation value for each particle is set when it is first generated.
The other options are: Set From Incubation Rate, Particle Radius, Particle Mass, Temperature, Smoke, Fuel and Fire.
Set From Incubation Rate
Section titled “Set From Incubation Rate”With this option, the incubation rate is set from the Incubation Rate value.
You can use this to give all particles the same incubation rate or you can add some variation by using the Variation setting.
In this animation, the Incubation Rate is set at 5%.
This animation demonstrates an Incubation Rate raised to 25%.
Use Particle Color
Section titled “Use Particle Color”The overall particle color brightness determines the rate.
Black particles have a rate of zero (so will never change from incubating to infected), while pure white particles have a rate of 100% and change to the infected state very quickly.
Here, the Incubation Mode is set to Use Particle Color, which - in turn - is set to a Noise shader, with only the bright areas being infected.
This animation has the same setting except, in this example, a logo bitmap is being used. Again, only the bright areas are being infected.
Particle Radius, Particle Mass
Section titled “Particle Radius, Particle Mass”With these options, the particles’ radius or mass control the incubation rate.
If you select one of these options you must also set the Min Value and Max Value settings.
Particles with a radius or mass equal to or below the Min Value will have an incubation rate of zero so will enter the incubation phase but never become infected.
Those with a radius or mass equal to or higher than the Max Value will have an incubation rate of 100%.
Temperature, Smoke, Fuel, Fire
Section titled “Temperature, Smoke, Fuel, Fire”The same as for Particle Radius or Particle Mass but using the physical data settings instead.
Min Value, Max Value
Section titled “Min Value, Max Value”The settings to use to determine incubation rates when Incubation Mode is set to Particle Radius, Particle Mass or the physical data parameters.
Animation with the Incubation Mode set as Particle Radius, where only particles within the Min Value of 2.6cm and the Max Value of 6.5cm are infected.
Incubation Rate, Variation
Section titled “Incubation Rate, Variation”The settings to use to determine incubation rates when Incubation Mode is set to Set From Incubation Rate.
Incubation Multiplier
Section titled “Incubation Multiplier”It may happen that, depending on how you set the incubation rate, the rate for all particles may be too slow for the desired animation.
This could happen, for example, if you set the Incubation Mode to Use Particle Color and all the particles have dark colors and therefore a low incubation rate.
If that is the case, you can use this setting to increase incubation rates for all particles; the rate is multiplied by this value.
You can also use values less than one if the simulation is progressing too quickly and you want to slow it down by reducing the incubation rate.
Invert
Section titled “Invert”If enabled, the calculated incubation rate is inverted.
This would cause (for example) particles with the brightest color to have the slowest incubation rate.
In this animation, with Invert enabled, the opposite is true and particles within the Min Value and Max Value are not infected, whereas the smaller particles are.
Immunity
Section titled “Immunity”Use Immunity
Section titled “Use Immunity”Check this box to enable the Immunity Level setting.
Immunity Level
Section titled “Immunity Level”With this setting, you can make some particles immune to infection.
The setting is measured against a particle’s incubation rate.
Those particles with an incubation rate lower than this value will never be infected.
The Immunity Level is set to 0 (zero) in this animation, with Use Immunity enabled.
In this second animation, the Immunity Level is raised to 4.2, reducing the infection spread.
Actions tab
Section titled “Actions tab”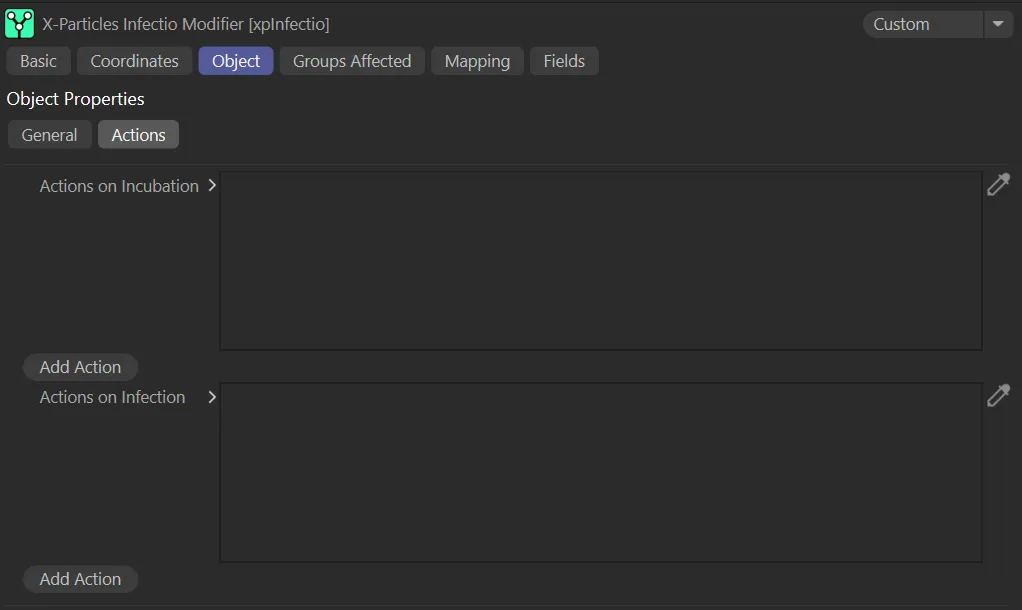
xpInfectio Actions tab.
Actions on Incubation
Section titled “Actions on Incubation”These actions will be triggered when the particle first changes from the uninfected state to the incubating state.
Animation to demonstrate the Actions on Incubation setting, with the Editor Display changing each incubated particle’s Editor Display mode to Lines and the Change Scale Action reducing the particle radius over time.
Add Action
Section titled “Add Action”Click this button to add an action to the Actions on Incubation list.
Actions on Infection
Section titled “Actions on Infection”These actions will be triggered when the particle first changes from the incubating state to the infected state.
In addition to the actions in the previous scene, as the particles become infected they are affected by the Actions on Infection set here, moving up on the Y+ axis, with a speed of 25cm, as set by the Change Speed Action and the Change Life Action reducing their life, as set by the xpLife modifier.
Add Action
Section titled “Add Action”Click this button to add an action to the Actions on Infection list.
Groups Affected tab
Section titled “Groups Affected tab”Groups
Section titled “Groups”To specify the group, drag and drop the desired Group object into this field.
This setting is useful if you want to ensure that the spawned particles are, or are not, affected by xpInfectio.
Mapping tab
Section titled “Mapping tab”The modifier’s settings can be mapped to particle data.
Use the dedicated manual page, below, for instructions on how this works.
Fields tab
Section titled “Fields tab”You can use the Fields options to control where xpInfectio operates.
In this animation, a Linear field is restricting particle infection.
Copyright © 2026 INSYDIUM LTD. All rights reserved.