nxFlock
nxFlock mimics the behaviors and reactions of creatures within a flock, with particles interacting with each other and reacting to stimuli.
There are three tabs within nxFlock: Behaviors, Reactions and Avoidance.
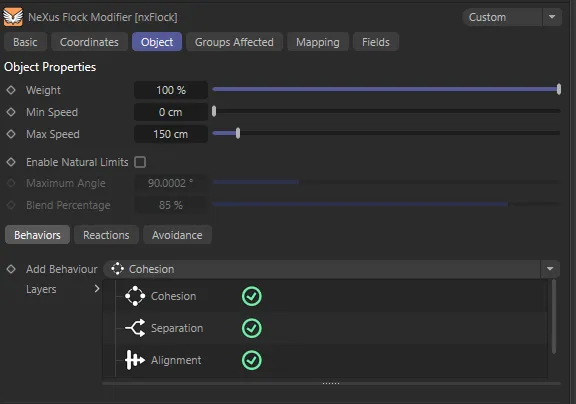
nxFlock parameter settings.
Weight
Section titled “Weight”The overall strength of the complete effect, including the result of any behaviors, reactions or avoidance.
Min Speed
Section titled “Min Speed”The minimum speed that a particle may have when affected by the modifier.
Max Speed
Section titled “Max Speed”The maximum speed that a particle may have when affected by the modifier.
Enable Natural Limits
Section titled “Enable Natural Limits”Checking this box will allow you to access the Maximum Angle and Blend Percentage parameters so that you can restrict the behaviors, reactions and avoidance patterns allowing for more natural movements.
Maximum Angle
Section titled “Maximum Angle”Sets the maximum angle that a particle can turn in a single frame.
Blend Percentage
Section titled “Blend Percentage”Controls how much the old direction is blended with the new direction.
Behaviors tab
Section titled “Behaviors tab”Add Behavior
Section titled “Add Behavior”These all have different effects on the particle motion.
There are five behaviors that can be selected from the drop-down menu: Cohesion, Separation, Alignment, Chaos and Swarming.
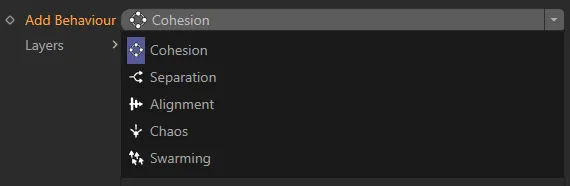
Add Behavior option drop-down menu.
All behaviors, except Swarming, are automatically enabled, by default, but they can be disabled by clicking on the green tick (turning it into a red cross) and they will be blended together to give the final result.
Layers
Section titled “Layers”List containing the behaviors.
Clicking on the individual behavior, to highlight it, will give its own parameter settings, explained below.
Cohesion
Section titled “Cohesion”The cohesion behavior makes particles draw together, attracting them to the center of mass/position.
Particles which are closer than the Cohesion Radius value and/or the particle radius will draw closer together.
Cohesion Type
Section titled “Cohesion Type”Set as Position, by default, this is how the cohesion is determined.
The alternative is Mass.
Position
Section titled “Position”The particles will be drawn together by the Cohesion Radius setting.
The particles of similar mass will be drawn together by the clumping of other particles, ie they will be attracted by large gatherings of particles, within the Cohesion Radius setting.
Cohesion Radius
Section titled “Cohesion Radius”Particles which are closer together than this value will be drawn together.
Increasing the Cohesion Radius, is demonstrated in these animations, with Use Particle Radius enabled, In this first video, the Cohesion Radius is set at 40cm, so only particles within that distance are drawn together.
Here, in this second animation, the Cohesion Radius is increased to 90cm, making more particles cohesively bond to other particles, in clumps, within greater distances.
Cohesion
Section titled “Cohesion”The strength of the cohesion effect.
Animation demonstrating the Cohesion value set at 25%.
In this second animation, the Cohesion is raised to 75%, pulling the particles together in clumps.
Separation
Section titled “Separation”This behavior causes the particles to maintain a distance from other nearby particles in the flock, repelling them from the center of mass/position.
‘Nearby’ particles are defined by the particle radius and/or the Separation Radius setting.
Separation Radius
Section titled “Separation Radius”This value is the distance that should be kept between a particle and its neighbors.
Demonstrating the Separation Radius, this first animation shows the particles kept apart to a low value of only 20cm
In this second animation, the Separation Radius is increased to 80cm, clearly separating the particles.
Separation
Section titled “Separation”The strength of the separation effect.
Alignment
Section titled “Alignment”This behavior causes the particle velocity (speed and direction) to change to match the average velocity of other nearby particles in the flock.
Align Radius
Section titled “Align Radius”Particles within this radius setting will be affected by the behavior.
This animation shows an Align Radius value of 30cm.
With the Align Radius increased to 90cm, particles from further apart become aligned.
The strength of the alignment effect.
In this animation, Align is set at 10%.
Here, the Align value is raised to 90%, strengthening the alignment of the particles.
This behavior introduces some random, chaotic movement into the particles.
Weight
Section titled “Weight”The strength of the chaos effect.
This animation shows the Weight set at 400%.
With the Weight increased to 2000%, the chaotic movement is clearly demonstrated.
Scale of the noise used for the random movement.
Larger scale settings will damp down the movement of the particles, giving smoother movement.
By contrast, a smaller scale will produce more chaotic movement.
Animation demonstrating the effect of a Scale setting of 95%.
Lowering the Scale to 35% produces a more chaotic movement.
Frequency
Section titled “Frequency”This setting changes the frequency of the internal noise generator used by the modifier, so the higher the value, the more rapid the chaos.
Swarming
Section titled “Swarming”This behavior makes separate emitters or particle groups tend to congregate with others in the same group or from the same emitter, while remaining part of a flock.
It is also used to segregate populations of different, or similar, kinds of particles.
There is a basic principle that governs a particle’s level of happiness, which in turn affects its speed.
Typically, happy particles move at a slower pace, while sad particles move faster; the speed sliders can be adjusted to modify the corresponding speeds.
The Swarming behavior requires at least two emitters or two particle groups.
Others Make Me Happy
Section titled “Others Make Me Happy”When unchecked, neighboring particles from the same emitter (or group) make the particle ‘happy’.
If it is checked, particles from different emitters (or groups) make it happy.
‘Happiness’ is a state which affects particle movement; a particle can either be happy or unhappy.
A particle’s happiness is determined by the type of particles in its Schelling radius.
If enough particles of the same type are nearby, the particle is content.
If there are too many particles of a different type, the particle becomes unhappy and moves faster to find a more satisfying location.
With Others Make Me Happy disabled, the different particle types eventually collect into groups made up of other native particles.
This animation demonstrates Others Make Me Happy when enabled, with particles happy to blend with each other.
Radius
Section titled “Radius”The radius around the particle to be searched for neighboring particles.
In this animation, the Radius value is 60cm.
With the Radius raised to 150cm, particles have a wider area they can search.
Happiness Ratio
Section titled “Happiness Ratio”This value determines when a particle becomes ‘happy’.
If you set this too high, most particles will be happy and if Speed When Happy is low (which it is by default), they will not move very quickly.
But if you set it too low, all the particles may be unhappy and, with the default settings, may move too fast.
Animation demonstrating a Happiness Ratio of 90%.
The Happiness Ratio is lowered to 55%, here, resulting in more frenetic particle movement.
Speed When Happy/Speed When Unhappy
Section titled “Speed When Happy/Speed When Unhappy”The speed of the particle when it is happy, or unhappy, respectively.
Swarming Type
Section titled “Swarming Type”You can select whether to use different emitters, groups or objects with this menu.
The three settings are: Emitter, Group and Object.
Periphery
Section titled “Periphery”These parameters are present for all behaviors except Chaos.
Use Periphery
Section titled “Use Periphery”When enabled, this behavior is used in conjunction with other behaviors.
A particle will then only be affected by other particles which are within its field of vision.
Here, Use Periphery is disabled. Particles can see all neighboring particles, so they all abide by the cohesion settings, creating one dense flock.
In this animation, Use Periphery is enabled and, at the default value, particles have a fairly wide field of view and can therefore form a somewhat cohesive group. However, particles that can’t see the group begin to stray.
View Angle
Section titled “View Angle”The effects of any behaviours will only be applied to other particles within a particle’s field of vision.
The angle can be adjusting using this setting.
Animation demonstrating a View Angle of 60 degrees. With this narrower field of view, more particles stray, forming a higher number of groups.
The View Angle is even lower here, at 20 degrees, giving a very narrow field of view so particles struggle to stay in the main group.
Reactions tab
Section titled “Reactions tab”Reactions cause the particle to react to a variety of stimuli or reactors.
Each reactor will create a new object in the Object Manager as a child of the flocking object.
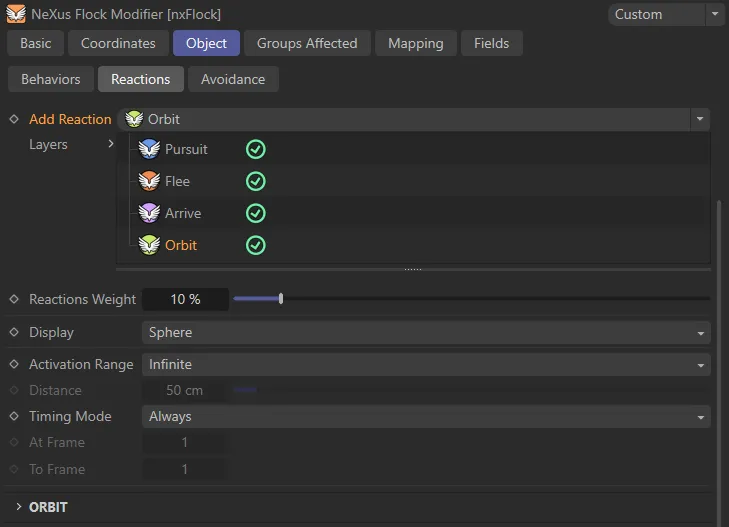
Reactions tab User Interface (UI).
Add Reaction
Section titled “Add Reaction”Select the rector you want to add using this drop-down menu button.
The options are: Pursuit, Flee, Arrive and Orbit.
Layers
Section titled “Layers”The list of reactors in use.
You can disable a reactor by clicking the green check mark next to the reactor’s name, turning it into a red cross.
Each has its own set of options which are shown when the reaction is selected in the Layers list.
To delete a reactor, select it and press the Delete key, or right-click it and select Remove or Remove All from the context menu.
Reactions Weight
Section titled “Reactions Weight”The overall strength of all reactors.
Setting this to zero will mean no effect from any reactor.
Display
Section titled “Display”Set as Sphere, by default, this is the viewport representation of the reactor.
The other options are: Box, Cross and None.
Activation Range
Section titled “Activation Range”Set as Infinite, by default, the reactor becomes active at any distance from a particle.
The alternative is Distance, where reactor acts on a particle if that particle is within the Distance setting of the reactor.
Distance
Section titled “Distance”The distance to use when Activation Range is set to Distance.
Timing Mode
Section titled “Timing Mode”Set as Always, by default, this menu controls when the reactor is active.
Other options are: Before, After, On, Pulse and Between.
Always
Section titled “Always”The reactor is always active.
Before
Section titled “Before”The reactor is only active before the time in the At Frame setting.
The reactor is only active after the time in the At Frame setting.
The reactor is only active at the time before the time in the At Frame setting; not before or after.
The reactor will become active with each multiple of the time in the At Frame setting.
For example, if At Frame is set to 10, the reactor will work on frames 10, 20, 30, etc. but not at other times.
Between
Section titled “Between”The reactor is active between the times given in the At Frame and To Frame settings.
At Frame/To Frame
Section titled “At Frame/To Frame”Time settings used for the Timing Mode options.
Pursuit settings
Section titled “Pursuit settings”Pursuit Type
Section titled “Pursuit Type”Set as Static Position, by default, the pursuit reactor can operate in several ways to move particles towards a location.
In all cases, except Static Position, the reactor requires two or more emitters - one or more of which are the pursuers, and one or more which are the ones being chased.
If required, you can use particle groups instead of emitters, in which case you will need at least two groups.
In this reactor, the particles which are pursuing should be added to the Friendly Emitter List (or Friendly Group List).
Those being chased should be added to the Enemy Emitter List (or Enemy Group List).
Static Position
Section titled “Static Position”This does not require another emitter.
The particles simply chase after the pursuit object, which can be animated, if desired.
This animation shows the effect of the Pursuit reaction type.
Center Position
Section titled “Center Position”The pursuing particles aim for the average position of all the chased particles.
Center of Mass
Section titled “Center of Mass”The pursuing particles aim for the average center of mass of all the chased particles.
Nearest
Section titled “Nearest”Each of the pursuing particles chases the nearest chased particle to itself.
With this menu you can opt to use separate emitters or different groups.
The two options are: Emitter or Group.
Pursuit Offset
Section titled “Pursuit Offset”Fixed distance behind the object.
You can use this to offset the target point for the pursuing particles.
Distance
Section titled “Distance”Only available if Pursuit Type is set to Nearest.
A pursuing particle must be within this distance of a chased particle for it to chase that particle.
If the distance subsequently exceeds this value, chasing will stop.
Friendly Emitter List (or Friendly Group List)
Section titled “Friendly Emitter List (or Friendly Group List)”Drag the emitter(s) or particle group(s) that are to do the chasing into this list.
Enemy Emitter List (or Enemy Group List)
Section titled “Enemy Emitter List (or Enemy Group List)”Drag the emitter(s) or particle group(s) that are to be chased into this list.
Flee settings
Section titled “Flee settings”This reactor is the same as the pursuit reactor except that the ‘friendly particles’ are those being chased and will try to evade the pursuer, moving particles away from a location.
The ‘enemy particles’ are those doing the chasing.
As with the pursuit reactor, the particles will flee from the flee object itself if you set Pursuit Type to Static Position.
Otherwise, all settings are the same as Pursuit settings, above.
In this animation, the blue particles are chasing the pursuit object while also in the Flee reaction type, evading the pink particles.
Arrive settings
Section titled “Arrive settings”Particles will move towards a location, slowing down as they get closer.
Animation demonstrating the Arrive reaction type.
The particles’ speed will be changed to this value, as they enter the activation range of the reactor, then slow down to nearly zero when they arrive at the object.
Orbit settings
Section titled “Orbit settings”Particles will orbit around a location.
Here, the particles are in the Orbit reaction type.
Strength
Section titled “Strength”The strength of the pull, which the object exerts on the particles to make them orbit.
The higher this value, the faster the particles will orbit.
Avoidance tab
Section titled “Avoidance tab”The particles will avoid objects dragged into the Layers list.
In this animation, the three Spheres are all dropped into the Layers list, therefore the particles avoid them.
Weight
Section titled “Weight”The overall force multiplier strength of the avoidance effect.
Distance
Section titled “Distance”Particles must be closer to the object than this distance before starting to move to avoid it.
Set as Soft, by default (the alternative is Hard).
This controls how the particles avoid the object.
The particles will move to flow around an object but not move away from it.
The particles will move strongly away from the object, almost as if they have rebounded from it.
Layers
Section titled “Layers”Drag any objects in the scene into this list; they will be avoided, as a result.
Groups Affected tab
Section titled “Groups Affected tab”Groups
Section titled “Groups”To specify the group, drag and drop the desired Group object into this field.
This setting is useful if you want to ensure that the spawned particles are, or are not, affected by nxFlock.
Mapping tab
Section titled “Mapping tab”The modifier’s settings can be mapped to particle data.
Use the dedicated manual page, below, for instructions on how this works.
Fields tab
Section titled “Fields tab”You can use the Fields options to control where nxFlock operates.
Copyright © 2026 INSYDIUM LTD. All Rights Reserved.