xpSprite
xpSprite generates sprites, small objects (Cinema 4D primitives or lights) which are a convenient way to generate simple geometric objects.
They have the advantage that they are small, lightweight objects which can be readily controlled via the X-Particles control system, including changing the type of generated sprite and their attached materials.
Object Properties
Section titled “Object Properties”![]()
xpSprite Object tab settings.
Emitter
Section titled “Emitter”For objects to be generated from particles, you must tell the xpSprite object which emitter it will work with.
Drag an emitter object into this field to do that.
Until you have done so, you will not be able to access any of the other settings in the xpSprite object.
Add Emitter
Section titled “Add Emitter”Click this button to create a new emitter and add it to the Emitter link field.
Sprites from Particle Birth
Section titled “Sprites from Particle Birth”If this setting is enabled, a sprite will be generated for each particle as soon as it is created.
If it is disabled, no sprite will be generated for newly-created particles until this box is ticked again, or until sprite generation for a particle is turned on by an action.
Set Rotation to Face Camera
Section titled “Set Rotation to Face Camera”This is a convenience function.
If there is an emitter in the Emitter link field, clicking this button will make the following changes to the emitter:
- Use Rotation is turned on
- Rotation Mode is set to Face Camera
- Persist Orientation is turned on
You don’t have to use this button; all the above changes can be made manually in the emitter.
Sprite Type
Section titled “Sprite Type”Set as Cube, by default, this drop-down menu lets you choose which type of object will be generated.
These are all very simple Cinema 4D primitives, so are quick to generate and draw, speeding up viewport performance.
The options are:
A cube primitive.
![]()
The cross object supplied with X-Particles.
You can choose if you want this to be a 2D or a 3D cross.
![]()
Placard
Section titled “Placard”A single small polygon.
Useful for applying a texture with an alpha channel to act as a billboard sprite in conjunction with the Face Camera option in the emitter rotation section.
The initial orientation plane can be set for this sprite type.
![]()
Sphere
Section titled “Sphere”A Sphere primitive.
You can set the number of segments to improve performance.
![]()
![]()
Cylinder
Section titled “Cylinder”A Cylinder primitive.
You can set its orientation and whether it has caps or not.
There is also a height multiplier value which can be used to increase the height of the Cylinder without increasing its radius.
![]()
![]()
Capsule
Section titled “Capsule”You can set its orientation and there is also a height multiplier value which can be used to increase or decrease the height of the Capsule without changing its radius.
![]()
![]()
A Cone primitive.
You can set the height and rotation segments and the orientation, just as in the object manager for a Cone primitive.
![]()
![]()
Pyramid
Section titled “Pyramid”A Pyramid primitive.
You can set the orientation, just as in the object manager for a Pyramid primitive.
![]()
A Disc primitive.
You can set the rotation segments, internal radius and the orientation, just as in the object manager for a Disc primitive.
![]()
![]()
3 Plane
Section titled “3 Plane”An object made from three single polygons, each one oriented on a different plane.
![]()
An Omni light, which is useful for generating large numbers of visible lights very quickly and making their parameters dependent on the age of the particle.
![]()
Points (Individual)
Section titled “Points (Individual)”The xpSprite object will generate a series of splines each containing one point.
This is very useful for use with the Metaball object in Cinema 4D.
Simply make the xpSprite object a child of the Metaball and adjust the Metaball parameters as required.
Points (Point Cloud)
Section titled “Points (Point Cloud)”The xpSprite object will create a single polygon object with one vertex per particle, but no polygons.
This point cloud can be used in the xpOpenVDBMesher to generate a mesh.
A simple text generation, fully compatible with the xpText modifier (more details for which can be found through the link below).
xpText
![]()
Rubble
Section titled “Rubble”The xpSprite object will generate small object primitives to give the illusion of small pieces of rubble or gravel.
![]()
In the case of the Cinema 4D primitives, these are the same settings as you can find for that primitive in the Cinema 4D interface; please refer to the Cinema 4D documentation for details.
Draw Mode
Section titled “Draw Mode”Set as Geometry Only, by default, this determines what the xpSprite object shows in the editor and at render time.
The other settings are: Particles Only, Geometry and Particles and Geometry on Render Only.
Geometry Only
Section titled “Geometry Only”This will turn off the editor display of the particles.
This is because it can be distracting to see the particles and objects in the editor at the same time, especially in wireframe views.
Particles Only
Section titled “Particles Only”Geometry will not be displayed and only the particles are shown.
This is very useful if you are caching a scene which generates a lot of geometry.
Because Cinema 4D is quite slow in drawing multiple objects on screen, caching a lot of particles with geometry is also slow, as the sprites are shown in the editor.
You can use this setting to generate the cache, then reset the drop-down menu to one that produces geometry before you render the cached scene.
Geometry and Particles
Section titled “Geometry and Particles”Both objects and particles are displayed.
Geometry on Render Only
Section titled “Geometry on Render Only”With this setting, geometry will not be generated in the editor (so speeding up the viewport) but will automatically be generated when rendering.
This is a convenience setting so you don’t have to remember to turn sprite generation on and off when creating a scene or rendering it.
Scale Using
Section titled “Scale Using”Set as Particle Radius, by default, the size of the sprites can be set in one of two ways from this drop-down.
The alternative is Particle Scale.
Particle Scale
Section titled “Particle Scale”The scale of the particle will be used to scale the sprite.
By default, particles have a scale of 1 so, with this option, the generated object will have the default size given to it by the xpSprite object, unless the particle scale is changed.
Particle Radius
Section titled “Particle Radius”This option will scale the sprite size up or down to match the particle radius.
Light settings
Section titled “Light settings”If you choose Light as the sprite type, the interface changes to give the following parameters.
Illumination
Section titled “Illumination”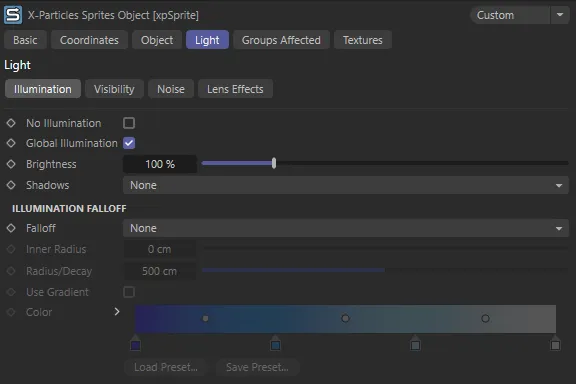
xpSprite Light tab Illumination settings menu.
No Illumination
Section titled “No Illumination”Enabling this setting means that the generated lights will not contribute to the scene illumination.
This is advised most of the time as generating thousands of lights, which do illuminate the scene, will enormously increase render times.
The remaining parameters in this section are only available if No Illumination is unticked.
Global Illumination
Section titled “Global Illumination”Corresponds exactly to the GI Illumination setting in the General tab of the light parameters in the Attributes Manager.
Please refer to the Cinema 4D documentation for full details.
Brightness
Section titled “Brightness”The brightness of the light.
Shadows
Section titled “Shadows”Set as None, by default, this drop-down has four settings.
For more details of these shadow types, please see the Cinema 4D reference documentation.
The light will not produce shadows.
Shadow Maps
Section titled “Shadow Maps”The light will generate shadows using low-resolution shadow maps for speed and low memory usage.
Raytraced (Hard)
Section titled “Raytraced (Hard)”The light will generate raytraced, hard shadows.
The light will generate area shadows.
Illumination Falloff
Section titled “Illumination Falloff”These settings are only available if No Illumination is unticked.
They allow you to set the falloff for the light cast by the light sprite.
They are identical in meaning to the illumination falloff settings for the lights in Cinema 4D; please refer to the C4D documentation for details.
Visibility
Section titled “Visibility”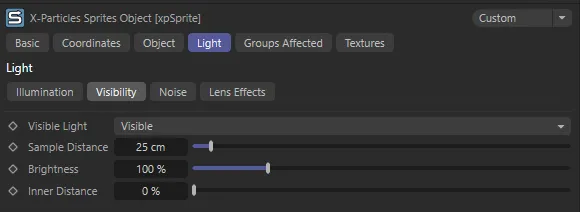
xpSprite Light tab Visibility settings menu.
This is the section that you use in order to generate visible lights in the scene.
The parameters in this section correspond to the parameters for a Cinema 4D light object, and more information can be found in the C4D documentation.
Visible light
Section titled “Visible light”Set as Visible, by default, this drop-down has three options.
The light is not visible.
Visible
Section titled “Visible”The light will be visible in the scene (the same as selecting Visible from the Visible light drop-down in a Cinema 4D light object).
Volumetric
Section titled “Volumetric”This is the same as selecting Volumetric from the Visible light drop-down in a Cinema 4D light object.
Sample Distance
Section titled “Sample Distance”The same as the corresponding setting in the Cinema 4D Light object, Visibility tab.
Brightness
Section titled “Brightness”This is the brightness of the visible light, not the light brightness when used for illumination.
Inner Distance
Section titled “Inner Distance”This value determines the inner distance for the visible light.
It is the same as the Cinema 4D parameter of the same name, but since the size of the light can vary depending on the particle size, this is a relative (percentage) inner distance, rather than an absolute one in scene units.
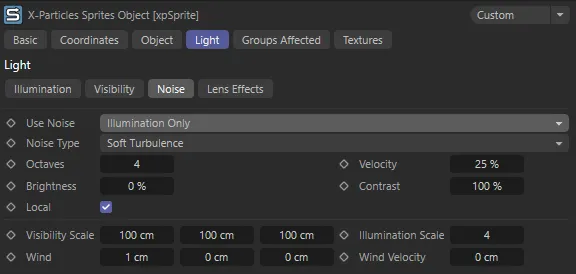
xpSprite Light tab Noise settings menu.
This section gives access to all the usual noise settings which you find in a Cinema 4D light object.
Please refer to the Cinema 4D reference documentation for details on how to use these settings.
Lens Effects
Section titled “Lens Effects”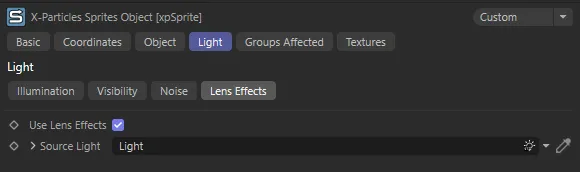
xpSprite Light tab Lens Effects settings menu.
The sprite lights can use lens effects.
First turn them on, by enabling Use Lens Effects, then drag a light, with the lens effects settings you want to use, into the Source field.
You can set the source light to be invisible in the editor and renderer.
All this does is provide the lens effects settings to use; you can edit these in the source light; see the Cinema 4D documentation for details.
Using lens effects is a good way to generate good-looking stars, fireworks, etc. - anything which needs a lot of brightness and glow.
If this effect is not present, it will be added automatically by the xpSprite object, but it won’t be added again if it is already present.
Be aware that this effect will not be removed or disabled if you disable lens effects in the sprite object or source light.
Use Lens Effects
Section titled “Use Lens Effects”Check this box to use lens effects on the sprite lights.
Source Light
Section titled “Source Light”Drag the light, which is the source of the lens effects, into this field.
Text settings
Section titled “Text settings”If you choose Text as the sprite type, the interface changes to give the following parameters.
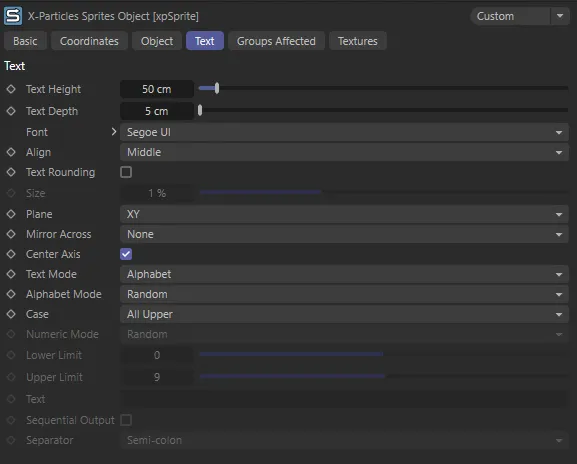
xpSprite Text tab settings menu.
Text Height
Section titled “Text Height”The height of the text in scene units.
Text Depth
Section titled “Text Depth”The depth of the text along the Z-axis in scene units (this corresponds to the Z-component of the Movement setting in an Extrude object).
Set as Segui UI, by default, use this setting to choose the font for the generated text.
Set as Middle, by default, this enables you to left-align, right-align, or centre the text.
Text Rounding
Section titled “Text Rounding”Ticking this box applies a bevel to the generated text.
The size of the bevel can be set in the Size field.
Sets the size of the bevel on a text sprite, expressed as a percentage of the text height.
Generally, the size should be 5% or lower for best results.
Set as XY, by default, this is the plane on which the text is generated.
Mirror Across
Section titled “Mirror Across”Set as None, by default, with this default setting the generated text is readable when viewed along the positive Z-axis.
Depending on the Plane setting and the camera angle, the text may be inverted when you look at it.
If this is the case, you can change its orientation with this drop-down.
It enables you to reorient the text along any axis or combination of axes.
You may have to find the correct one for your purposes by trial and error.
Center Axis
Section titled “Center Axis”If you take a Text spline in Cinema 4D and drop this in an Extrude object, which you then make editable, the axis of the polygon object which results is located at the bottom and front of the object instead of in its center.
This is often perfectly acceptable, but not if you want to emit a trail from the text - in that case you probably want the axis to be centered on the text.
If this setting is enabled, the axis is centered on the text; if unticked, it is left at the default setting.
Text Mode
Section titled “Text Mode”Set as Alphabet, by default.
The other options are: Numbers, Alphabet and Numbers, User Text, User Text and Numbers. and User Text (Phrases).
Alphabet
Section titled “Alphabet”Only letters are displayed.
These are selected from the standard alphabet; the letters selected depend on the Alphabet Mode setting.
Numbers
Section titled “Numbers”Only numbers are displayed.
The numbers generated depend on the Numeric Mode setting.
Alphabet and Numbers
Section titled “Alphabet and Numbers”Letters are displayed followed by numbers, so you can generate strings such as A1, B2, etc. if you need to.
User Text
Section titled “User Text”The text generated is taken from the Text field.
User Text and Numbers
Section titled “User Text and Numbers”The text generated is taken from the Text field and is then followed by a number, determined from the Numeric Mode setting.
User Text (Phrases)
Section titled “User Text (Phrases)”The text consists of a string of words or phrases separated by a character selected from the Separator menu.
The text displayed will be one of the words or phrases from the text.
They will be shown in order if Sequential Output is enabled.
Alphabet Mode
Section titled “Alphabet Mode”Set as Random, by default, this setting is only available in the Alphabet and Alphabet and Numbers modes.
The alternative setting is Sequential.
Random
Section titled “Random”Single letters are selected randomly from A to Z.
Sequential
Section titled “Sequential”Single letters are generated starting with ‘A’, then ‘B’, ‘C, etc. up to ‘Z’.
After that ‘A’ is generated again, and so on.
Set as All Upper, by default.
The other options are: All Lower and Mixed Upper and Lower.
All Upper
Section titled “All Upper”Only upper-case letters are generated.
All Lower
Section titled “All Lower”Only lower-case letters are generated.
Mixed Upper and Lower
Section titled “Mixed Upper and Lower”A random mixture of upper-case and lower-case text and numbers is generated.
Numeric Mode
Section titled “Numeric Mode”Set as Random, by default, this setting is only available in the Numbers, Alphabet and Numbers and User Text and Numbers modes.
The alternative setting is Sequential.
Random
Section titled “Random”Numbers are generated randomly between the values in Lower Limit and Upper Limit inclusively.
Sequential
Section titled “Sequential”Numbers are generated starting with the value in Lower Limit then incrementing by 1 each time until Upper Limit is reached, at which point it reverts to the Lower Limit value again.
Lower Limit
Section titled “Lower Limit”This setting is only available if Text Mode is set to Numbers, Alphabet and Numbers or User Text and Numbers.
It shows the smallest number which will be generated.
Upper Limit
Section titled “Upper Limit”This setting is only available if Text Mode is set to Numbers, Alphabet and Numbers or User Text and Numbers.
It shows the largest number which will be generated.
This setting is only available if Text Mode is set to User Text or User Text and Numbers.
The text in this field will be generated.
No changes are made to the case of the text.
Sequential Output
Section titled “Sequential Output”This setting is only available if Text Mode is set to User Text or User Text and Numbers.
Normally, in these modes each particle will carry the full string of characters from the Text field.
By ticking this box, the xpSprite object will generate one character from the string in the Text field, in sequence.
When the end of the string is reached, the sequence will start again from the beginning.
If Text Mode is set to User Text and Numbers, each character from the string in the Text field will have a number appended to it.
The number will either be chosen at random or in sequence, depending on the chosen option in Numeric Mode.
If Text Mode is set to User Text (Phrases) and this box is ticked, each phrase will be chosen in sequence.
Otherwise the phrase is chosen at random.
Separator
Section titled “Separator”Only used if Text Mode is set to User Text (Phrases).
It defines the character used to separate the individual phrases.
The choices are: Semi-colon, Pipe, Comma, Slash and Space
Rubble settings
Section titled “Rubble settings”If you choose Rubble as the sprite type, the interface changes to give the following parameters.
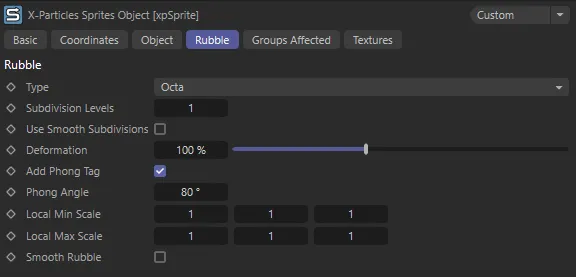
xpSprite Rubble tab settings menu.
Set as Octa, by default, this drop-down lets you select the shape of the rubble object.
The rubble is created from a Platonic primitive and the options in this drop-down are identical to the Type drop-down in the Platonic object.
There is one addition - Random which selects randomly from the available types.
Subdivision Levels
Section titled “Subdivision Levels”The sprite object can subdivide the basic object to give more polygons.
This is important when deforming the object (see Deformation, below).
The default value is 1, but higher values may give better results.
As more polygons are generated, the editor playback may be slower.
A value of 2 is a good compromise.
A value of 0 (zero) means no subdivision will occur.
Use Smooth Subdivisions
Section titled “Use Smooth Subdivisions”If this setting is enabled, the subdividing process will use smooth subdivisions.
This gives a smoother object but it becomes more spherical in shape, which may not be desirable.
Deformation
Section titled “Deformation”This slider will deform the object randomly along polygon normals.
The greater the value, the more the deformation.
Add Phong Tag
Section titled “Add Phong Tag”If this is enabled, a phong tag is added to the object; the angle can be adjusted in the Phong Angle setting.
Adding a phong tag will give a smoother object, which may or may not be what you want.
Phong Angle
Section titled “Phong Angle”The phong angle to use if a phong tag is added.
Local Min Scale, Local Max Scale
Section titled “Local Min Scale, Local Max Scale”These settings allow you to set the minimum and maximum scale of each object.
They are applied in addition to any scale set by the sprite object.
So, for example, if the particle scale is 2 and the local scale in the rubble setting is also 2, the final scale value is 4.
In general, it is recommended that you keep the particle scale to 1 and use the local scale settings to determine the size of the rubble.
The actual scale used is a random value between the minimum and maximum settings.
Smooth Rubble
Section titled “Smooth Rubble”If this setting is enabled, the object is further subdivided one more time using smooth subdivision.
These settings are independent of one another, but the initial subdivision is carried out before the object is deformed and the Smooth Rubble subdivision takes place after deformation.
As a result, they produce distinctly different effects.
You can use them together in any combination.
Groups Affected tab
Section titled “Groups Affected tab”Groups
Section titled “Groups”To specify the group, drag and drop the desired Group object into this field.
This setting is useful if you want to ensure that the spawned particles are, or are not, affected by xpSprite.
Textures tab
Section titled “Textures tab”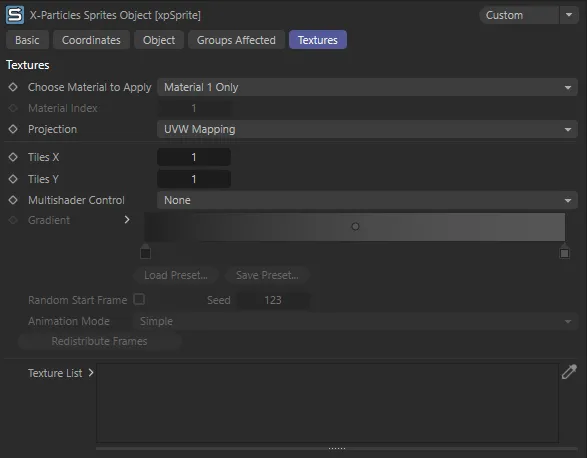
xpSprite Textures tab settings.
This tab enables you to apply textures to the sprites.
The textures can be any Cinema 4D channel shader or bitmap.
Choose Material to Apply
Section titled “Choose Material to Apply”Set as Material 1 Only, by default, this drop-down menu lets you choose which material is applied to the sprites.
The alternative settings are: Random Selection and Select by Index.
Material 1 Only
Section titled “Material 1 Only”The first material in the Texture List box is used.
If there is no material in that list, no textures will be applied to the sprite.
Random Selection
Section titled “Random Selection”For each particle, the xpSprite object will choose at random a material from all those in the Texture List box.
Select by Index
Section titled “Select by Index”You can select which material is used from the list, where the first material has index 1, the second material index 2, and so on.
It is up to you to make sure that there is a material corresponding to the index you entered.
If you enter ‘3’ and the list has no third material, no material will be applied to the sprites.
Material Index
Section titled “Material Index”The index of the material to use if Choose Material to Apply is set to Select by Index.
The index is the position of the material in the Texture List box.
Projection
Section titled “Projection”Set as UVW Mapping, by default, these are the texture mapping modes, as in a standard Cinema 4D texture tag.
Please refer to the Cinema 4D documentation for details.
Tiles X, Tiles Y
Section titled “Tiles X, Tiles Y”The tiling values, as in a standard Cinema 4D texture tag.
Multishader Control
Section titled “Multishader Control”Set as None, by default, this drop-down menu lets you use the MoGraph Multishader to texture the generated sprites.
The alternative settings are: Greyscale, Color and Use Gradient.
To use this option, you must apply a material to the xpSprite object which has a Multishader in the Color channel.
The Multishader is not used.
Greyscale
Section titled “Greyscale”Each sprite is assigned a random greyscale value.
This is then used to select the shader to use from the shaders in the Multishader.
Similar to Greyscale, each sprite is assigned a random RGB value and this is used to select from the list of shaders.
This will give different results to Greyscale, especially when using the Color Red (or Green or Blue) modes in the Multishader.
Gradient
Section titled “Gradient”The gradient used when Multishader Control is set to Use Gradient.
Random Start Frame
Section titled “Random Start Frame”This parameter is used when you have an animated texture and you don’t want to start texture playback at the same frame for each individual sprite.
Tick the box to enable this feature.
The random seed for calculating random start frames in animated textures.
You can change this seed if you don’t like the initial results of the random selection.
Animation Mode
Section titled “Animation Mode”Set as Simple, by default, these are used for animated textures, setting each frame in the animation to use the selected animation mode.
The alternative options are: Loop and Ping-Pong.
They are the same as in Cinema 4D’s bitmap shader; please see the Cinema 4D documentation for details.
Selecting an option here means that you don’t have to go through each individual frame, selecting the required option in each one, the xpSprite object will do it for you.
Redistribute Frames
Section titled “Redistribute Frames”Normally, the random frames are reassigned when you rewind the scene to the starting frame.
However, if you need to do that at some other point, you can click this button.
Texture List
Section titled “Texture List”The list of possible materials to apply to the sprites.
Copyright © 2026 INSYDIUM LTD. All rights reserved.