Leaves
Overview Video
Section titled “Overview Video”This tab allows you to negotiate different settings for leaves and how to generate and shape them.
Use Leaves
Section titled “Use Leaves”Simply click in the box to enable, revealing the polygon leaves in your scene.
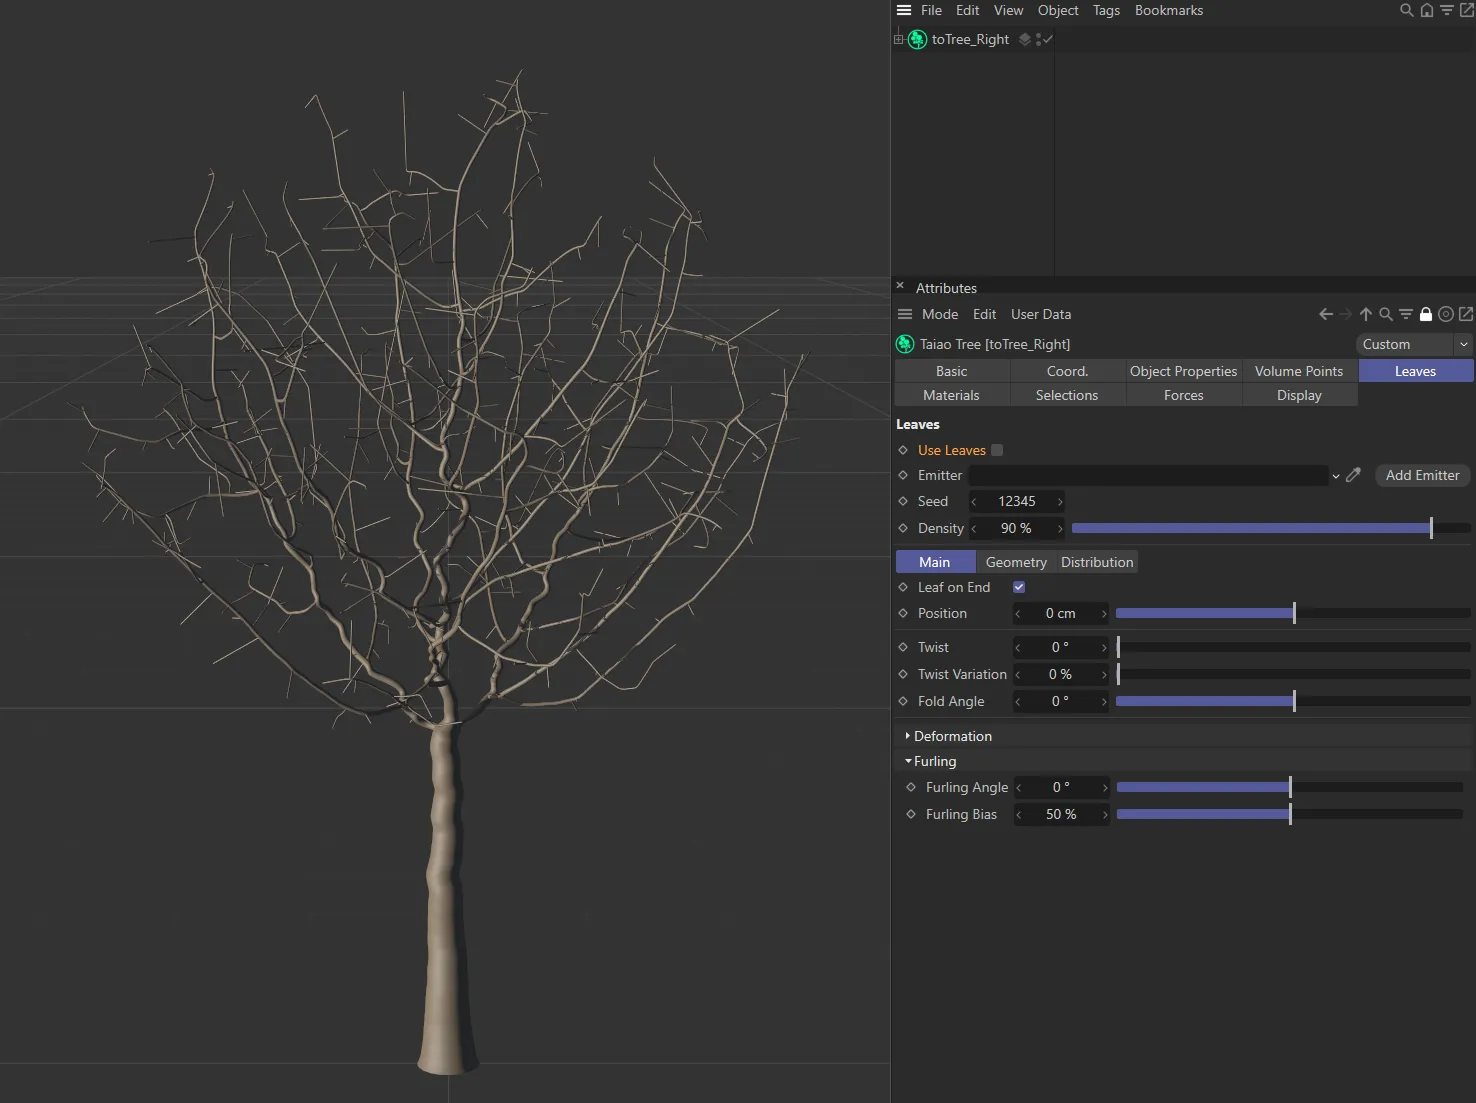
Tree before Use Leaves is enabled.
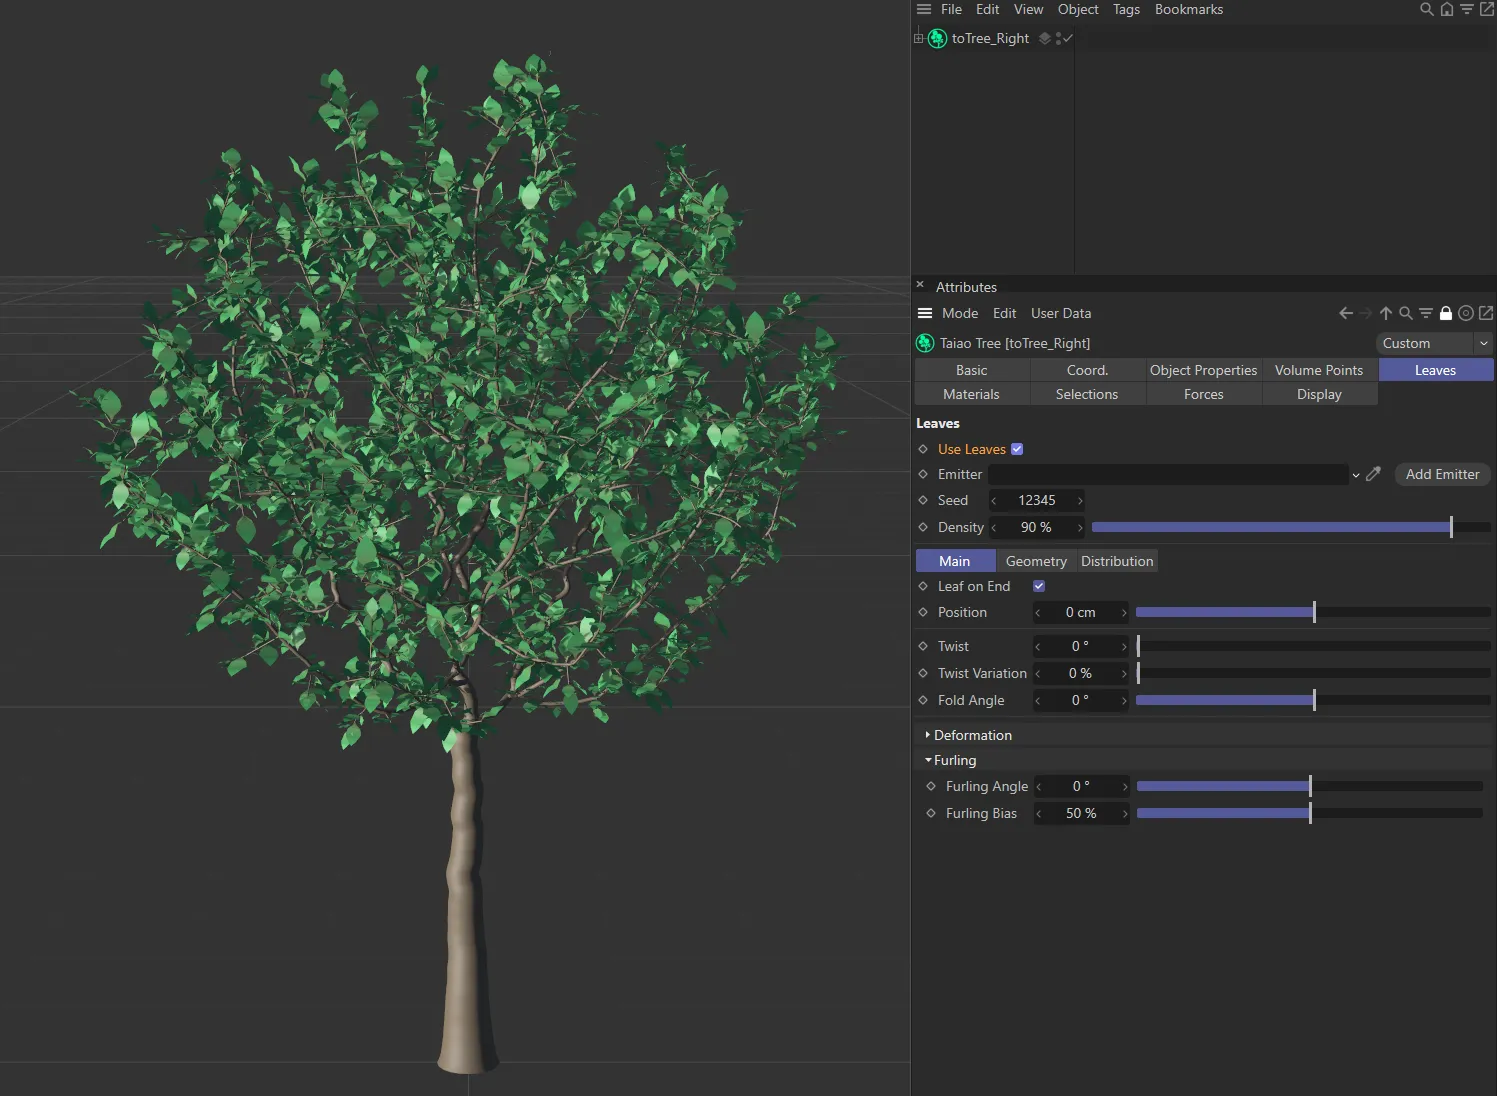
Use Leaves enabled.
Emitter
Section titled “Emitter”Activate this, to use particles for your leaves, by either dragging an xpEmitter into the link field or by clicking on Add Emitter.
You can then access the settings in the xpEmitter itself.
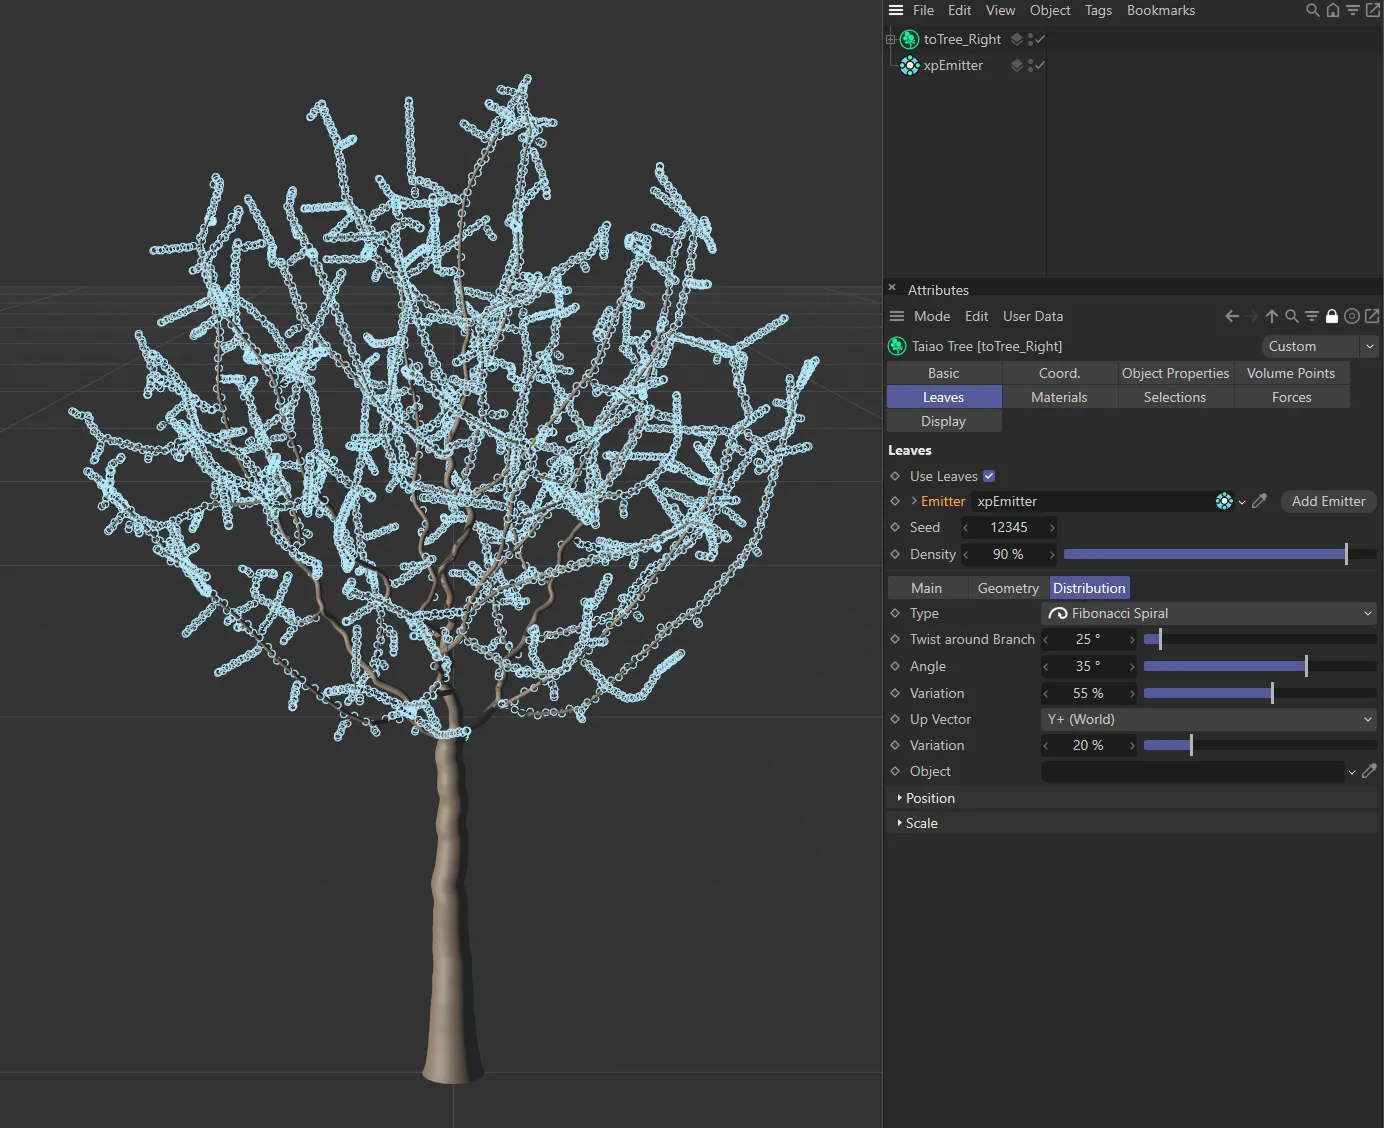
xpEmitter added, with the resulting particles on the tree.
Video to demonstrate an animation created using xpEmitter.
Changing the Seed value will give you different variations and deformations, driven by any turbulence noise settings that you select.
Density
Section titled “Density”You can increase the Density setting to get more leaves or reduce it to get less.
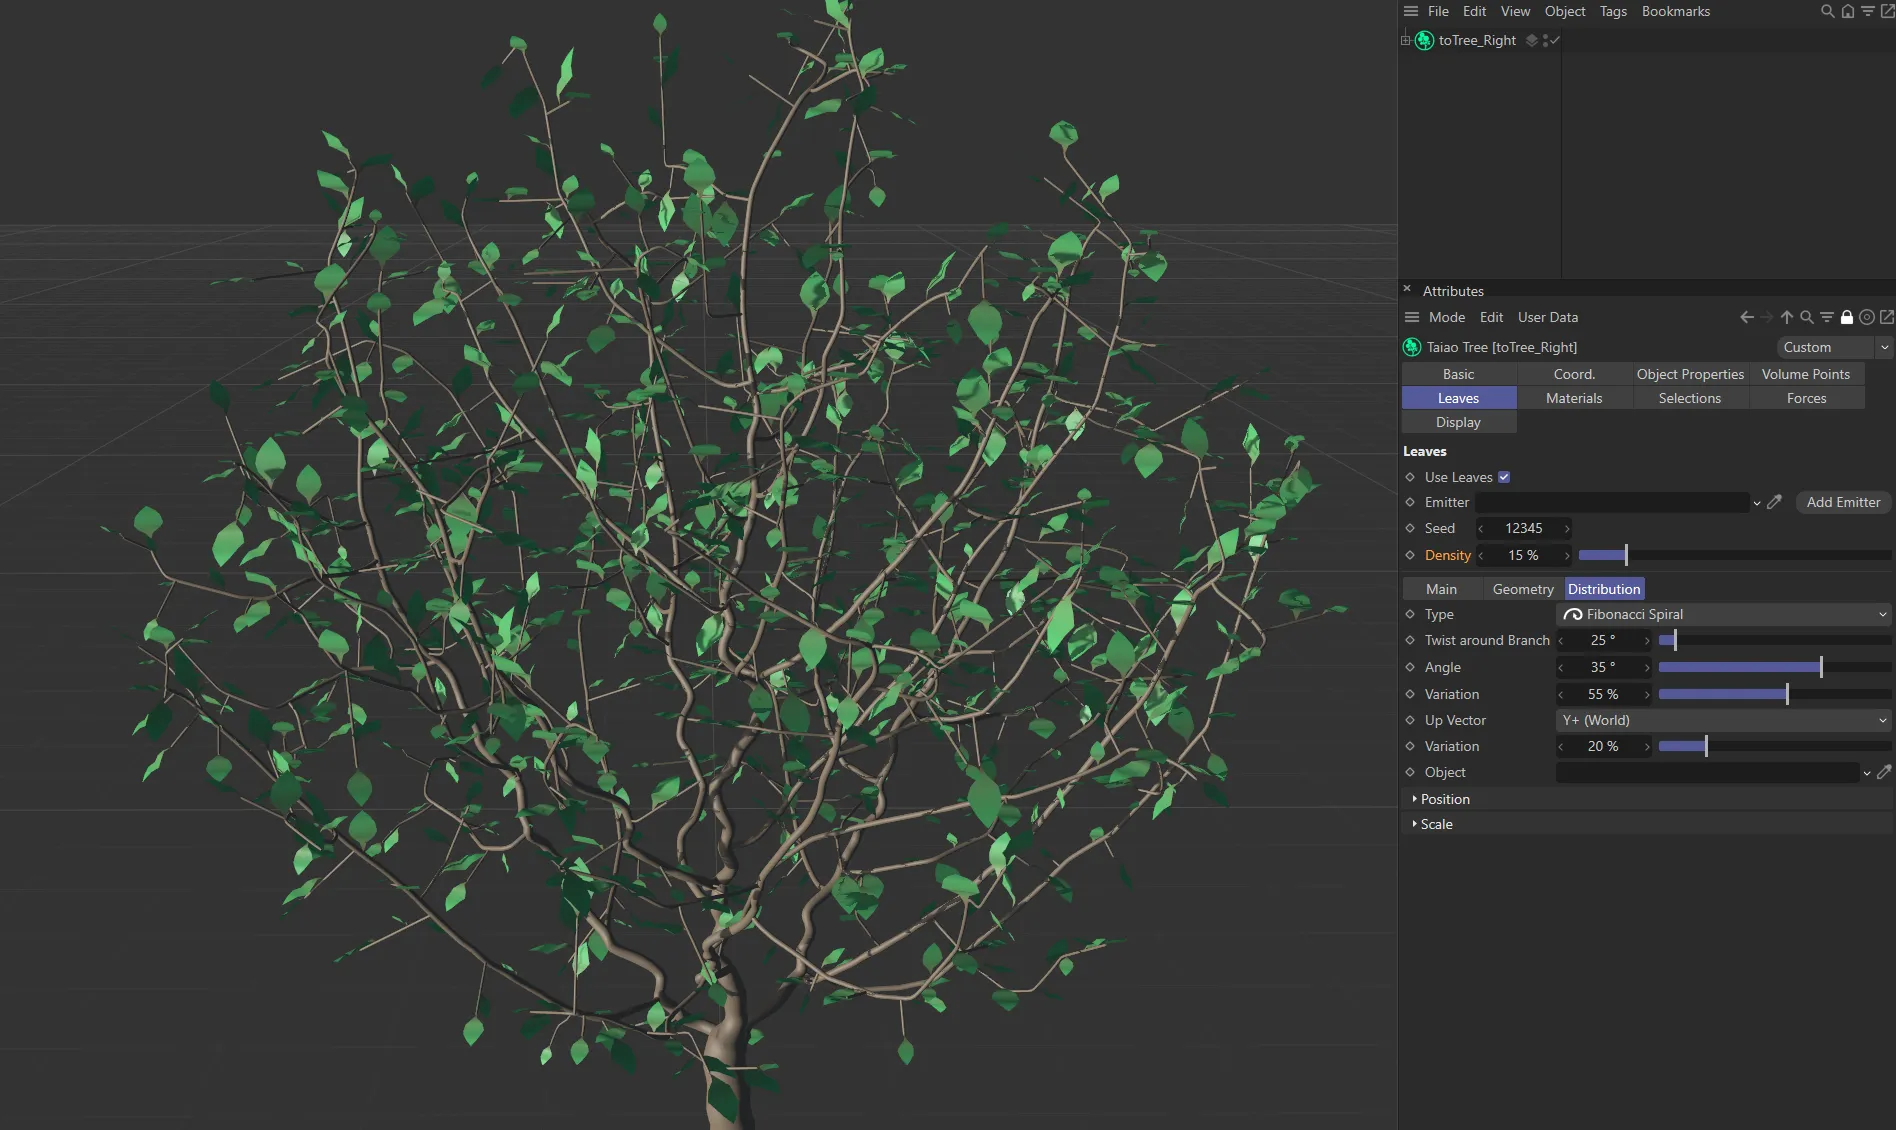
Density set at 15%.
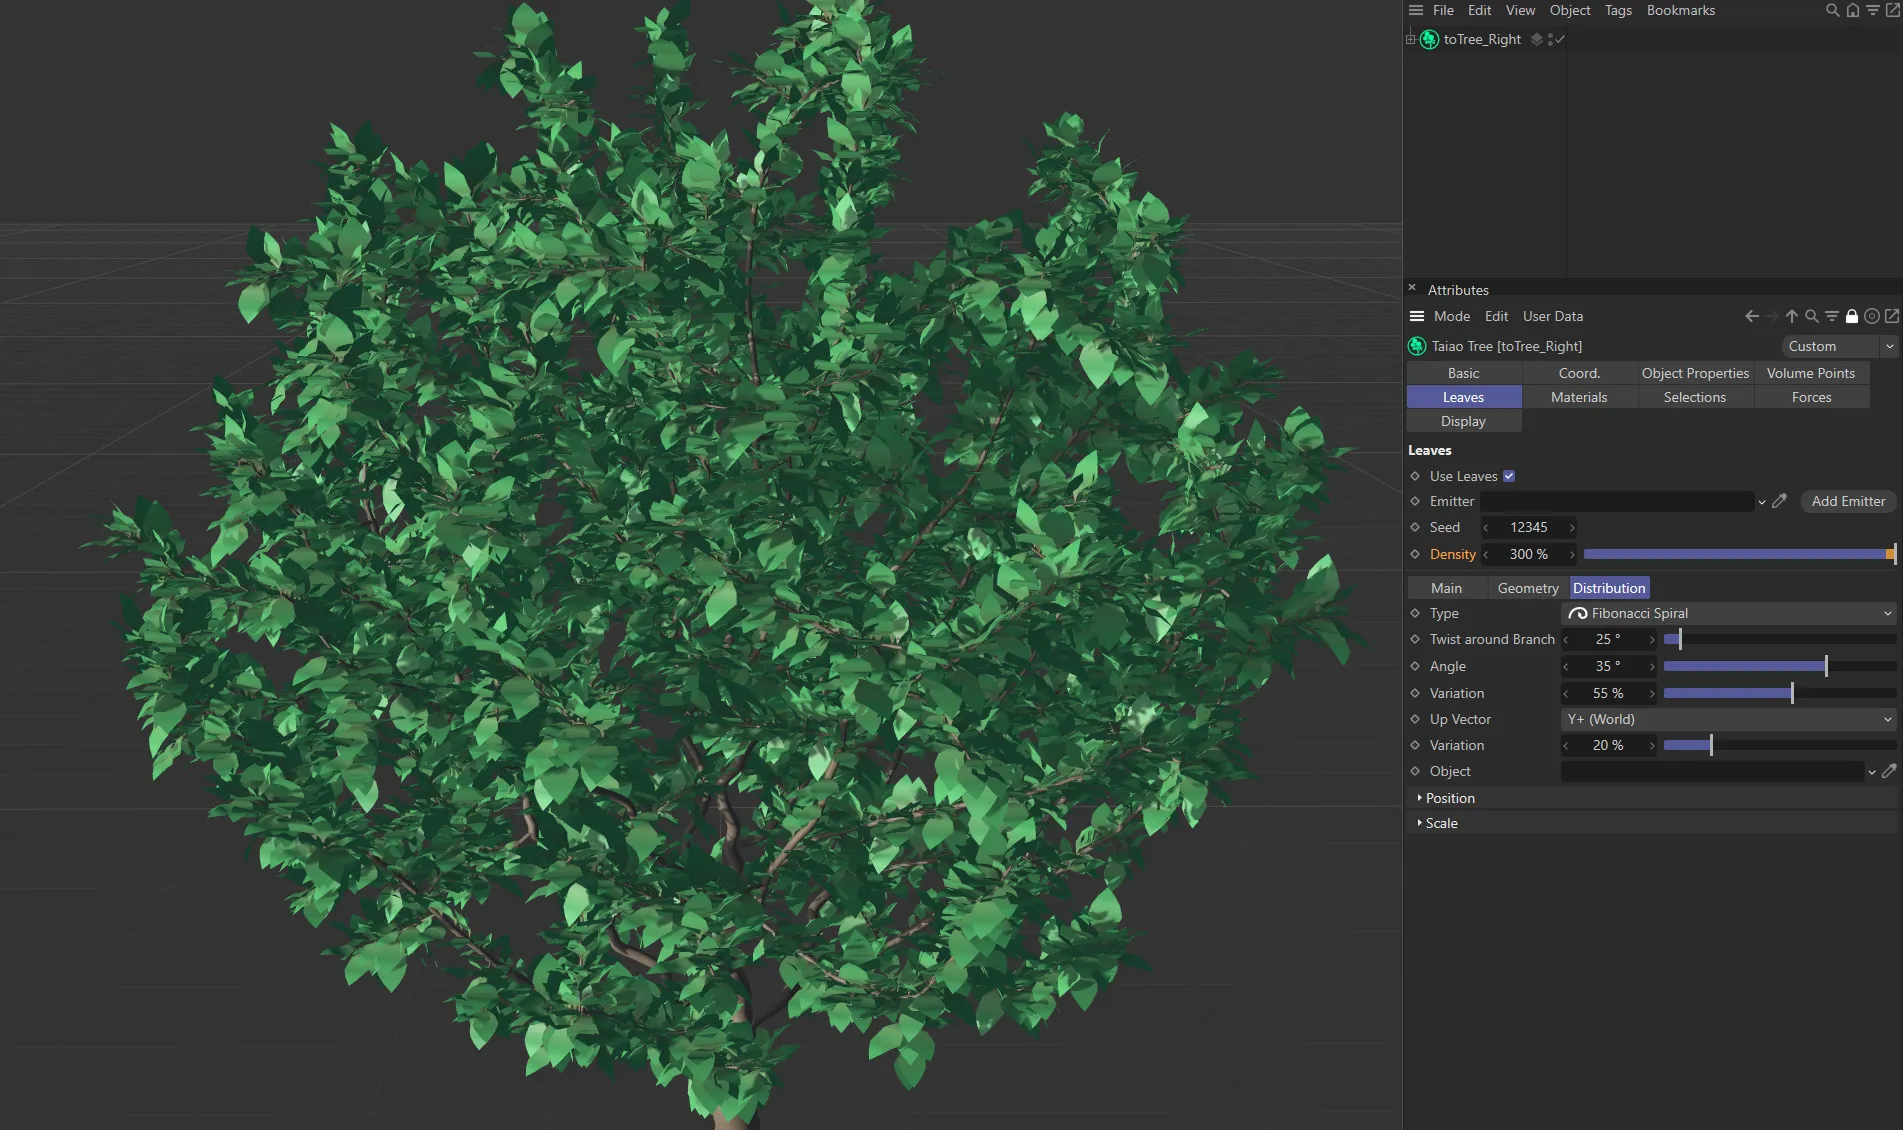
Density value raised to 300%.
Main tab
Section titled “Main tab”Leaf on End
Section titled “Leaf on End”As a default, this setting puts a leaf on the end of each branch, but it can be switched off.
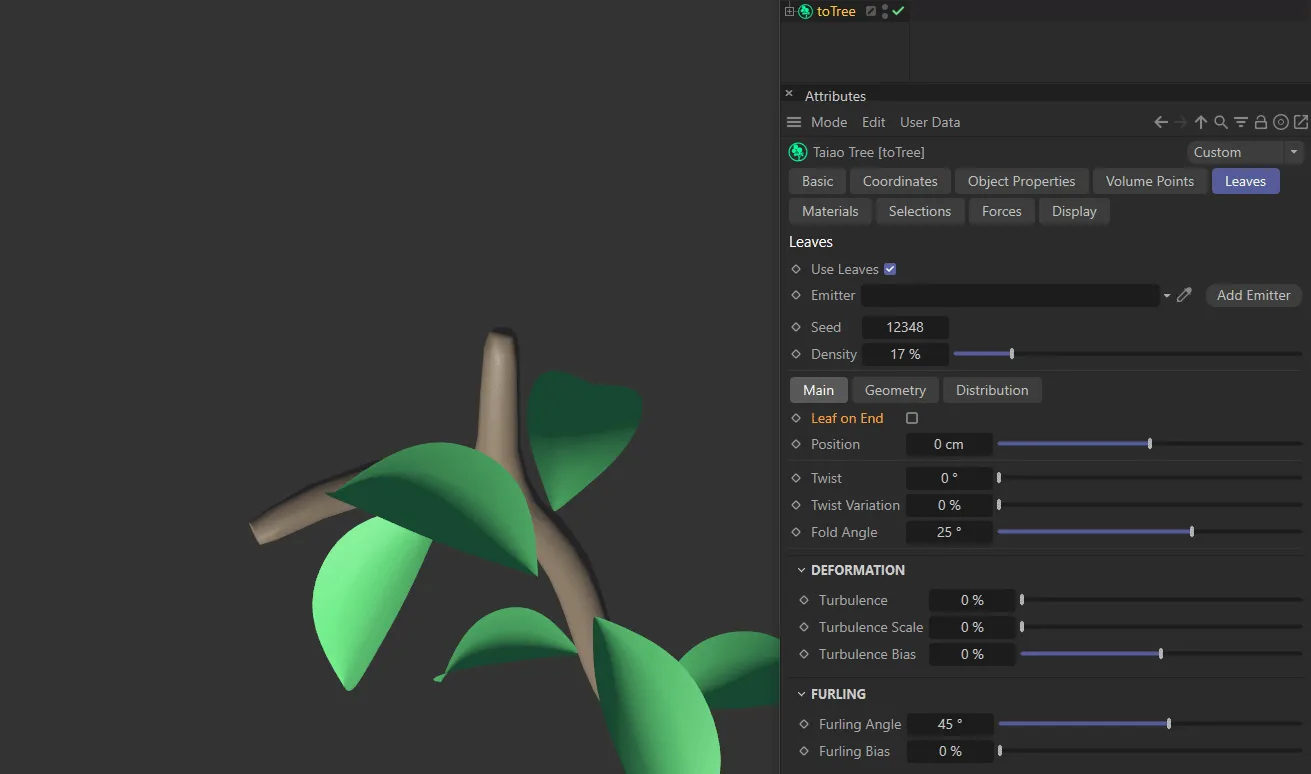
Leaf on End disabled.
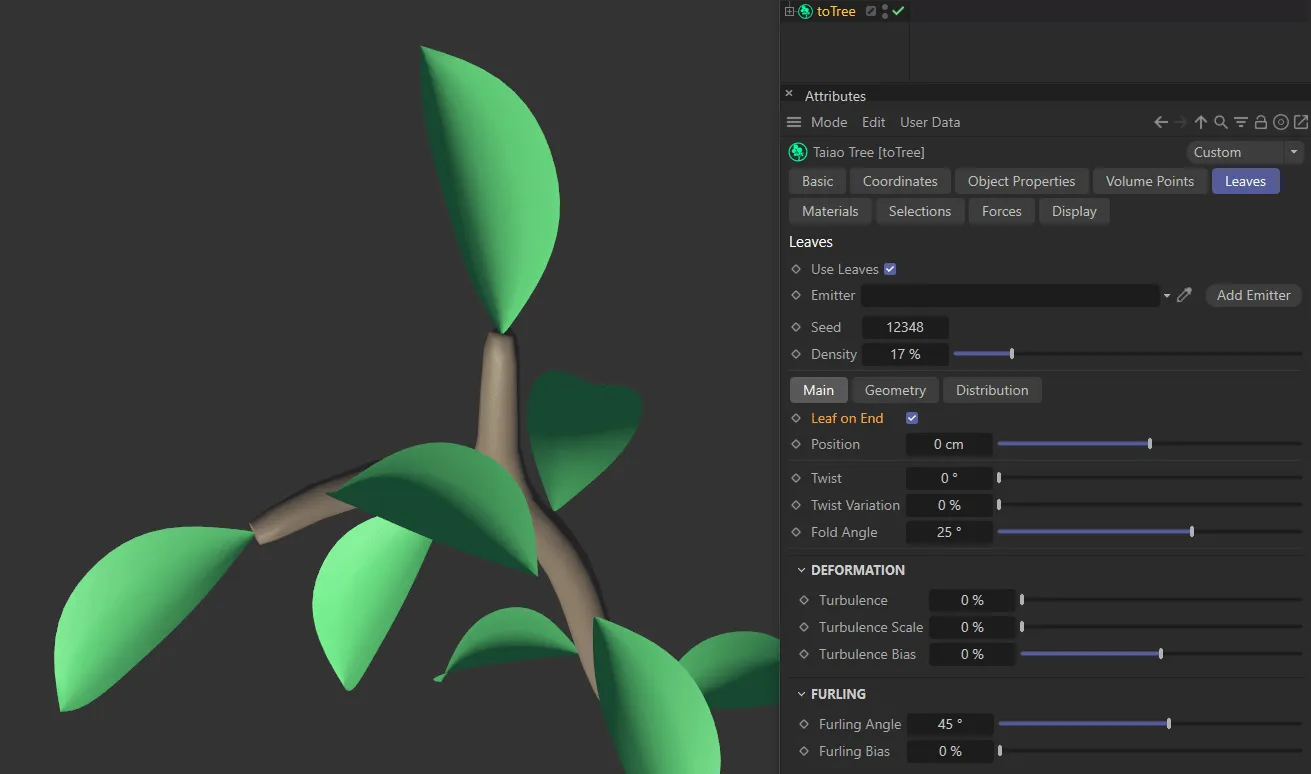
Leaf on End enabled.
Position
Section titled “Position”You can offset the leaves away from the branch or closer to it.
Leaves can be twisted, using the slider, or a value can be manually input.
Animation demonstrating the Twist slider.
Twist Variation
Section titled “Twist Variation”This will add a variation to the individual patterns of twisting across the leaves to get a more organic look.
Animation to show the effect of the Twist Variation slider.
Fold Angle
Section titled “Fold Angle”Leaves can be folded either in or out using this slider.
Animation to illustrate the use of the Fold Angle slider.
Deformation
Section titled “Deformation”These settings will deform your leaves.
Deformation is only visible if the object, that you are attempting to deform, has sufficient polygon resolution.
Turbulence
Section titled “Turbulence”You can increase this, with the slider, to 100%, but you may need to manually input a figure to see turbulence in objects with a low-polygon count.
Turbulence Scale
Section titled “Turbulence Scale”Using this, increases the level of the Turbulence setting, in order to distort the object.
Turbulence Bias
Section titled “Turbulence Bias”At the default of zero, this is affecting the whole leaf.
Moving the slider to the left (in a negative setting) will distort the branch end of the leaf more and moving it to the right will have the opposite effect.
Furling
Section titled “Furling”This will curl the leaves.
The detail of the furling will depend on the resolution of your geometry.
Furling Angle
Section titled “Furling Angle”The angle can be positive or negative, depending on the direction you wish to furl the leaves.

The leaves in this image have a Furling Angle of 90 degrees. You can see that, from the tip to the branch, the leaf changes direction by 90 degrees.
Furling Bias
Section titled “Furling Bias”Again, this will dictate where the furling will begin.
At 50%, the furling is starting halfway along the length of the leaf.
If you decrease this, it will start furling from the beginning of the leaf and increasing it will only furl at the tip of the leaves.
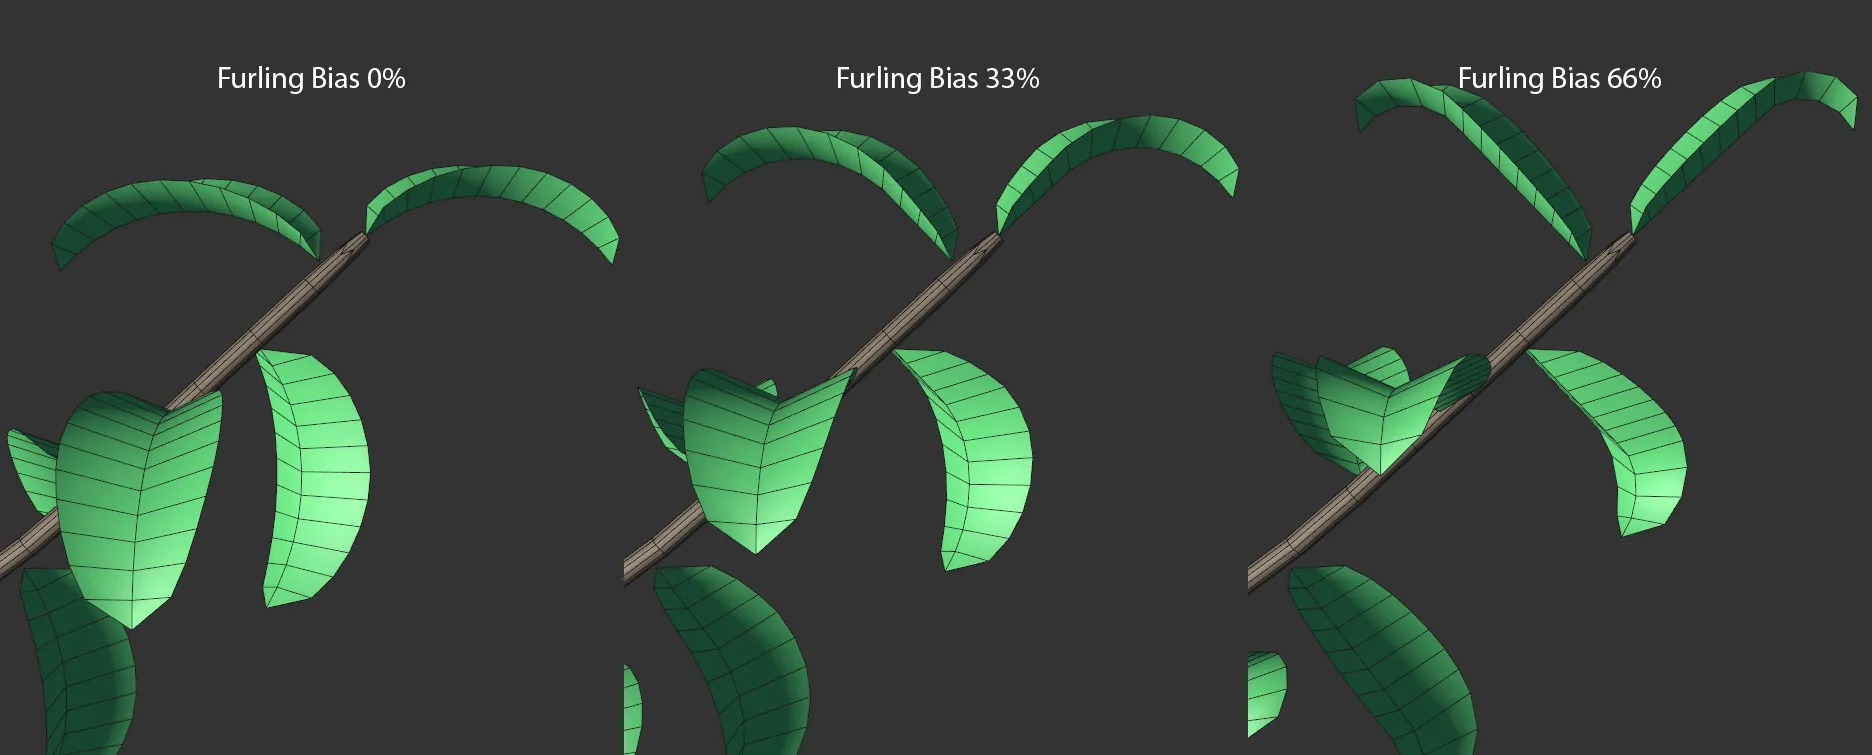
Image to show Furling Bias settings of 0 (zero) %, 33% and 66% respectively, available in the Distribution tab.
Geometry tab
Section titled “Geometry tab”This slider will increase the global size of the leaves, across the whole plant.
Size Variation
Section titled “Size Variation”Use this to add a variety of size, to make things look more organic and realistic.
Globally adjusts the width of the leaves.
Length
Section titled “Length”Adjusts the length of the leaves, again globally.
Width Segments
Section titled “Width Segments”You can also increase the polygon resolution of your leaf by adding segments in its width.
As well as offering more deformation detail, an increase in polygons can help with the shaping options in the next section.
Length Segments
Section titled “Length Segments”You can increase the polygon resolution of your leaf by adding segments in its length.
Leaf Shape
Section titled “Leaf Shape”Subdivisions
Section titled “Subdivisions”You can add subdivisions to further increase the polygon count and to smoothen edges.
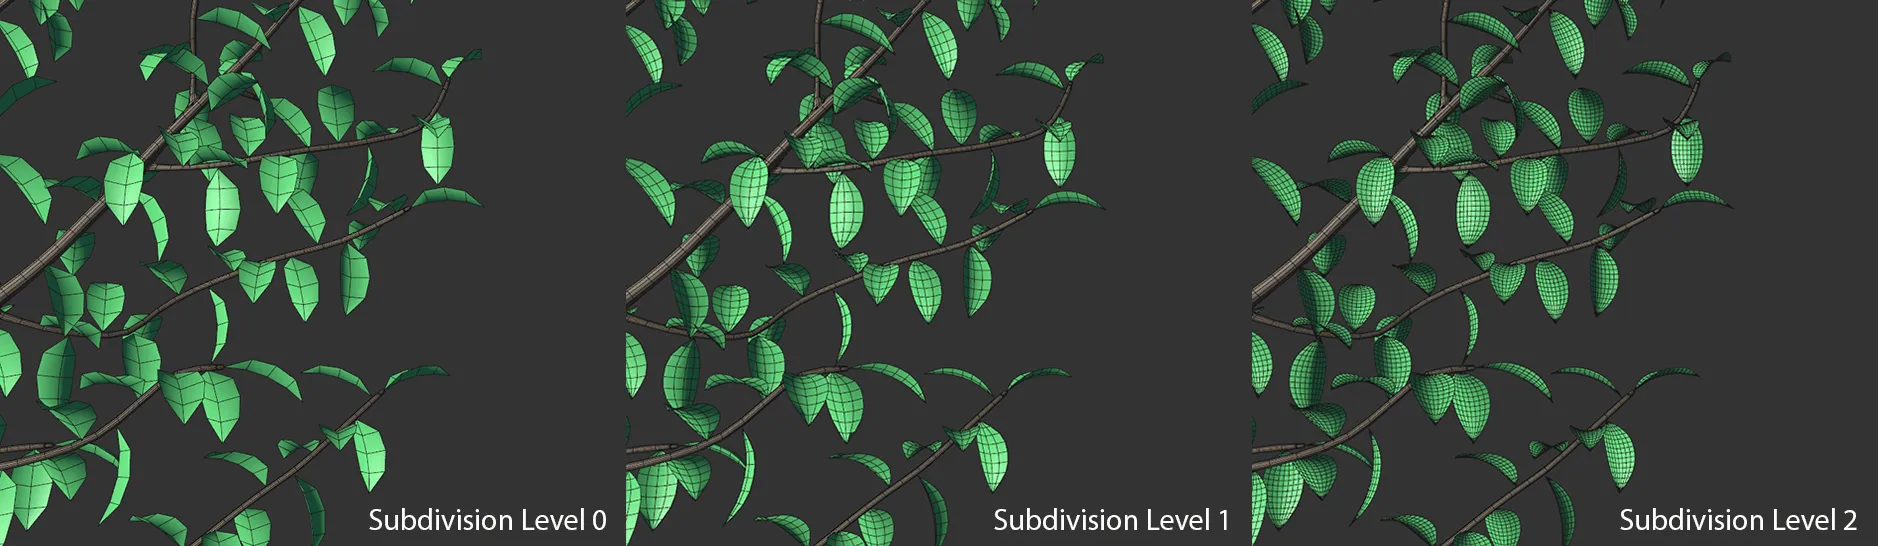
Image to show leaves with Subdivisions set at level 0 (zero), then 1 and, finally, 2.
Thickness
Section titled “Thickness”By default, the leaves are flat; with this setting, you can make them thicker, giving them a more natural depth.
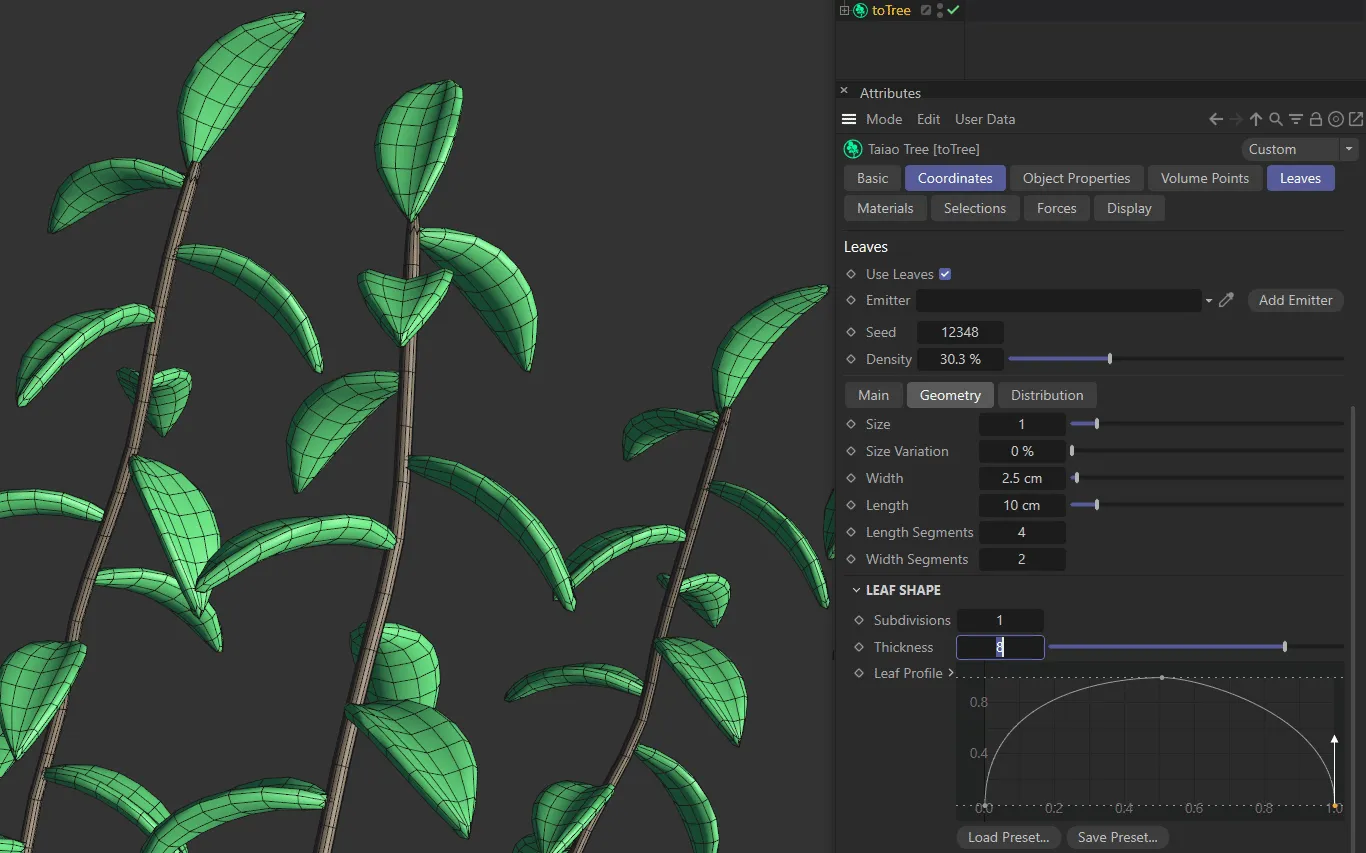
Leaves with a Thickness setting of 8.
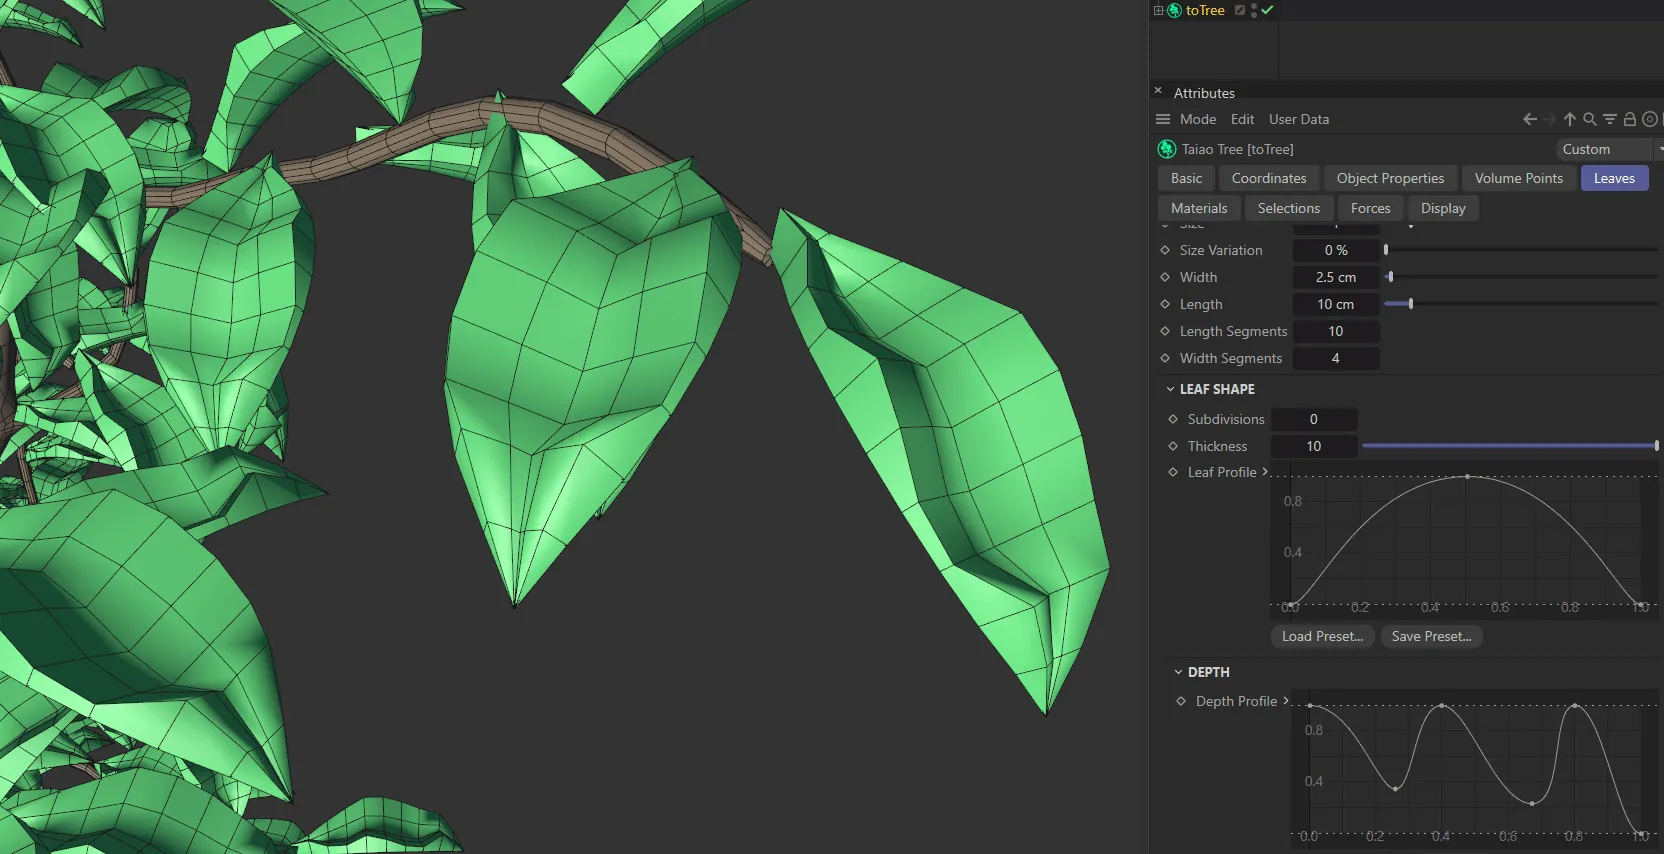
Leaf Profile
Section titled “Leaf Profile”There are many ways to manipulate this, in order to shape the leaves to suit your particular need.
Adding a knot in the spline (using CTRL) and pulling down the ends, will pull in both ends of the leaves, as seen below.
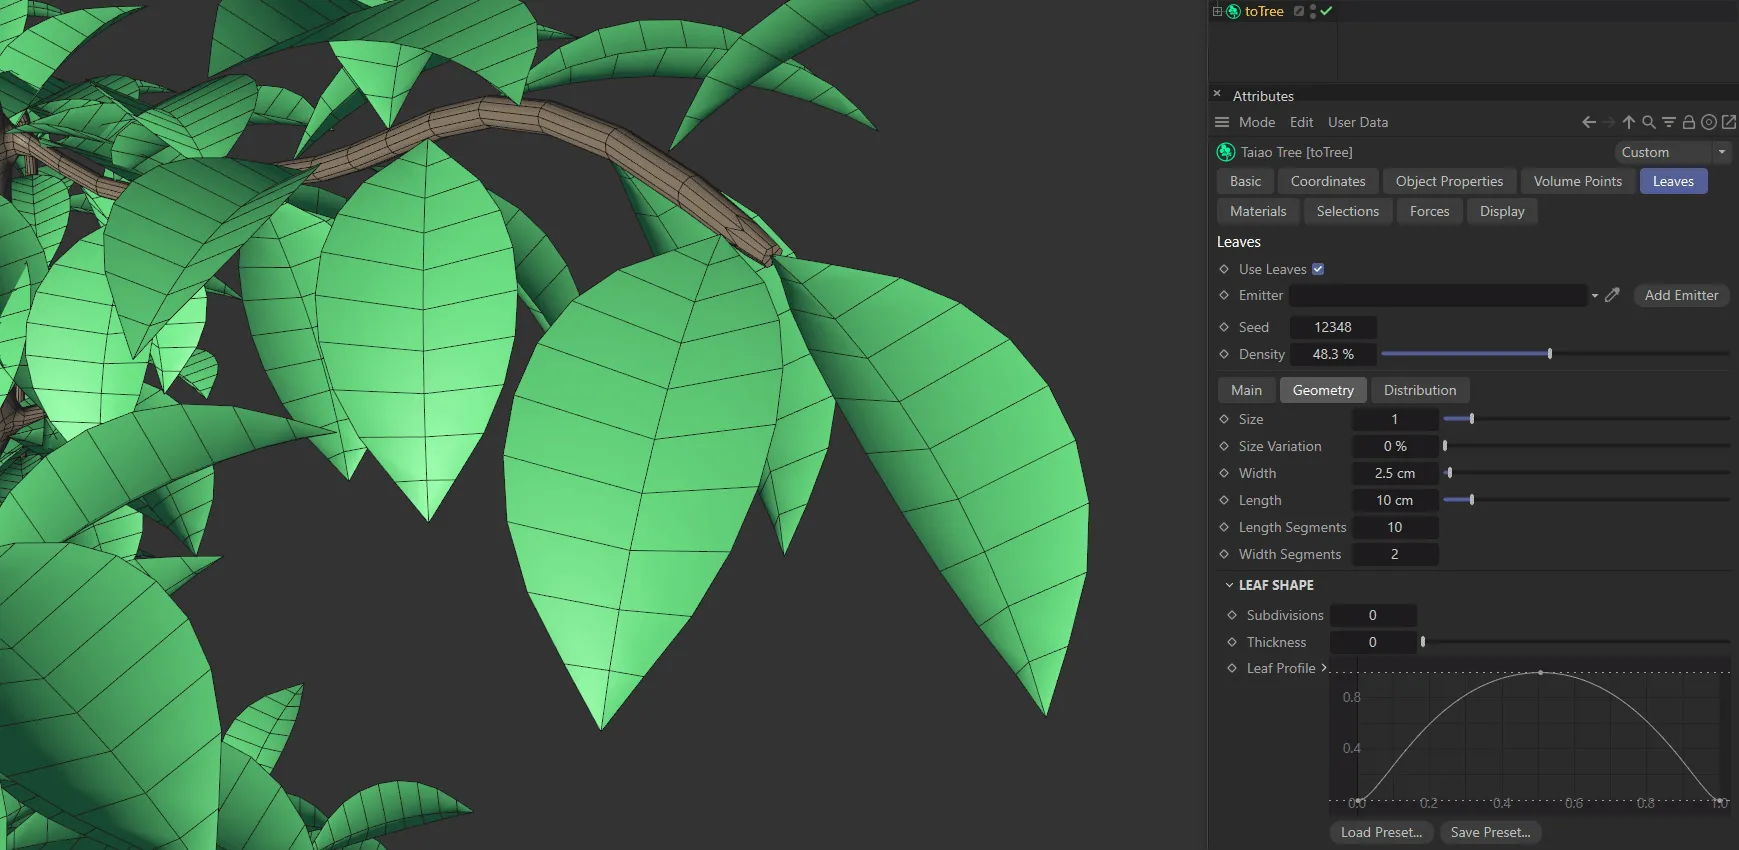
Leaf Profile spline curve, driving the leaf shapes.
And, as you can see below, adding several knots can create some interesting shapes.
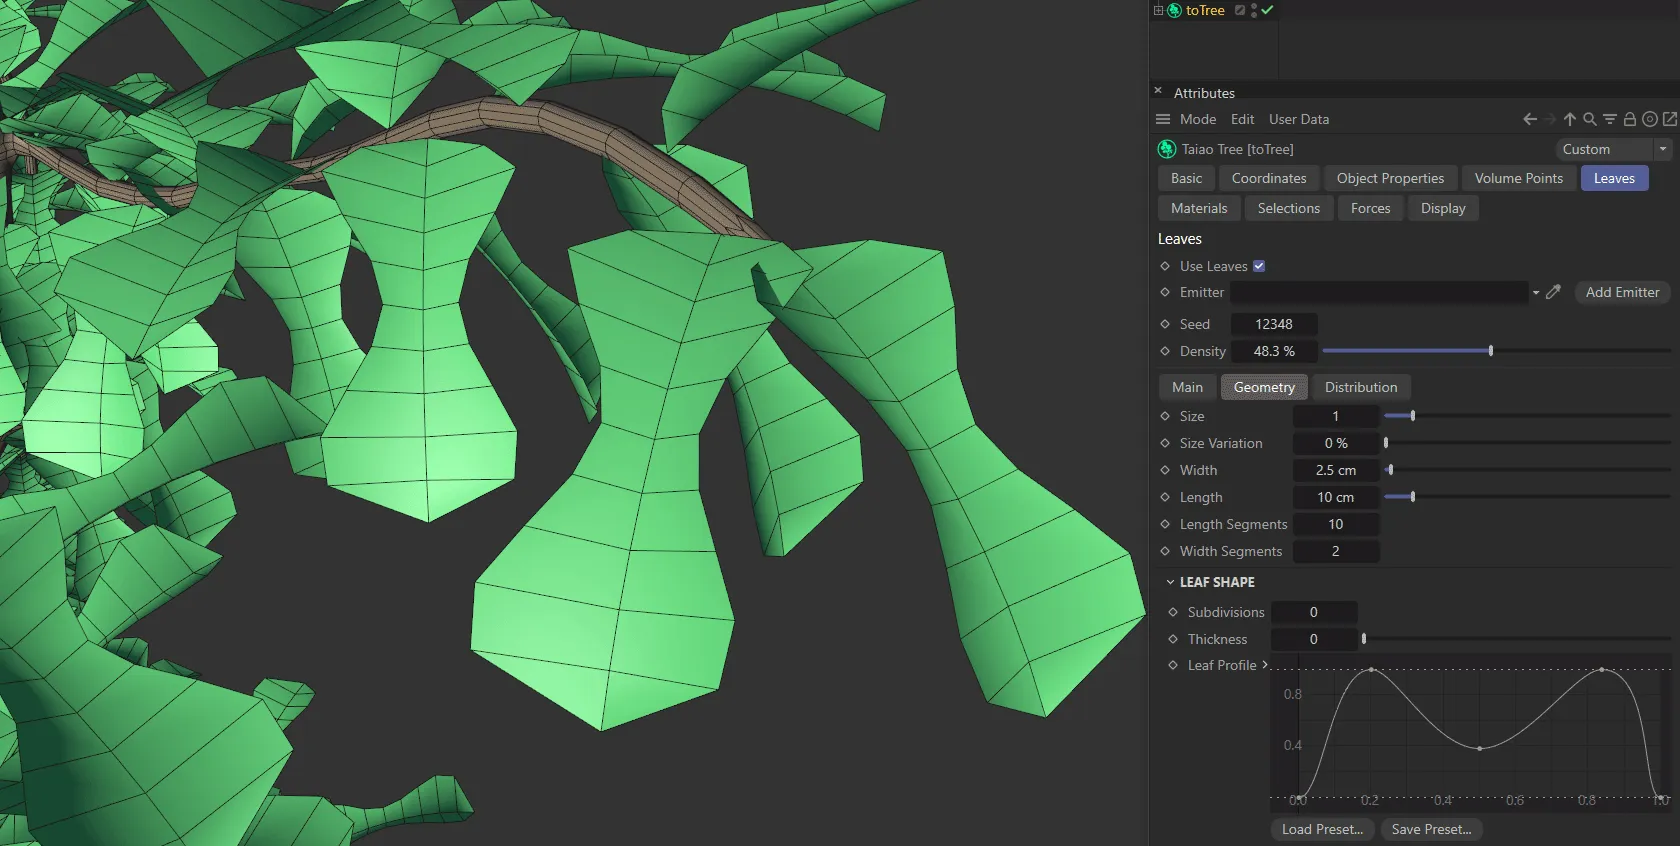
The Leaf Profile setting in the two images above are driven by the corresponding spline curves.
It is also possible to work further with the Depth settings, that are folded up, within the Leaf Shape section.
Depth Profile
Section titled “Depth Profile”Similar to the Leaf Profile parameter, above, you can shape the depth of the leaves and add knots in the same way to give you additional options.
Depth Profile setting driven by the spline curve in the bottom right of the image.
Deform
Section titled “Deform”You also have the ability to further deform your leaves, but you may need additional geometry in your leaf to take full advantage of these options.
Deform Shape
Section titled “Deform Shape”Manipulate the spline curve to give you the shape you need; you will need to set the Strength setting, below, for this shaping to be possible.
Strength
Section titled “Strength”Increase this slider to enable the deform shaping to take place to the level you require.
As usual, if you wish to go beyond 100%, you can manually input the value, to give you greater deformation.
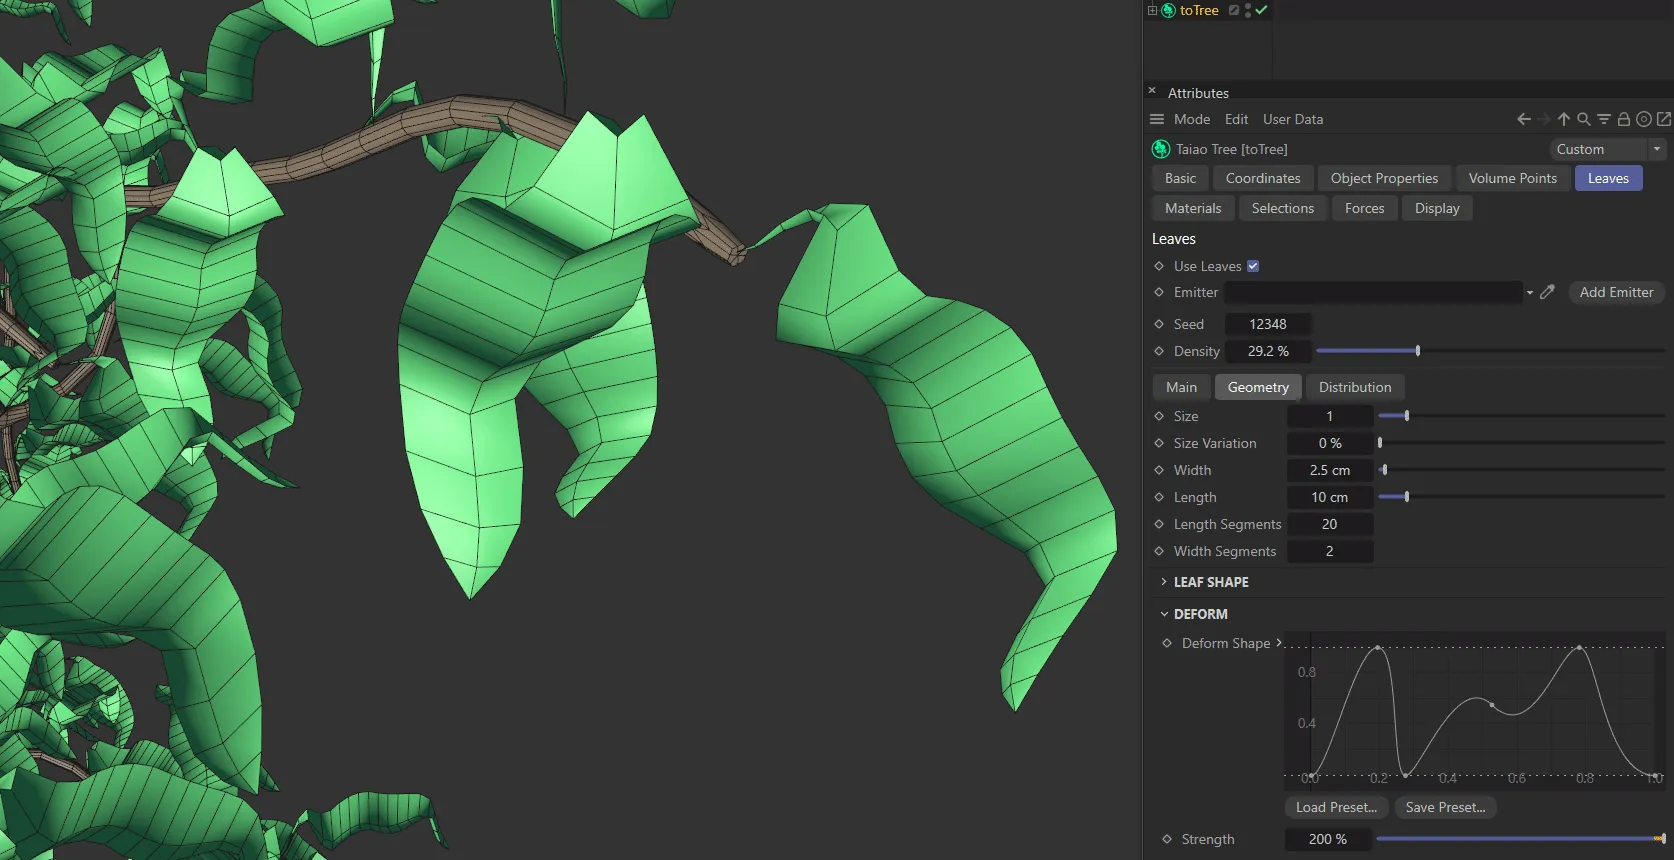
Leaves deformed according to the Deform Shape spline curve and the Strength setting of 100%.
Custom Leaf Object
Section titled “Custom Leaf Object”You are also able to add a custom leaf if you have something specific that you are looking for in your scene.
Custom Leaf Object
Section titled “Custom Leaf Object”Simply drag and drop your object into the Custom Leaf Object field.
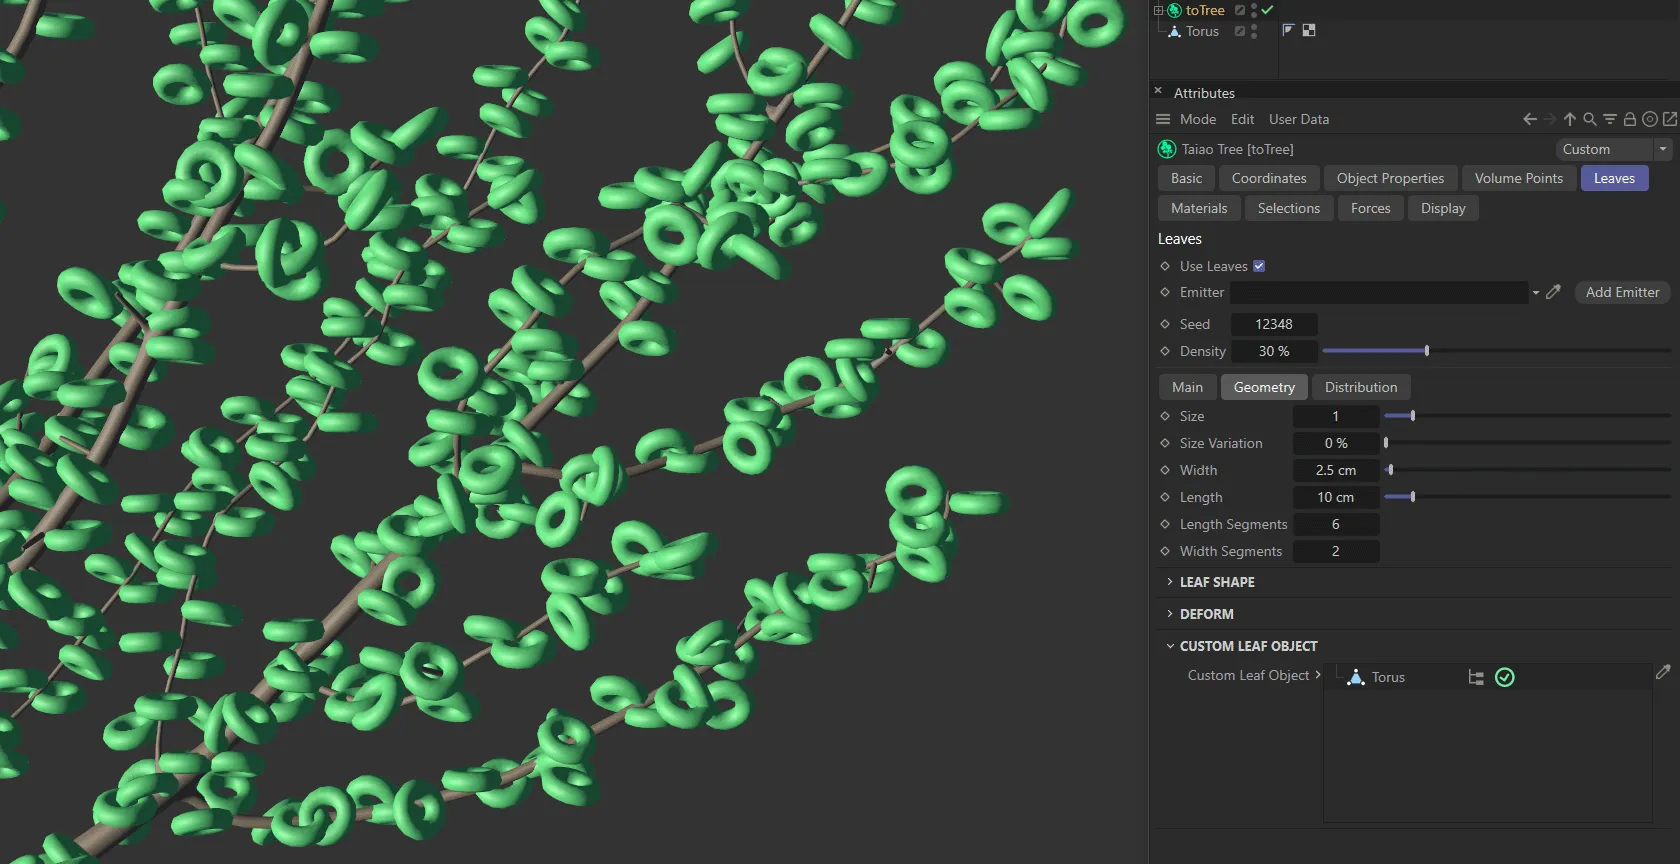
Torus object dropped into the Custom Leaf Object field.
Distribution tab
Section titled “Distribution tab”Depending on the distribution Type that you select here, you may need to re-visit your settings, to ensure an accurate and even distribution pattern.
There are seven types of distribution patterns: Random, Alternate, Distichous, Fibonacci Spiral, Decussate, Tricussate and Lobed.
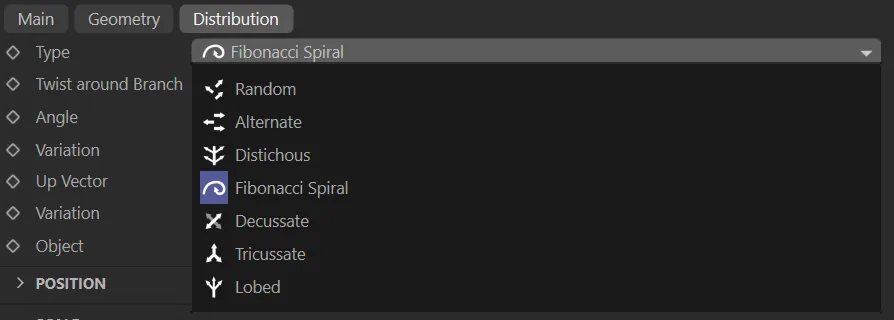
Image to show the seven Type settings available in the Distribution tab menu.
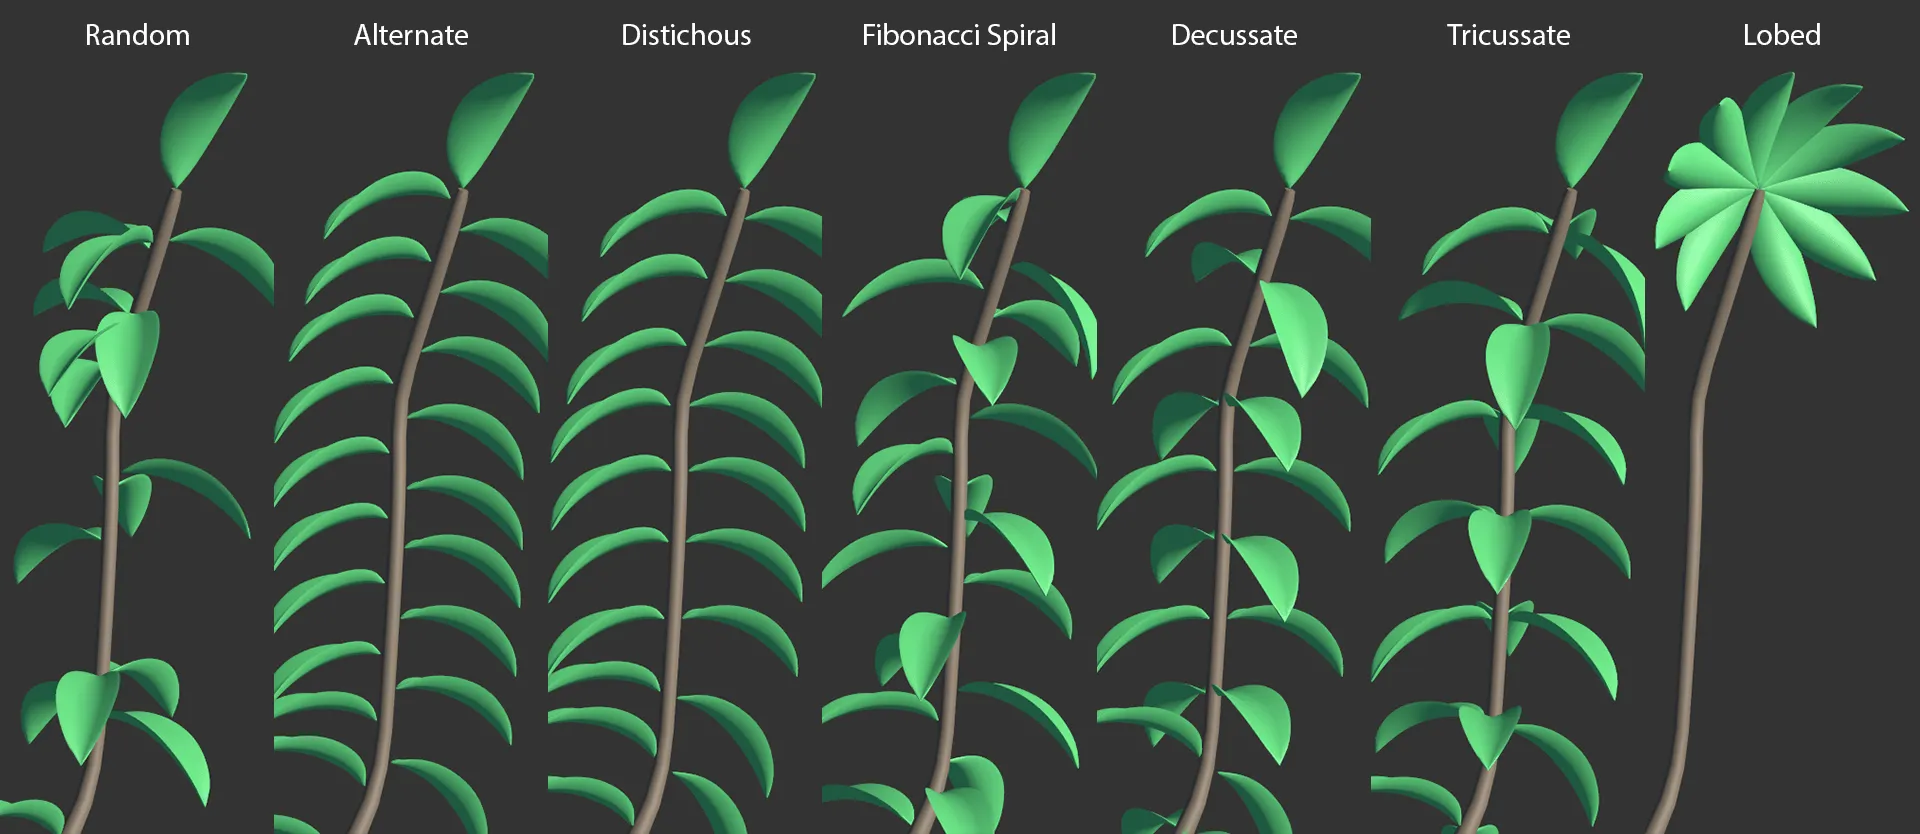
Image to show the seven Type settings available in the Distribution tab.
Random
Section titled “Random”By altering the Seed value in the Main tab, it is possible to change these random looks.
Alternate
Section titled “Alternate”This will give you alternating rows of leaves down your branch.
Distichous
Section titled “Distichous”Similar to Alternate, above, except that the rows are in a line, with leaves running in parallel.
Selecting Distichous (as with Decussate, Tricussate and Lobed) will present you with the Count parameter.
By default, this is set at 2 and determines how many leaves are in each layer.
Fibonacci Spiral
Section titled “Fibonacci Spiral”Set as the default, the leaves are being distributed in the natural Fibonacci spiral, along the length of the branch.
Decussate
Section titled “Decussate”With the Count set at 2, this will have groups of two leaves that alternate, as in the image below.
Tricussate
Section titled “Tricussate”Similar to the Decussate type, except with alternating groups of 3 leaves.
This Type setting works differently from the others, with the leaves all emanating from the same point, at the end of the branch, requiring an Angle setting in order to all be visible.
Twist Around Branch
Section titled “Twist Around Branch”This slider will twist your leaf pattern, at a set degree, around your branch.
Increase or decrease this slider, to angle the leaves either forward or backward.
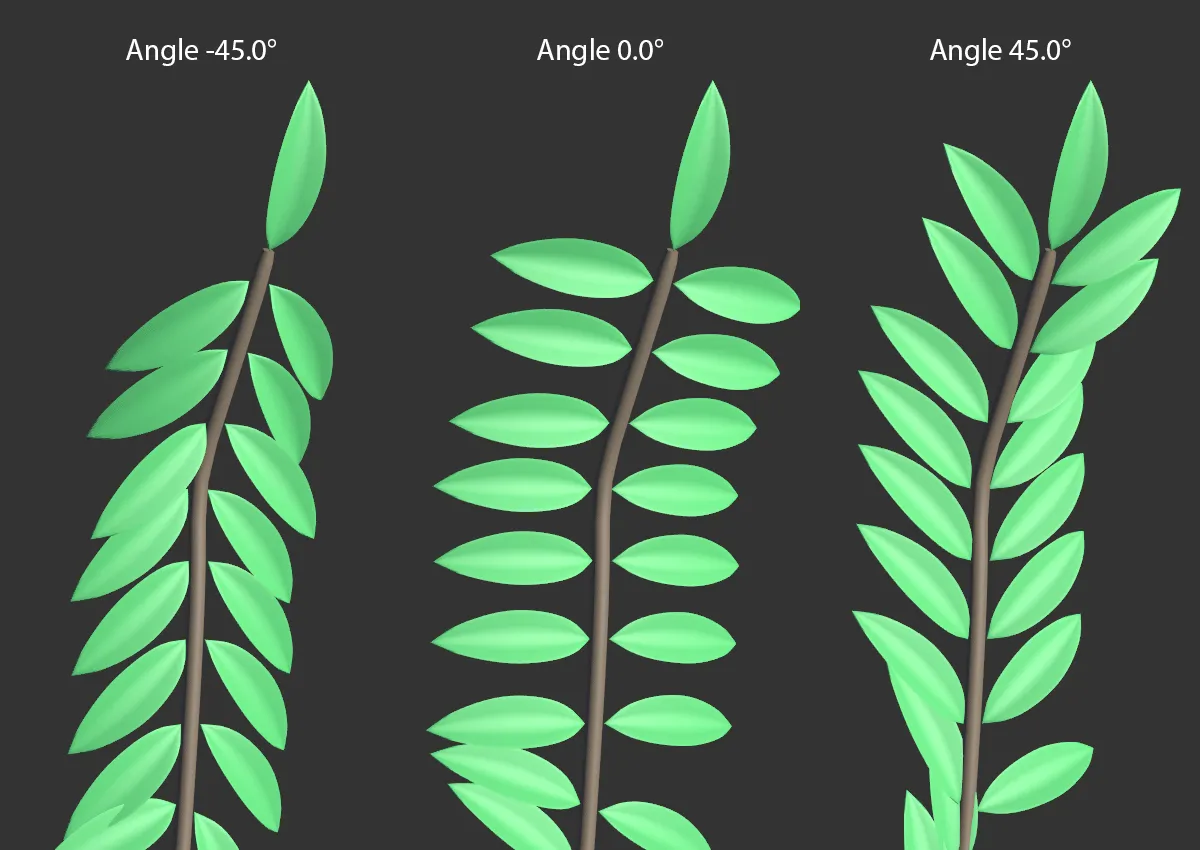
Leaves in Distichous Type with Angle values of -45, 0.0, and 45 degrees.
Variation
Section titled “Variation”To make your distribution more organic, you can add some variation.
Up Vector
Section titled “Up Vector”By default, this is set upwards at Y+ (World), but can be changed to None, Y- (World), Y+ (Local), Y-(Local) and Object.
If you select a local setting, the leaves will always stay oriented relative to the vector of the parent object.
Variation
Section titled “Variation”Adds a slight variation in the way that the leaves are facing.
Object
Section titled “Object”By selecting Object in the Up Vector setting, you can drag an object into this link field, so that your leaves will target it in their trajectory.
Position
Section titled “Position”This setting controls how the leaves are distributed along the length of the tree.
Position on Tree
Section titled “Position on Tree”The X-axis represents the length of the tree and the Y-axis is the ‘weight’ of distribution.
By default, the setting has the leaves harmoniously distributed, as illustrated in the image below.
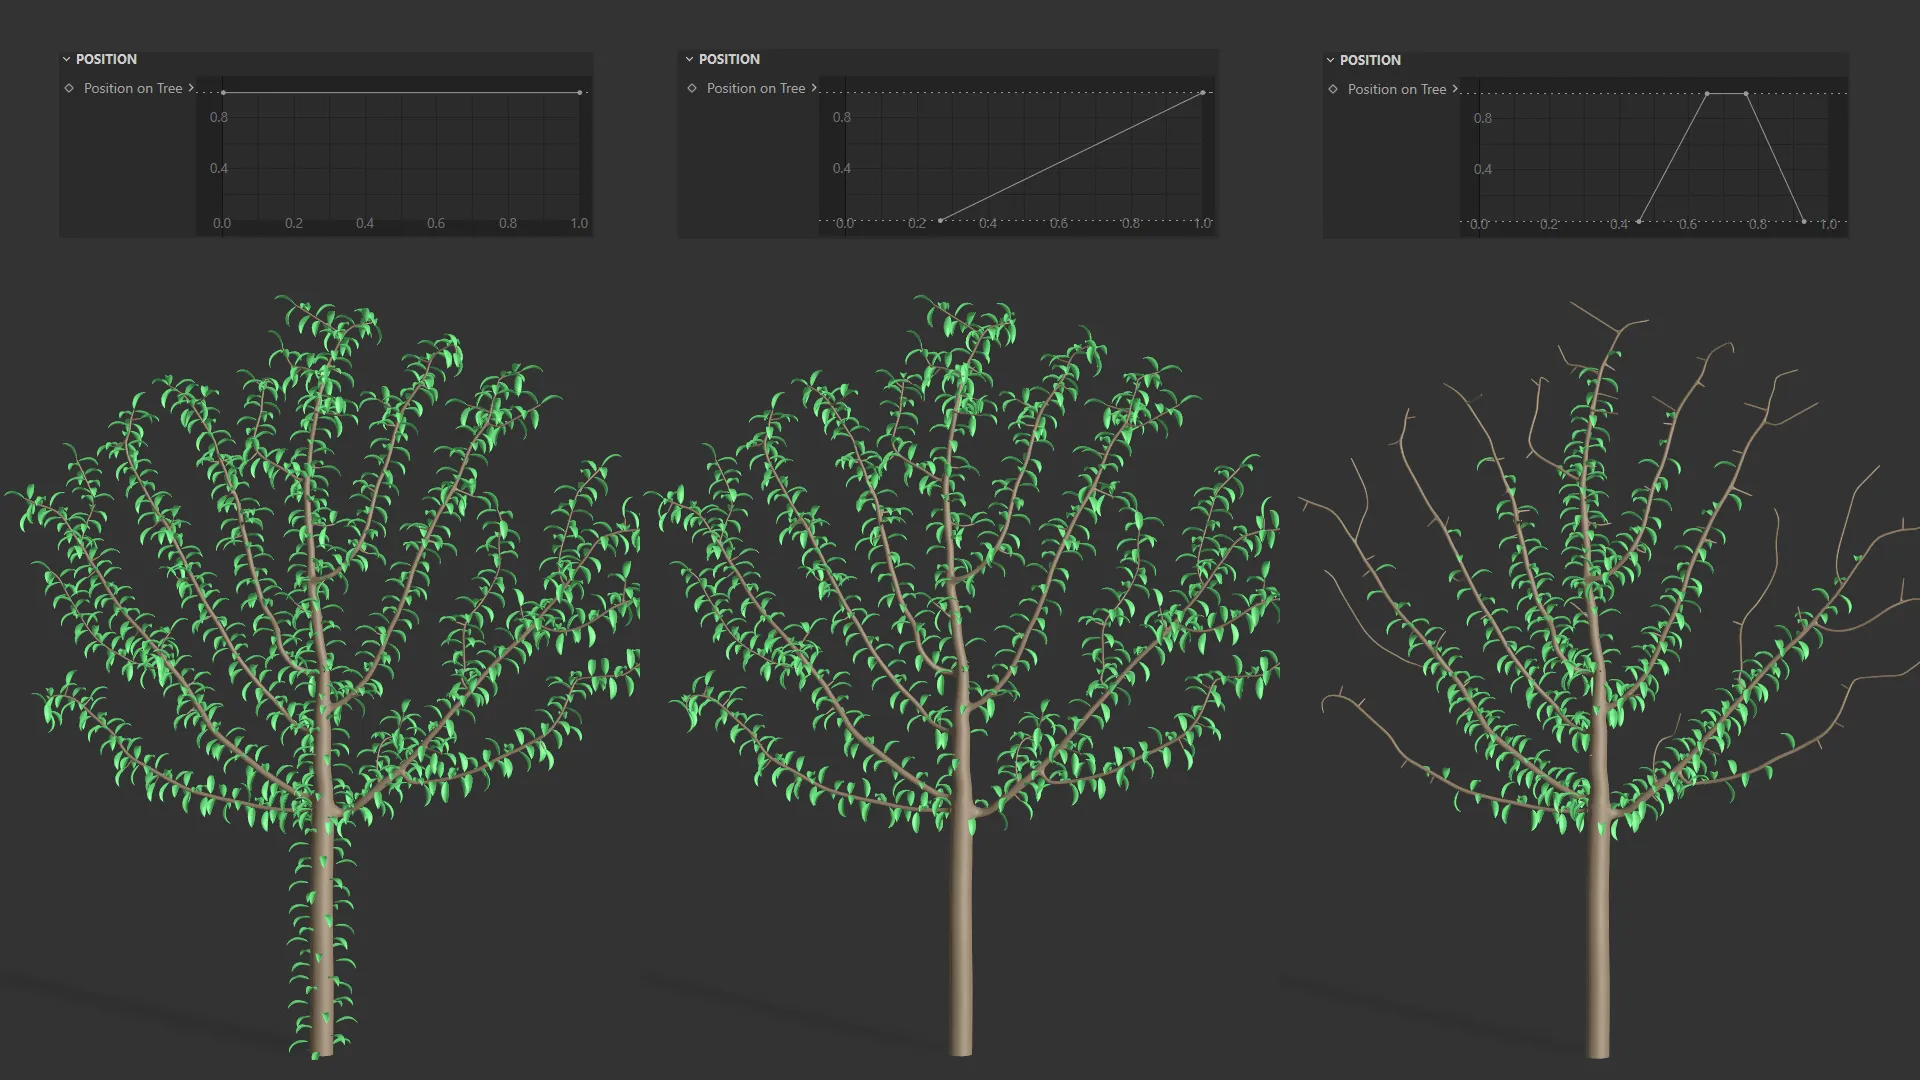
The default setting for the Position on Tree parameter on the left, a linear spline curve in the center and a custom setting on the right.
This will scale the leaves along the length of the branch.
Scale Along Branch
Section titled “Scale Along Branch”Again, the X-axis is the length of the branch and the Y-axis is the scale of the leaves.
By pulling the knot down at the right-hand side, it is possible to scale down the leaves towards the end of the branch, making them gradually smaller.
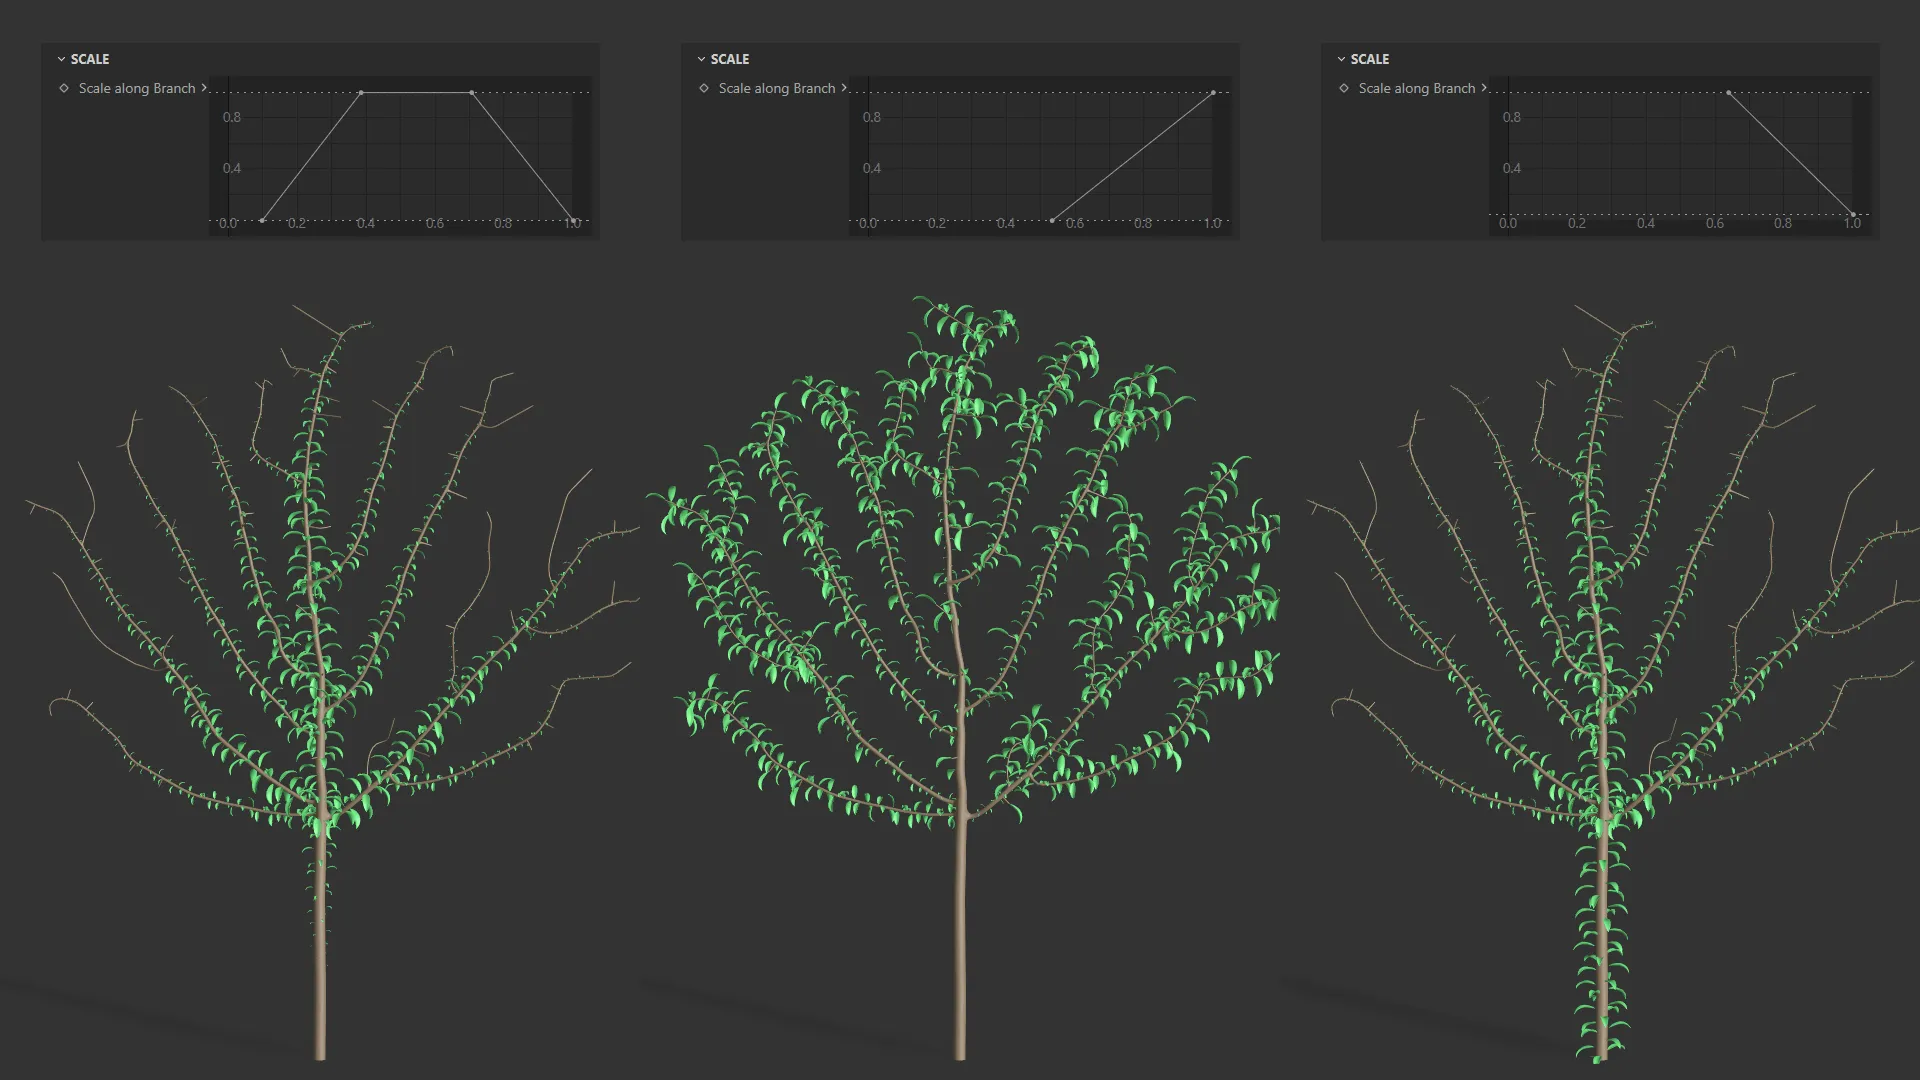
Scale Along Branch settings driven by the spline curves shown above each tree.
Copyright © 2026 INSYDIUM LTD. All rights reserved.