Leaf
Using the Leaf plant layer, you can easily add leaves to your plant then shape them.
In the Plant Layers tab, go to the Add Part menu, highlight the parent (Branch) layer and select Leaf from the drop-down menu.
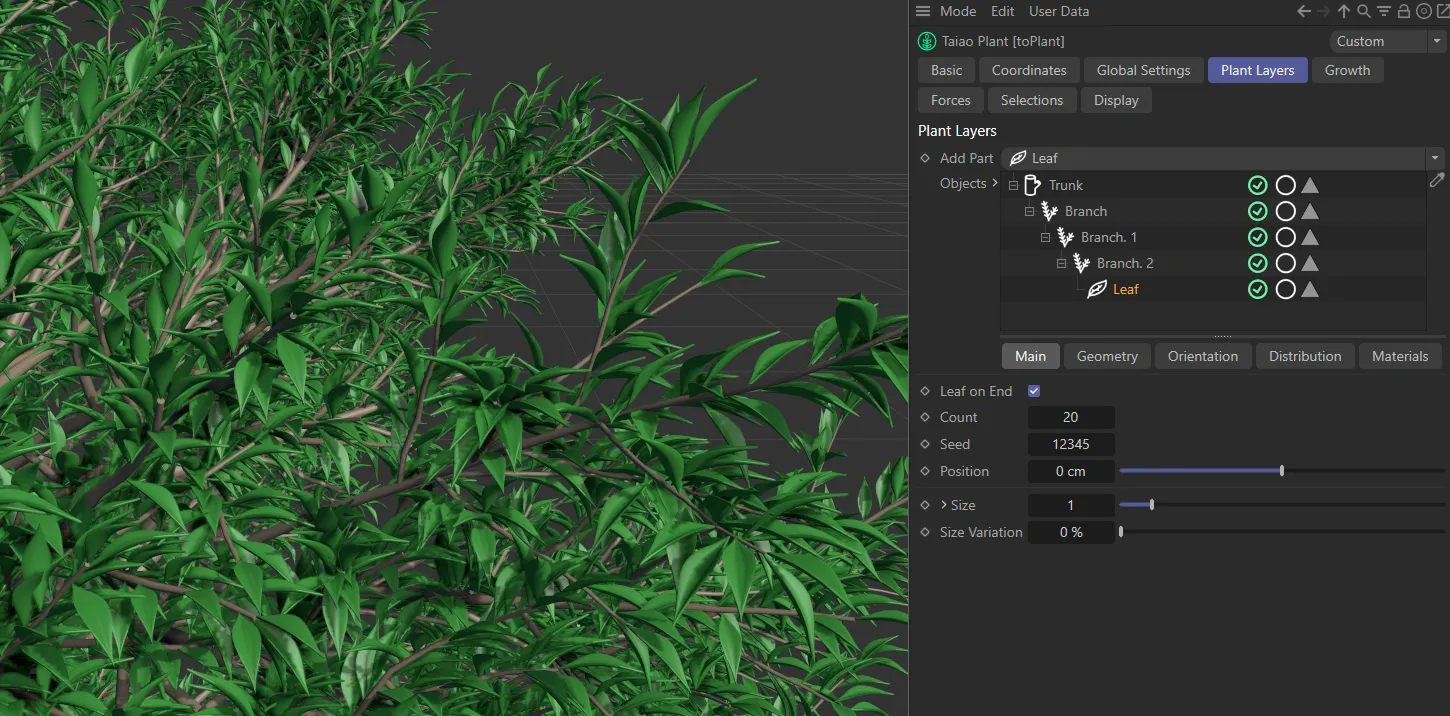
Leaf layer added in the Add Part menu.
There are tabs for Main, Geometry, Orientation, Distribution and Materials.
Main tab
Section titled “Main tab”Leaf on End
Section titled “Leaf on End”As a default setting this box is checked so that there is a leaf on the end of each branch.
To turn this off, simply uncheck the box.
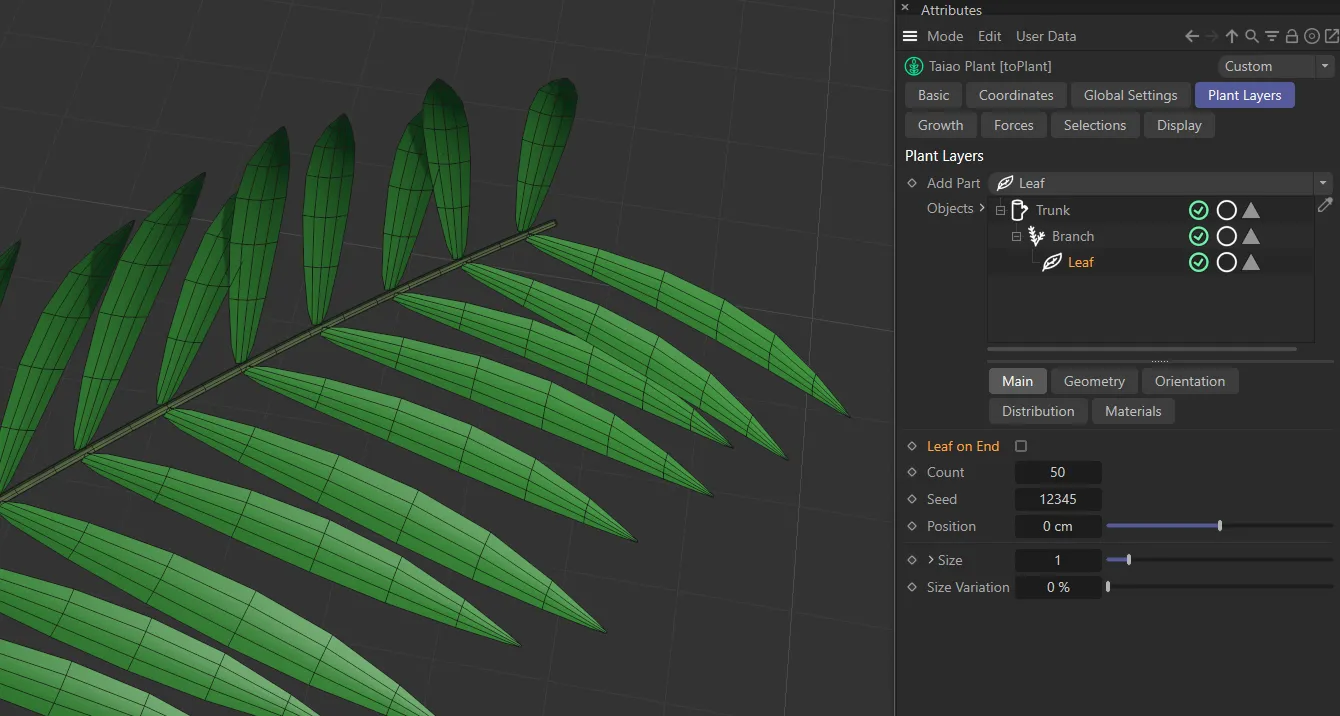
Leaf on End unchecked.
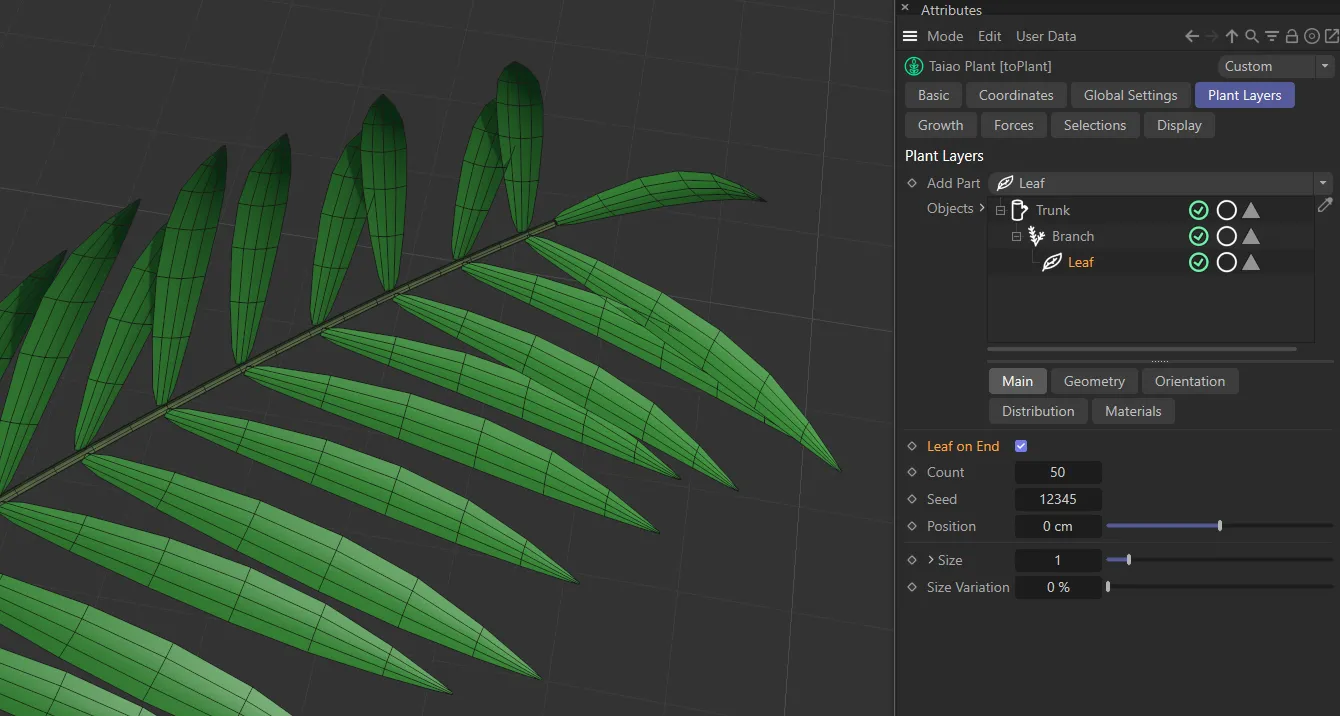
Leaf on End checked and enabled.
Select how many leaves you wish to grow.
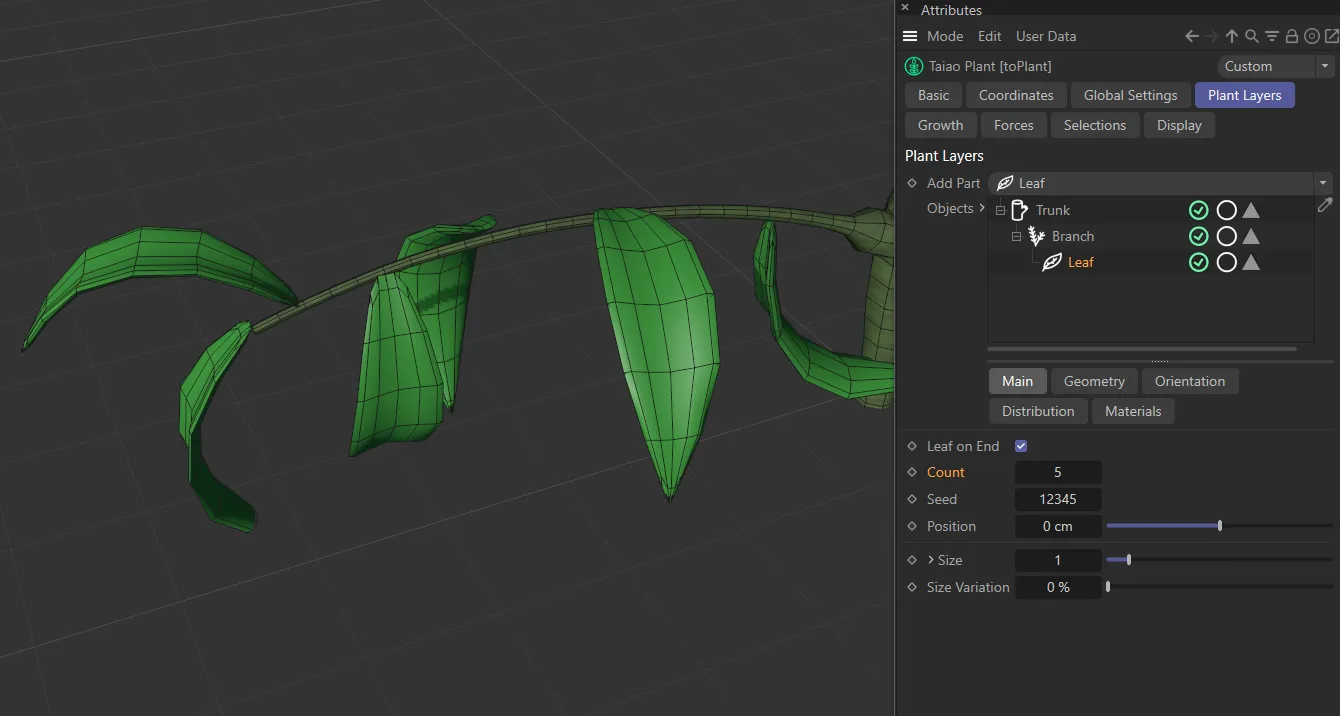
Leaf Count setting of 5.
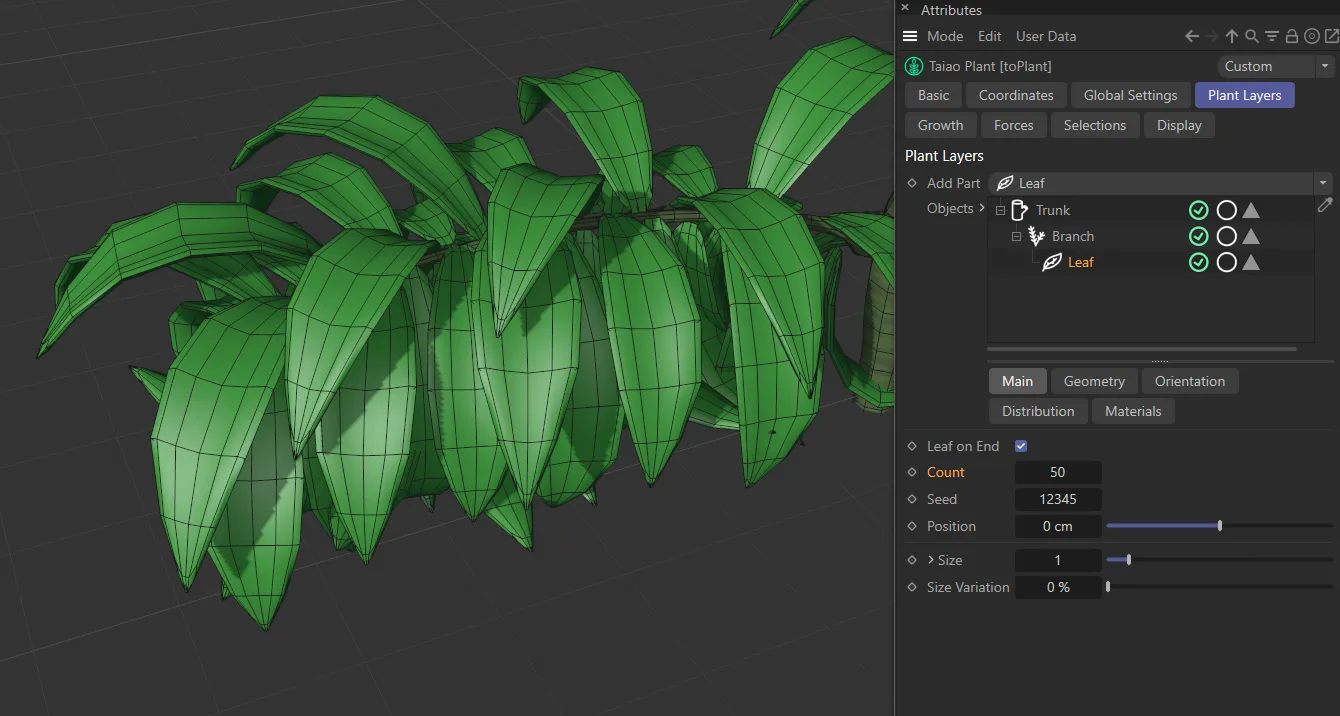
The Leaf Count value here is 50.
Changes the random variation and distribution of leaves where applicable.
For example, if you have size or twist variation set, changing this Seed value will give you different looks.
Position
Section titled “Position”Moving this slider offsets the position of the leaf relative to the parent layer (the branch) and can be both positive and negative.
This slider will increase the global size of the leaves, across the whole plant.
Clicking and unfurling the drop-down arrow will reveal a Scale Along Branch parameter.
Scale along Branch
Section titled “Scale along Branch”Again, the X-axis is the length of the branch and the Y-axis is the scale.
By pulling the knot down at the right-hand side, it is possible to scale down the leaves towards the end of the branch, making them gradually smaller.
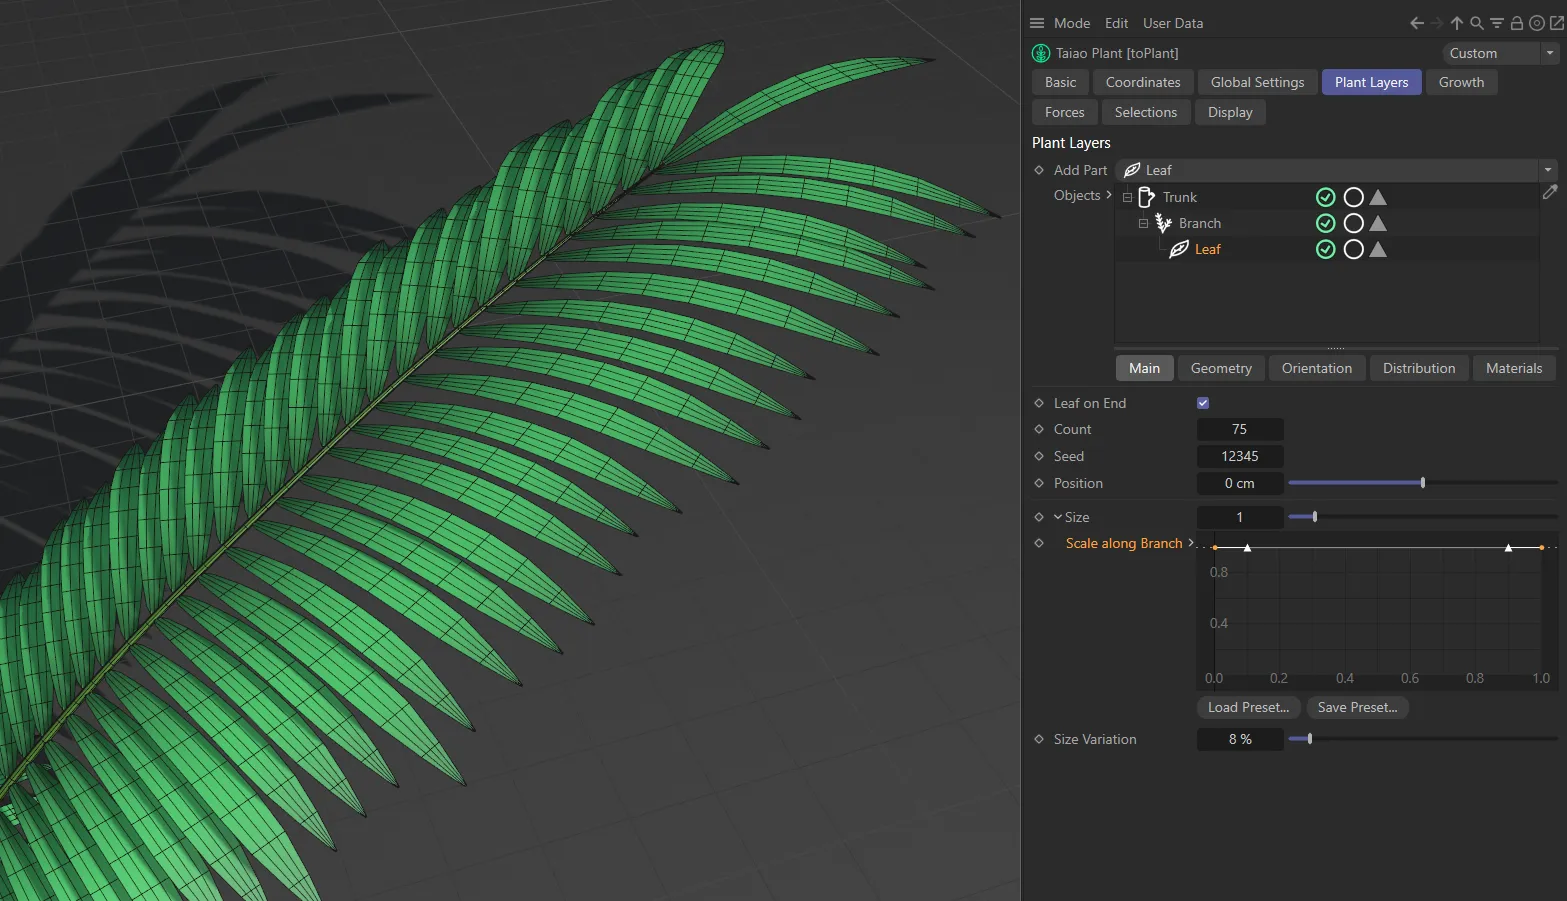
Scale along Branch being driven by the spline curve setting at full strength.
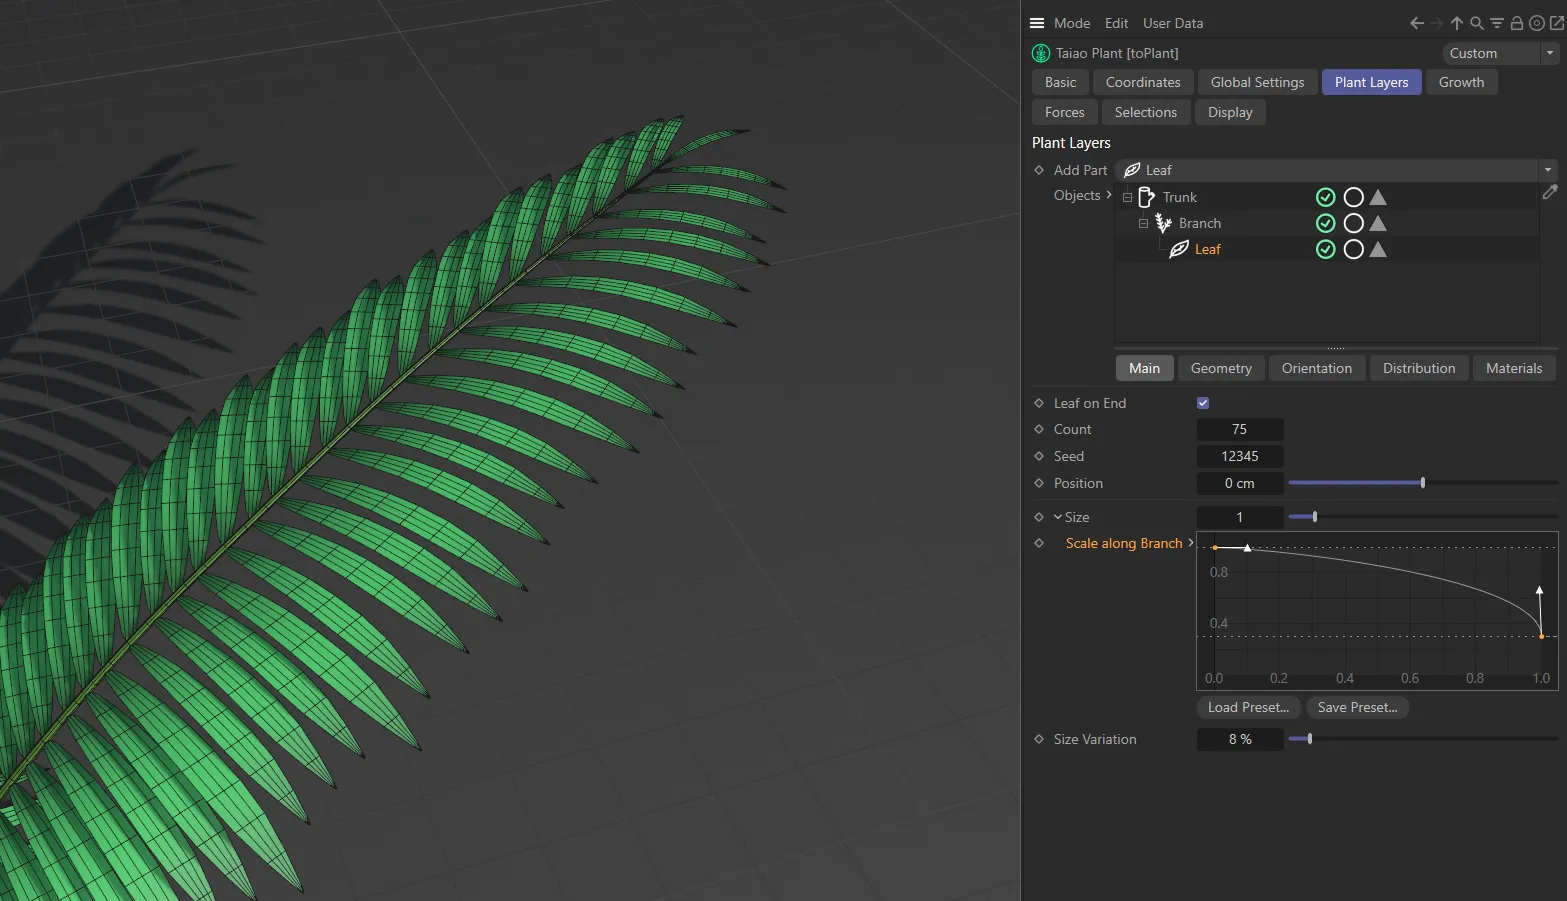
Here, the Scale along Branch curve drops off, reducing the leaf size towards the end of the branch.
Size Variation
Section titled “Size Variation”Use this setting to make things look more organic and realistic.
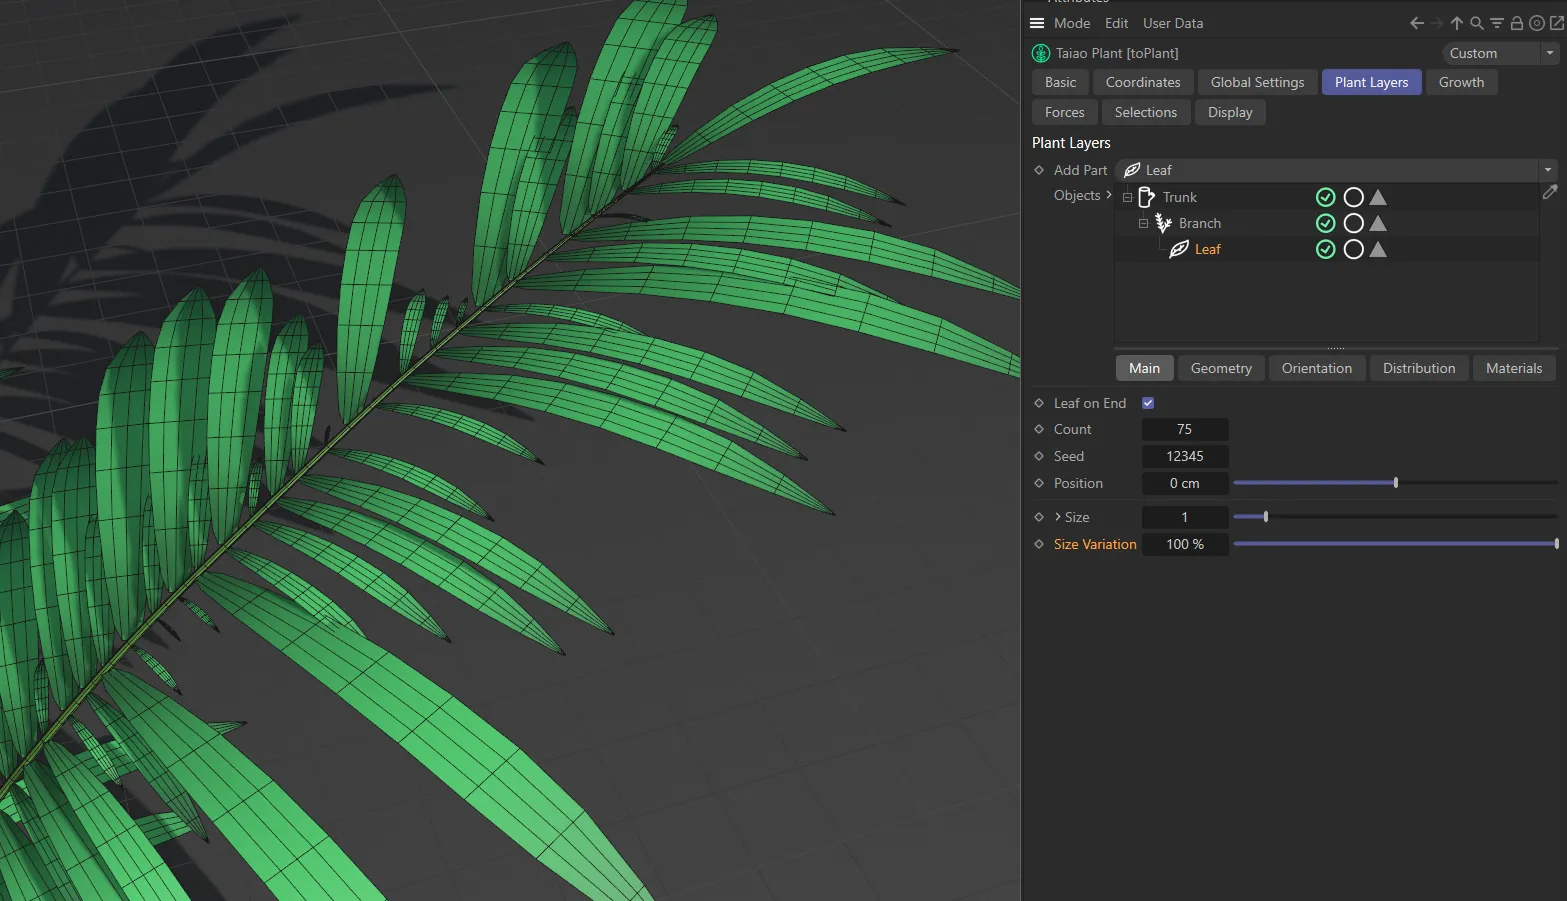
Here, the Size Variation is set at 100%, giving different lengths of leaves across the Branch layer.
Geometry tab
Section titled “Geometry tab”Set as Basic, by default, this setting controls how your leaves are presented.
The other options are: Custom and Emitter.
In Basic mode, you can style and shape your leaves in the traditional way they are presented in nature.
Custom
Section titled “Custom”You are also able to add a custom leaf object, if you have something specific that you are looking for in your scene.
Add Custom Leaf
Section titled “Add Custom Leaf”Click this button to add toLeaf to your scene.
toLeaf will now be in your Objects Manager, with its own settings; these are explained in detail in the toLeaf pages.
Custom Leaf Object
Section titled “Custom Leaf Object”Simply drag and drop your object into the Custom Leaf Object list.
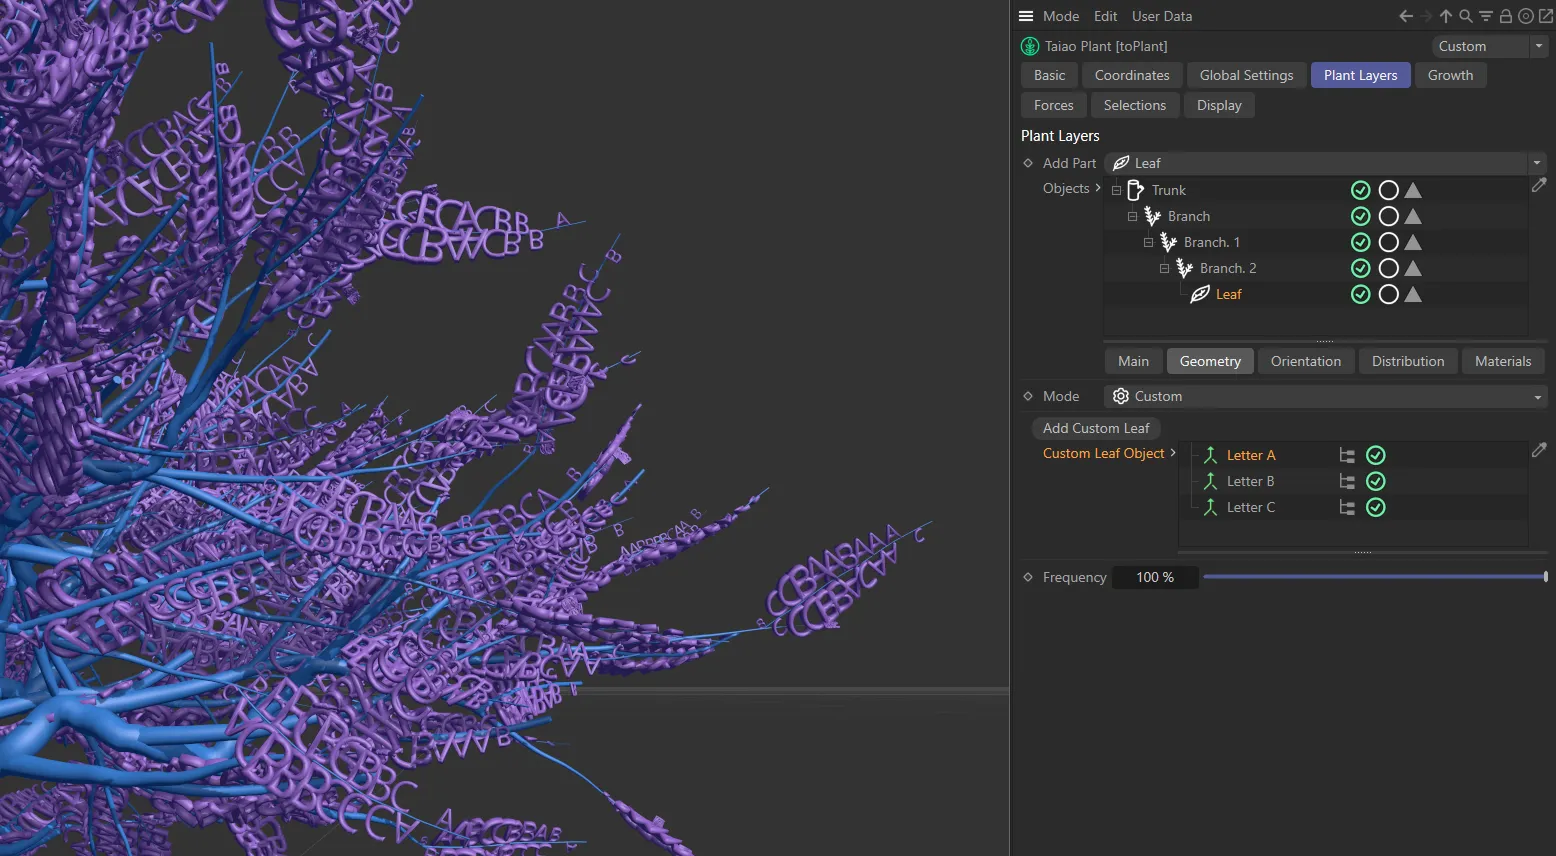
Three separate 3D text objects have been used as the Custom Leaf Object here.
Emitter
Section titled “Emitter”Instead of generating leaf geometry, you can emit X-Particles instead.
This gives you the ability to create animation effects.
Emitter
Section titled “Emitter”Either click on the Add Emitter button or drag an existing scene emitter into this field.
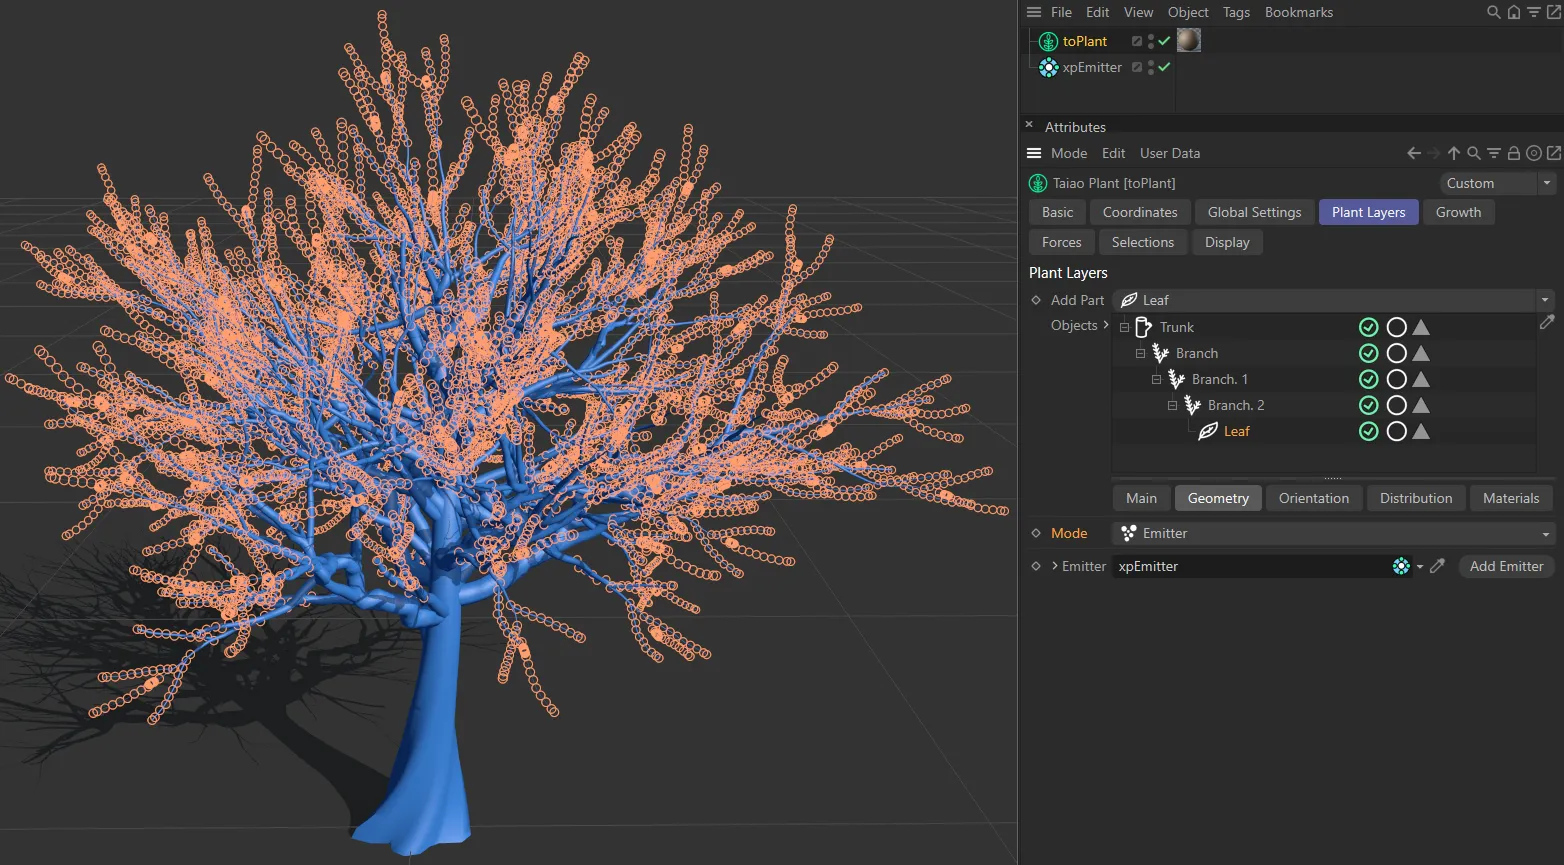
In this image, the emitter is creating a particle for each leaf, driving size, direction and position.
The following Geometry tab parameters are only available with Mode set as Basic.
Leaf Profile
Section titled “Leaf Profile”There are many ways to manipulate this, in order to shape the leaves to suit your particular need.
Adding a knot in the spline (using CTRL) and pulling down the end, will pull in the tips of the leaves.
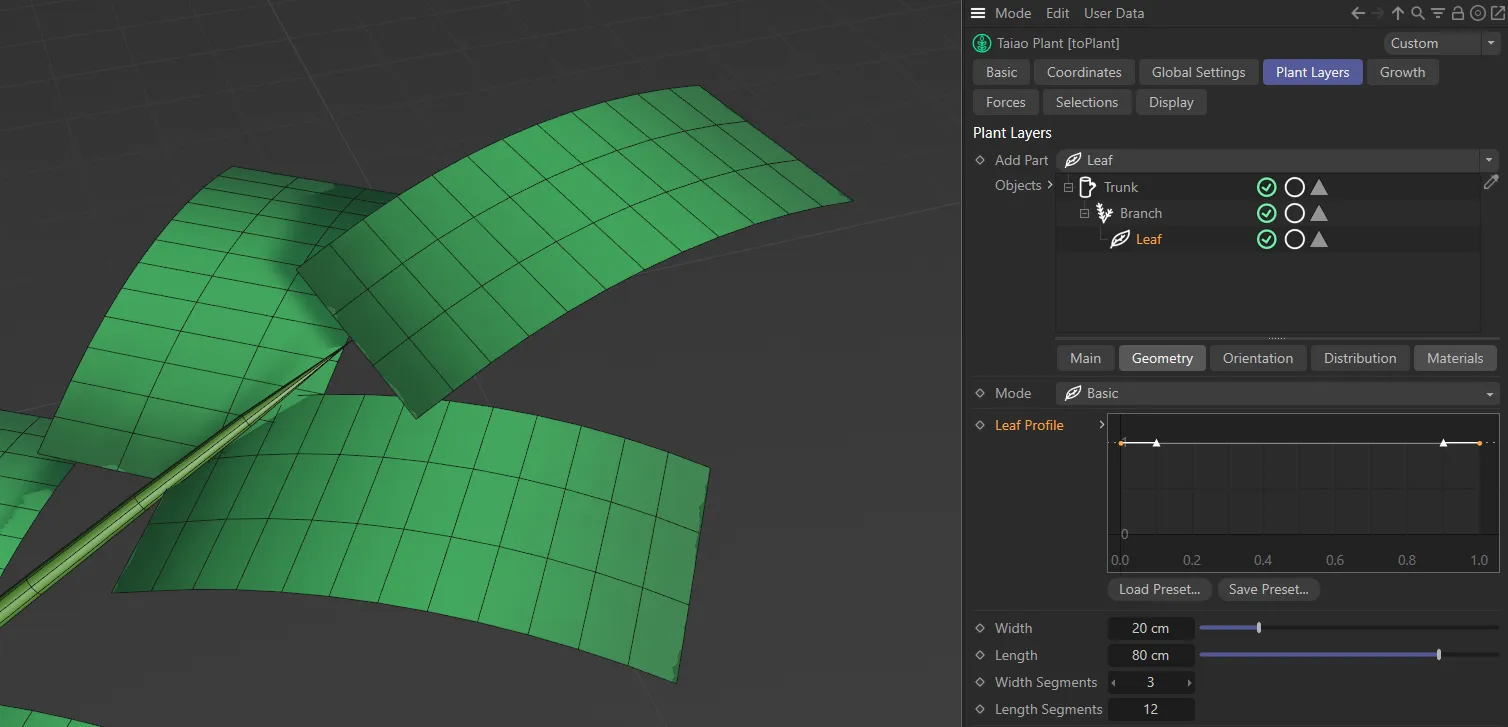
With the Leaf Profile at full strength, the leaf is at full width from start to tip (the default shape).
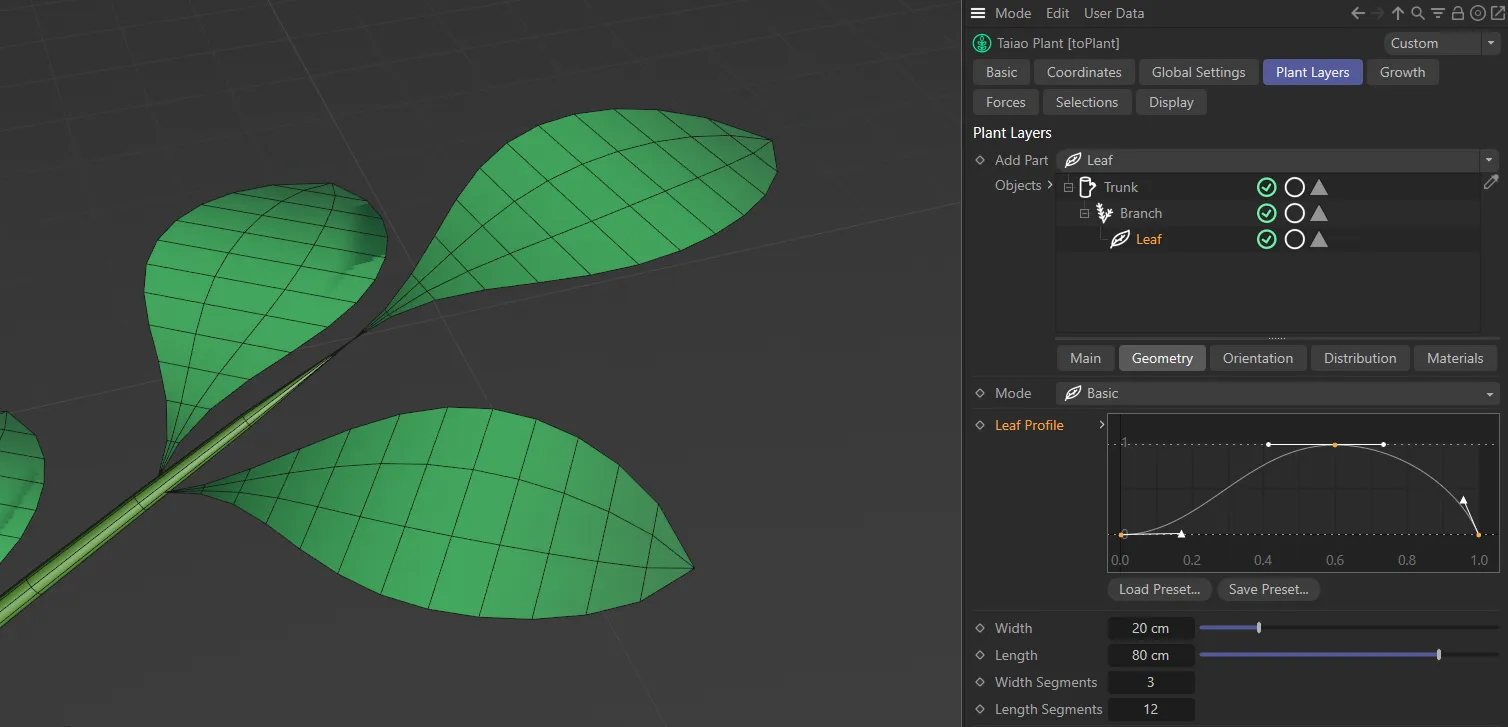
The Leaf Profile spline curve has been manipulated here, to create this natural-looking leaf shape.
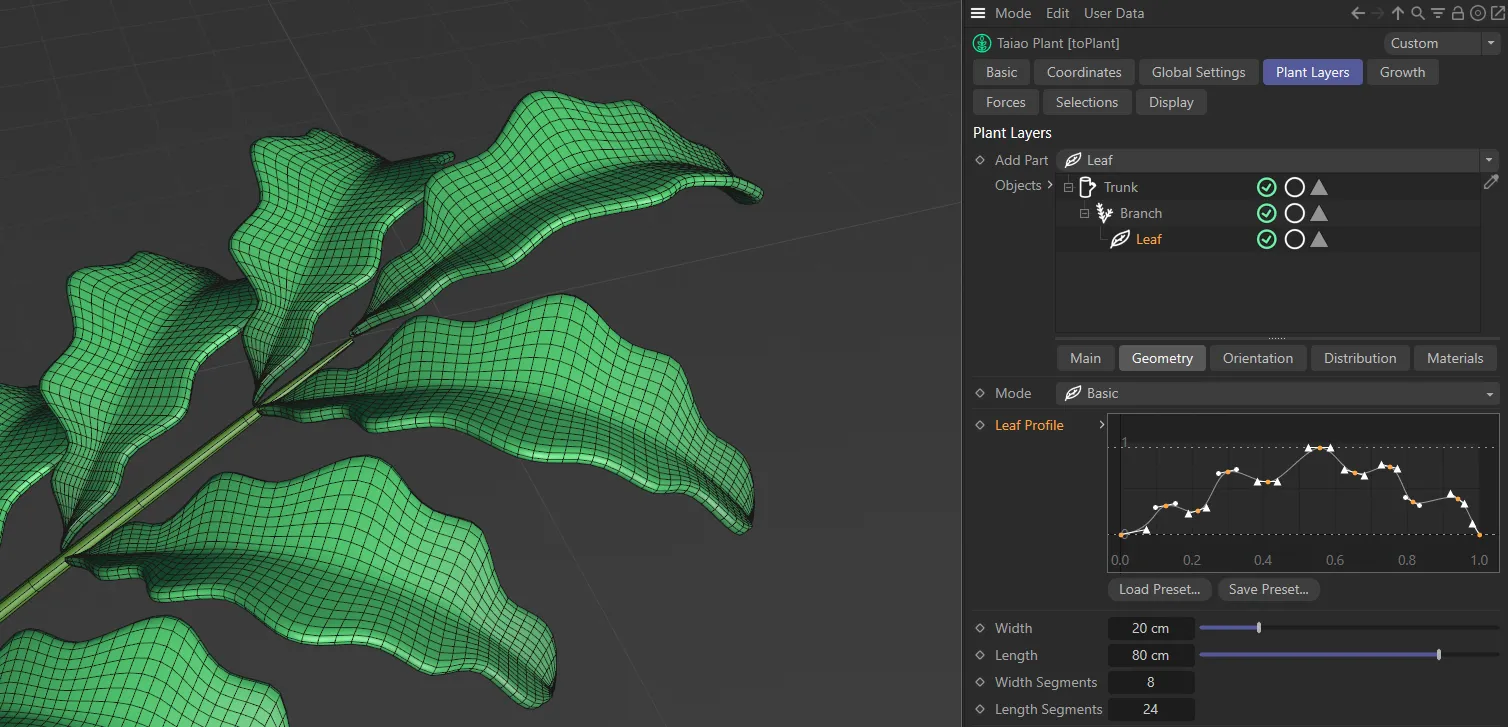
Add leaf profile spline points to create more complex leaf shapes.
Globally adjusts the width of the leaves.
Length
Section titled “Length”Adjusts the length of the leaves, again globally.
Width Segments
Section titled “Width Segments”As above, this will add to the geometry of the leaves.
As well as offering more options with Turbulence settings, an increase in geometry can help with the shaping options in the next section.
Length Segments
Section titled “Length Segments”To add to the geometry of the leaves, you can increase the segments in length, giving you more options with Deformation settings in the Main tab.
Subdivisions
Section titled “Subdivisions”You can add subdivisions to increase polygon detail and to add smoothing to the leaves.
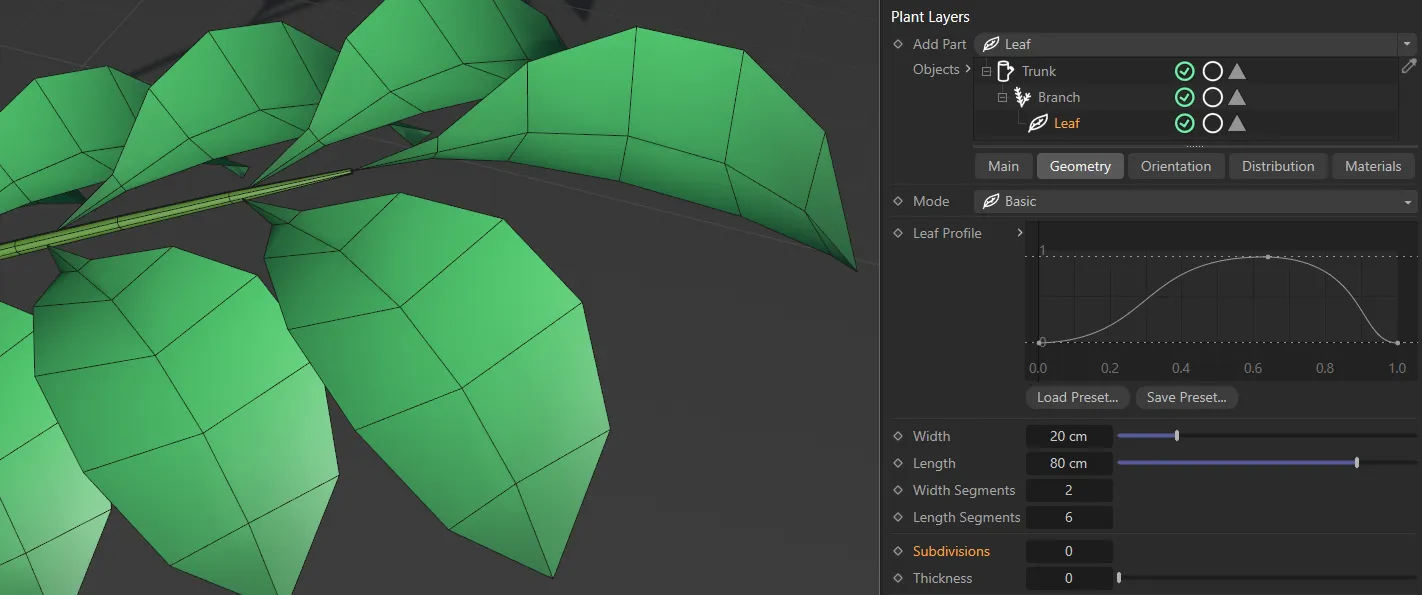
Leaves with Subdivisions set at 0.
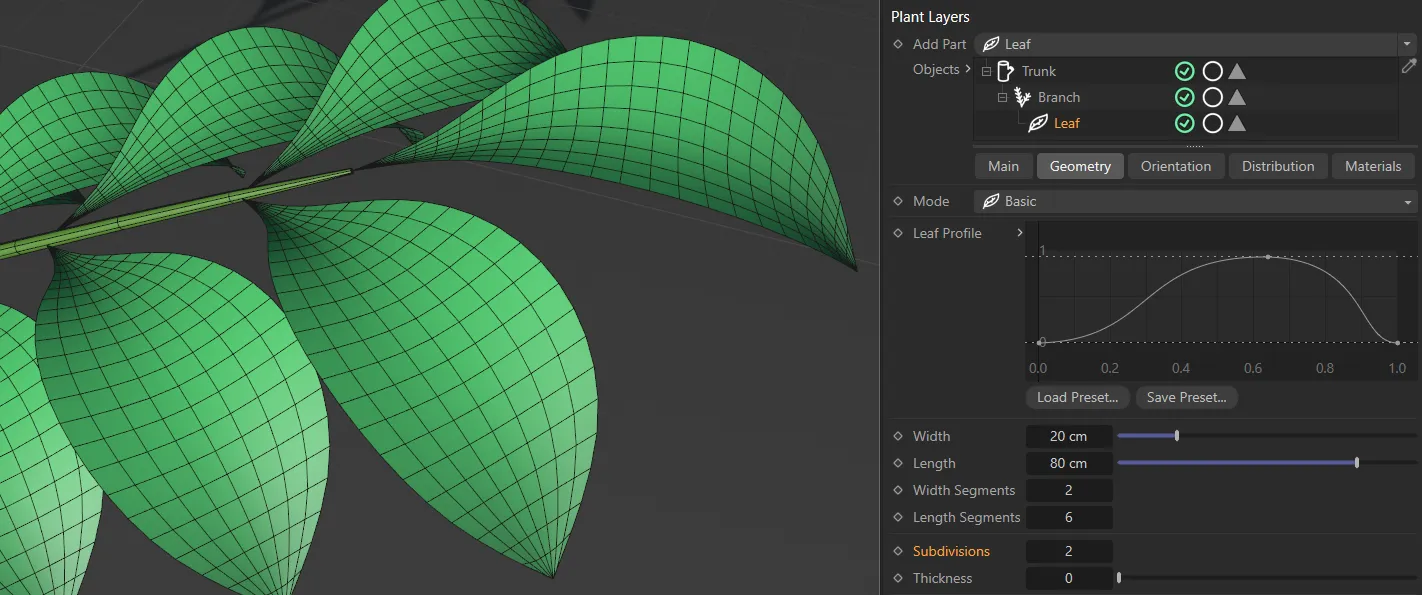
Leaves with Subdivisions set at 2.
Thickness
Section titled “Thickness”By default, the leaves are flat; with this setting, you can make them thicker, giving them a more natural depth.

Leaves with Thickness set at 0.
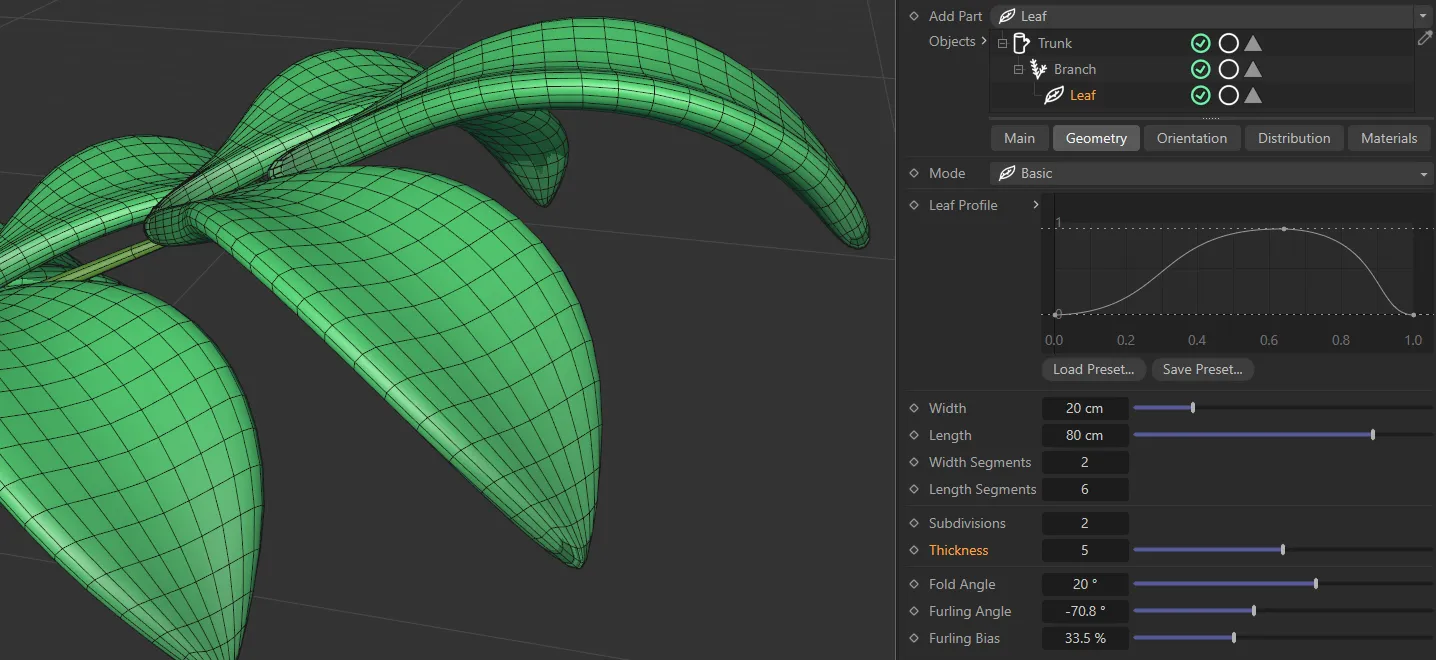
Leaves with Thickness set at 5.
Fold Angle
Section titled “Fold Angle”Again, this angle can be positive or negative, folding the leaves backward or forwards down the middle.
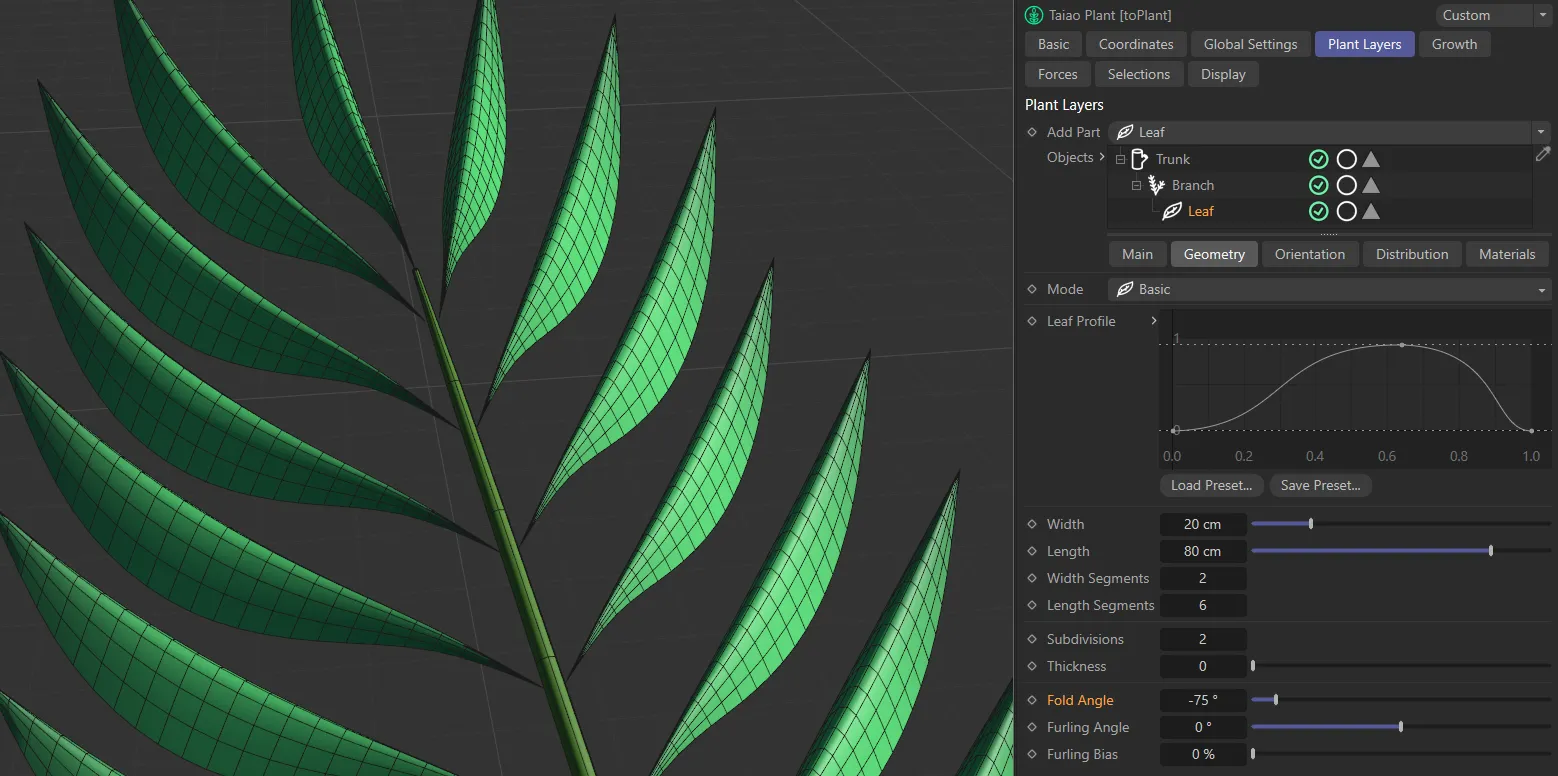
Fold Angle set at (negative) -75 degrees.
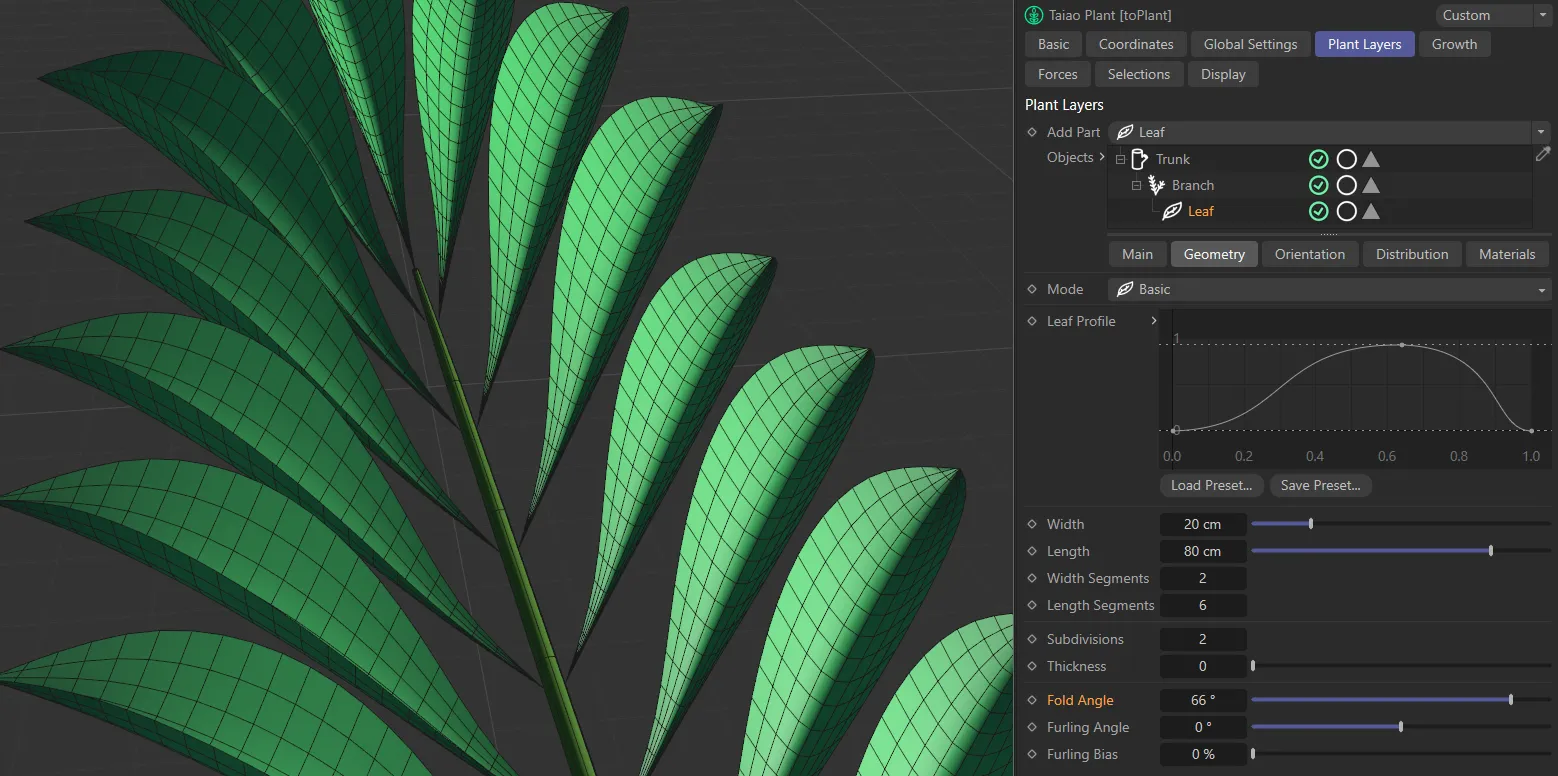
In this second image, the Fold Angle is 66 degrees.
Furling Angle
Section titled “Furling Angle”This feature allows you to bend all leaves of the selected plant layer along their length, starting from the stem, replicating a curling shape.
The angle can be positive or negative, depending on the direction you wish to furl the leaves.
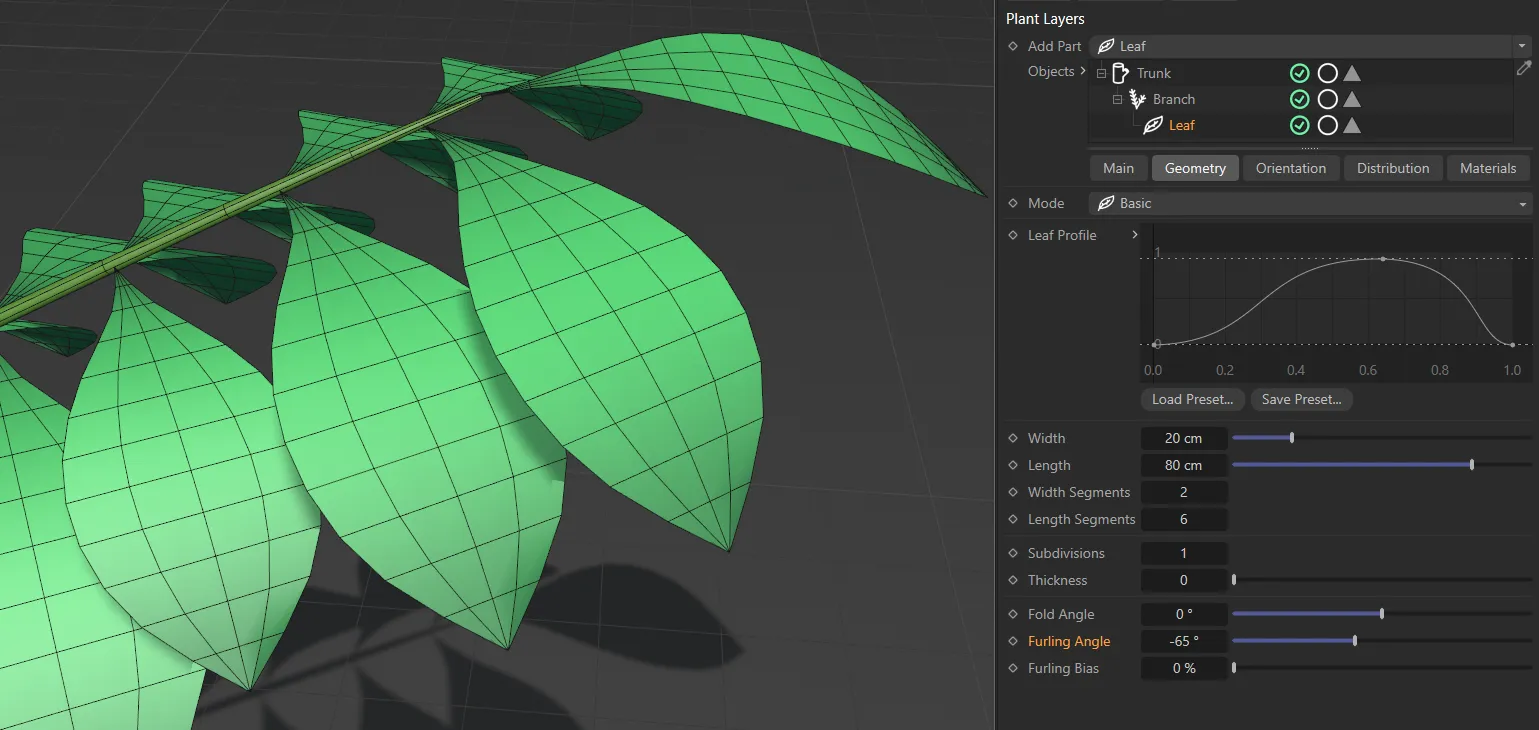
Furling Angle of (negative) -65 on all leaves of the plant.

Here, the Furling Angle is 75 degrees.
Furling Bias
Section titled “Furling Bias”Again, this will dictate where the furling will begin.
At 50%, the furling is starting halfway along the length of the leaf.
If you decrease this, it will start furling from the beginning of the leaf and increasing it will only furl at the tip of the leaf.
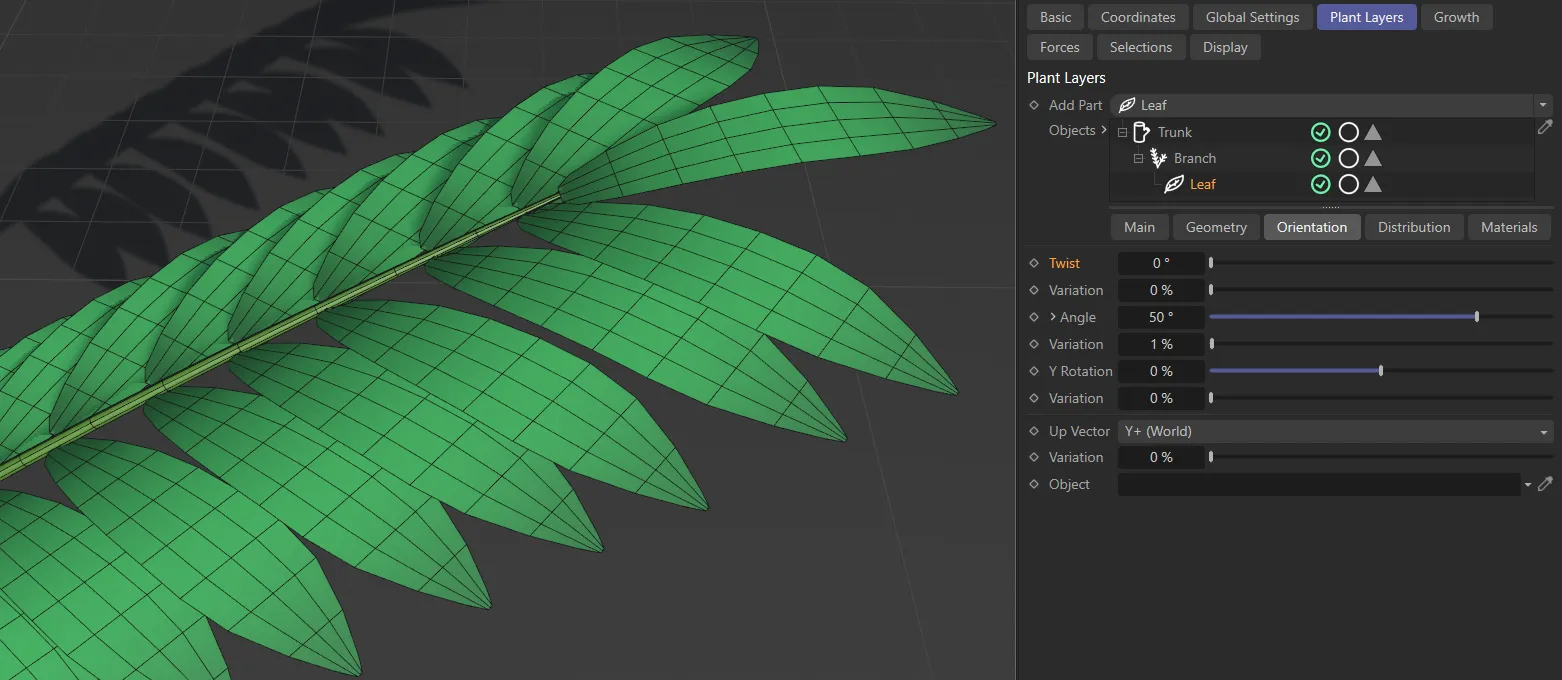
Orientation tab
Section titled “Orientation tab”This will twist the leaves on their own axes by the degree set.
In this image, there is no Twist, set at 0 (zero) degrees.
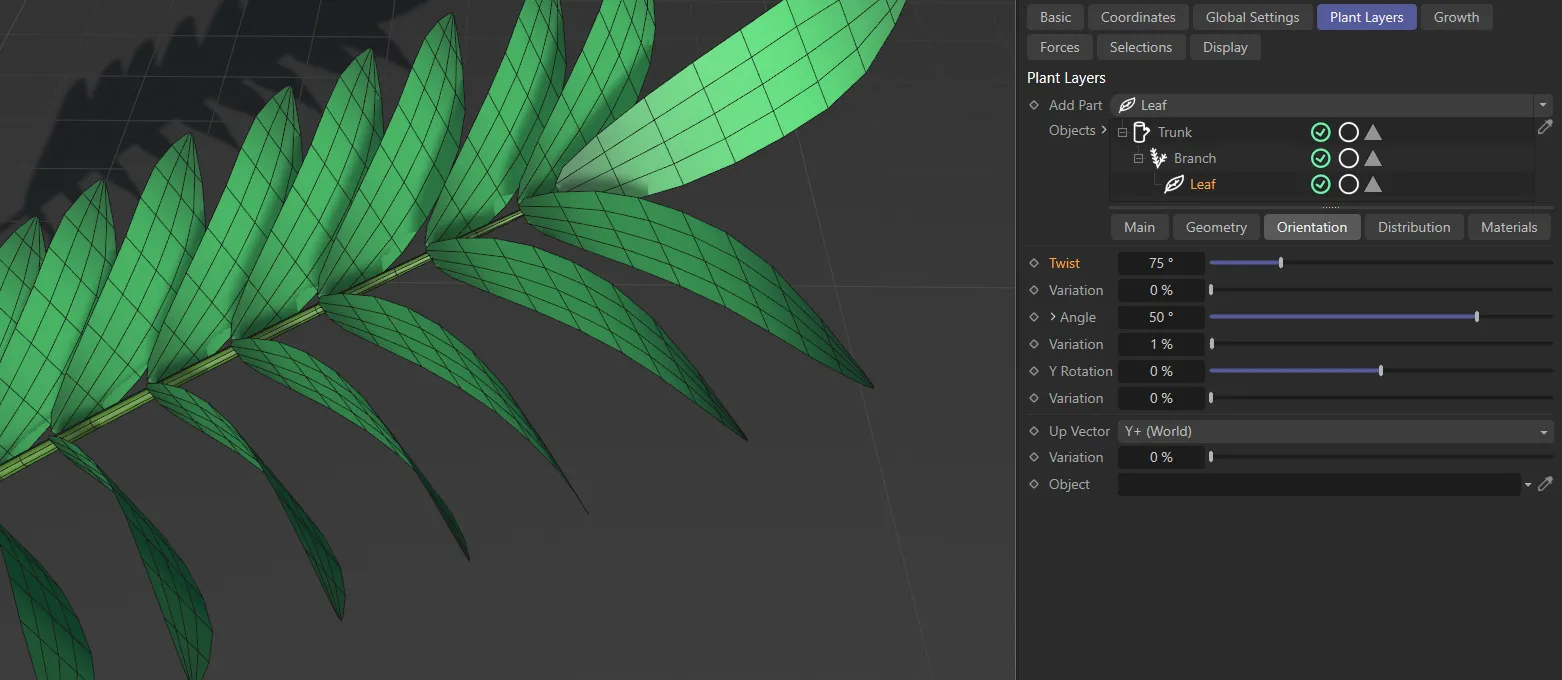
Twist value raised to 75 degrees.
Variation
Section titled “Variation”Adding a variety in the amount of twist amongst the number of leaves, which you are growing.
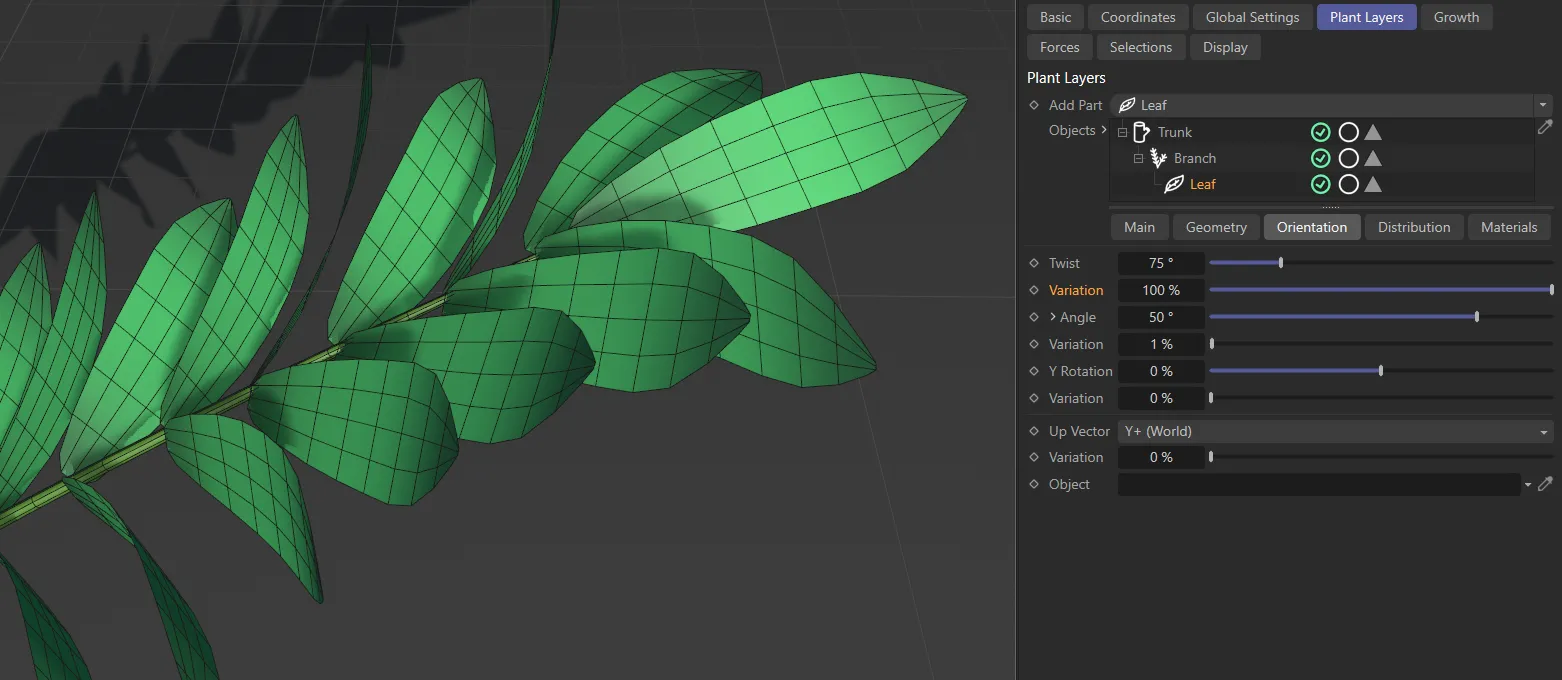
In this final image, the settings are the same as the last one, except for the 100% Variation set, giving a different Twist value for each leaf.
Increase or decrease this slider to angle the leaves either forward or backwards.
Unfurling the drop-down arrow will reveal a Bias curve.

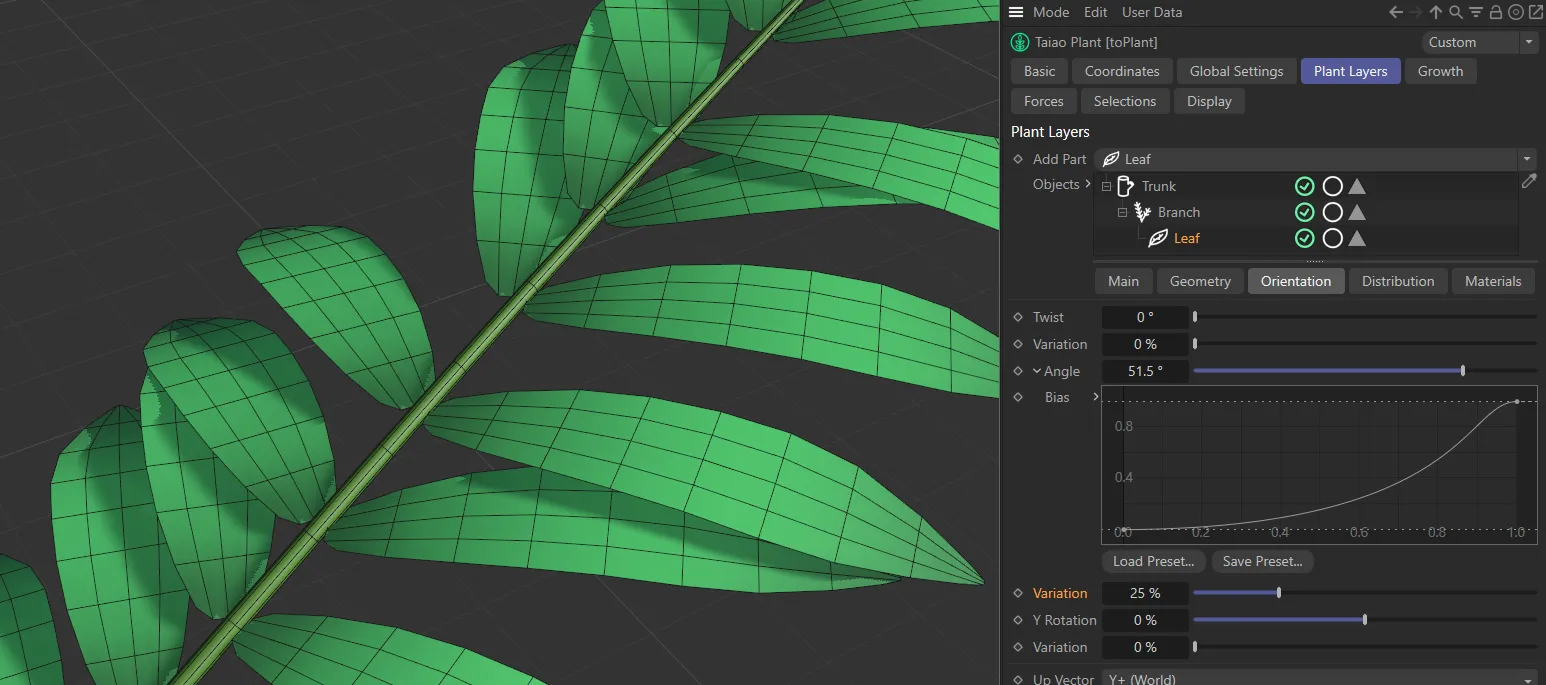
In this image, the Angle is set at (negative) -25 degrees.
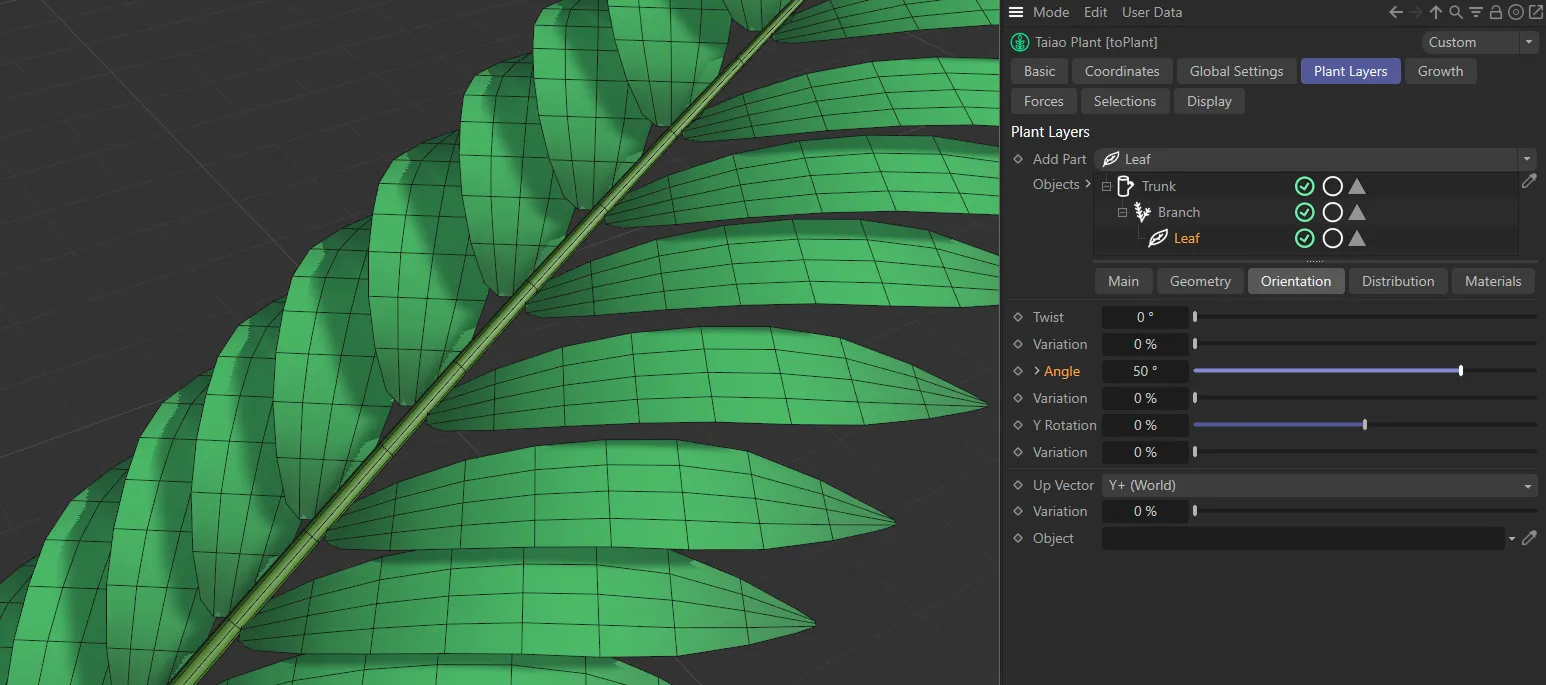
Here, the Angle is raised to 50 degrees.
This parameter offers a greater control over the angle, comparative to the parent branch layer.
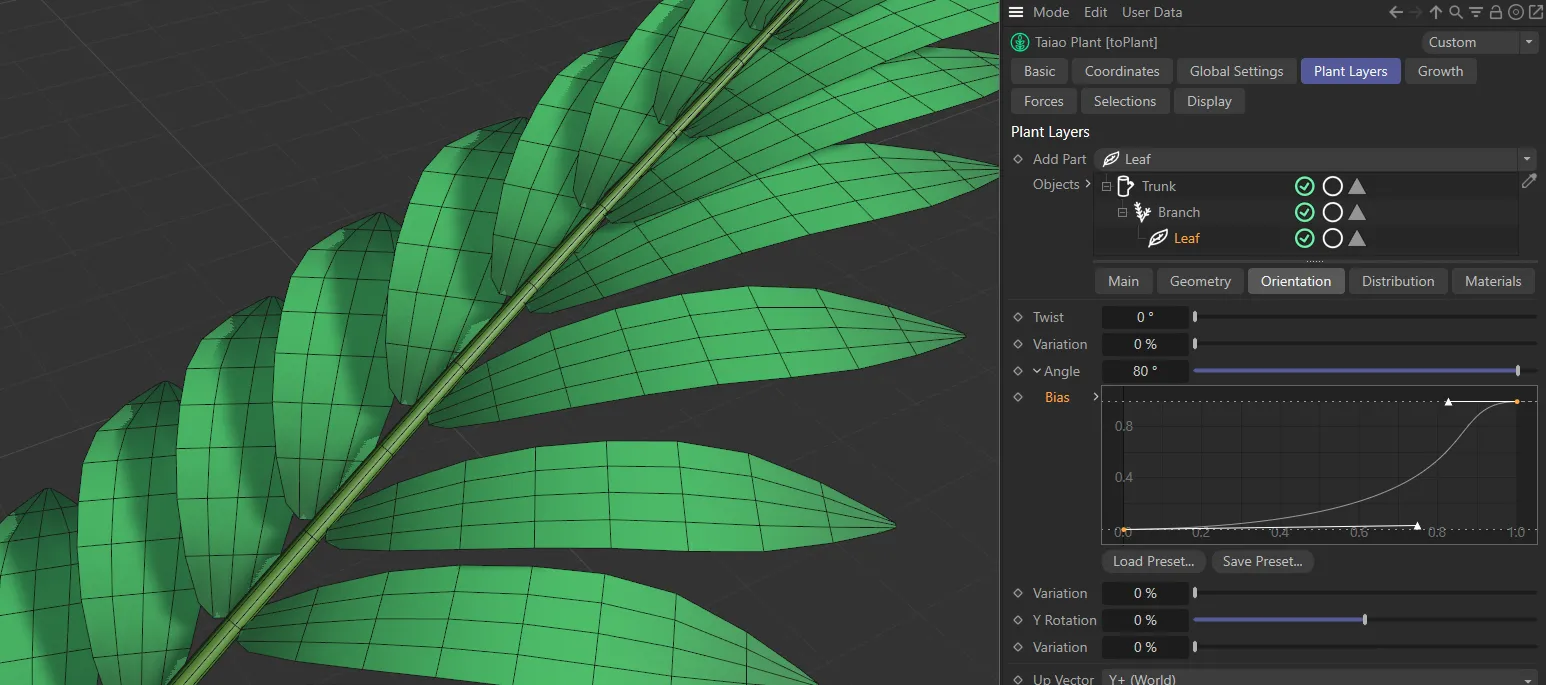
In this third image, the Angle is 80 degrees, with the Bias curve set so that the angle raises towards the end of the branch.
Variation
Section titled “Variation”To make your distribution more organic, you can add some variation.
Animation to demonstrate the effect of the Twist Around Branch, Angle and Variation sliders.
Y Rotation
Section titled “Y Rotation”Applies a percentage rotation on the Y-axis.
Variation
Section titled “Variation”Adds a variety in this percentage set across the leaves in your scene.
Up Vector
Section titled “Up Vector”By default, this is set upwards at +Y (World), but can be changed to -Y (World), +Y (Local), -Y (Local) and Object.
This is explained more fully in the Branch layer manual.
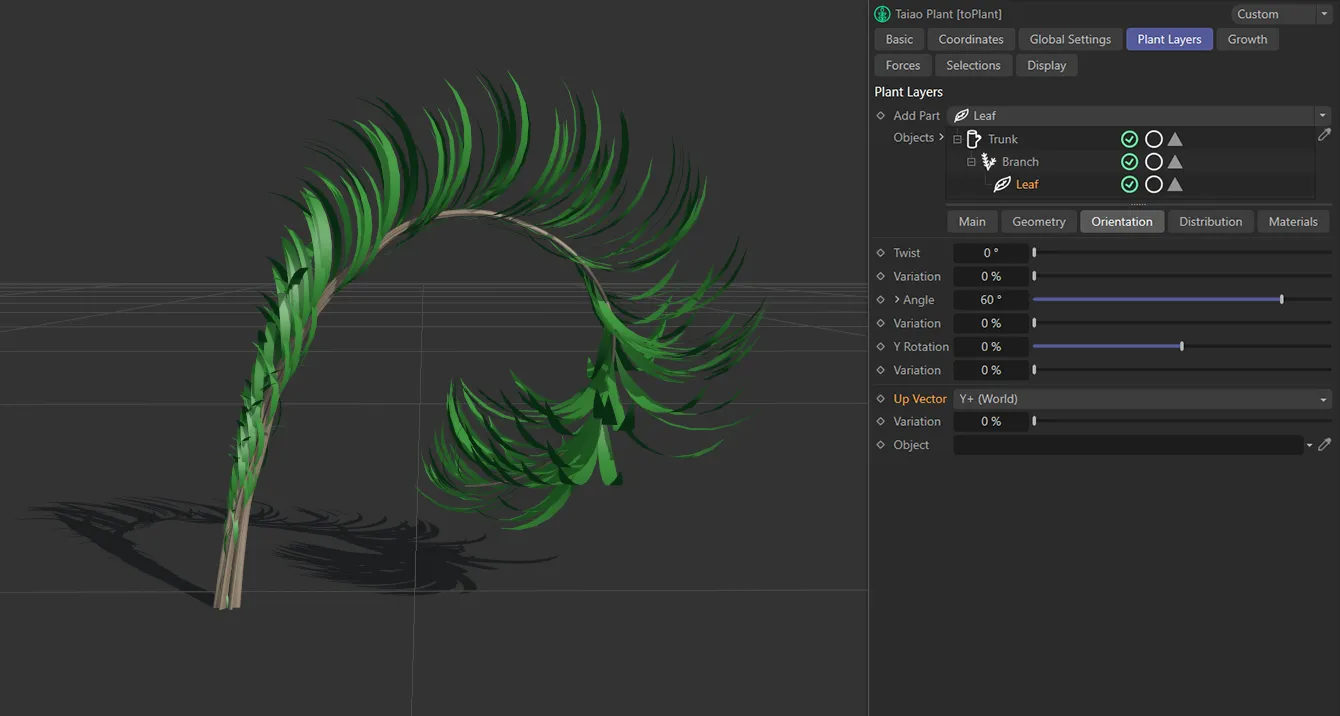
Y+ (World) vector.
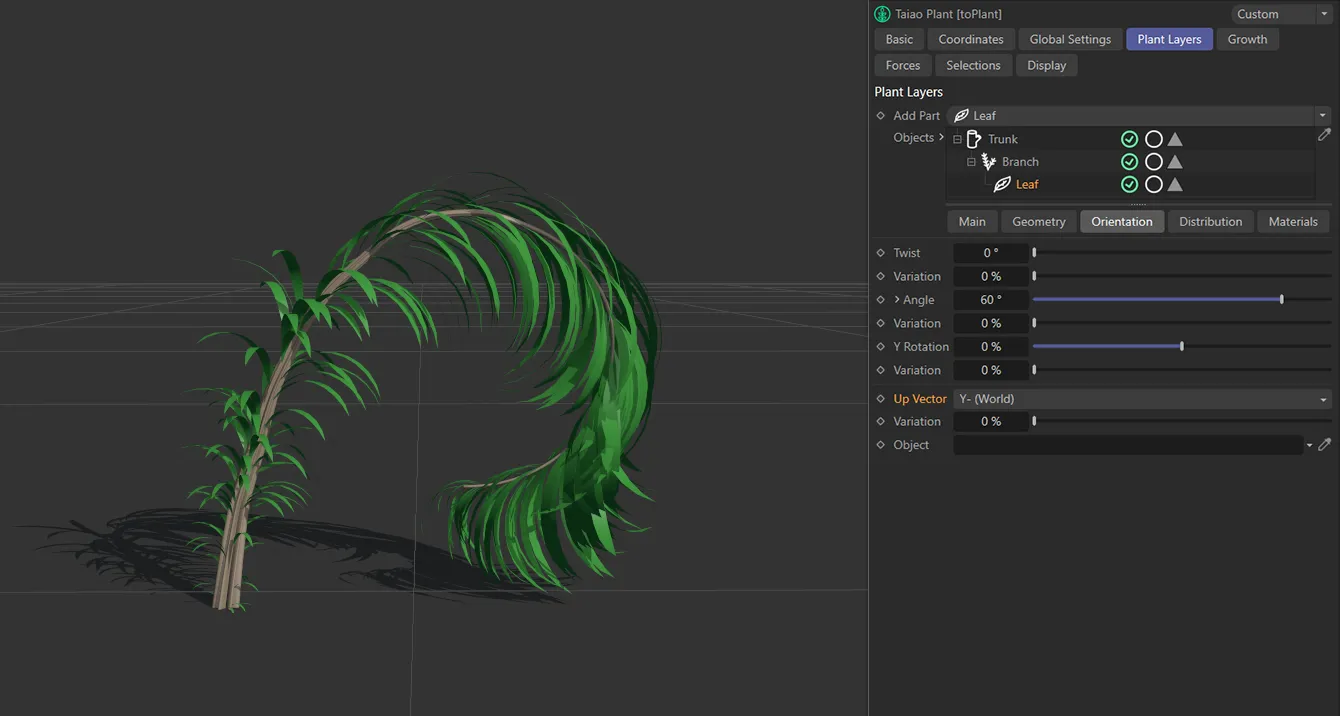
Y- (World) vector.
Variation
Section titled “Variation”Adding a slight variety in the way that the leaves are facing, once again, helps to make things look more organic.
Object
Section titled “Object”By selecting Object in the Up Vector setting, you can drag your object into this link field, in order that your leaves will target it in their trajectory.
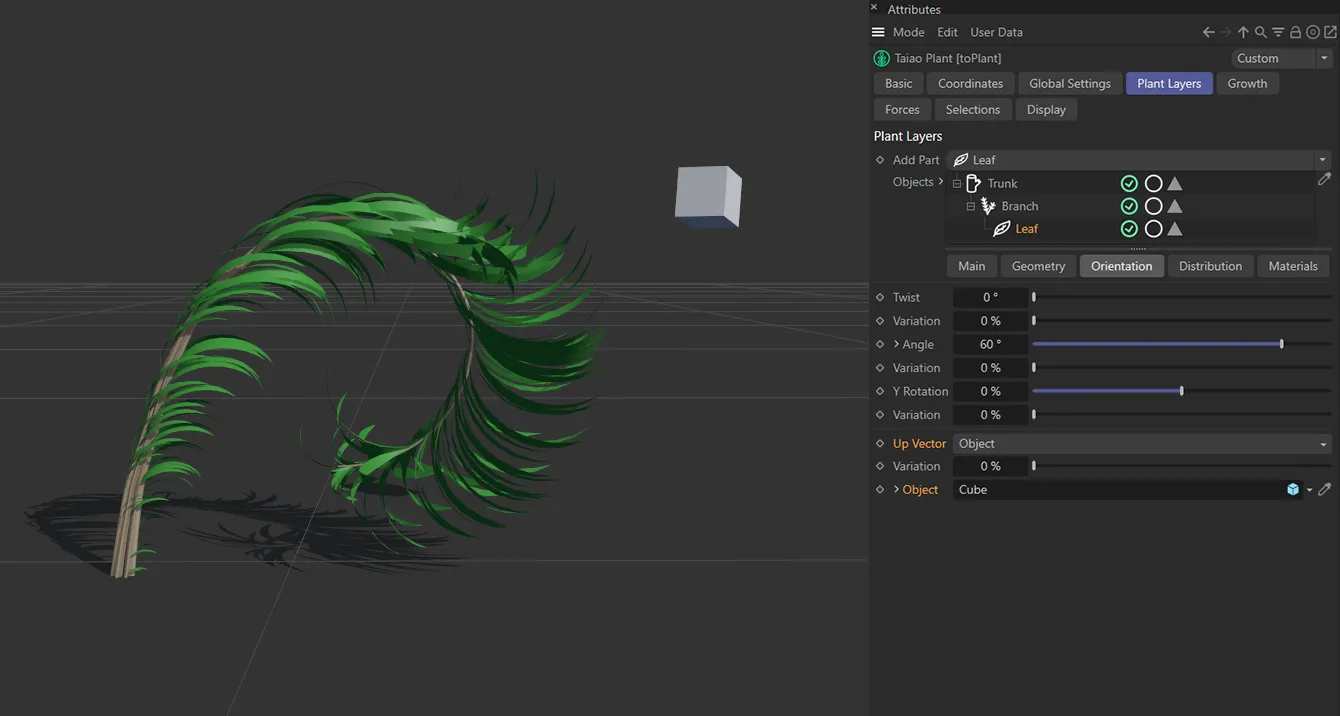
Up Vector in the Object setting, with leaves targeting the Cube primitive.
Distribution tab
Section titled “Distribution tab”Depending on the Type that you select here, you may need to re-visit your length settings in the Main tab for the Branch layer and the Leaf Count parameter in the Main tab for the Leaf layer, in order to ensure an accurate and even distribution pattern.
There are seven Type patterns: Random, Alternate, Distichous, Fibonacci Spiral, Decussate, Tricussate and Texture.
Distichous, Decussate and Tricussate will allow the additional option of a Count parameter, making it possible to change the number of patterns along the length of the branch.
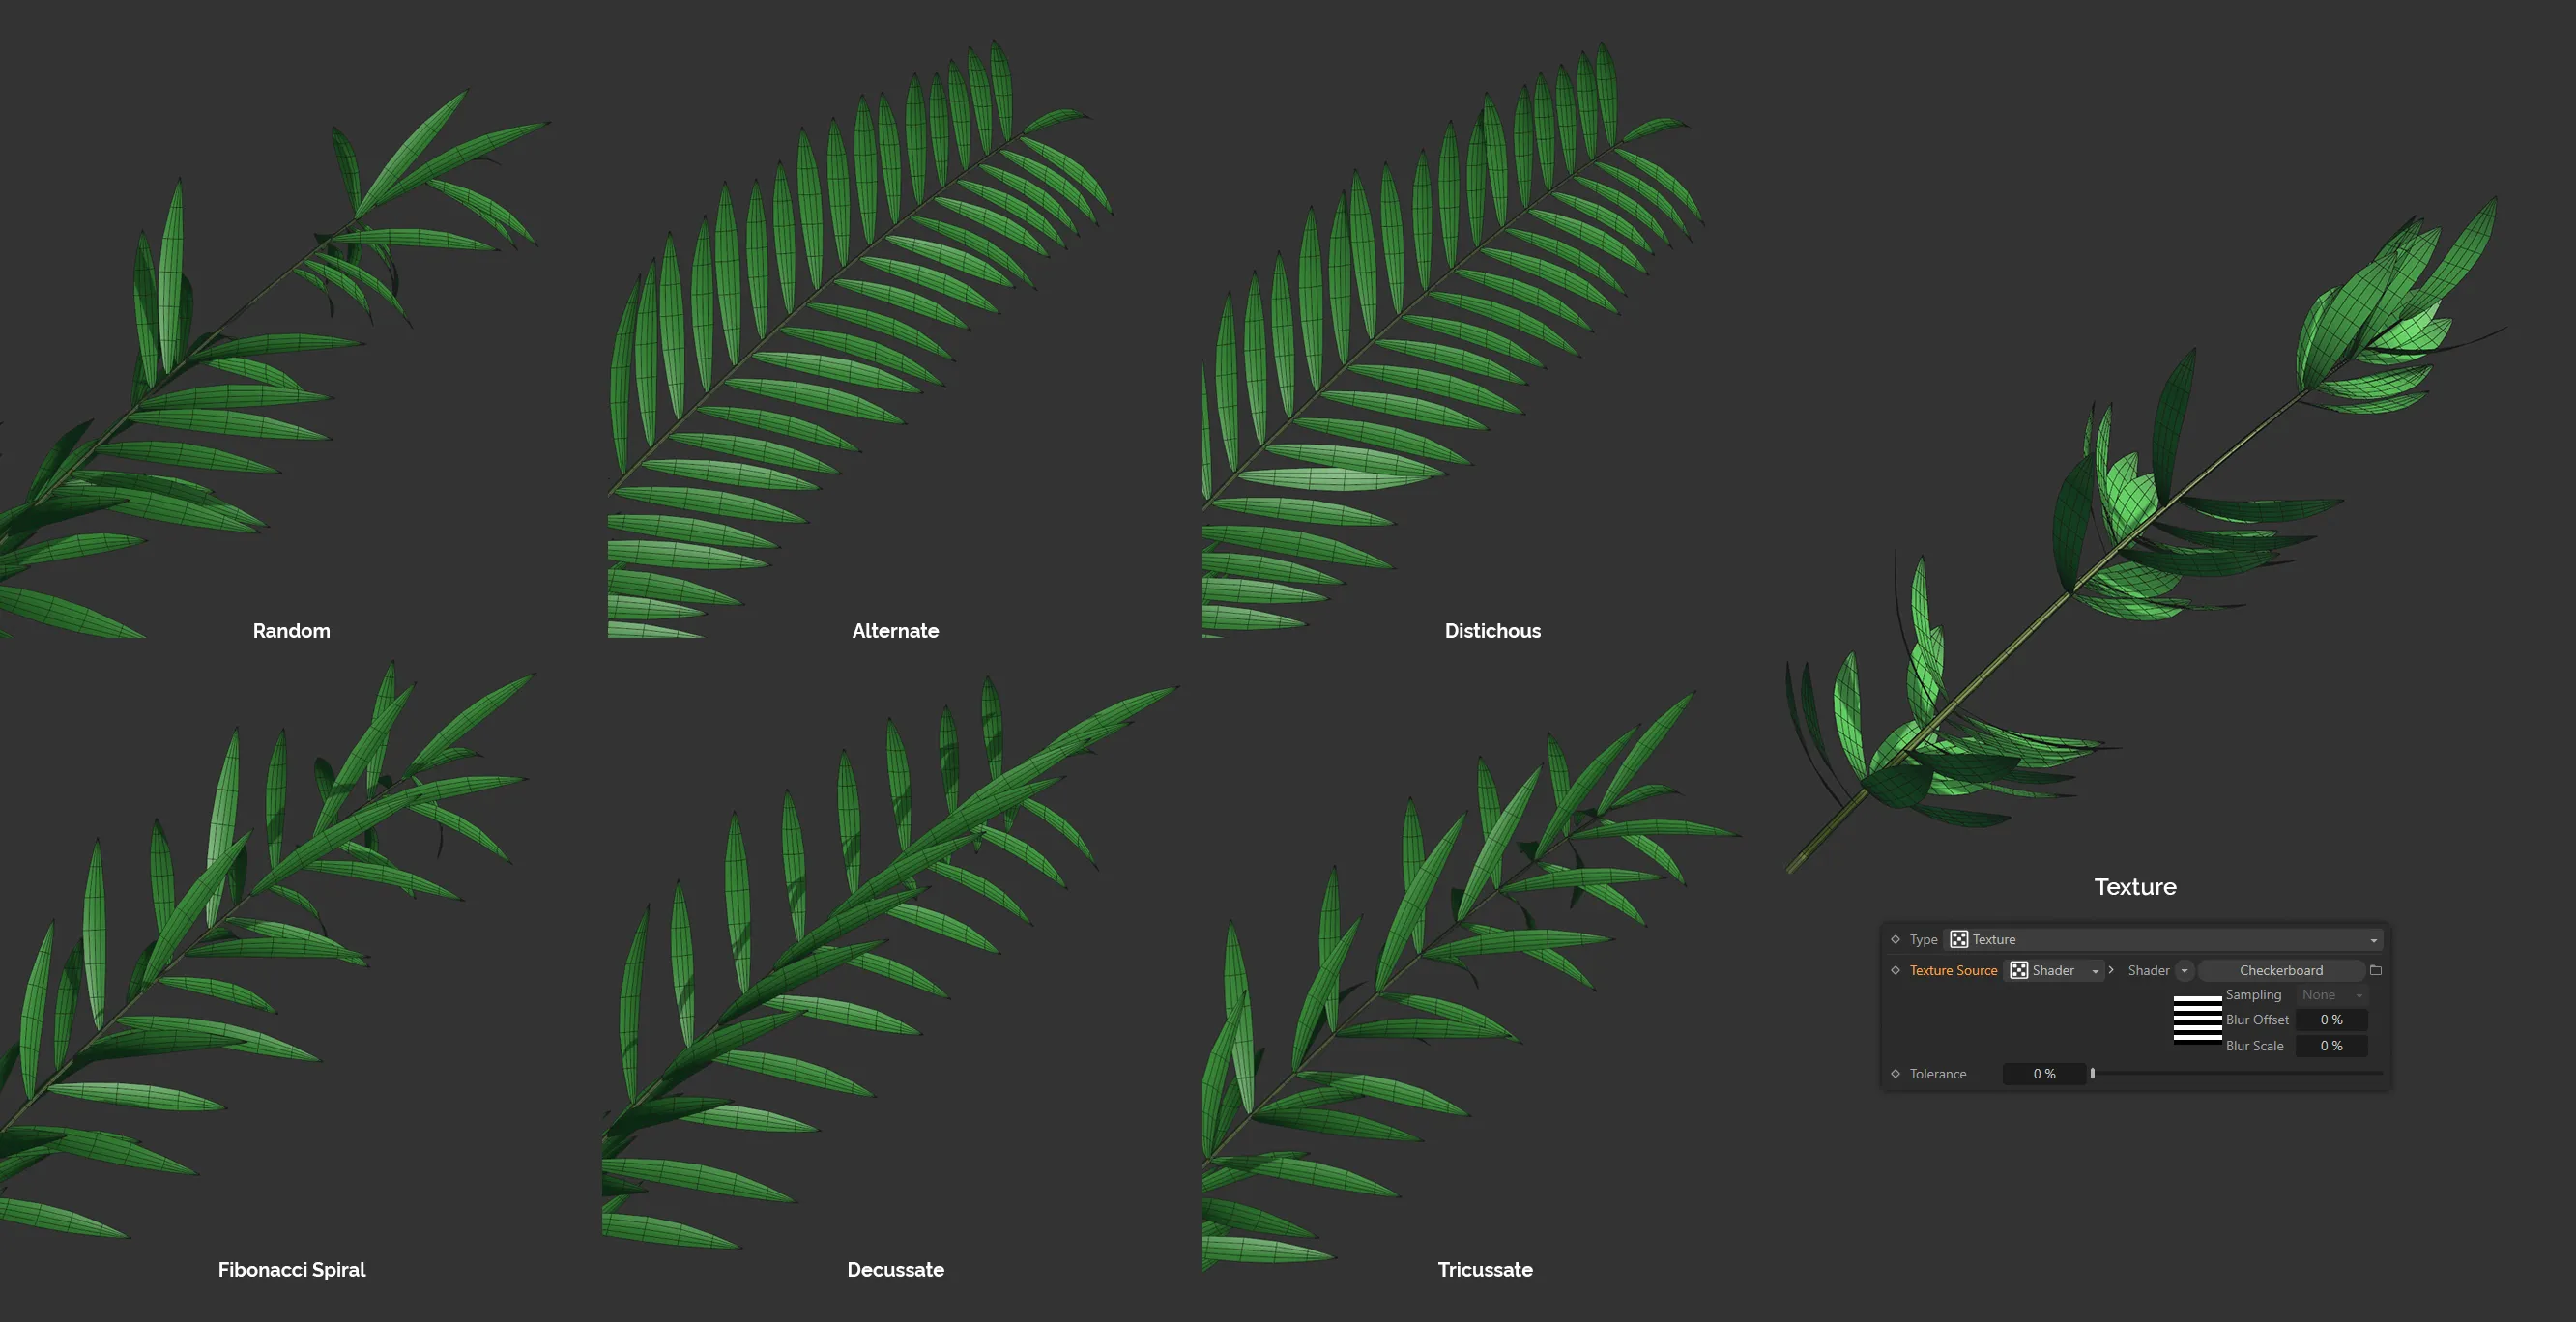
Distribution Type overview, including the Texture type, together with the associated settings.
Random
Section titled “Random”Randomly generates and distributes the leaves.
By altering the Seed value in the Main tab, it is possible to change these random looks.
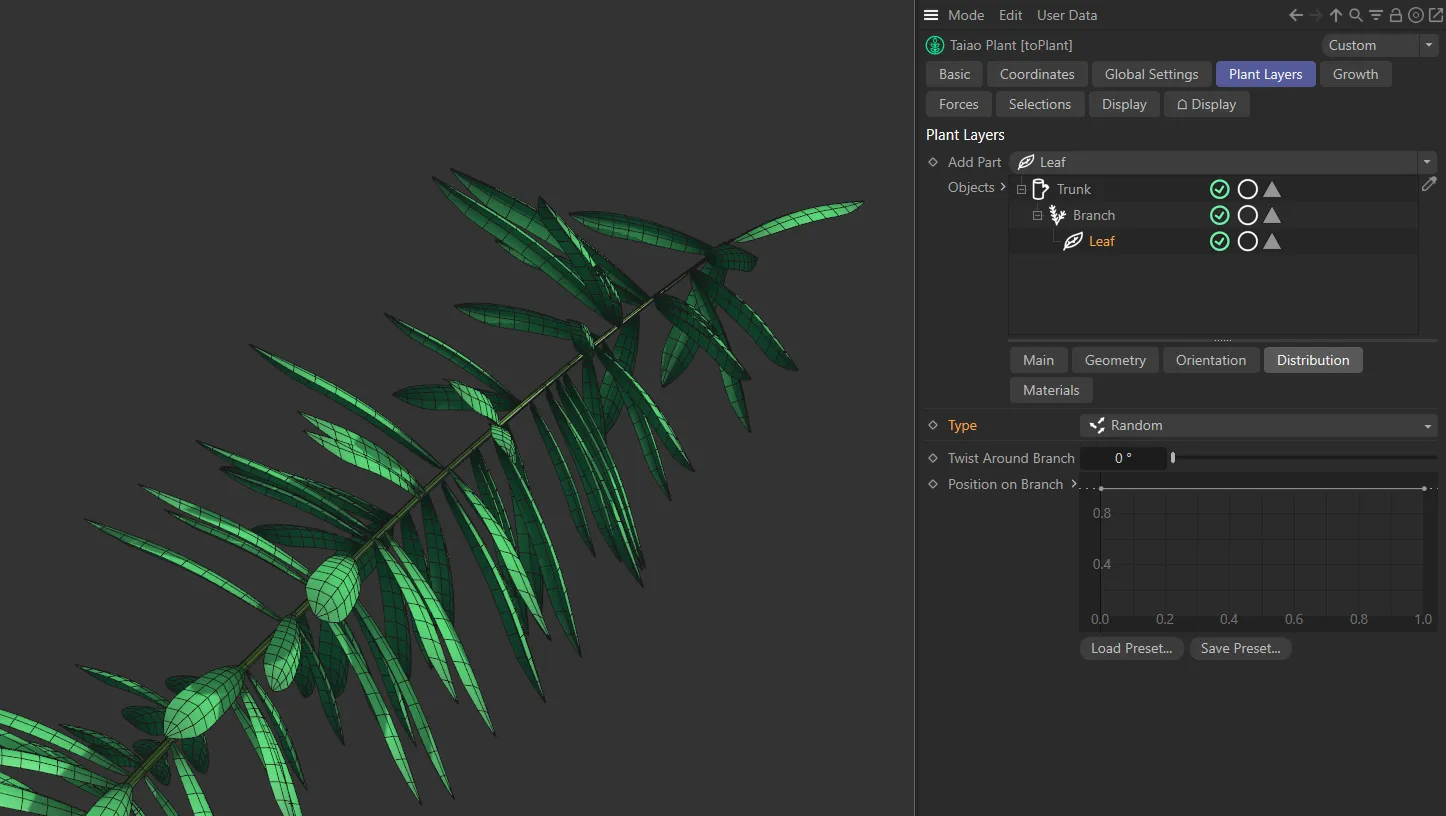
Type setting set as Random.
Alternate
Section titled “Alternate”Alternating distribution of leaves along the branch.
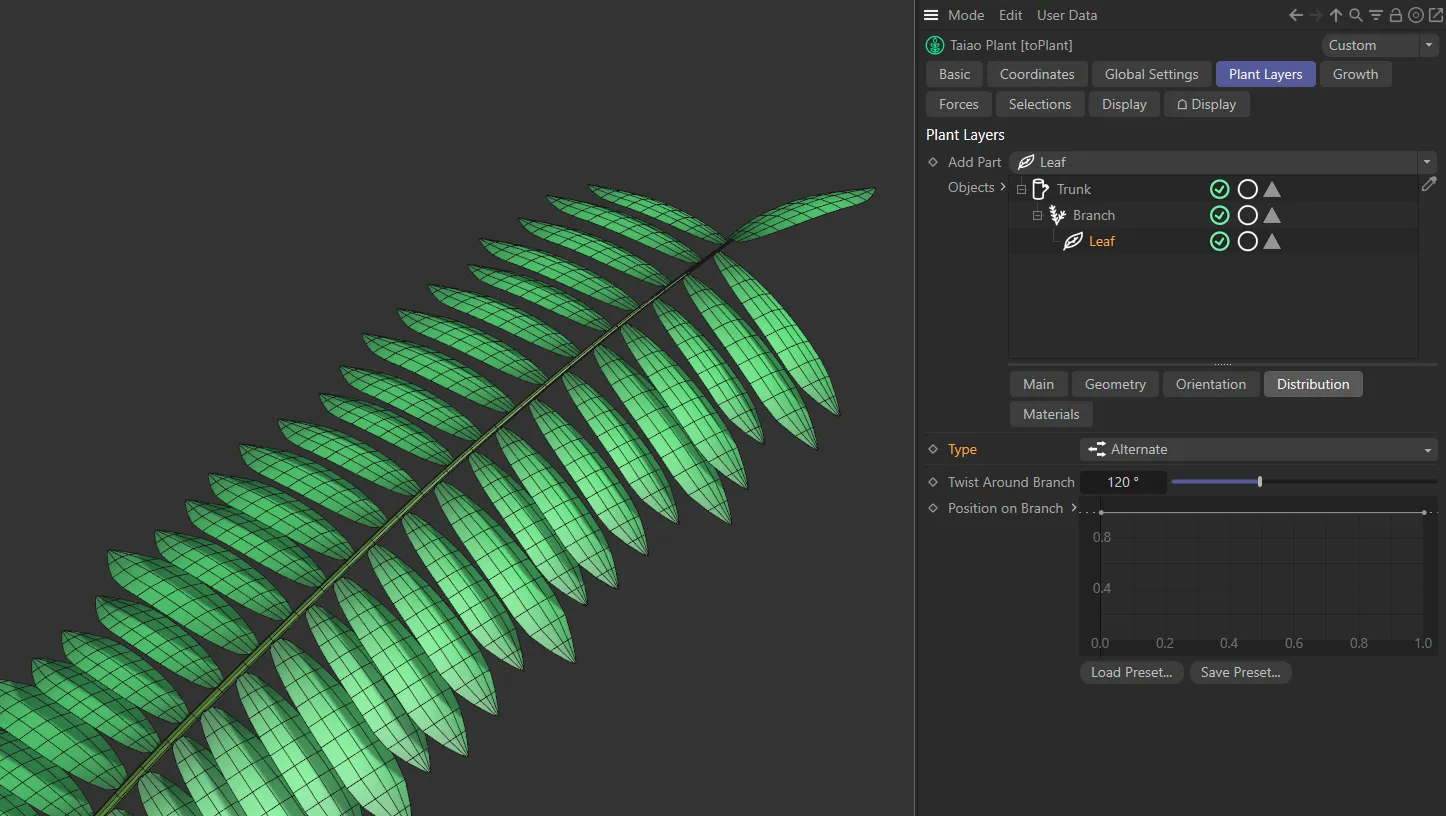
Alternate setting.
Distichous
Section titled “Distichous”Giving pairs of leaves all the way along the branch.
This setting opens up the Count parameter.
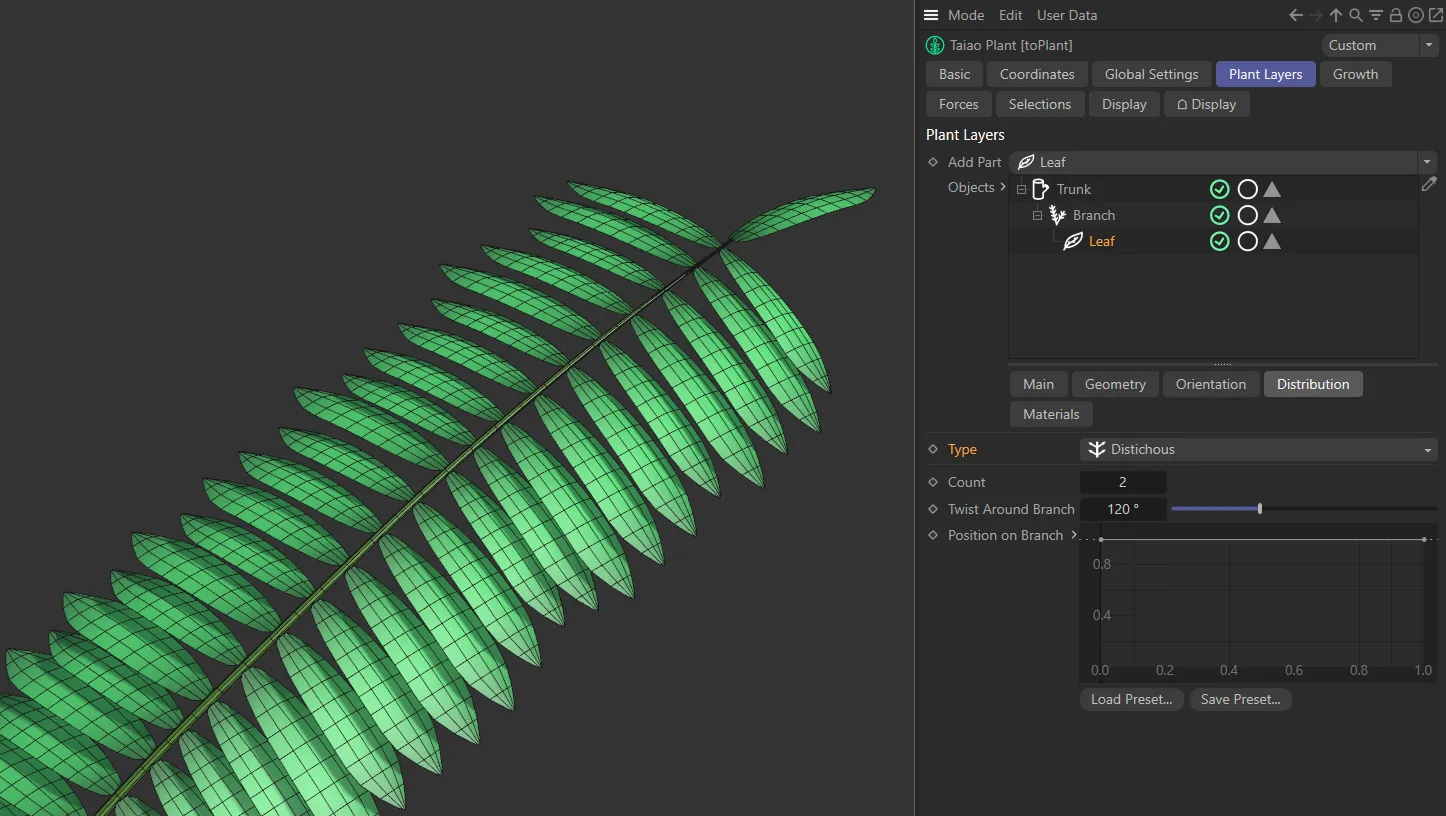
Distichous Setting.
Fibonacci Spiral
Section titled “Fibonacci Spiral”The default setting, leaves are being distributed in the natural Fibonacci spiral, along the length of the branch.
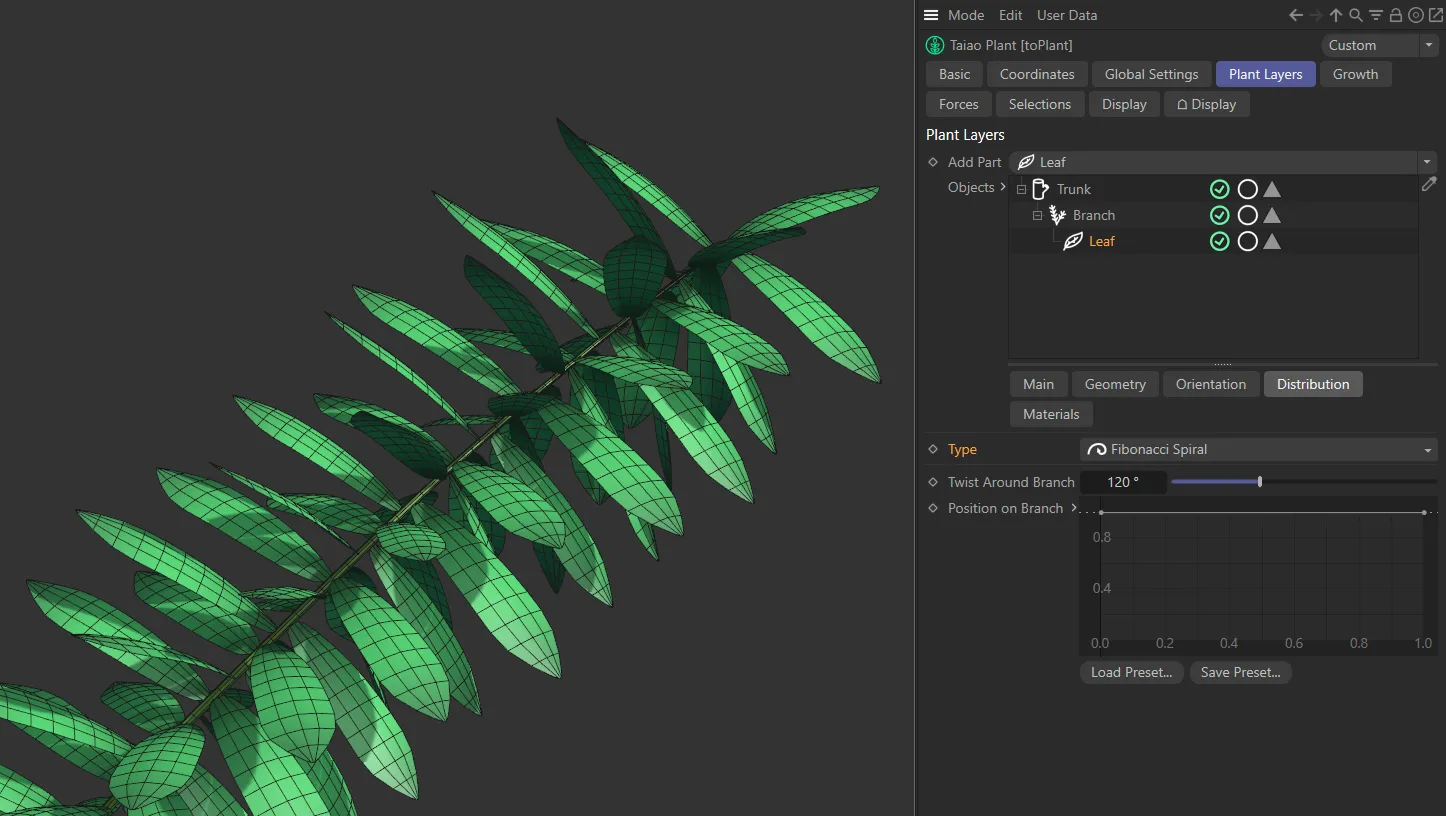
Fibonacci Spiral setting.
Decussate
Section titled “Decussate”This gives alternating pairs, by default, which, again, can be changed with the Count setting.
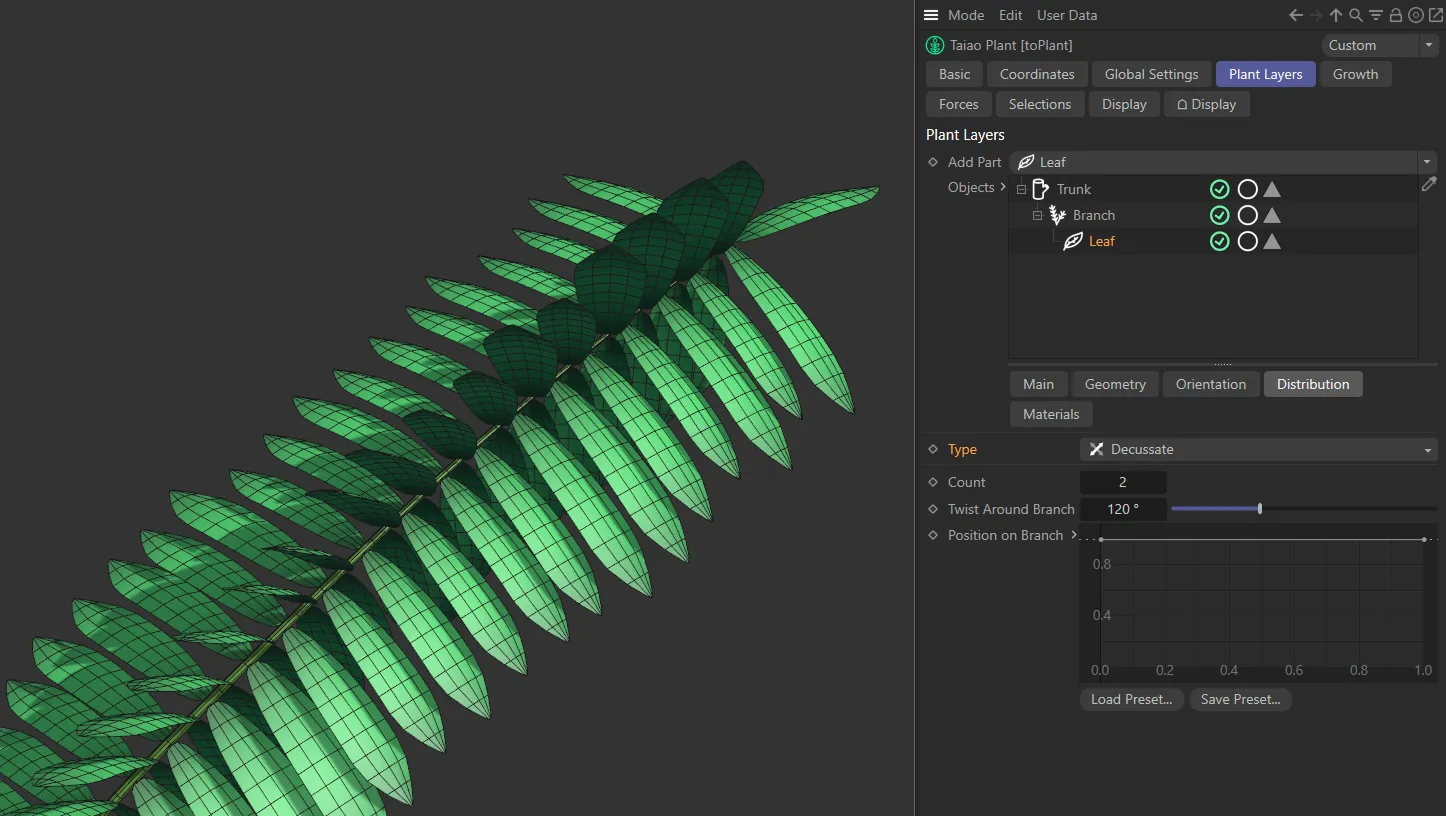
Decussate setting.
Tricussate
Section titled “Tricussate”Alternating, once again, but this time with three leaves on each layer of the branch.
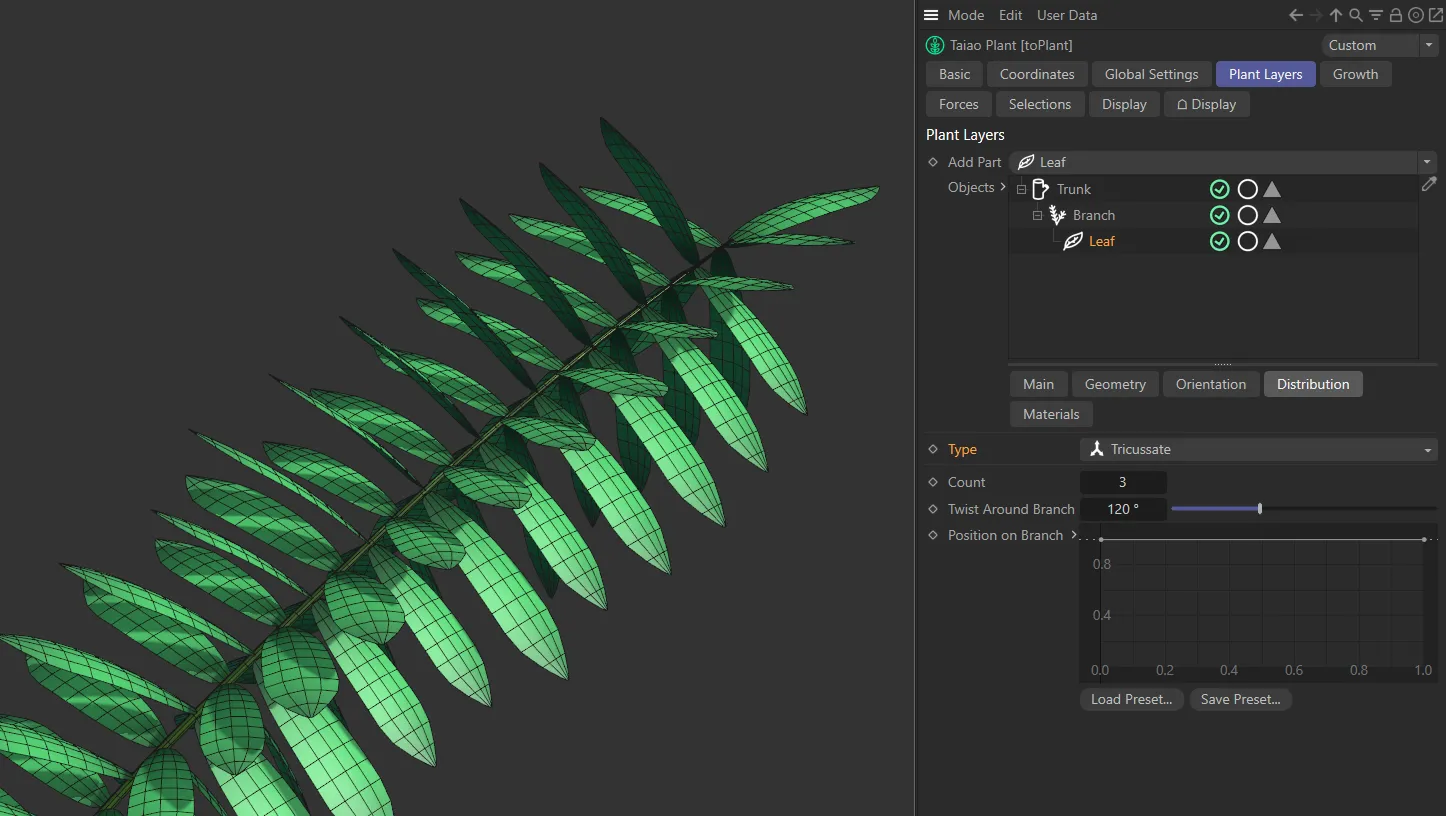
Tricussate setting.
Texture
Section titled “Texture”You can now use a Shader or a Texture to control the distribution of your branches.
Selecting this Type will give you the usual additional options to be able to import your Shader or Texture into the scene, including parameters for Channel and Tolerance settings.
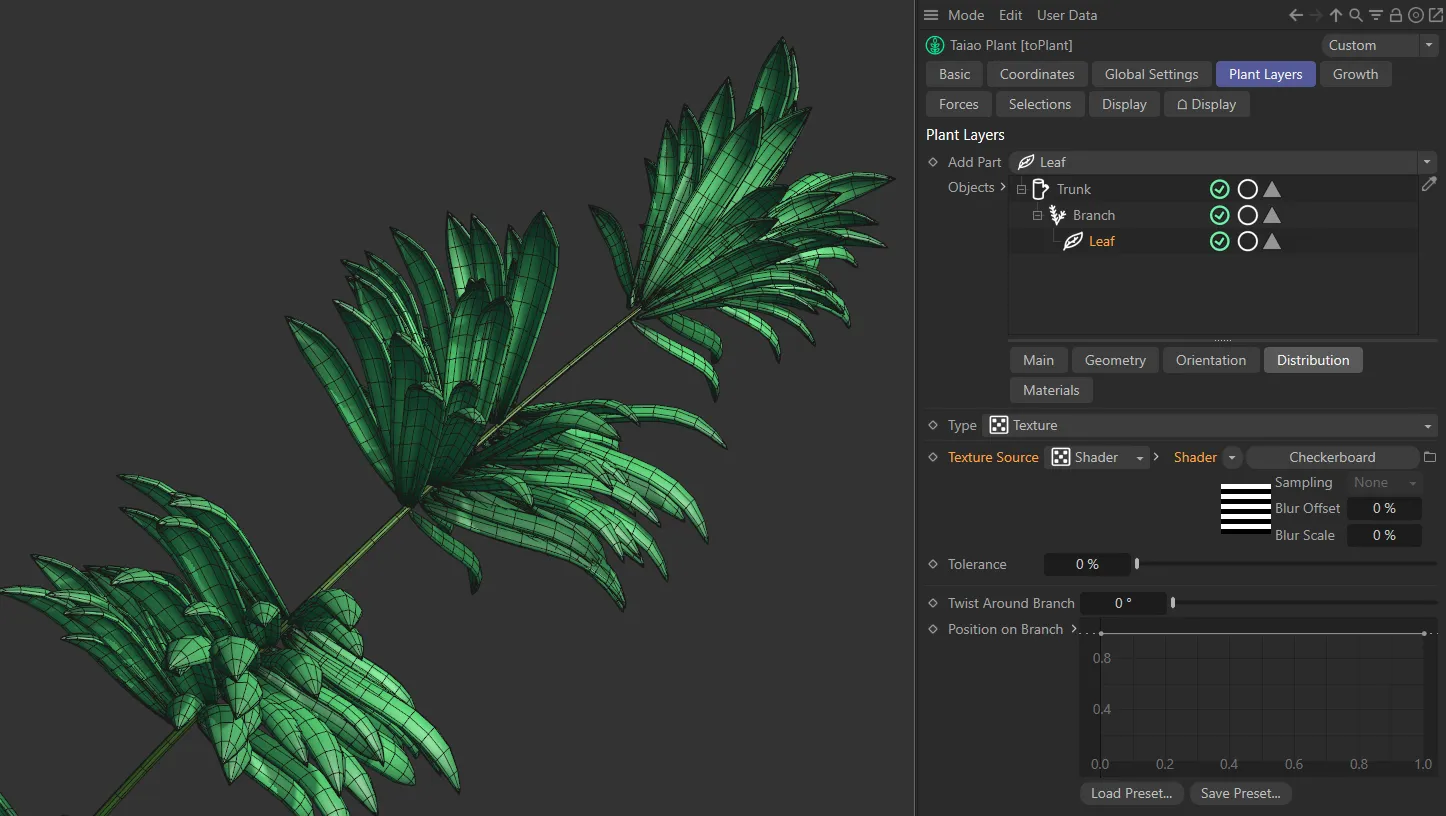
Here the Type is Texture, with a Checkerboard shader set.
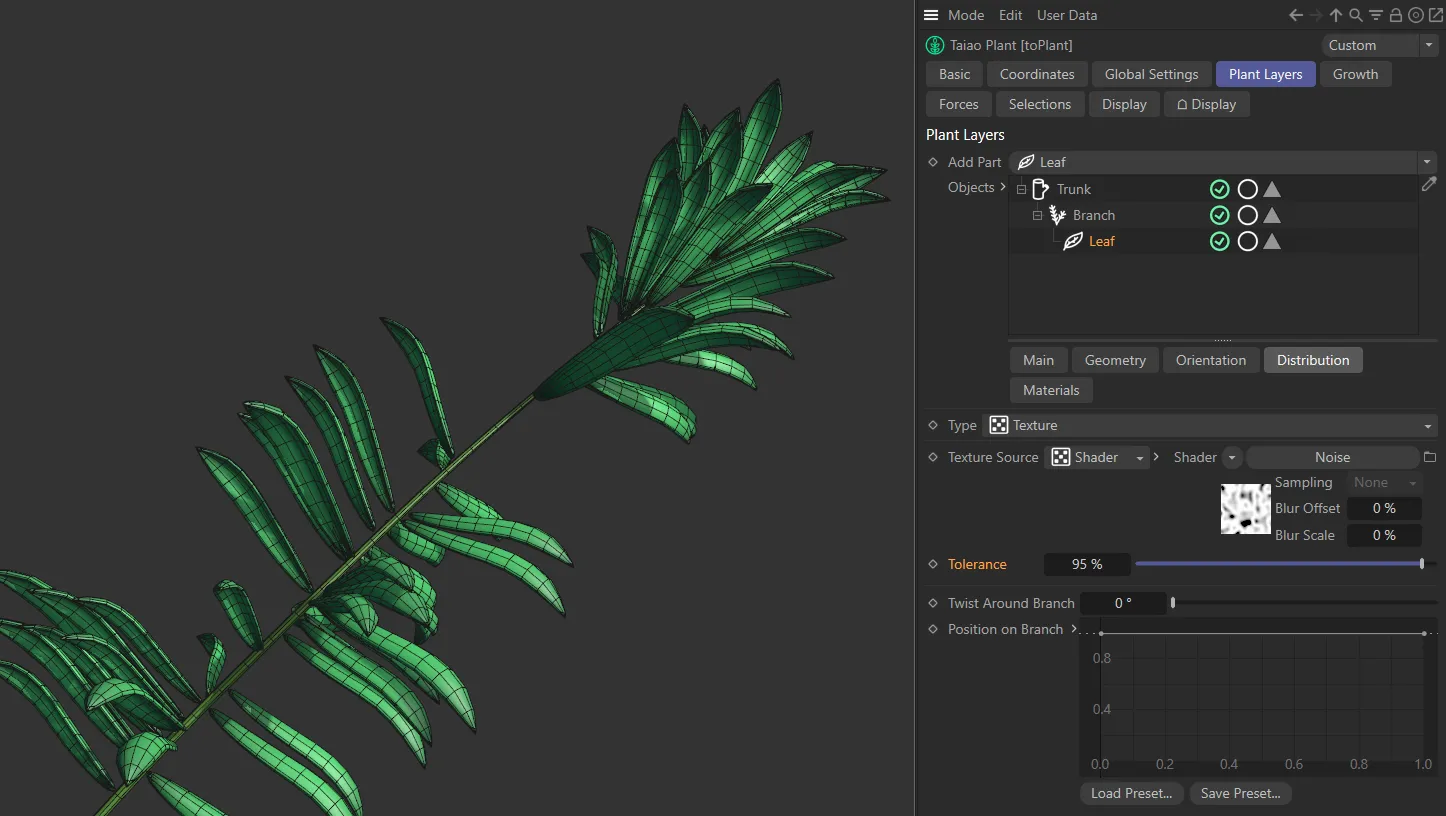
In this second image, a Noise shader has been applied, with the Tolerance at 95%.
In certain Type settings, there is a Count parameter available, in order to select the number of leaves in each individual layer.
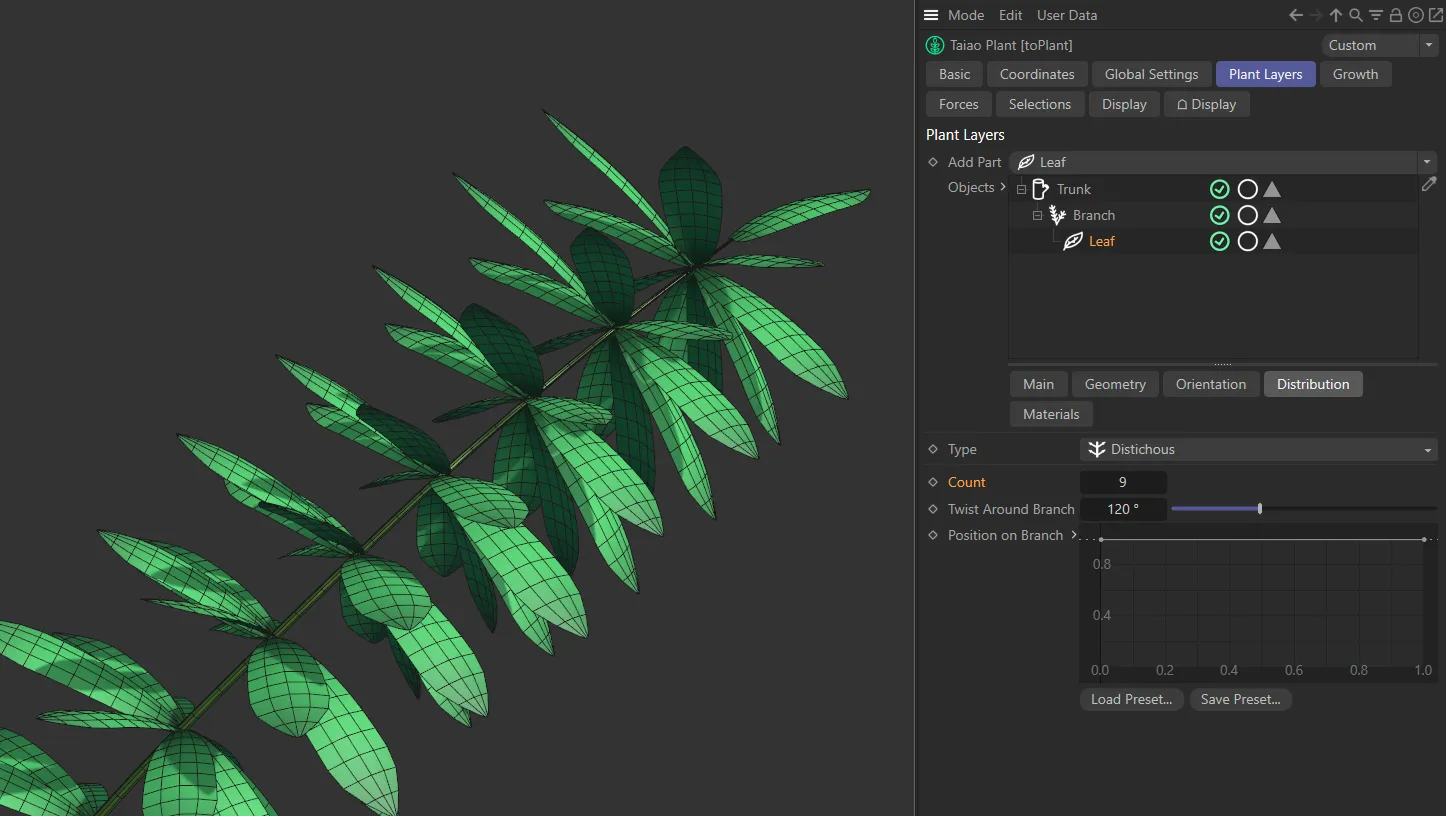
The Type, in this image, is Distichous, with a Count value of 9.
Twist Around Branch
Section titled “Twist Around Branch”This slider will twist your leaf pattern, at a set degree, around your branch.
Position on Branch
Section titled “Position on Branch”Drives how the leaves are distributed along the length of the branch.
The X-axis represents the length of the branch and the Y-axis is the ‘weight’ of distribution.
By default, the setting has the leaves harmoniously distributed, as seen below.
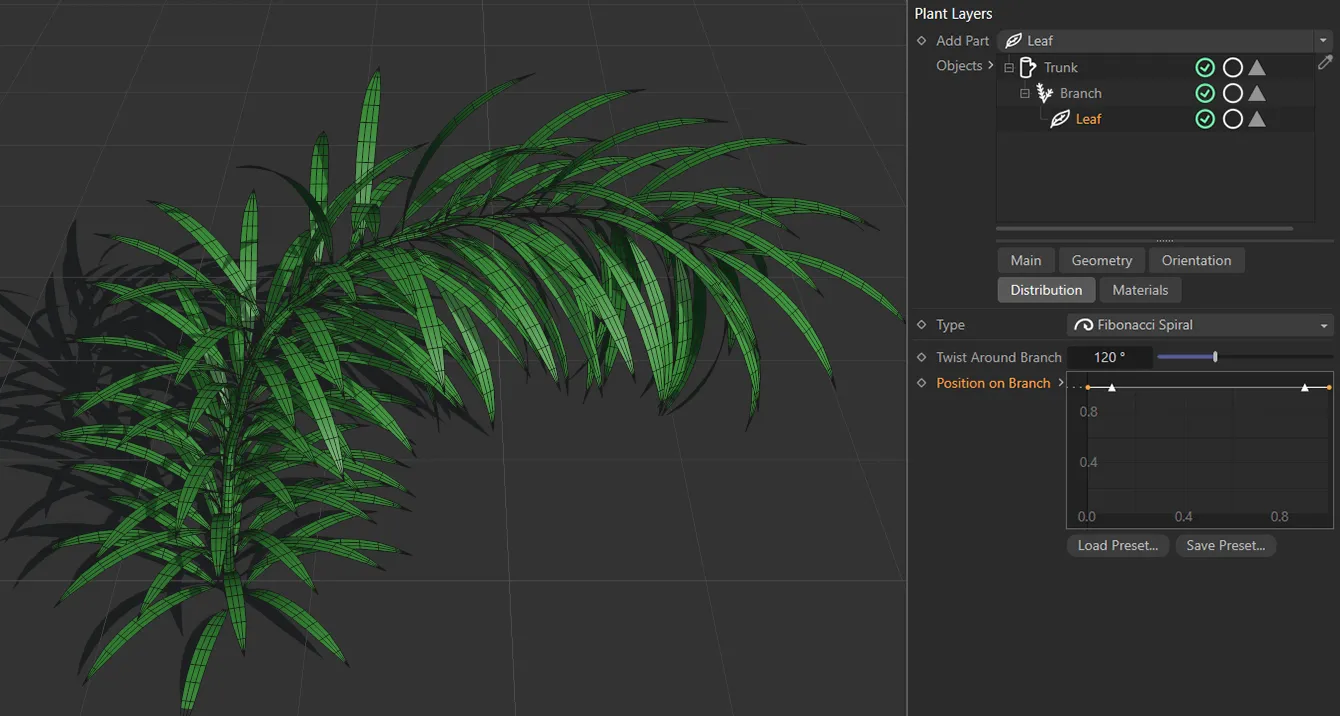
Position on Branch spline curve driving the leaf distribution.
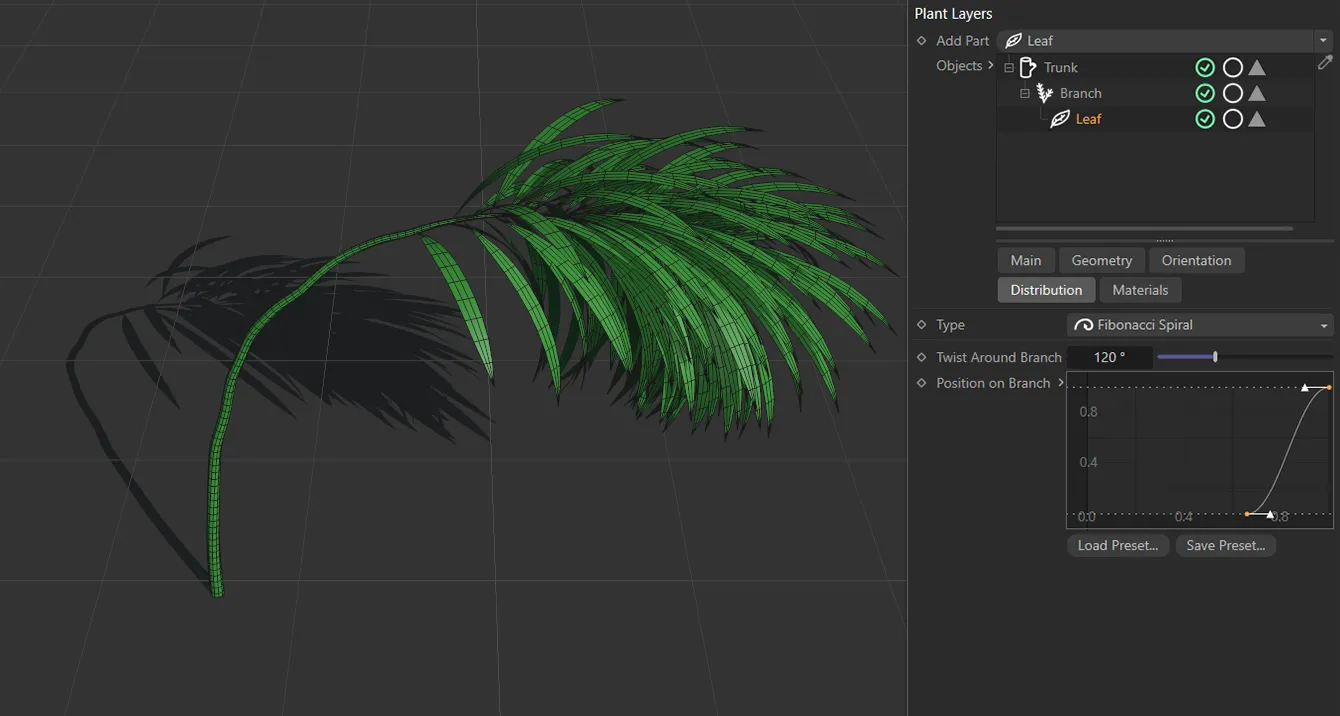
A different spline curve setting driving a different ‘look’.
With the spline pulled down at the beginning of the x-axis, the leaves will be more concentrated further along the branch.
Materials tab
Section titled “Materials tab”These settings apply materials to specific layers, operating in exactly the same manner as with the Trunk and Branch layers (described in greater depth in their pages).
Simply drag the required materials into the link field.
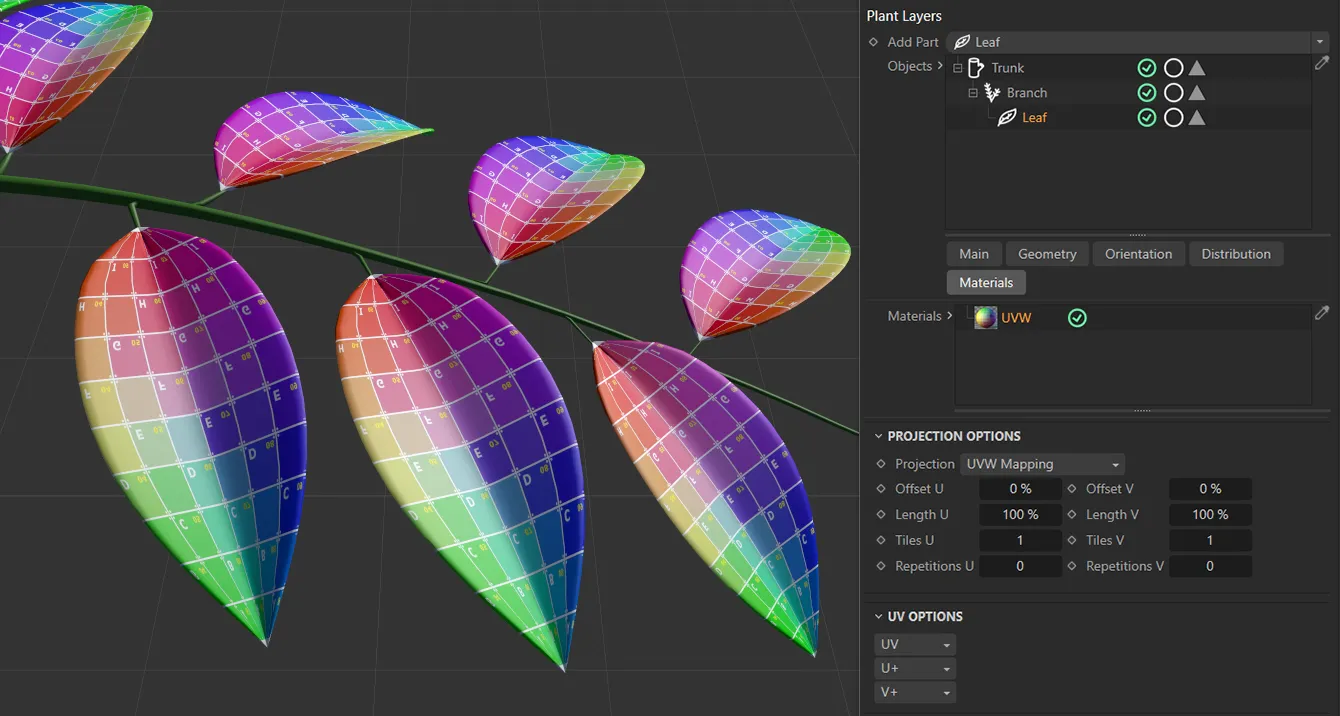
In this image, the material has been dragged and dropped into the Materials link field and is only affecting the selected Leaf layer.
The use of the Projection Options, UV Options and Phong Options are explained fully in the page for the Trunk layer.
Copyright © 2026 INSYDIUM LTD. All rights reserved.