Custom Object
You are able to add a custom object, if you have something specific that you are looking for in your scene.
Highlighting it will reveal individual settings related to the layer, with three tabs: Main, Profile and Materials.
Main tab
Section titled “Main tab”Custom Object
Section titled “Custom Object”Simply drag and drop your object into the Custom Object list and, depending where you have placed your custom object in the Add Part list, it will be added to your plant.
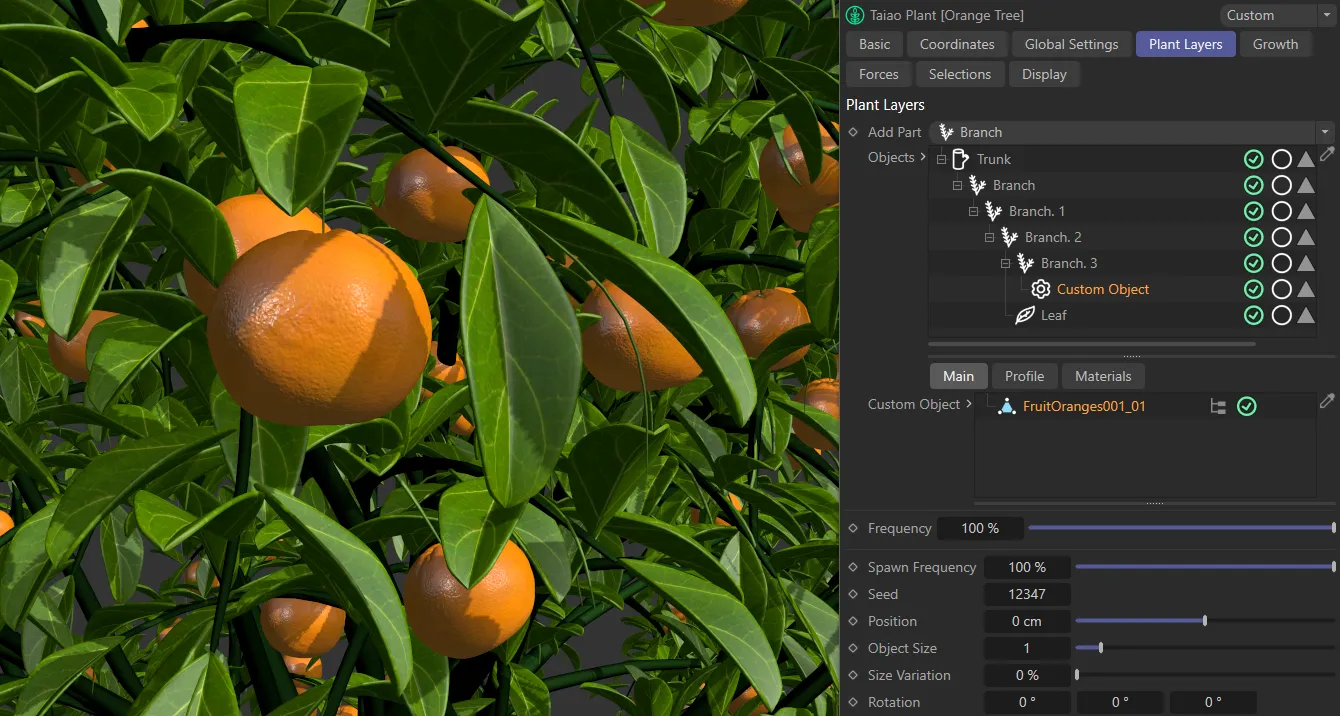
Orange model (FruitOranges001_01) dropped into the Custom Object list, as a child of the Branch.3 layer.
Spawn Frequency
Section titled “Spawn Frequency”This slider controls how many of your parent layers will have a custom object cloned onto them.
Set at 100%, every parent Trunk, Branch or Growth Point layer will have a Custom Object layer assigned.
Animation to demonstrate control over the amount of scattered objects by increasing or decreasing the Spawn Frequency slider.
Changing this setting will give you a different random look.
Position
Section titled “Position”By default, the custom object is positioned directly on top of the parent layer, but this can be altered to raise or lower it.
Object Size
Section titled “Object Size”Adjusts the global size of your custom object.
This animation shows manipulation of the Object Size and Size Variation sliders, giving control over all custom objects of the selected layer.
Object Size Bias
Section titled “Object Size Bias”Scales the custom objects based on the length of the parent object.

The Object Size Bias spline is scaling the flowers down based on the length of the parent.
Size Variation
Section titled “Size Variation”Adds a variation in size between your custom objects.
Rotation
Section titled “Rotation”Heading, pitch and bank can be rotated on your Custom Object.
Rotation Variation
Section titled “Rotation Variation”Here you can add a variation to the rotation settings.
Profile tab
Section titled “Profile tab”Subdivisions
Section titled “Subdivisions”You can add subdivisions to increase polygon detail and to add smoothing to the custom object.
Globally adjusts the width of the custom objects.
Animation to demonstrate the Width and Length sliders giving control over the selected custom object layer.
Length
Section titled “Length”Adjusts the length of the custom objects, again globally.
Profile
Section titled “Profile”This spline curve will allow you to manipulate the custom objects, in order to suit your particular needs.
This animation shows how to adjust the custom object geometry by changing the Profile spline.
Materials tab
Section titled “Materials tab”The Custom Object layer settings operate in exactly the same manner as described in the Trunk layer page.
Materials
Section titled “Materials”Simply drag your material into the Materials list and your object will be textured using the material.
Projection and UV Options
Section titled “Projection and UV Options”Both of these options operate in exactly the same way as described in the Trunk layer page.
Phong Options
Section titled “Phong Options”These options allow you to adjust the smooth shading between neighboring polygons.
Smooth shading can be applied across all polygons, or it can be restricted using the Angle Limit and Phong Angle settings. **
Angle Limit
Section titled “Angle Limit”When activated, this will use the Phong Angle value to **restrict where smoothing occurs. **
Phong Angle
Section titled “Phong Angle”You can change this to set the angle limit, up until which the neighboring surfaces will be smoothed.
Copyright © 2026 INSYDIUM LTD. All rights reserved.