Growth
The Growth tab gives extended control over specific layers of your plant.
Parameters available in this section will depend on the layers that you have added to your plant in the Plant Layers tab.
Global Growth
Section titled “Global Growth”This slider allows you to scale out all of your plant layers at the same time.
Animation to demonstrate the effect of the Global Growth slider, uniformly affecting the growth of all plant layers.
Growth Layers
Section titled “Growth Layers”This list will contain all the plant layers that you have added in the Plant Layers tab.
By highlighting an individual layer, you can take control of it in the two parameters below.
Highlighting this layer will bring up the additional parameters, explained below.
Animation
Section titled “Animation”Available for Leaf and Flower layers only.
It enables the use of growth effects using keyframed toLeaf and toFlower objects.
Activation of this feature is done by clicking the key icon in the Growth Layers list, turning the key green.
Once selected, each leaf or flower will become an individual polygon object, despite the Organ Mode selected in the Global Settings tab.
This may slowdown playback.
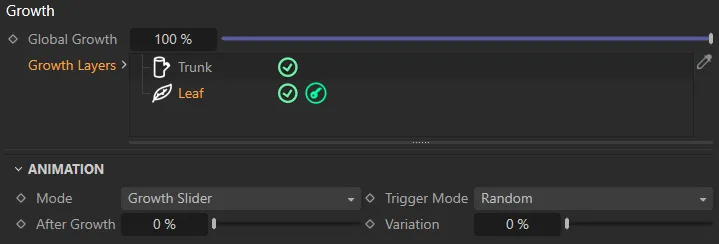
In this image, the green key symbol signifies activation of the Animation settings in the Leaf layer.
This animation is driven by the keyframing of the Furling Angle parameter, using a toLeaf object, which will be used as a Custom Leaf layer in the following animations.
Set as Growth Slider, by default, this dictates which slider controls the keyframed layer animation.
The alternatives are Global Growth Slider and Animate Slider.
Global Growth Slider
Section titled “Global Growth Slider”The Global Growth slider will control both the scale of all of your plant layers and the object’s animation cycle.
At 0 (zero) %, the plant will have no scale and the object layer will be at the first keyframe of its animation.
At 100%, the plant will have grown to full scale and the object layer will be at the last keyframe of its animation.
This animation demonstrates the Mode set as Global Growth Slider, controlling the scale of all of the plant layers.
Growth Slider
Section titled “Growth Slider”The Growth slider works in the same way, but instead of affecting the whole plant, it scales the specific layer.
At 0 (zero) %, the object will have no scale and will be at the first keyframe of its animation.
At 100%, it will have full scale and be at the last keyframe of its animation.
The Growth slider is keyframed, here, to simulate the growth of the leaves, from 0 (zero) to 100%.
Animate Slider
Section titled “Animate Slider”The Animate slider mode gives you direct control over the keyframed animation.
Use this slider to move through the animation cycle of your object, with 0 (zero) % being at the first keyframe and 100% being at the last.
This gives you the option of using the Grow Slider, to control the scale, and the Animate Slider, to control the animation.
In this animation, the Animate parameter is keyframed from 0 (zero) % to 100%, then it’s animated back to 0 (zero) % along with the Growth slider, which reduces the leaves scale.
Trigger Mode
Section titled “Trigger Mode”Set as Random, by default.
The other options are: Sequence and Field.
This setting controls when a layer object will begin its animation cycle.
Random
Section titled “Random”The animation of layer objects is randomly offset so it doesn’t occur simultaneously.
Sequence
Section titled “Sequence”The animation of layer objects is offset according to its position on the layer.
For example, the leaf closest to the start of a branch will begin its animation first.
The leaf on the end of the branch will be the last to begin its animation.
The animation of layer objects is driven by a field object and its falloff.
This Linear field is being used in conjunction with the Growth parameter, to animate the Leaf layer growth.
After Growth
Section titled “After Growth”In Growth Slider mode, this setting can be used to delay the start of the animation.
Animation will only begin once the Growth Slider has exceeded this value.
Animate
Section titled “Animate”In Animate Slider mode, this setting is used to control the animation cycle of the objects.
Variation
Section titled “Variation”Adds variation per object to the After Growth or Animate Sider value.
The following two parameters are available for all Growth Layers types.
Growth
Section titled “Growth”Here you can have control over the growth of the layer you have highlighted in the Growth Layers list (above), along with all plant layers in its hierarchy.
Animation to illustrate the use of the Trunk Growth slider and its proportional effect on child plant layers.
Variation
Section titled “Variation”You can add variation to the Growth setting here.
Animation to show how the Variation sliders add different states of growth for trunks when using growth points.
You have access to the usual field objects, which can be used to drive the toPlant growth in your scene.
Animation of a Box Field, controlling the custom object growth within the field falloff.
Copyright © 2026 INSYDIUM LTD. All rights reserved.