Forces
The two forces available are wind and turbulence, both with their own settings.
Forces
Section titled “Forces”Enable
Section titled “Enable”Clicking in the check box activates the wind settings.
Animation will only begin once play is clicked.
Loop Time
Section titled “Loop Time”Inputting a value one frame higher than the end of your Timeline will ensure you have a perfect loop, with no jumping in your animation.
Animation demonstrating the Loop Time feature, set to repeat all forces every 30 frames.
Global Settings
Section titled “Global Settings”Wind Strength
Section titled “Wind Strength”The Wind Strength slider can be taken to 100%, but manually inputting the numbers means that you can select a Wind Strength setting of well over 100% to simulate gale forces.
Wind Strength Variation
Section titled “Wind Strength Variation”This slider needs to be above 0 (zero) % in order to see any movement in the animation.
Animation to demonstrate the Wind Strength Variation parameter, with 25% on the left and 100% on the right.
Changing this value gives a different random turbulence, based on the settings chosen.
Changing the Seed value will give you different looks in both still frames and animation.
Noise Type
Section titled “Noise Type”Set as Noise, by default.
Alternative options are: Turbulence, Wavy Turbulence and FBM (Fractional, or Fractal, Brownian Motion).
This animation highlights the four different Noise Type settings, shown above each tree.
Turbulence
Section titled “Turbulence”Turbulence adds a more random movement once play has been clicked.
Again, the slider will take this up to 100%, but you can manually input a higher value.
The system is set, as a default, to target the turbulence more heavily on the leaves of the plant.
These settings can be altered in the Level Options parameters below.
Animation to illustrate the effect of the Turbulence slider, set at 50% on the left, raised to 300% on the right.
Turbulence Scale
Section titled “Turbulence Scale”Selecting higher amounts will mean that the different layers (Trunk, Branch and Leaf) will move together more cohesively.
Lower amounts will result in different layers moving at different rates, due to the smaller noise size.
Animation to demonstrate the use of the Turbulence Scale setting. On the left this is set at 5%, while on the right it is raised up to 750%.
Octaves
Section titled “Octaves”This slider increases and decreases the detail of the Noise Type, with a smoother animation at a lower setting, getting more frenetic as the Octaves level is raised.
Animation to show the effect of Octaves values of 1 on the left and 3 on the right, with a Noise Type of FBM.
Direction
Section titled “Direction”Dragging the slider, or inputting a value, will change the direction of the wind up to 360 degrees.
Direction from Object
Section titled “Direction from Object”You can also use a scene object as the source of the wind direction, by simply inputting an object into the link field.
The wind direction will always be dictated by the +Z direction of the object, as with the example null shown here.
Animation showing the effect of using a Null in the Direction from Object link field as the source of wind direction.
Level Options
Section titled “Level Options”In this section, you can select where the forces are being targeted, altering the weight towards a particular area, using the sliders.
Levels
Section titled “Levels”This list contains all the plant layers that you currently have in your scene, so that you can choose where the forces are targeted.
You have the option to disable any layer that you don’t wish to feel the effect of the forces set by clicking on the green check mark, changing it to a red cross.
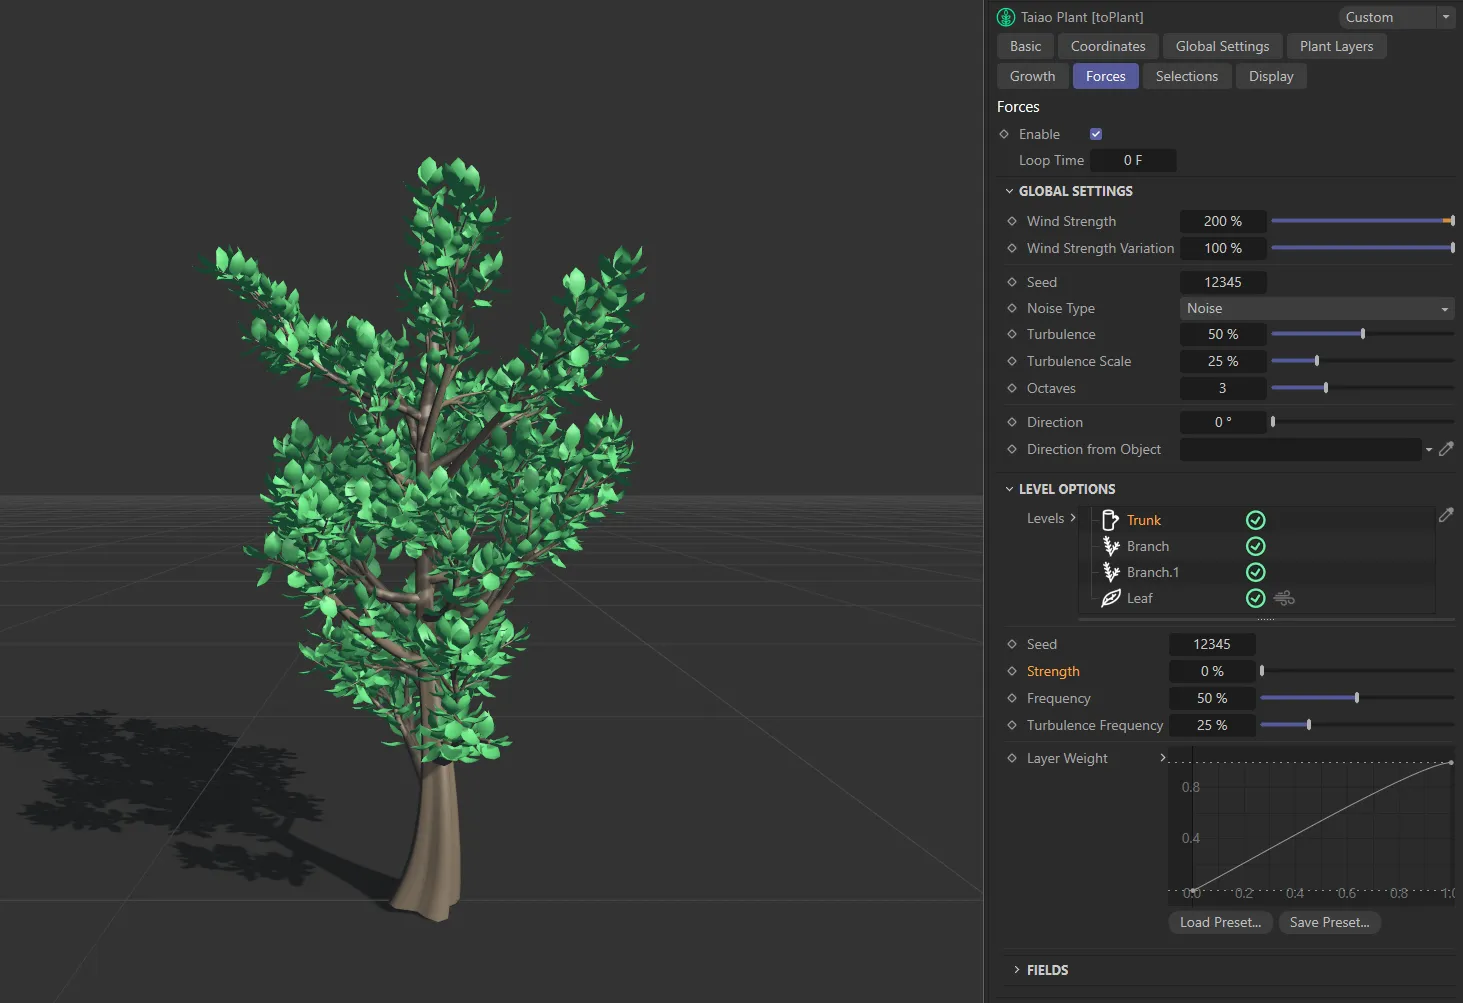
In this image, the force’s Strength value on the Trunk layer is at 0 (zero) %.
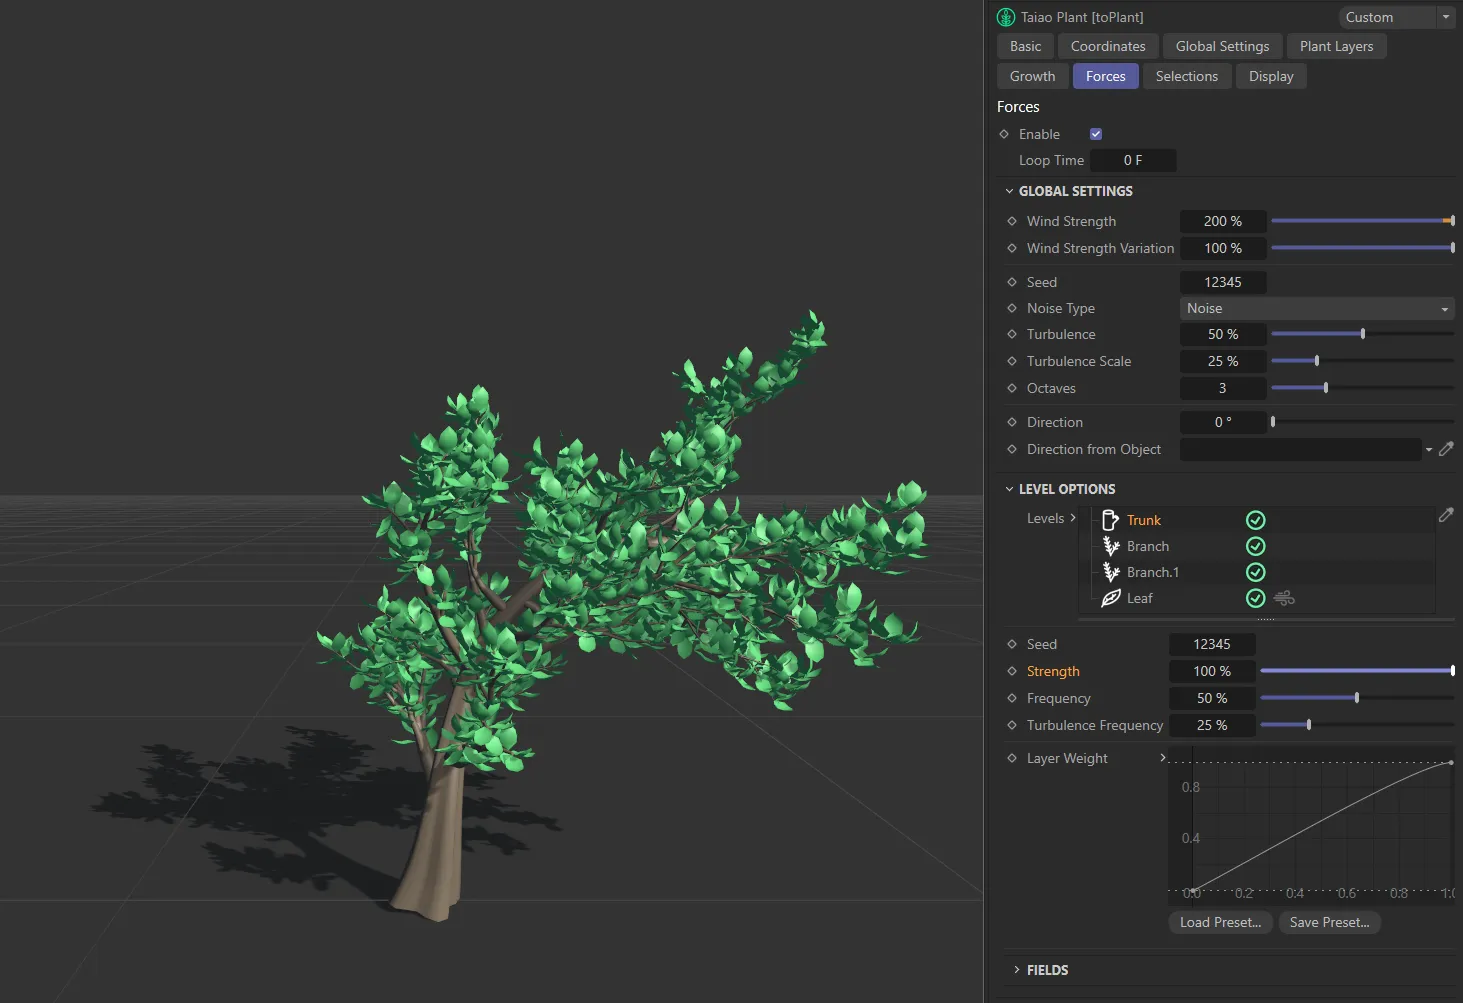
Strength raised, on the Trunk layer only, to 100%
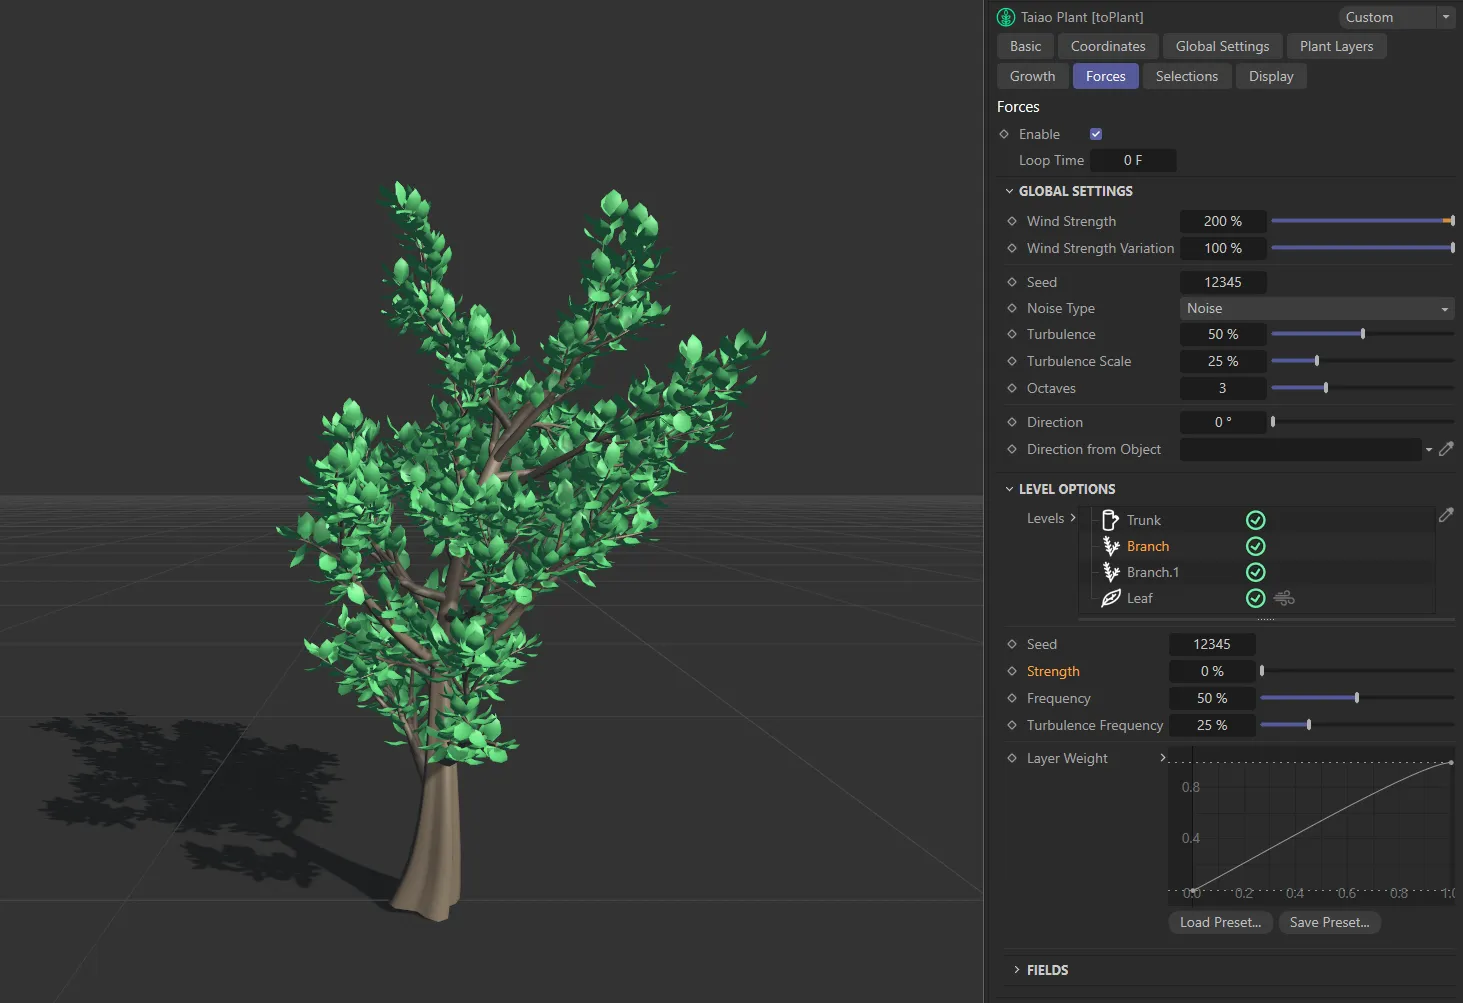
In this image, the force’s Strength level on the Trunk layer is 50%, while all other layers are at 0 (zero) %.
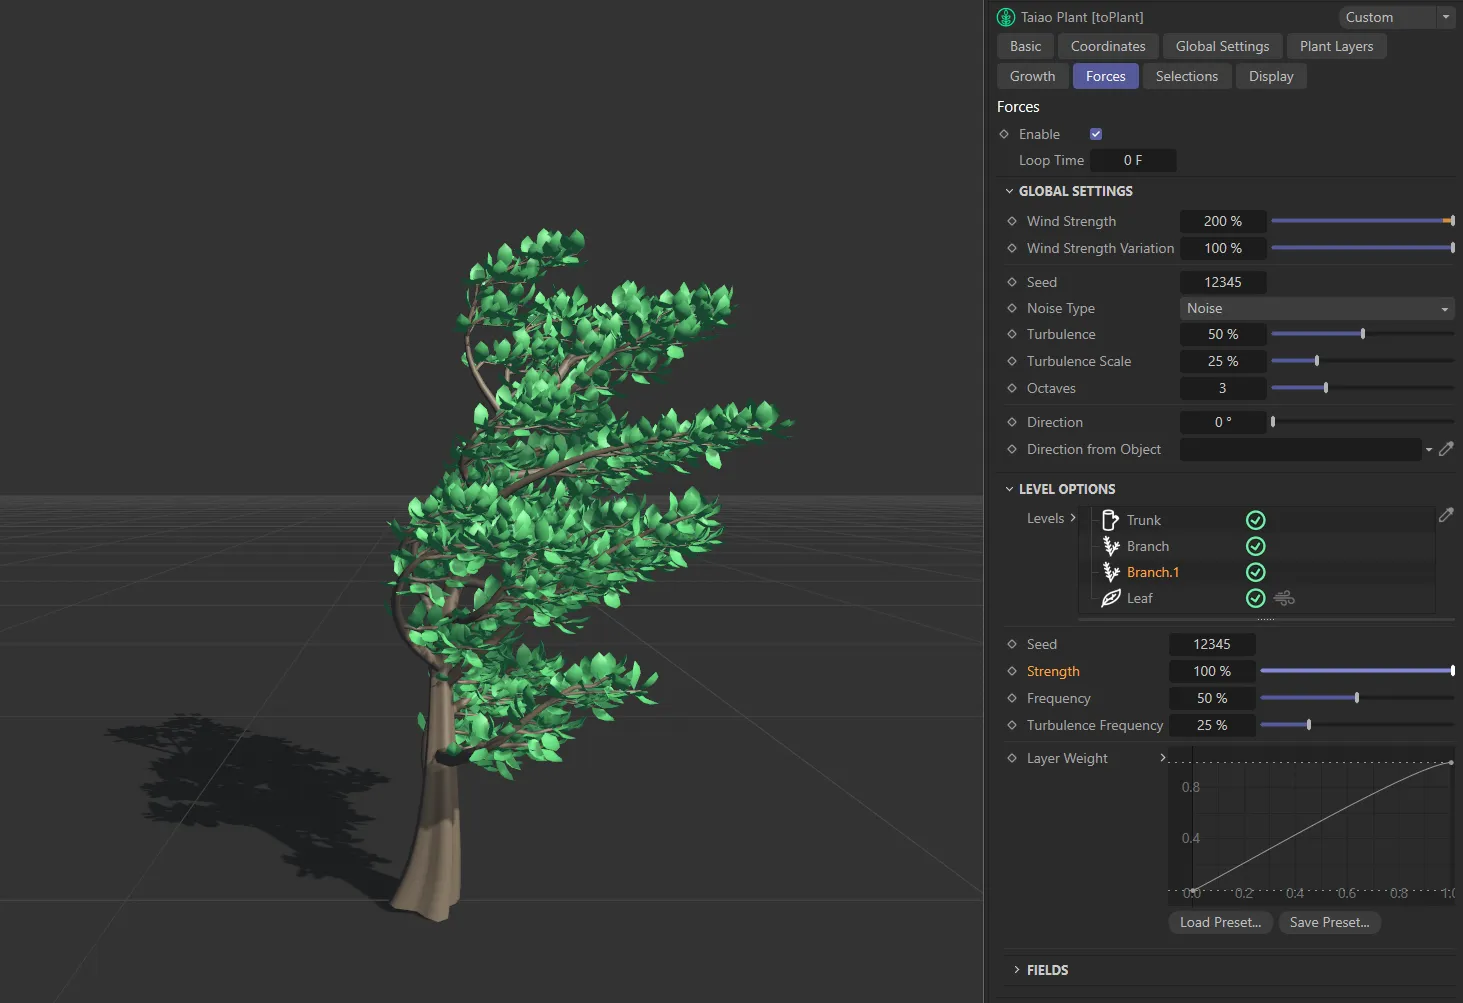
By direct contrast, with the same Strength on the Trunk layer, the Branch layer here is at 50% and Branch.1 is at 100%.
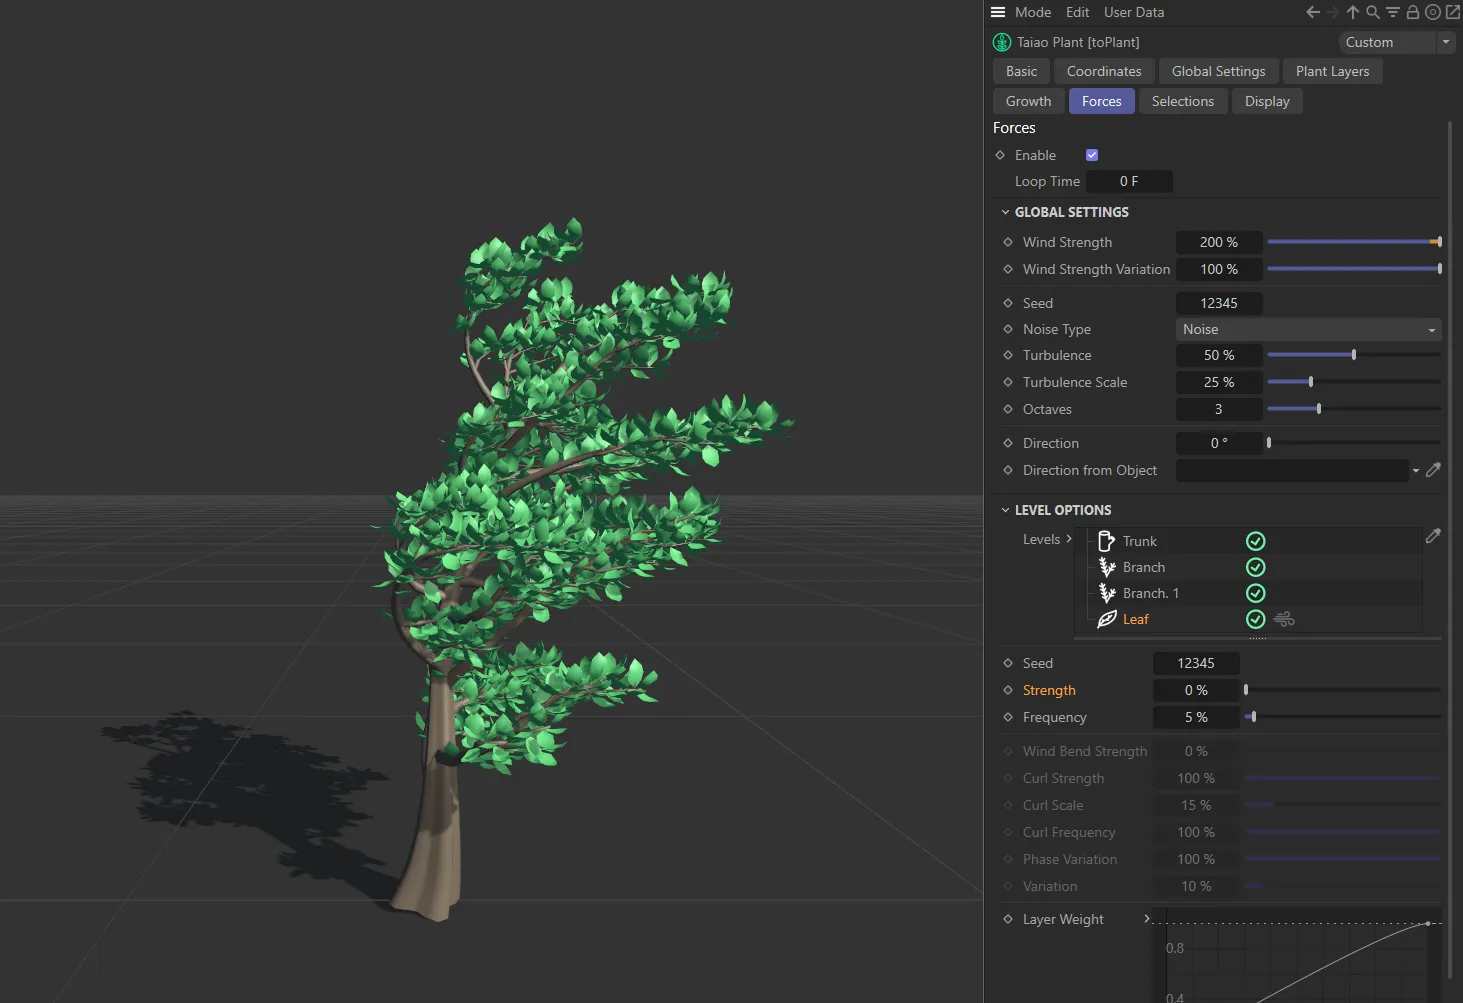
With the same settings as above, the Leaf layer’s Strength is 0 (zero) %, in this image.

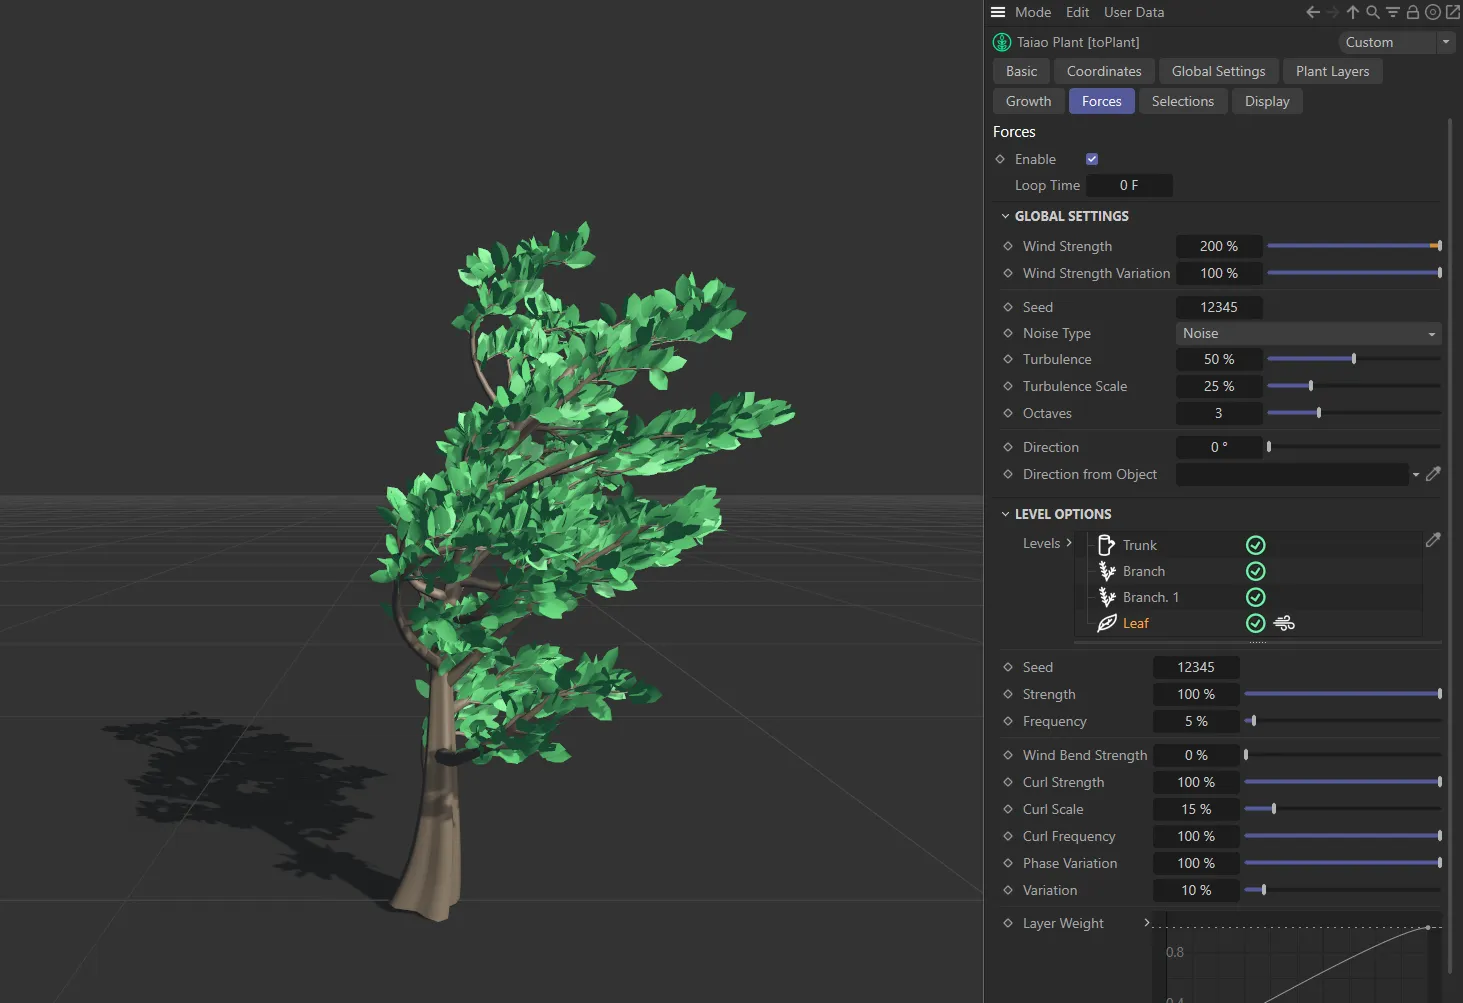
While here, the Strength force on the Leaf layer is 100%.
When active, the leaves from this layer will become individual polygon objects, despite the Organ Mode setting in the Global Settings tab. With large leaf counts, this can slow down playback.
In this final image, the wind icon, on the Leaf layer, is enabled allowing individual leaf deformation.
Each value will give a different look, based on the values set.
Strength
Section titled “Strength”Controls the overall forces strength, dependent on the Levels enabled.
Frequency
Section titled “Frequency”This setting adjusts how the Noise Type is animating.
Higher frequencies will animate more quickly, whereas lower frequencies will produce a much slower animation.
Turbulence Frequency
Section titled “Turbulence Frequency”Only available for the Trunk and Branch layers, this sets the rate at which the turbulence animates.
Set to 200%, this can be adjusted to control the turbulence setting.
The next five parameters are available for the Leaf layer only, and only if the wind icon is selected.
Wind Bend Strength
Section titled “Wind Bend Strength”Bend into or against the direction of the wind.
Curl Strength
Section titled “Curl Strength”This is set to 100%, by default, and adds additional deformation to the lead geometry.
Curl Scale
Section titled “Curl Scale”This is set to 50% and alters the size of the deformation.
This animation shows the effect of a Curl Strength of 100%, with a Curl Scale of 25%.
Curl Frequency
Section titled “Curl Frequency”Alters the animation speed of the deformation.
At 0 (zero) % there is no speed, while at a high number, like 5000%, you will see a quick fluttering effect.
In this animation, the Curl Frequency is demonstrated, beginning at 30% then increasing up to 200%.
Phase Variation
Section titled “Phase Variation”A higher value here will vary the frequency stage for each leaf.
Variation
Section titled “Variation”This setting will give additional variation control for the curl parameters, above.
This animation illustrates the effect of applying Variation to the curl settings.
Layer Weight
Section titled “Layer Weight”You can adjust this curve to create a personalized setting for your forces on the layers of your plant.
The X axis represents the length, from bottom to top, while the Y axis is the strength.
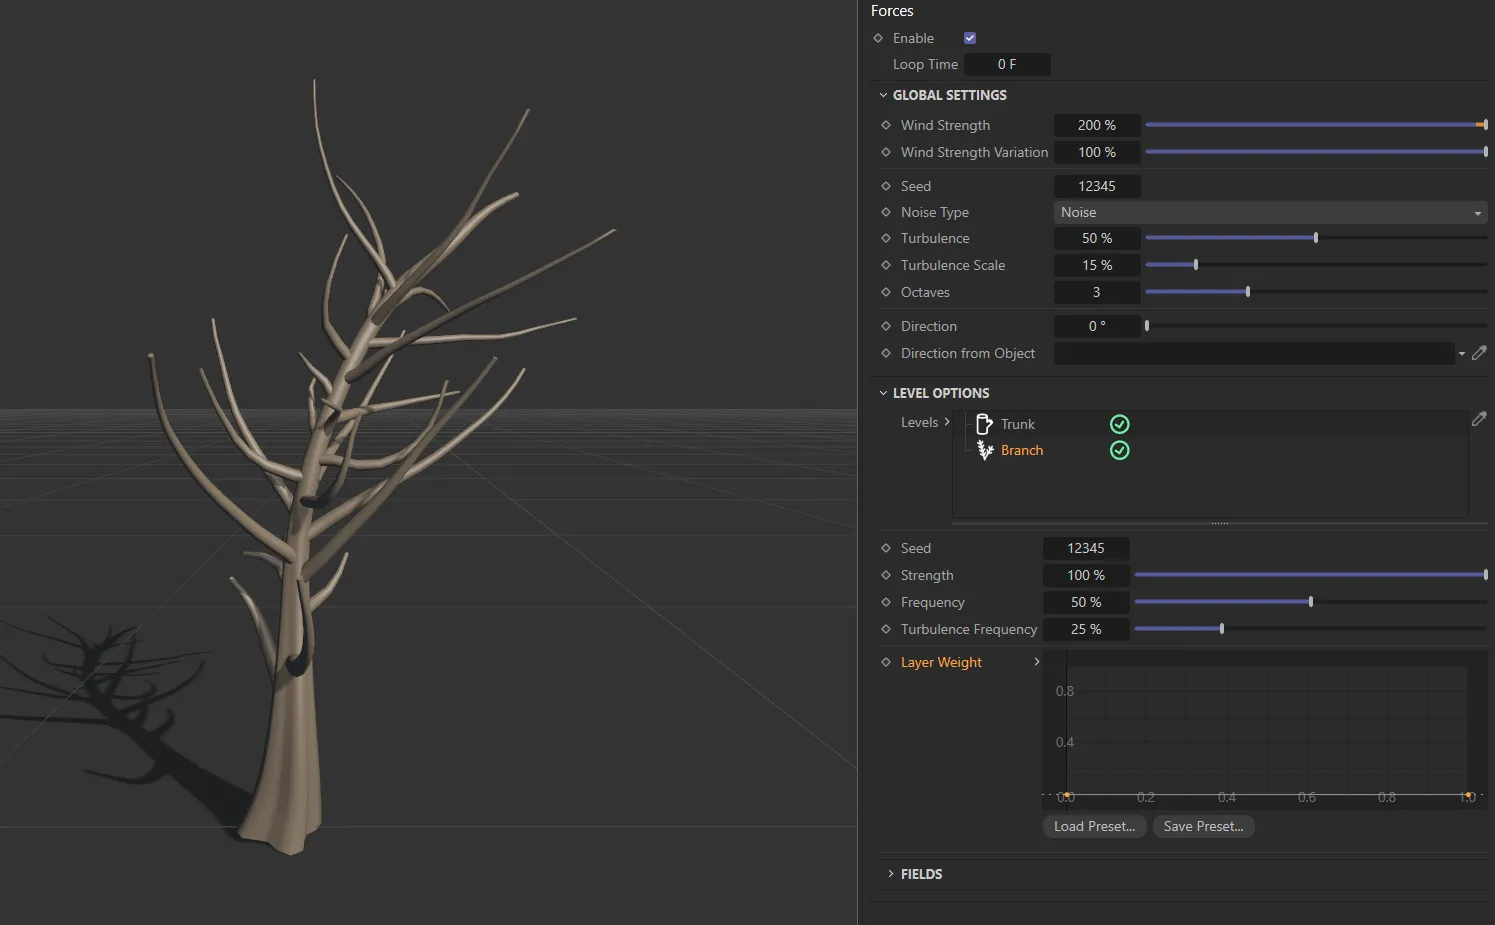
In this image, both spline points are at 0 (zero) on the Y axis, resulting in no forces acting upon the branches.
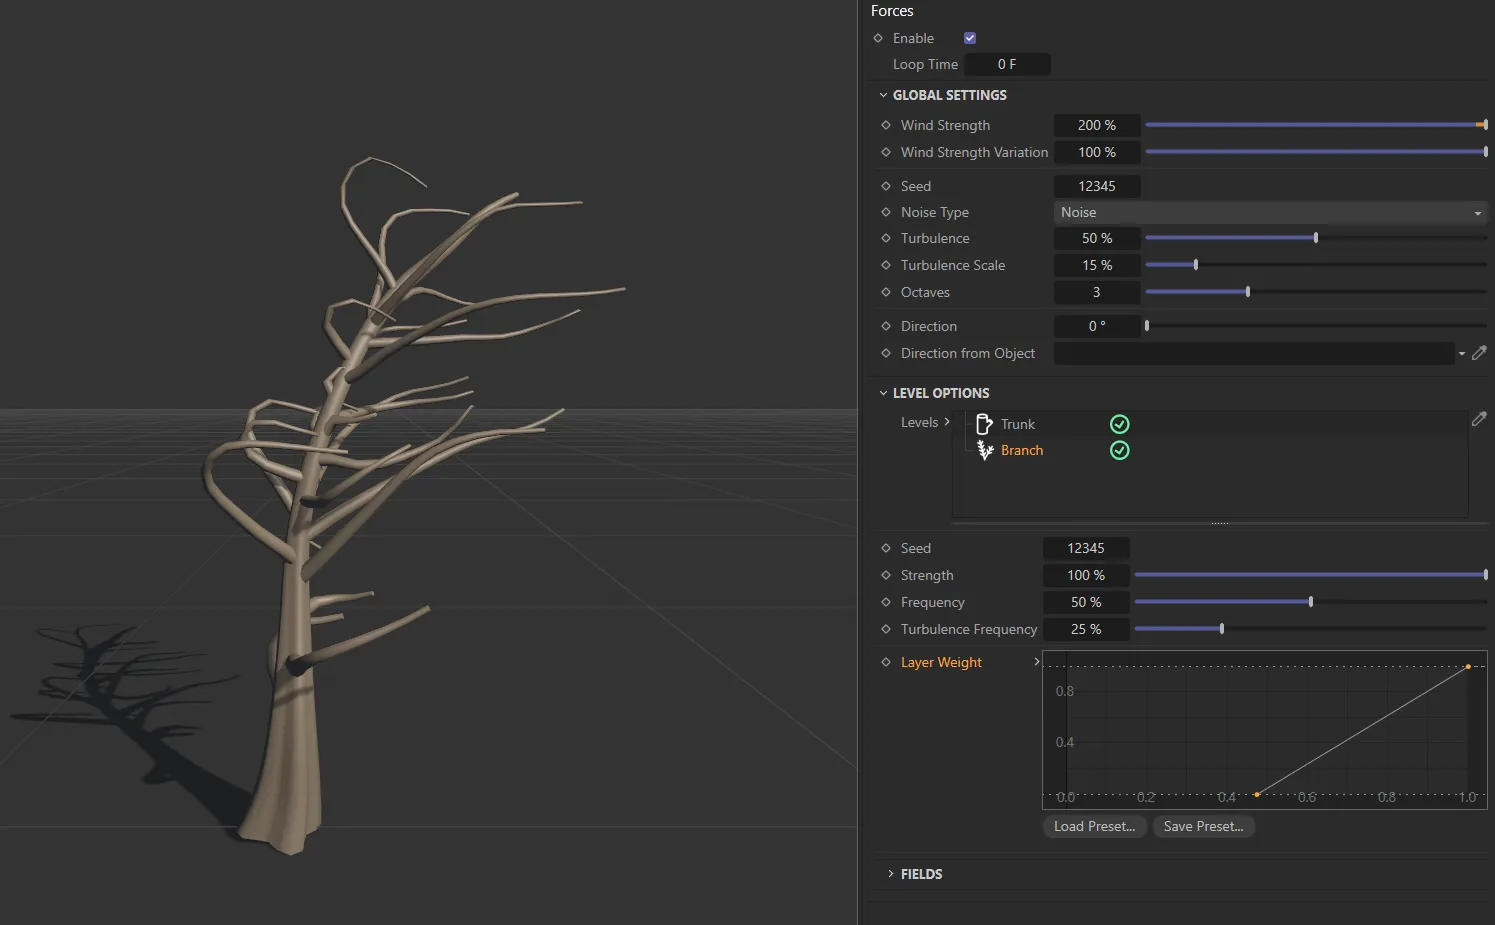
This spline shape results in the branches being affected by forces from their halfway point to the tips.

Finally, the spline points here are both at 100%, resulting in full force along the branch length.
Fields
Section titled “Fields”You can use the usual Fields options to control where the forces operate.
Copyright © 2026 INSYDIUM LTD. All rights reserved.