Global Settings
The Global Settings menu allows you to decide what kind of geometry is generated and how it is generated.
It allows you to make adjustments to the leaf as a whole.
Leaf Type
Section titled “Leaf Type”Set as Standard, by default, your leaf is already in the viewport when you open up toLeaf.
Alternatively, you can change this to Lobed, which will open up a Lobing tab.
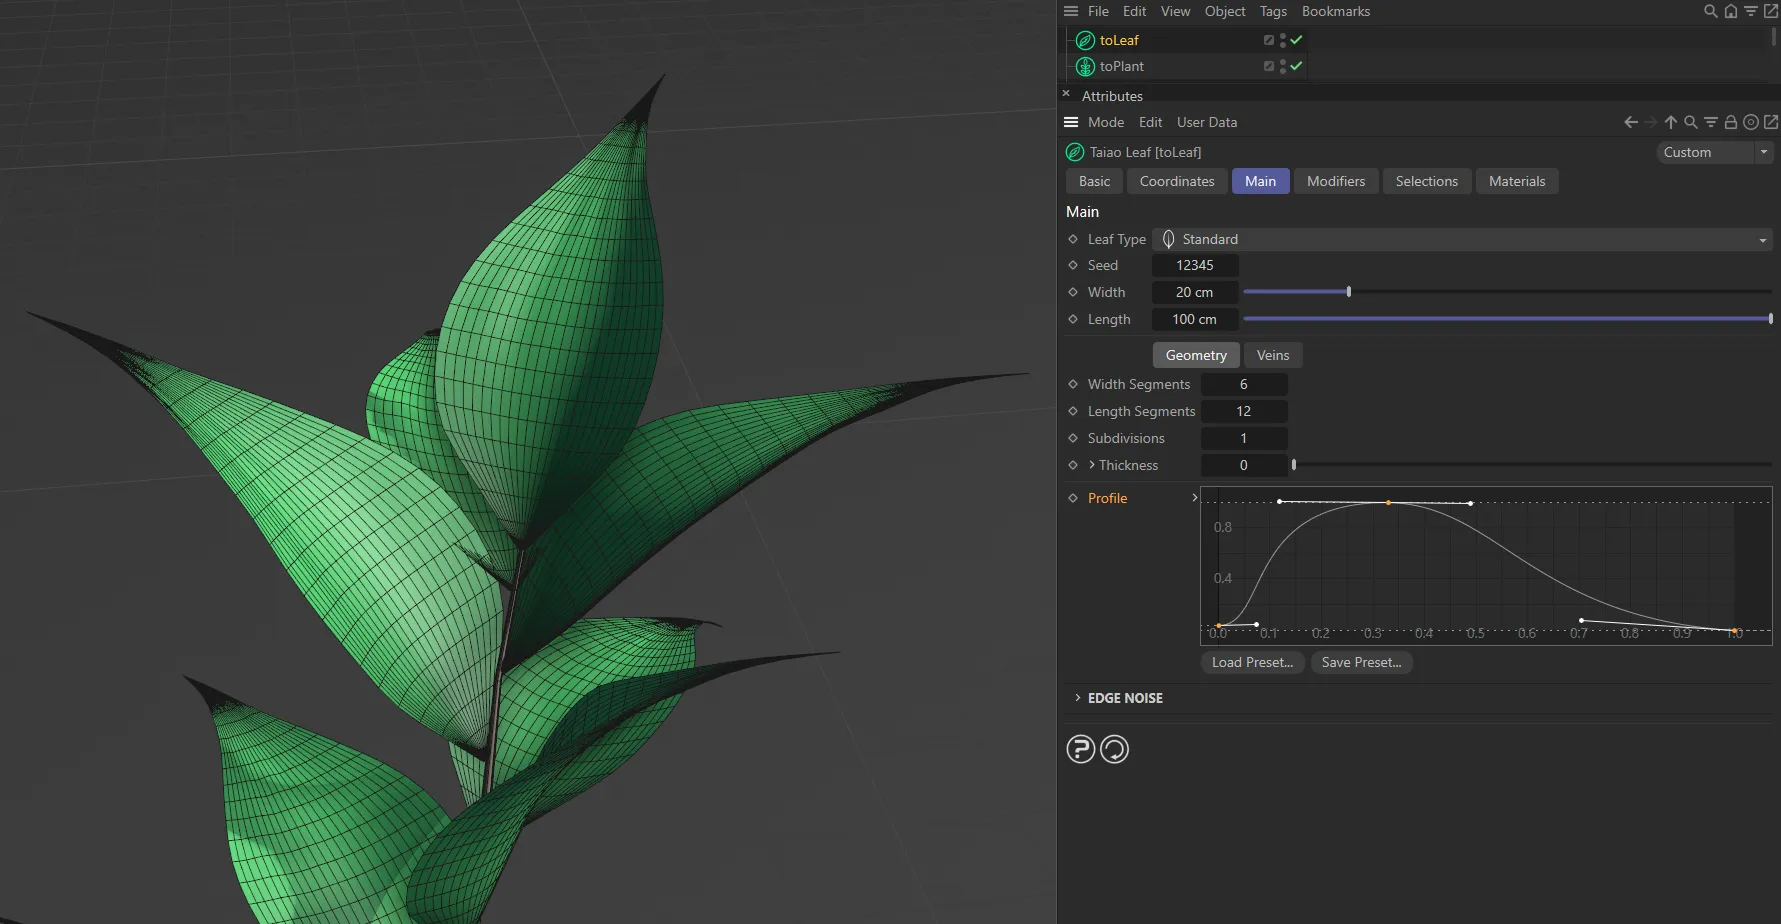
Leaf Type set as Standard.

Leaf Type set as Lobed.
Changes the random variation and distribution of leaves where applicable.
For example, if you have size or twist variation set, changing this Seed value will give you different looks.
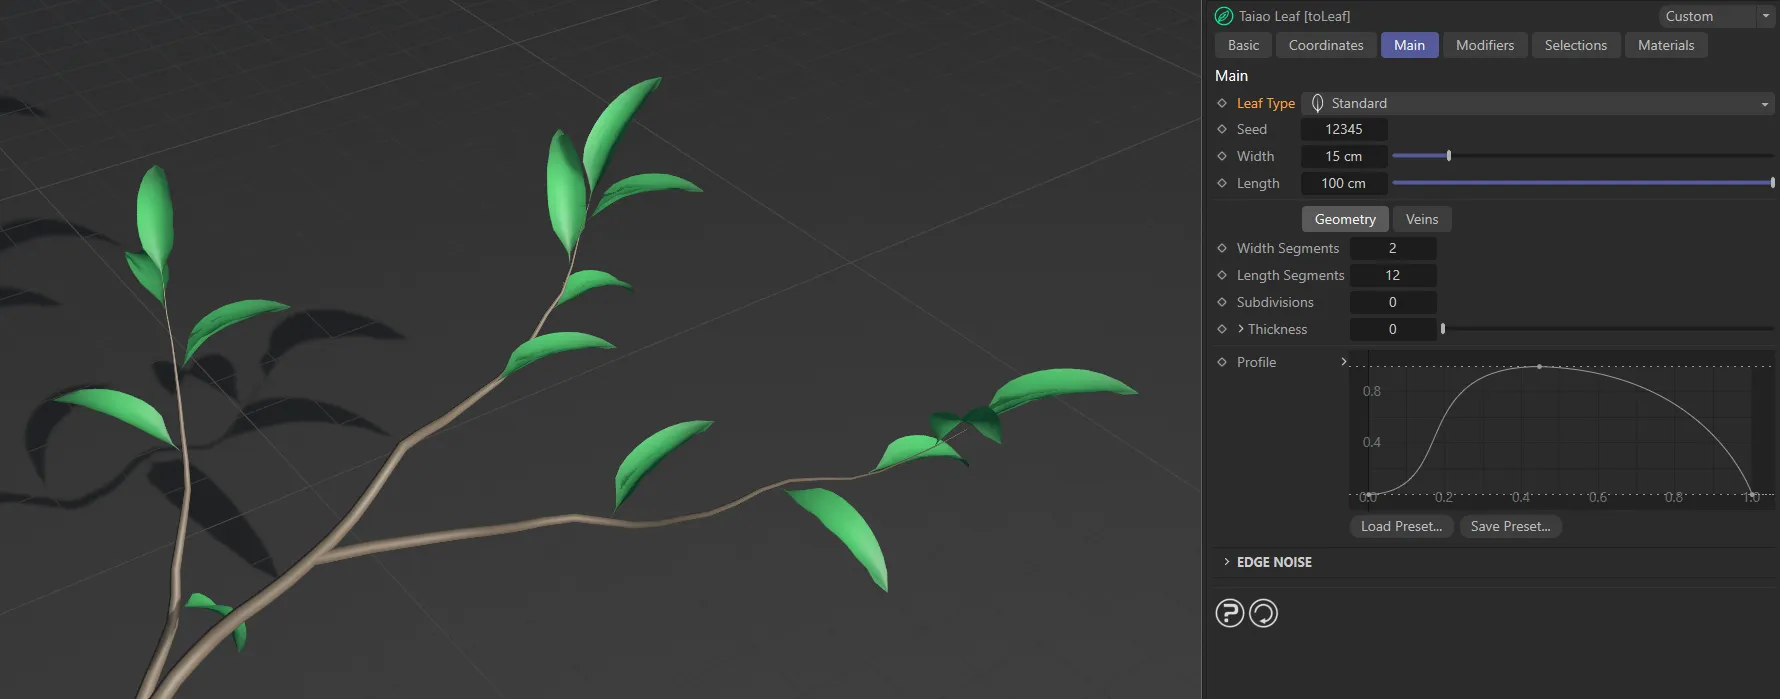
Globally adjusts the width of the leaves.
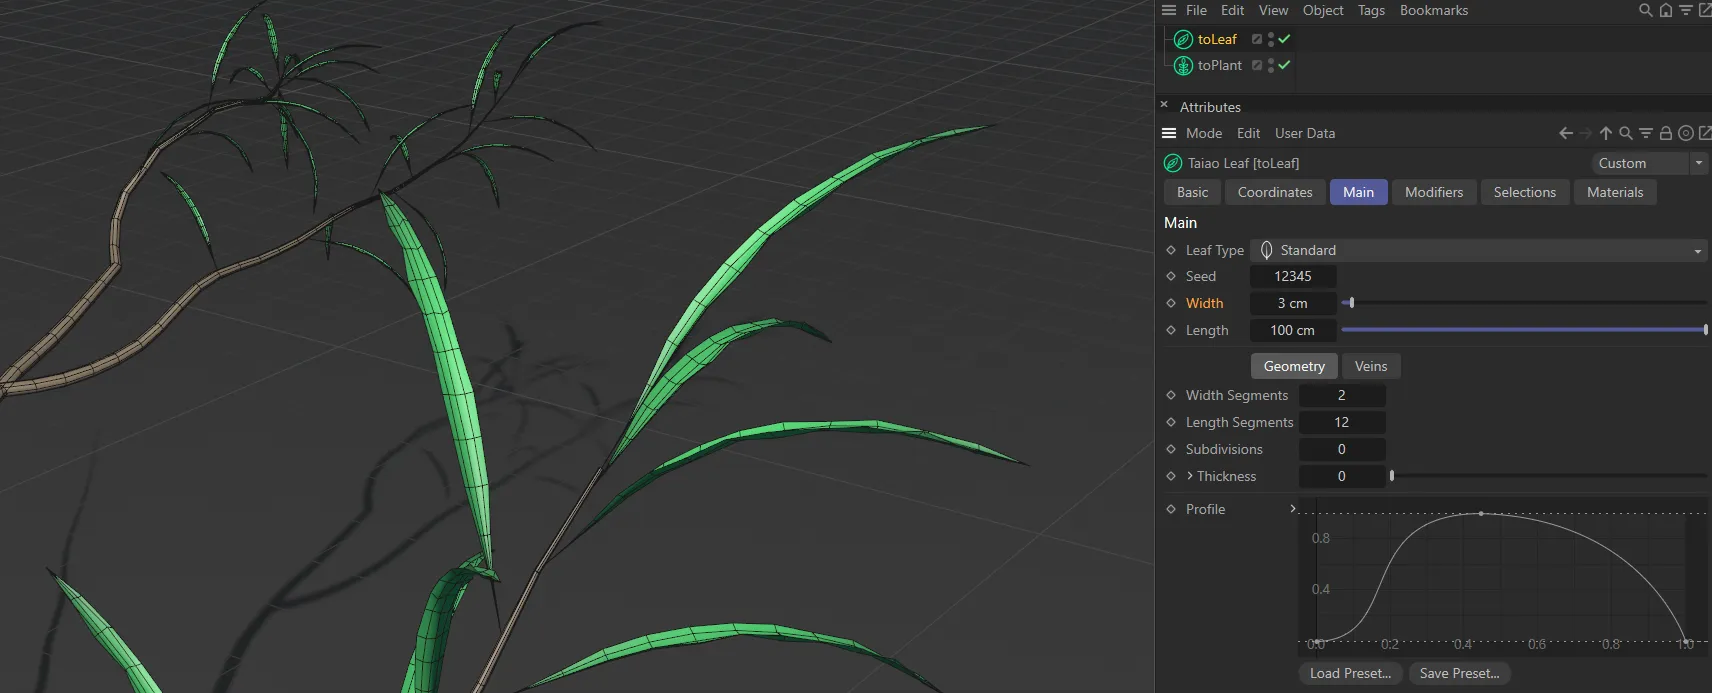
Here the leaf Width is set at 3cm.
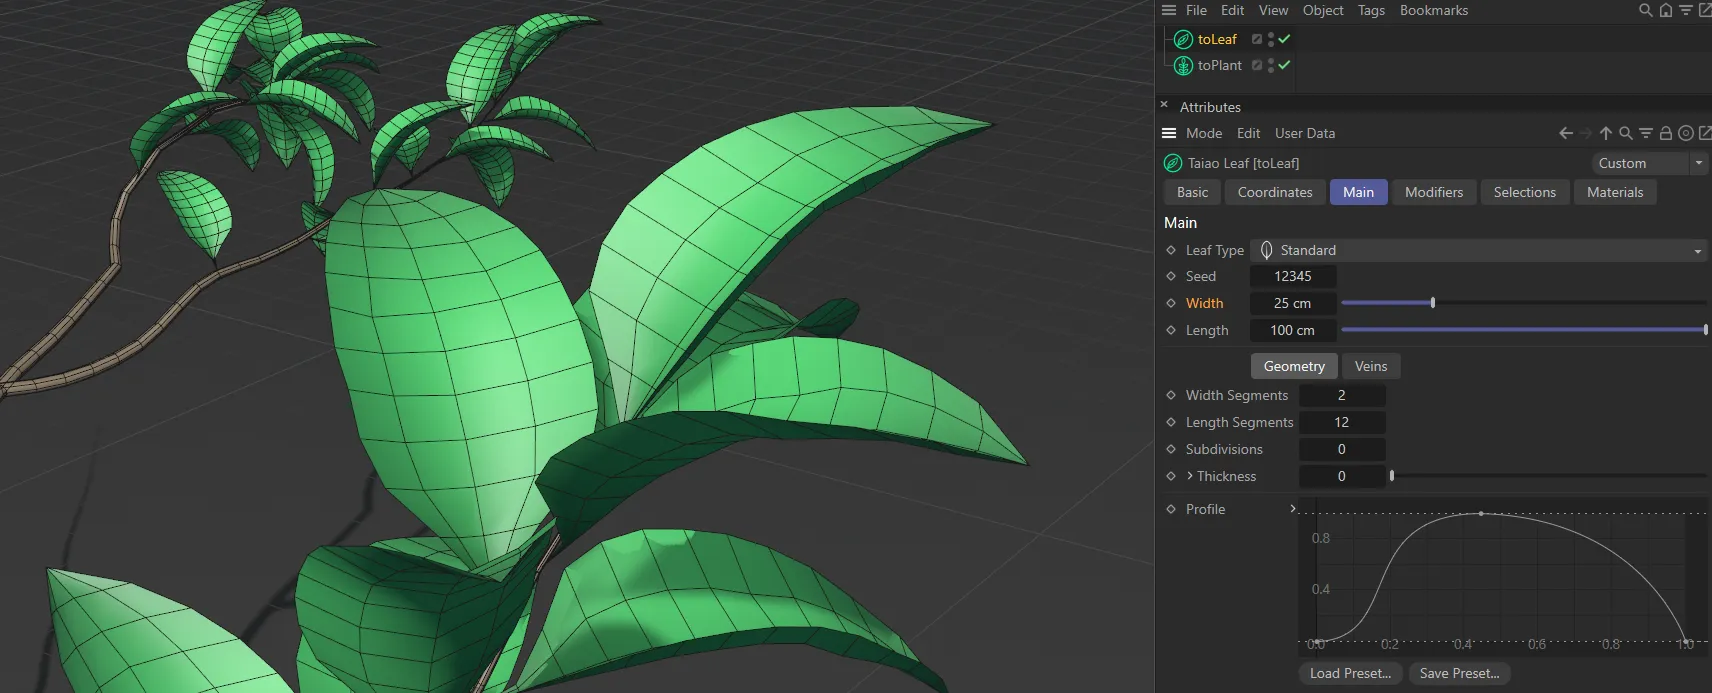
Width increased to 25cm.
Length
Section titled “Length”Adjusts the length of the leaves, again globally.
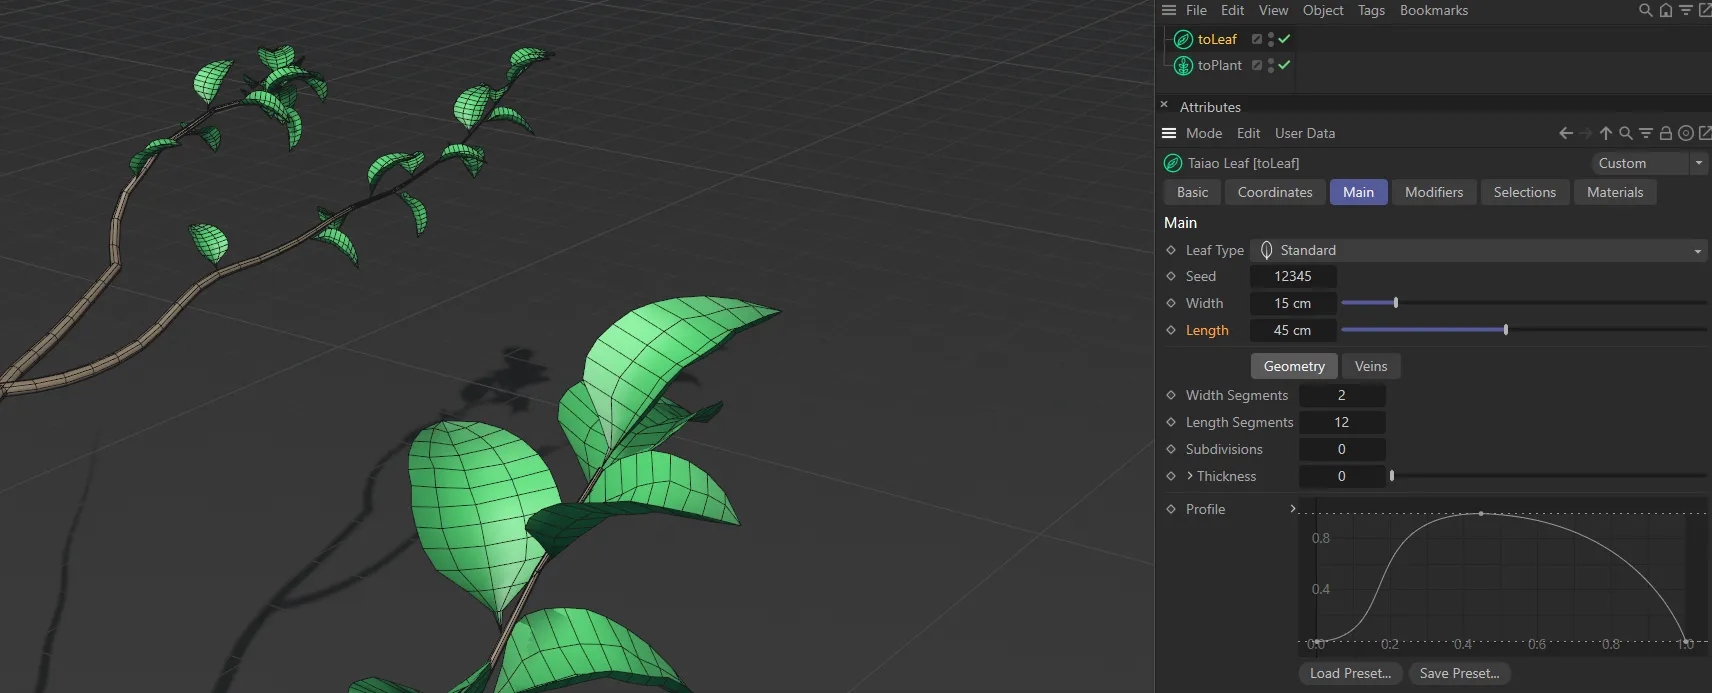
The Length of the leaves is 45cm, in this image.
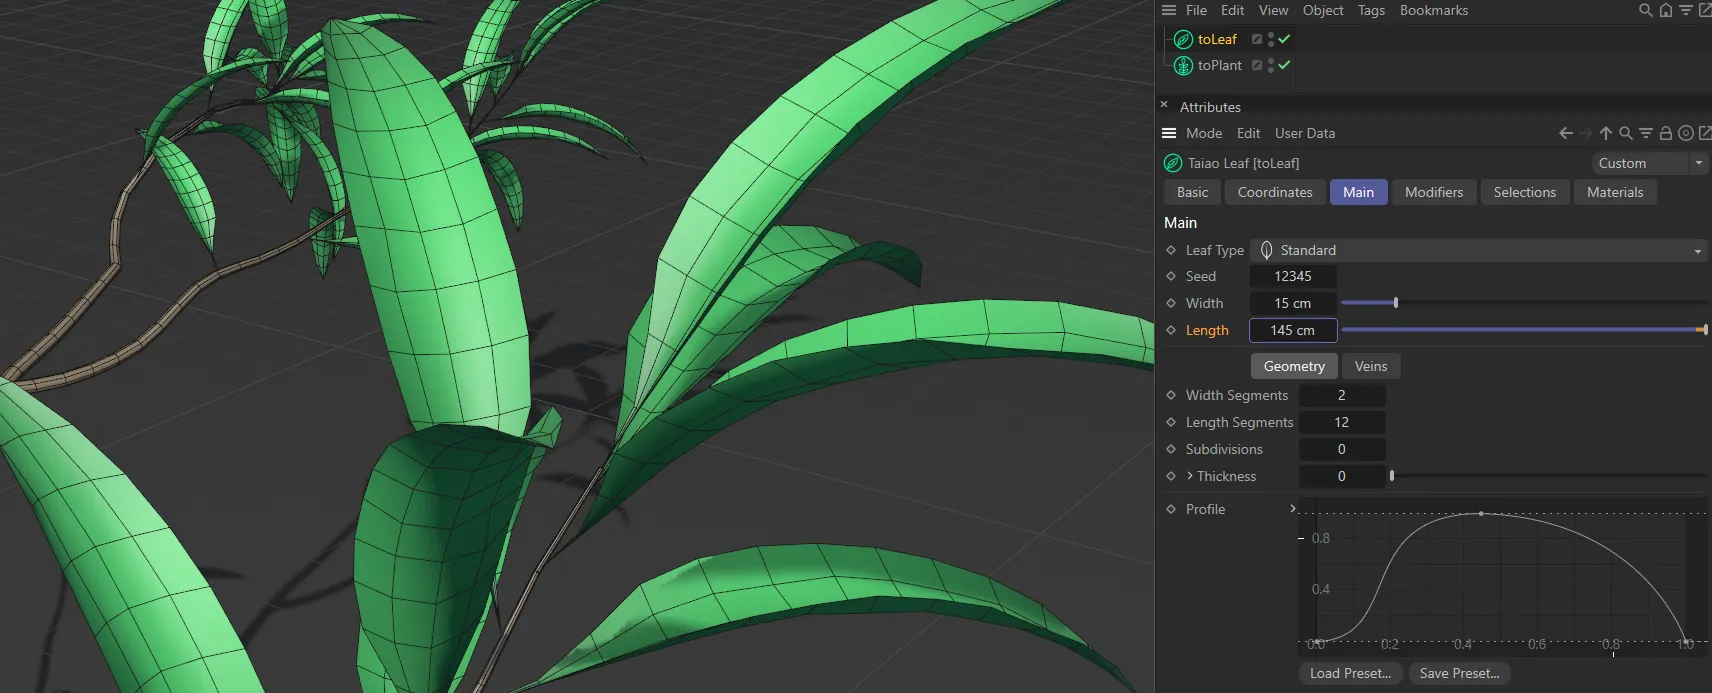
Length increased to 145cm, here.
There are separate tabs for Geometry and *Veins (*and Lobing, when Leaf Type is set to Lobing).
Geometry tab
Section titled “Geometry tab”Width Segments
Section titled “Width Segments”As above, this will add to the geometry of the leaves.
As well as offering more options with settings, an increase in geometry can help with the shaping options.
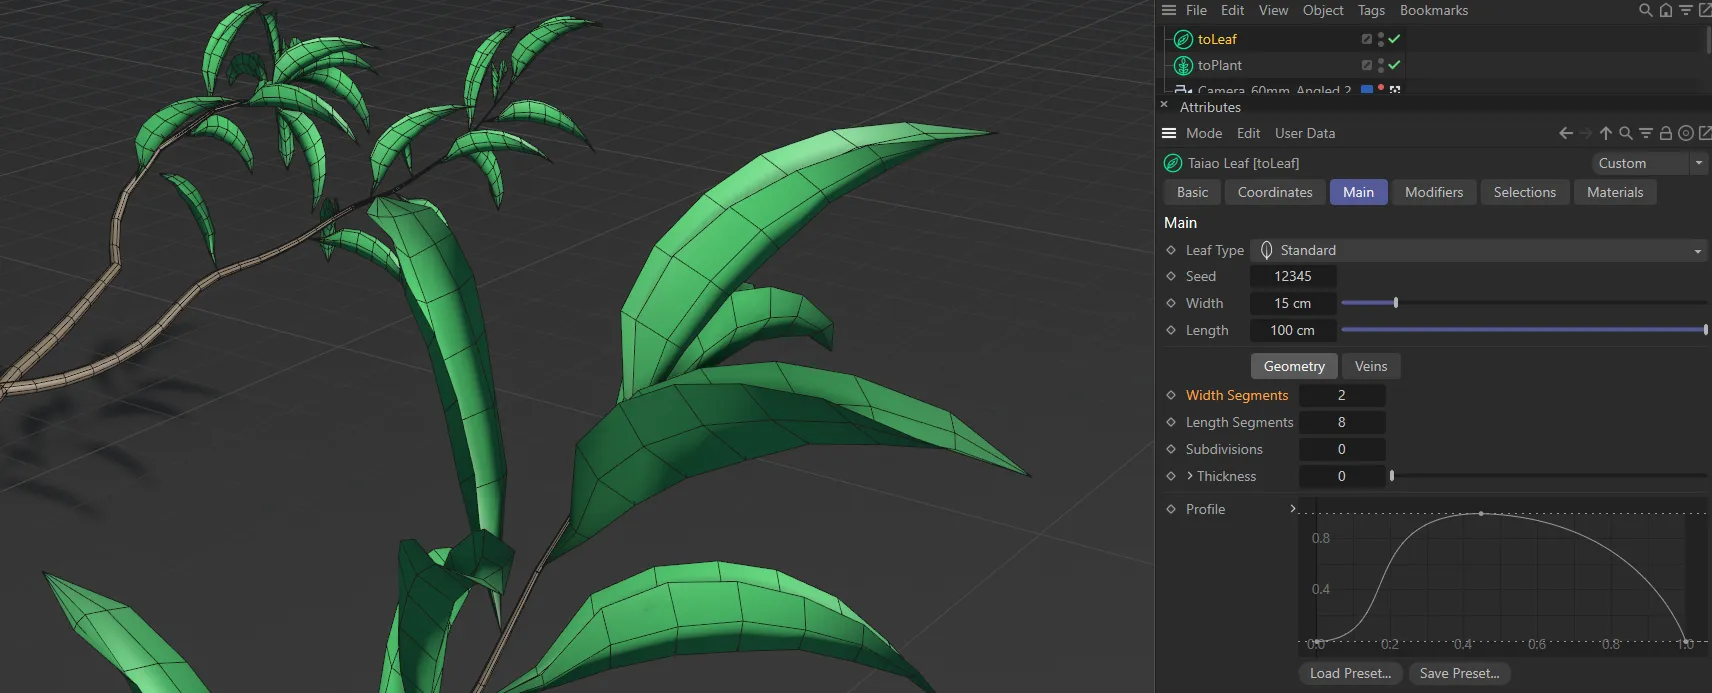
Width Segments set to 2.
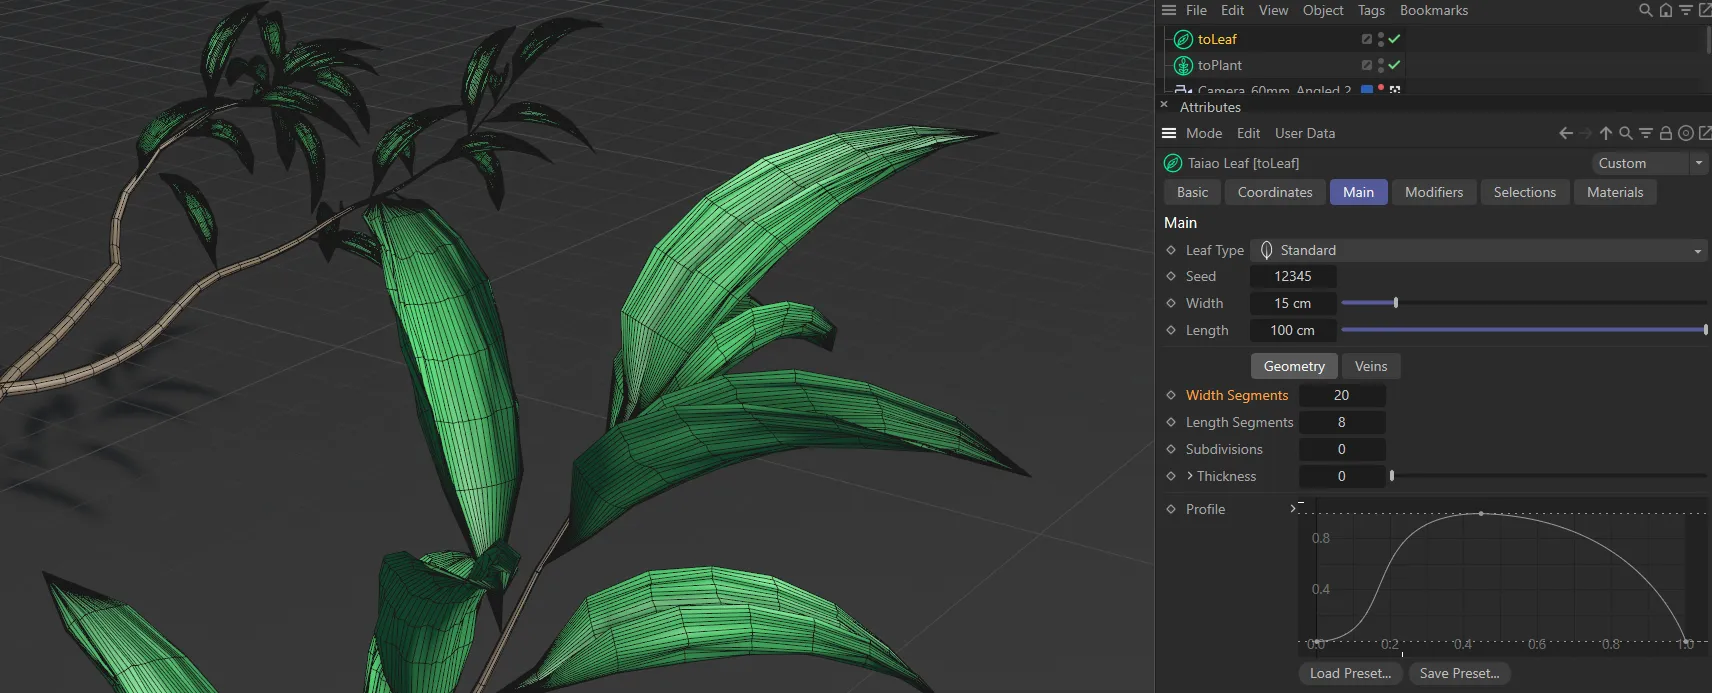
In this second image, the Width Segments value is raised to 20, giving much more geometry.
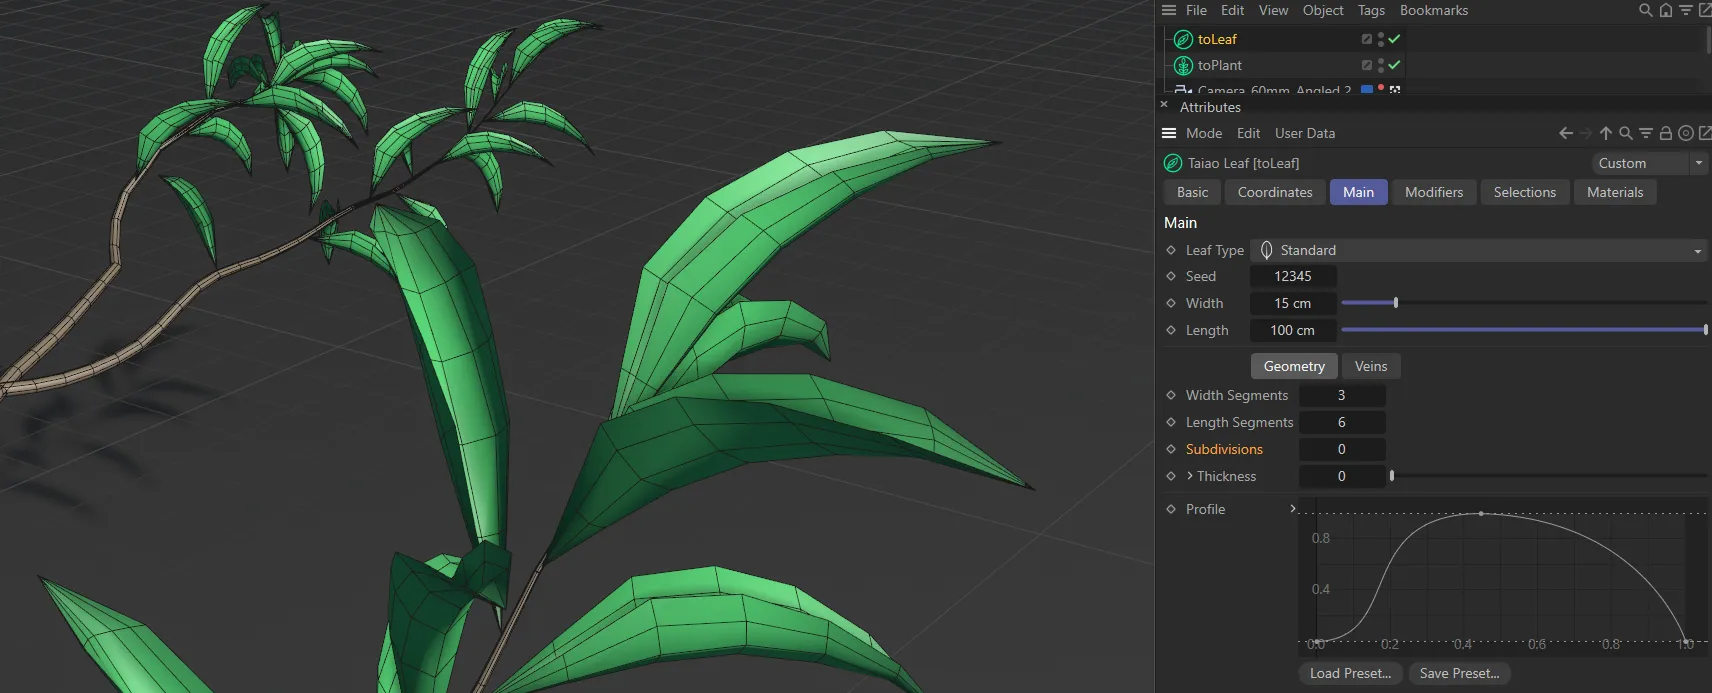
Length Segments
Section titled “Length Segments”To add to the geometry of the leaves, you can increase the segments in length, giving you more options with settings in the Modifier tab.
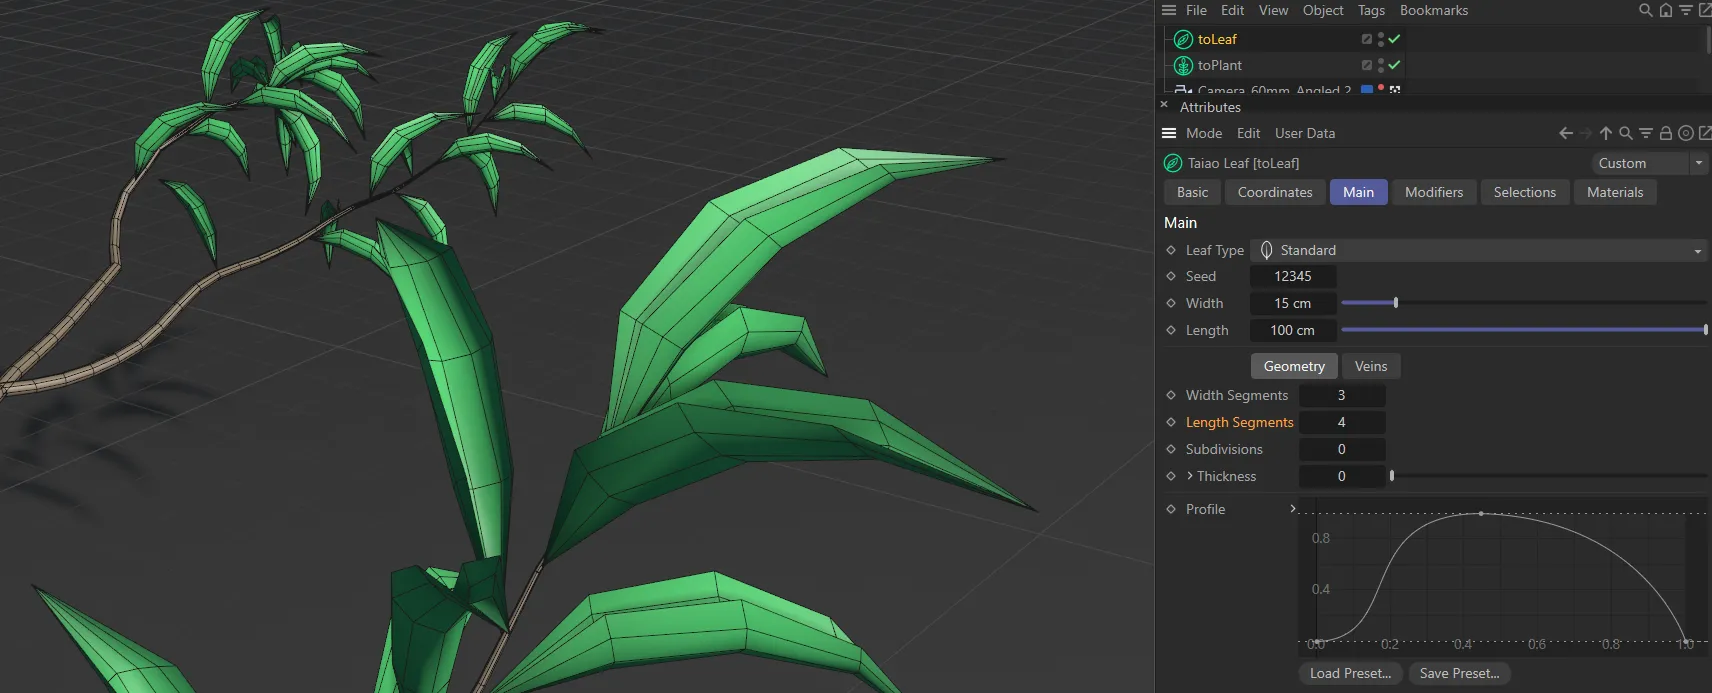
Here, the Length Segments is set to 4.
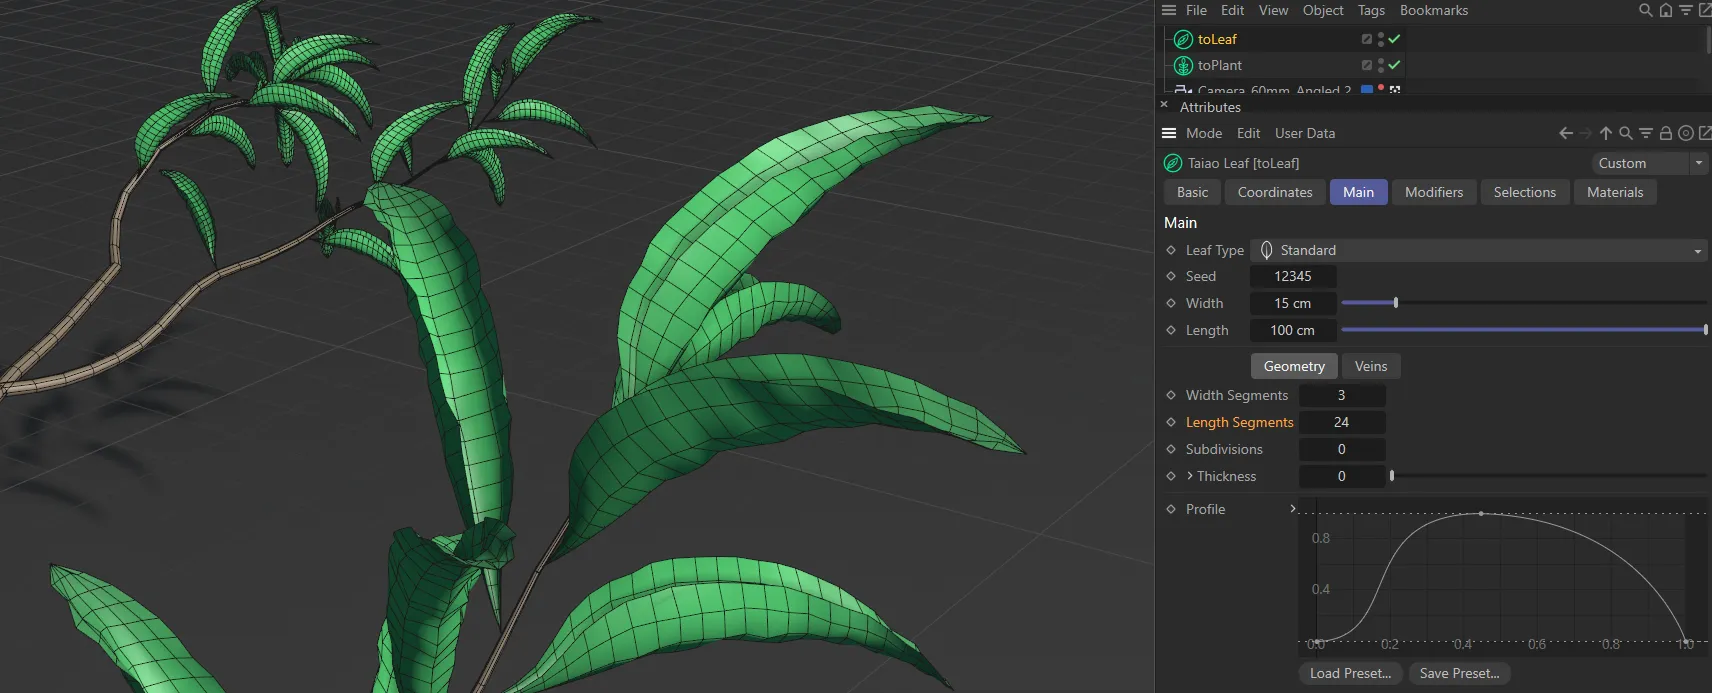
Length Segments raised to 24.
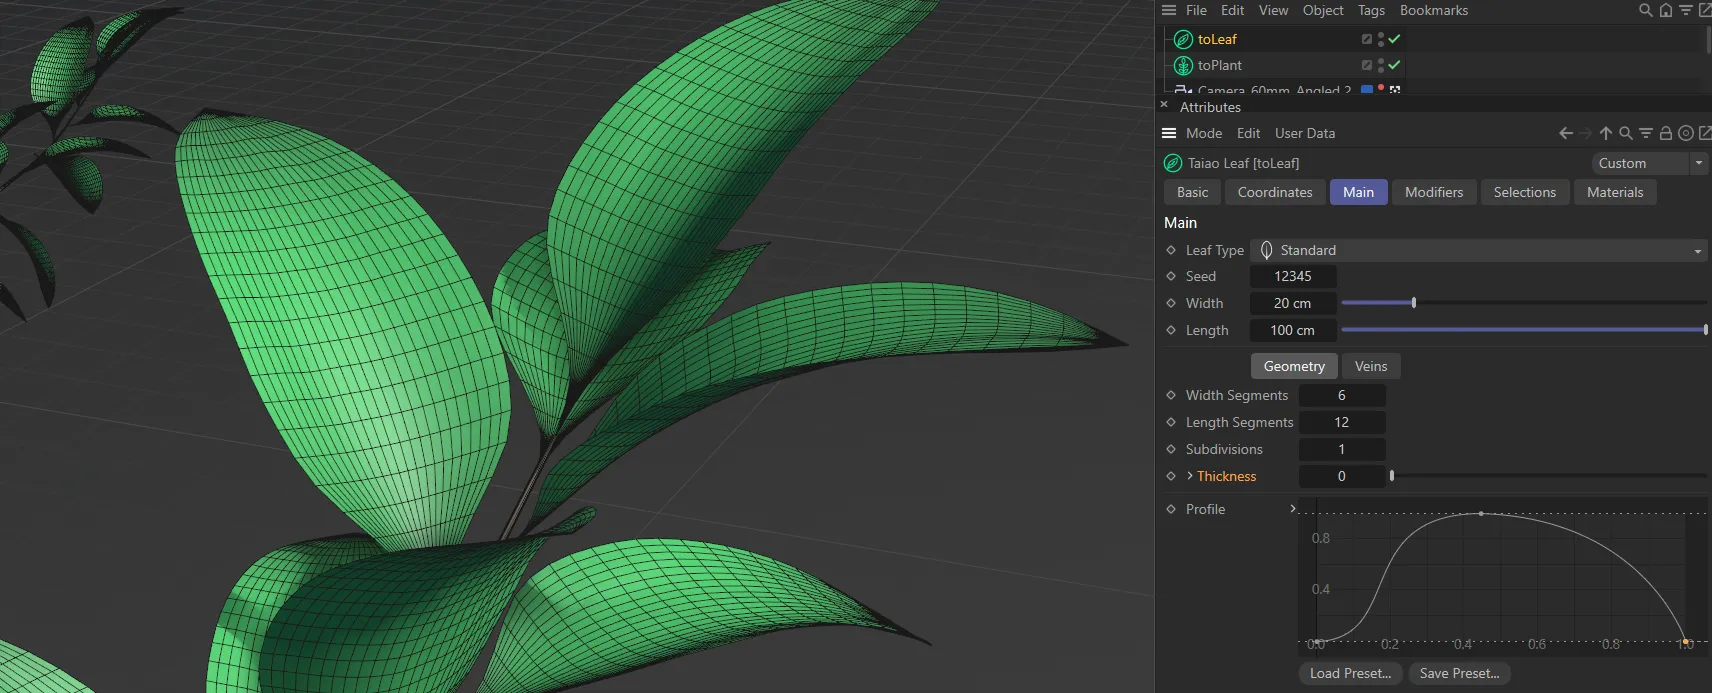
Subdivisions
Section titled “Subdivisions”You can add subdivisions to increase polygon detail and to add smoothing to the leaves.
Subdivisions set to 0 (zero).

In this second image, the Subdivisions setting is raised to 2.
Thickness
Section titled “Thickness”By default, the leaves are flat; with this setting, you can make them thicker, giving them a more natural depth.
Unfolding the drop-down arrow will reveal the Symmetric and Depth Profile parameters.
In this image, the Thickness is set as 0 (zero).
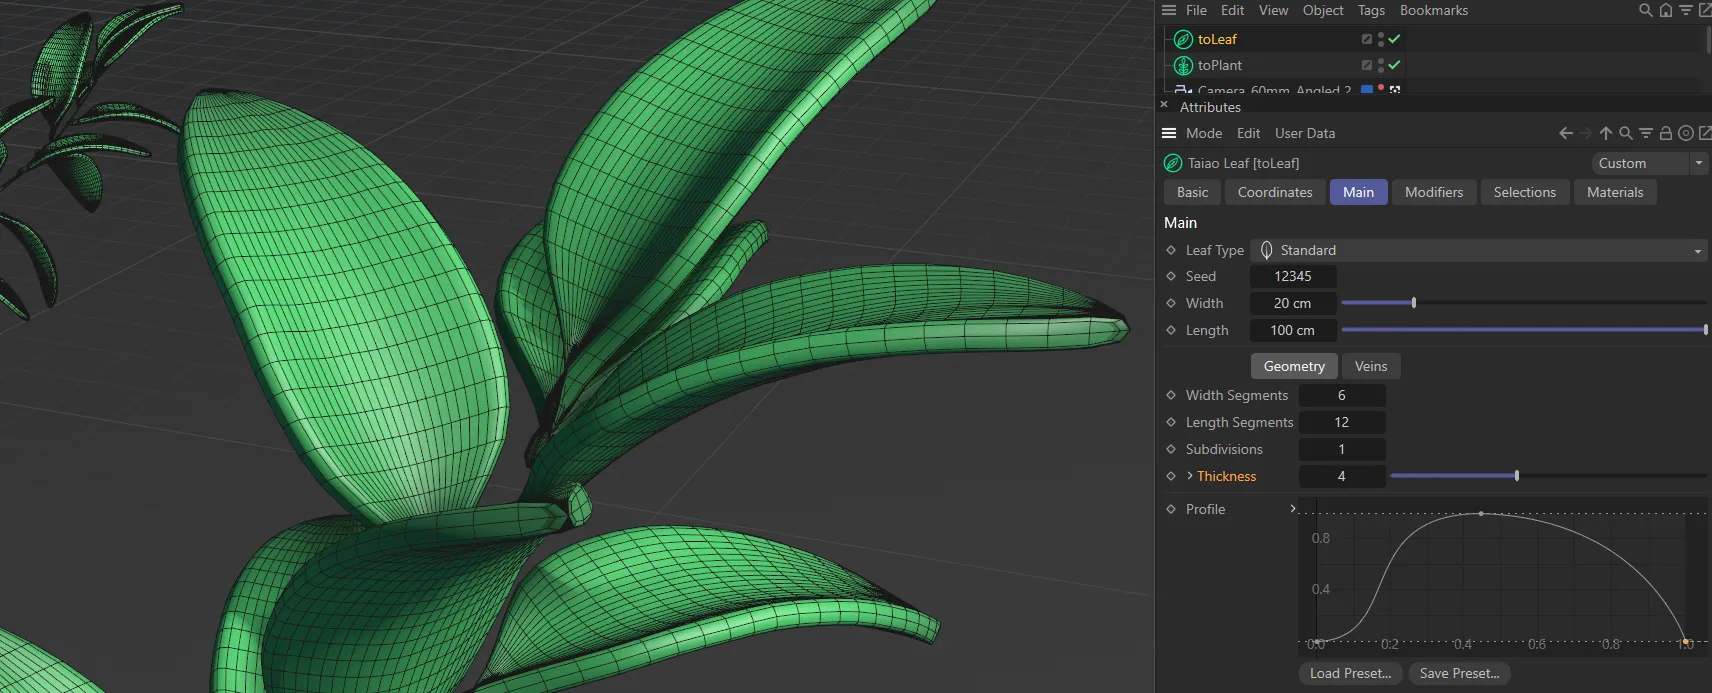
Thickness increased to 4.
Symmetric
Section titled “Symmetric”Enabling this parameter will apply a symmetry in thickness across the leaf.
Depth Profile
Section titled “Depth Profile”Similar to the Profile setting, below, you can shape the depth of the leaves and add knots, in the same way, to give you additional options.
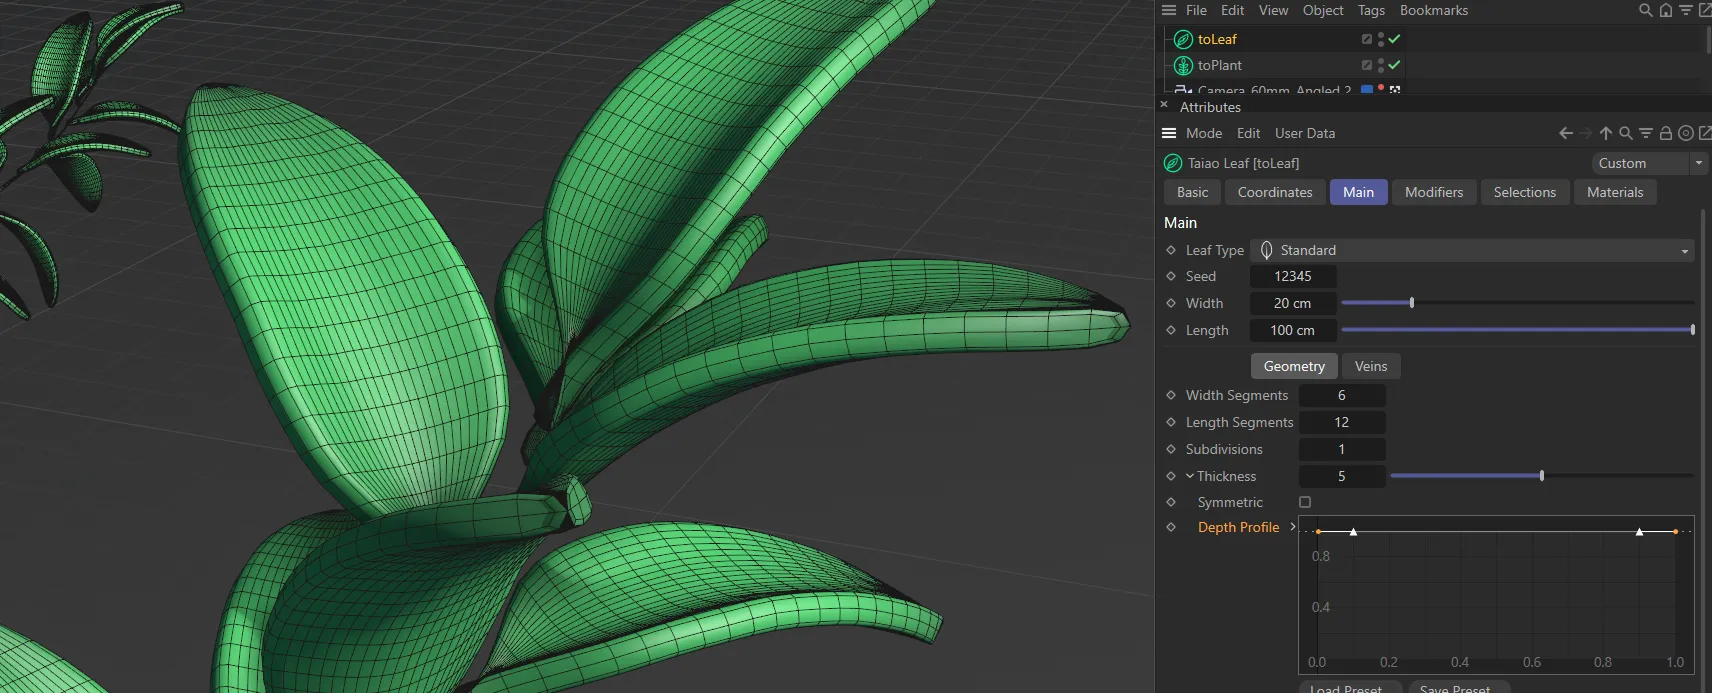
This leaf has a constant thickness across the length of the leaf, driven by the Depth Profile spline curve at full strength.
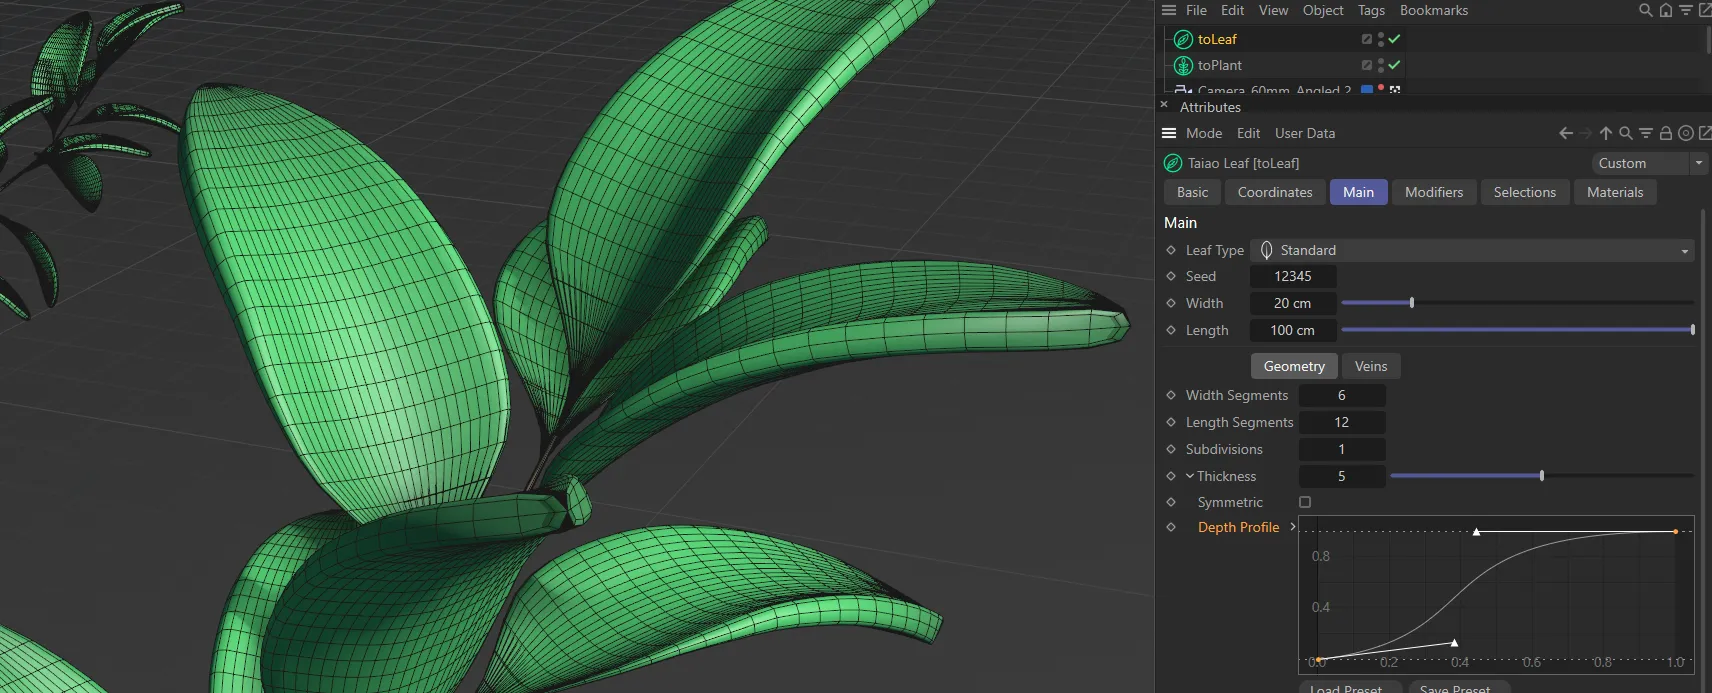
This second spline raises, increasing the thickness towards the end of the leaf.
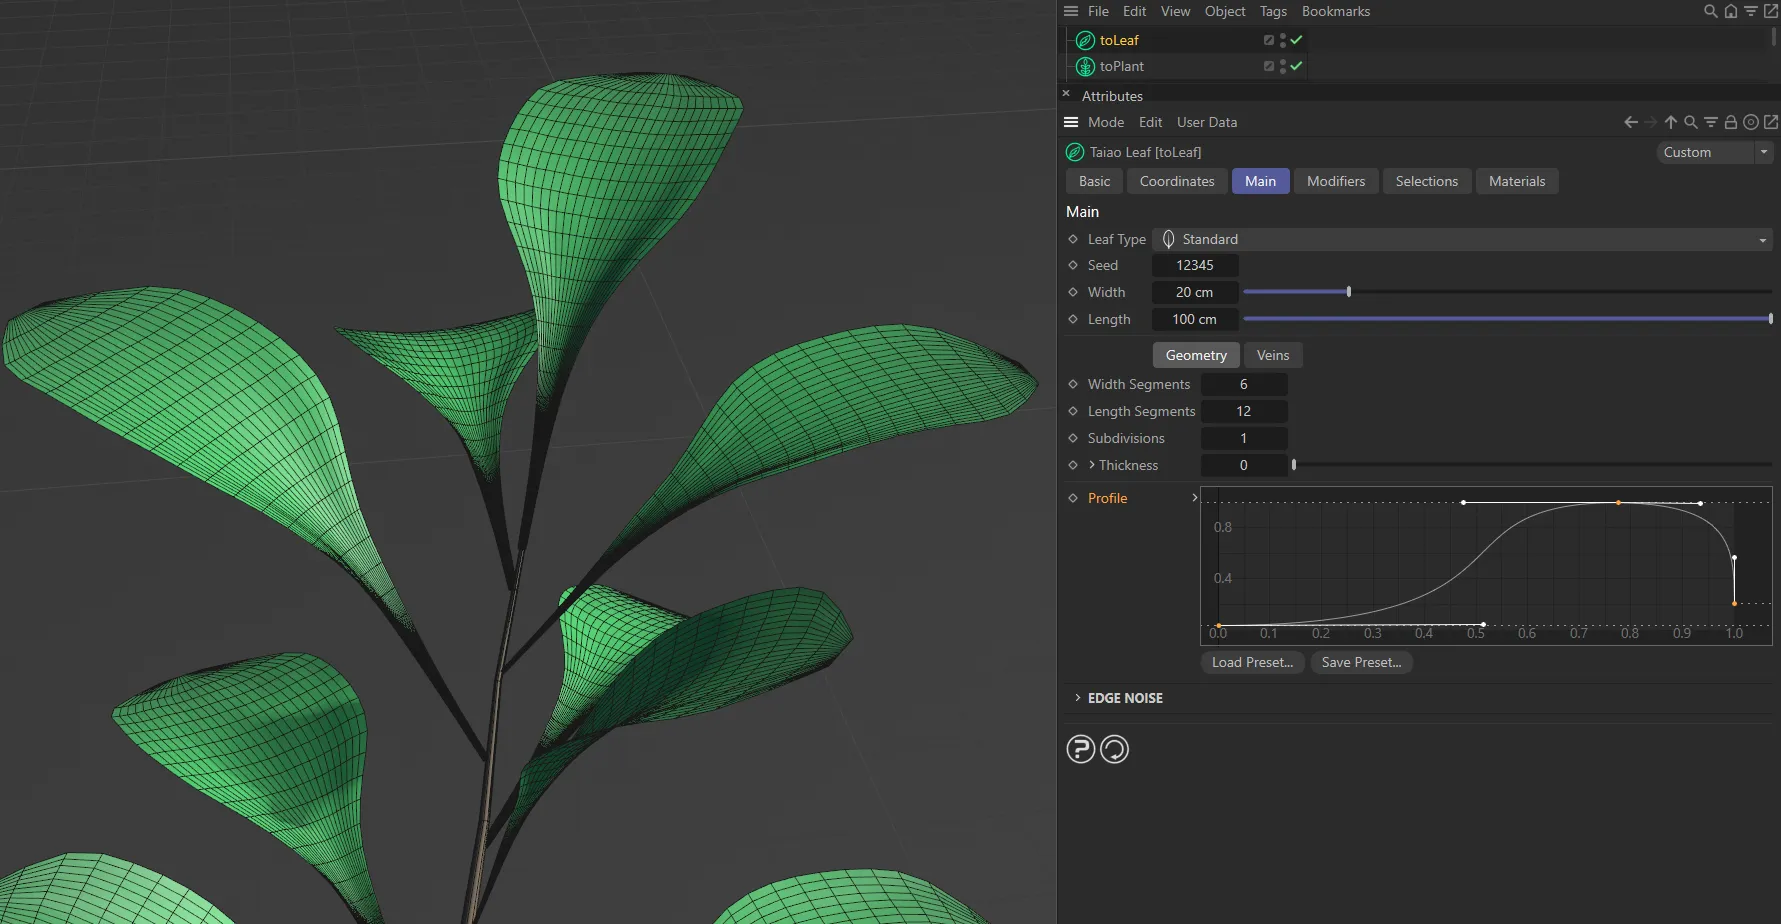
Profile
Section titled “Profile”There are many ways to manipulate this spline curve, in order to shape the leaves to suit your particular need.
Adding a knot in the spline (using CTRL) and pulling down the end, will pull in the tips of the leaves.
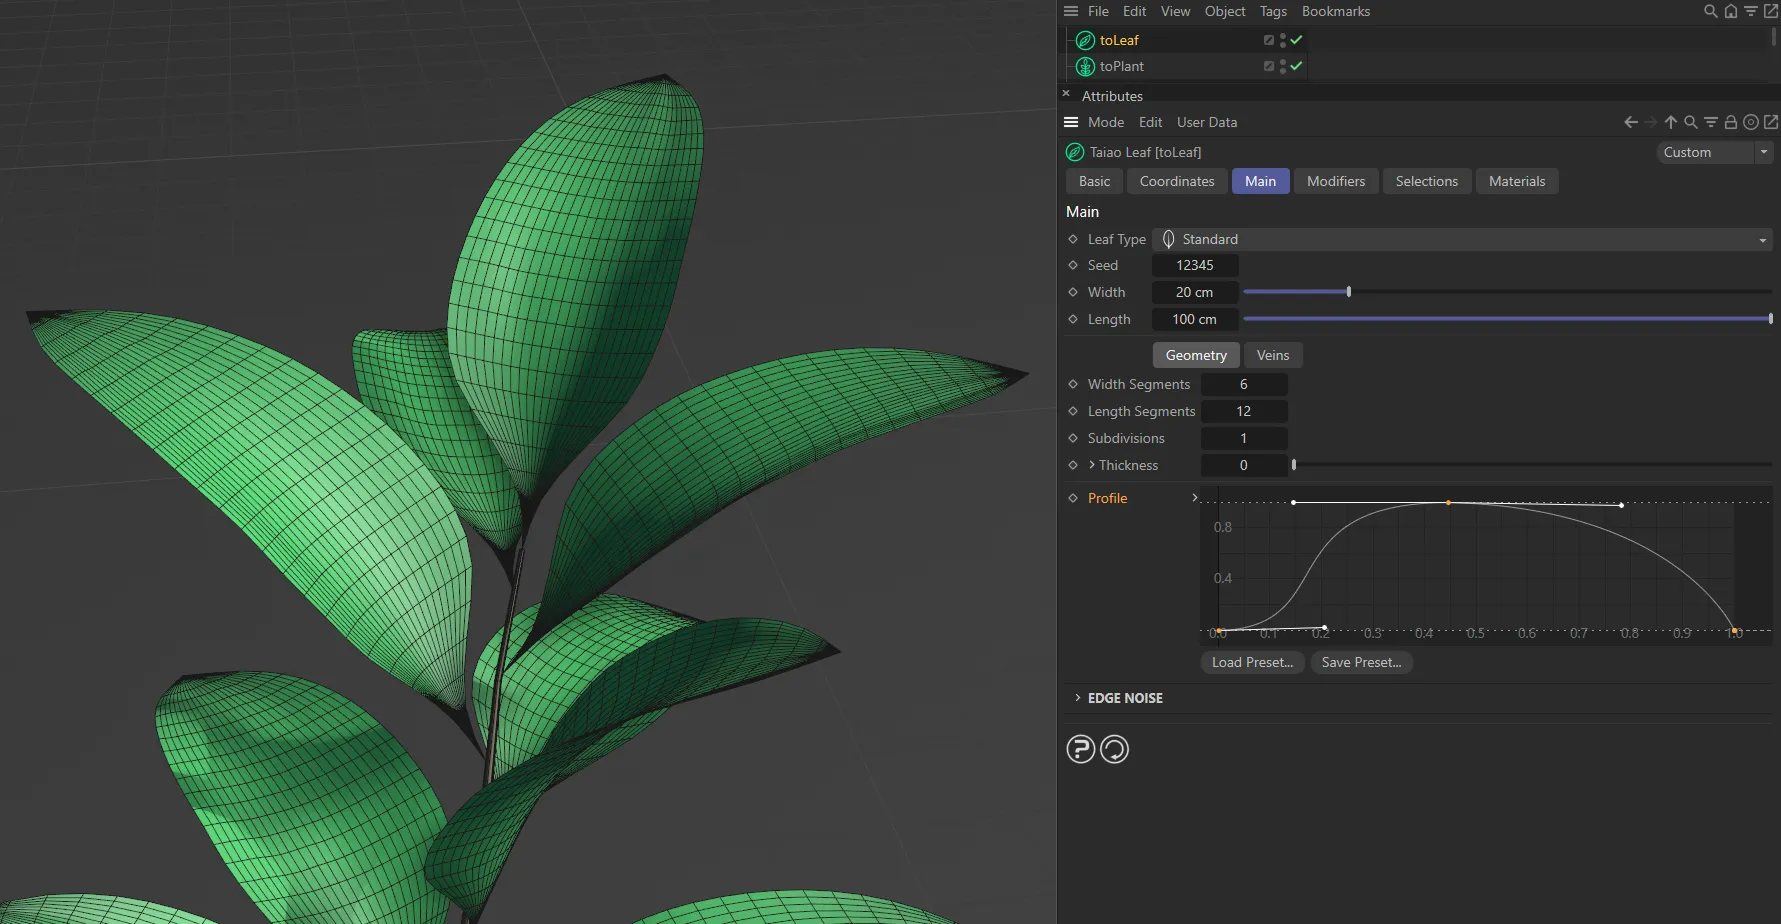
This leaf is being shaped by the Profile spline curve setting.
This second Profile setting starts thinner, then provides a fuller leaf shape towards the end of the leaf.
Conversely, this Profile curve has a fuller shape closer to the start of the leaf, then thins out sooner.
Edge Noise
Section titled “Edge Noise”Symmetric
Section titled “Symmetric”Enabling this parameter will apply symmetry to the edge noise across the Leaf layer.
Strength
Section titled “Strength”Controls the amount of noise along the edges of the leaves.
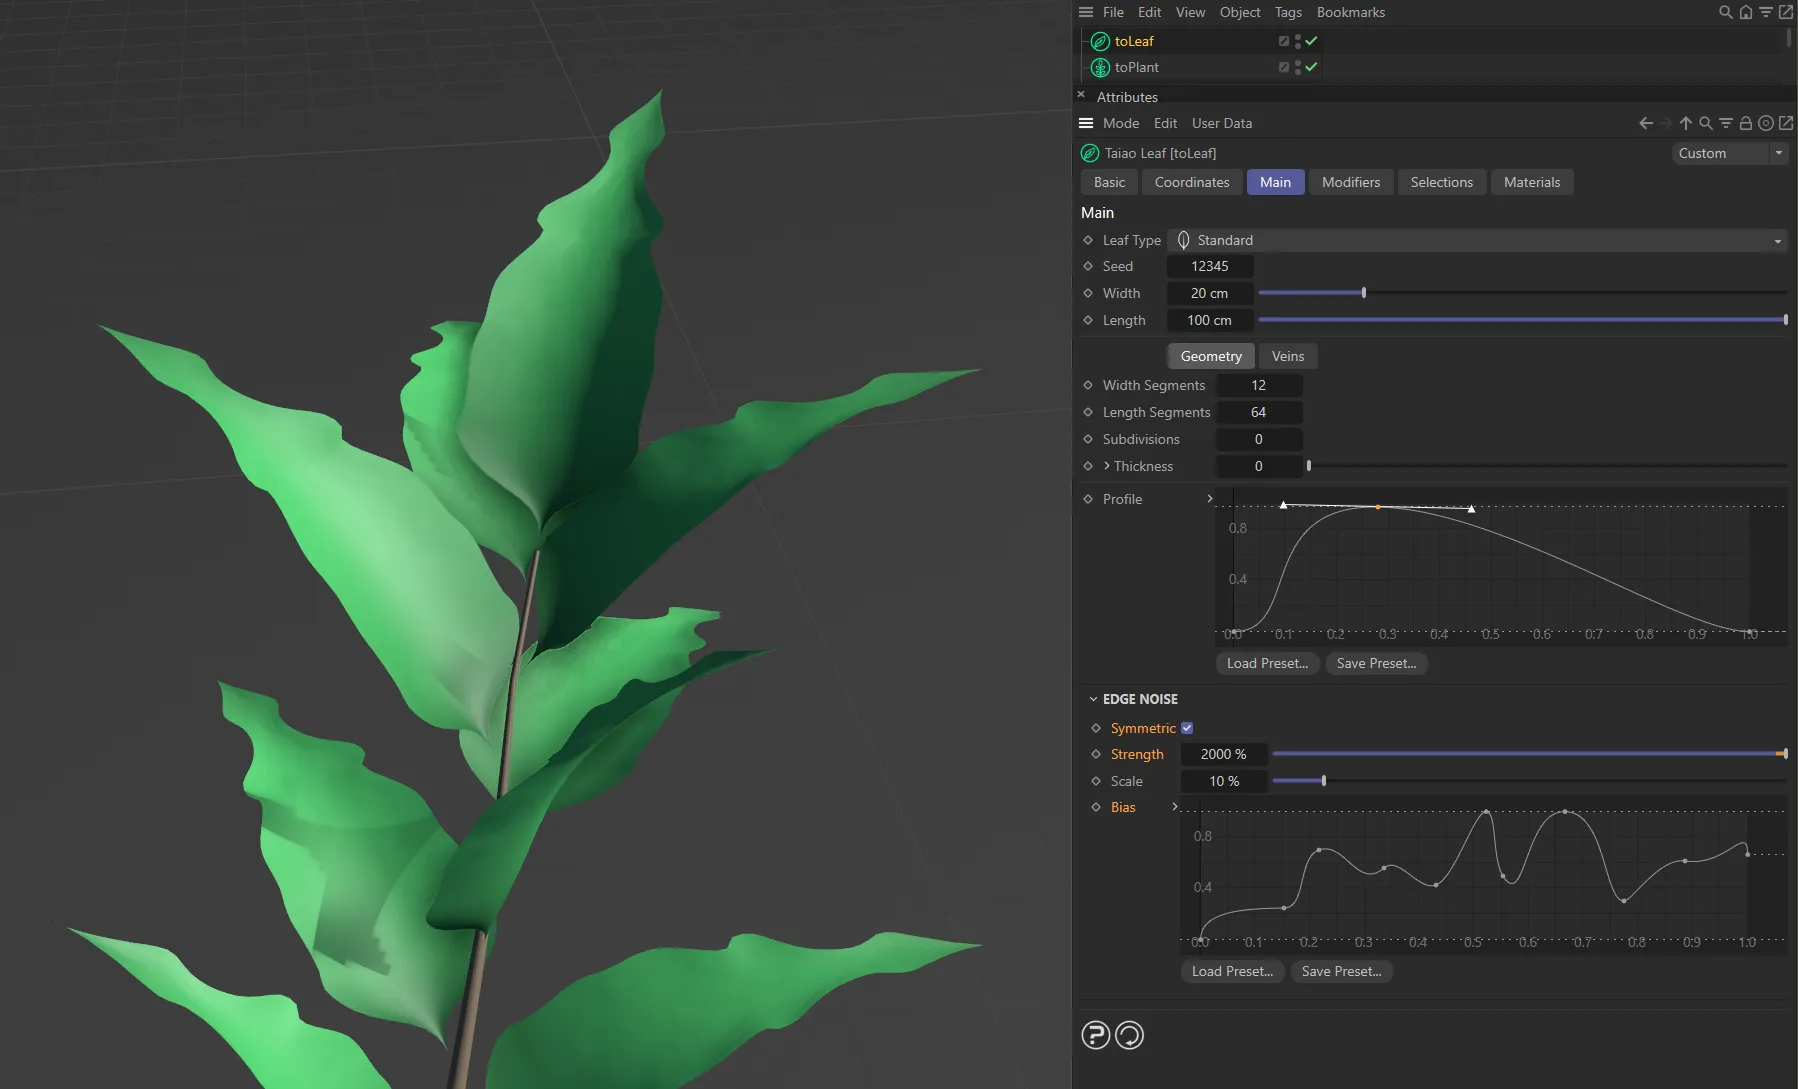
With the edge noise Strength set at 2000% and Symmetric enabled, the leaf edges are distorted according to the Bias curve setting.
Applies the usual scale control to the noise setting.
Allows you to further control where, on the leaves, the noise is targeted.
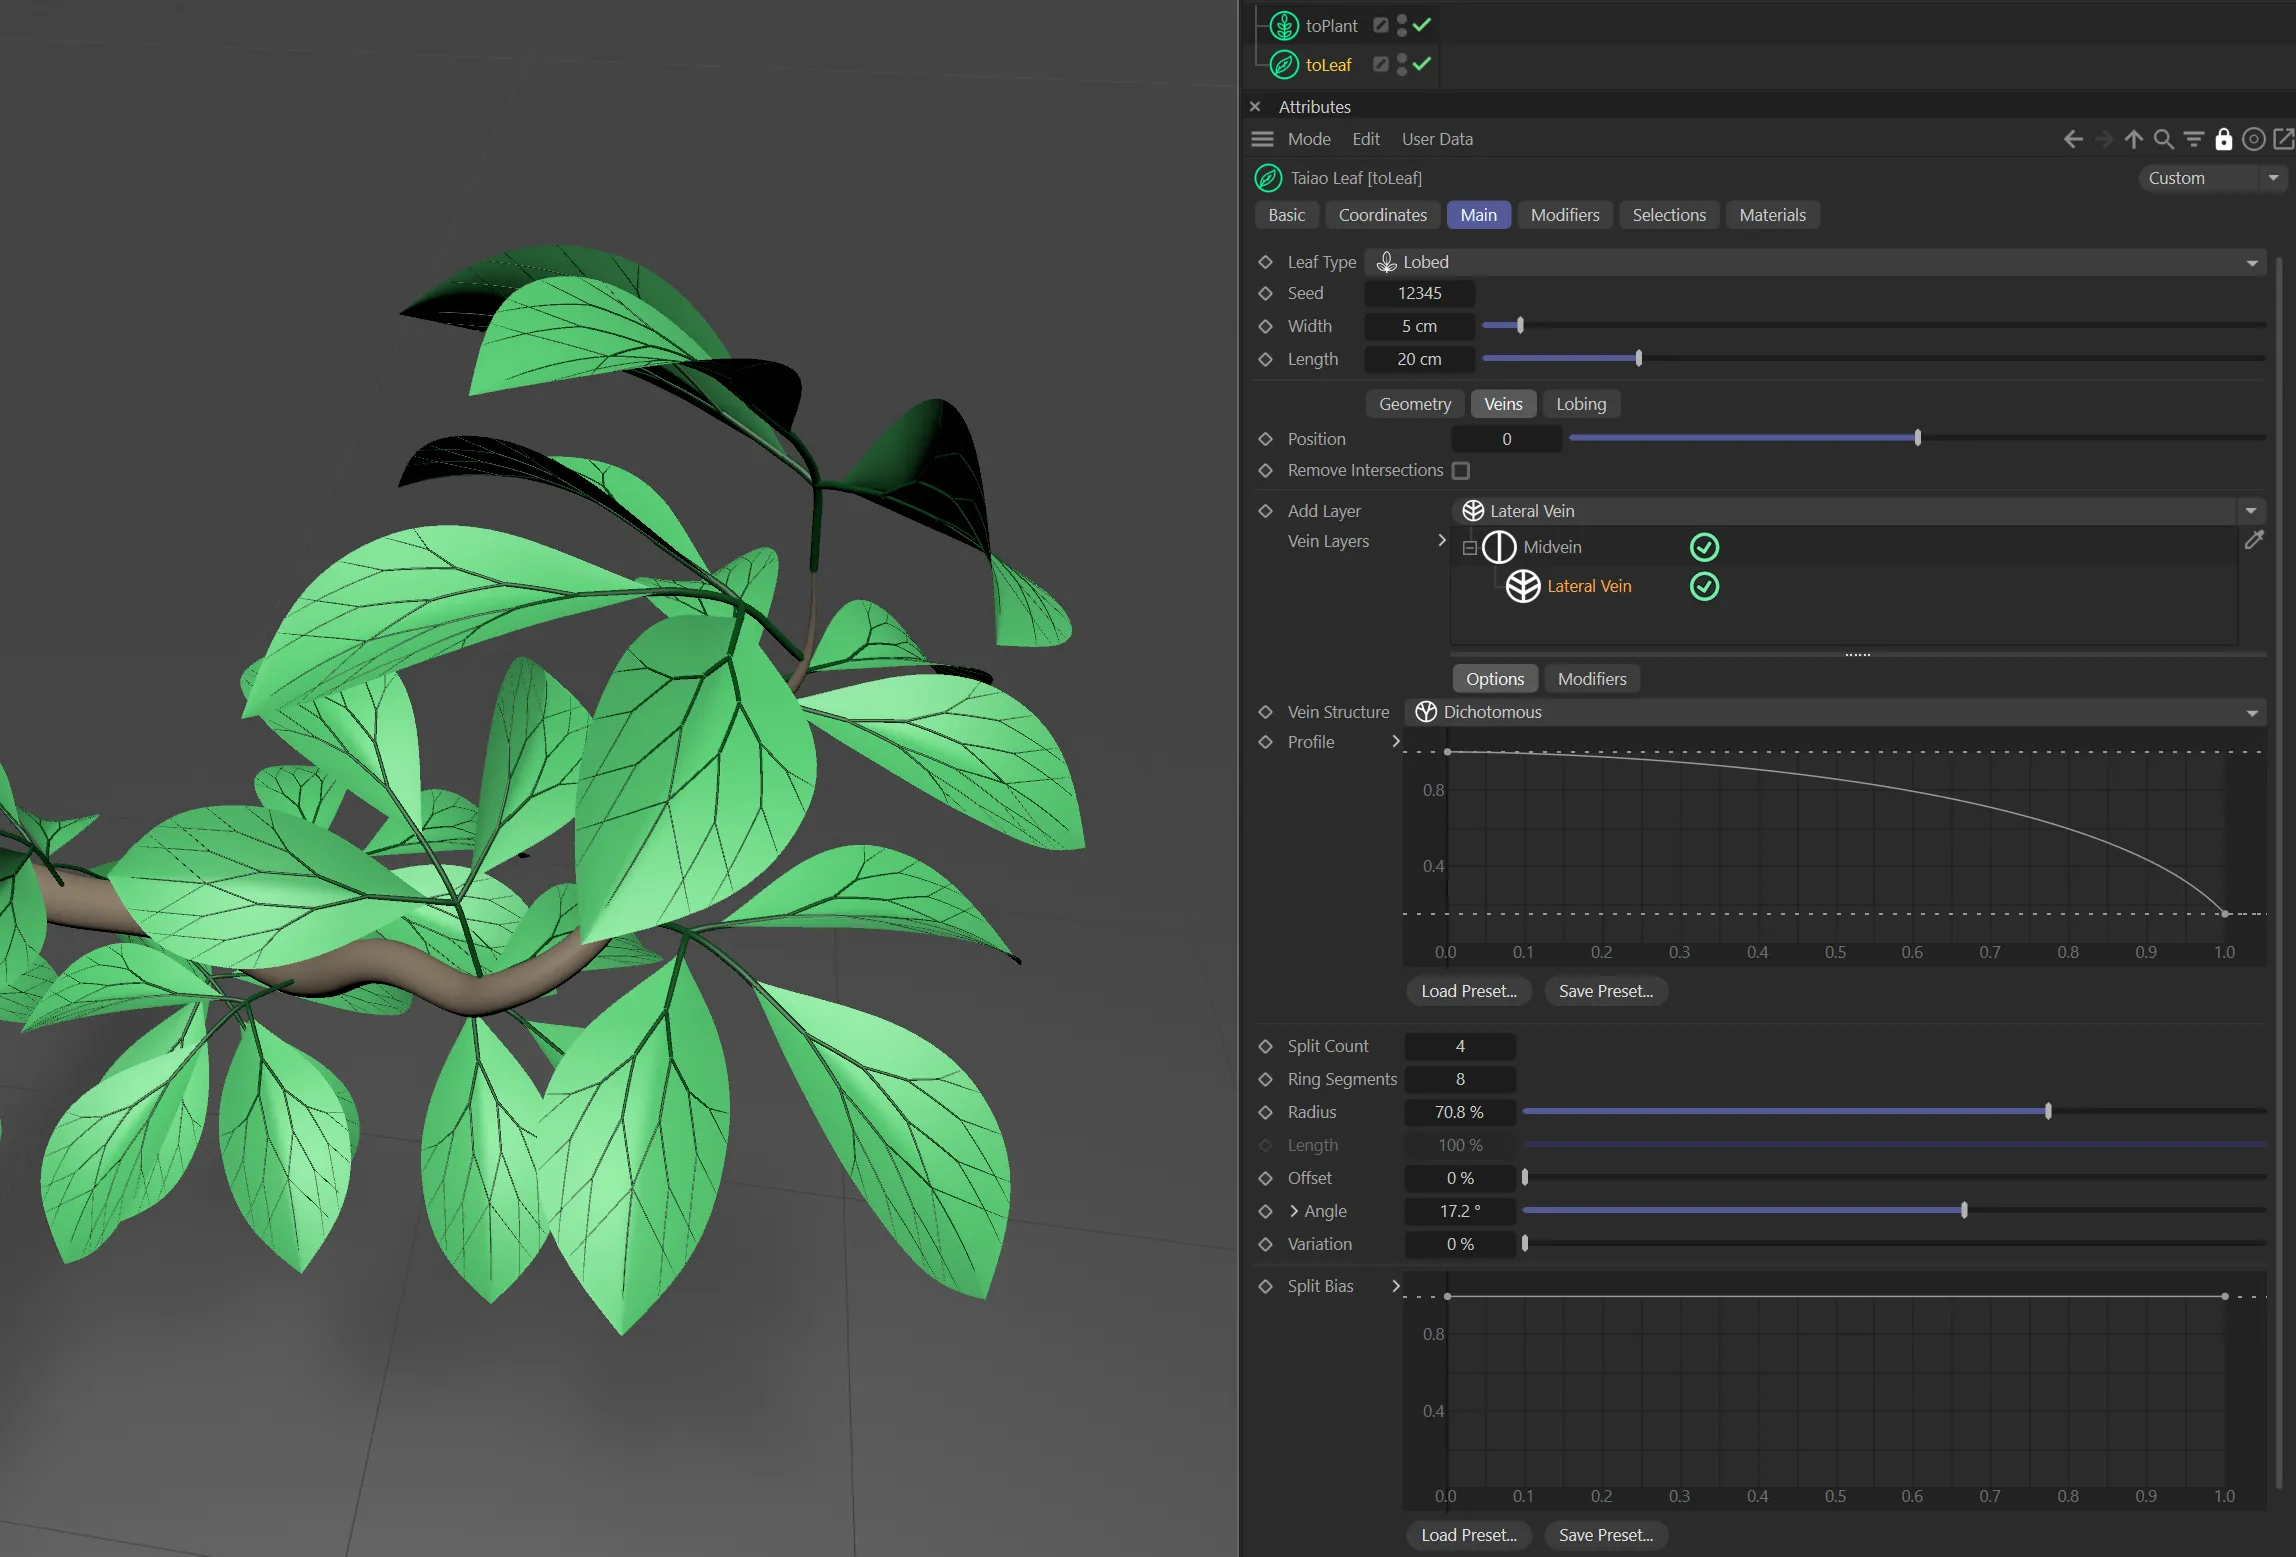
Veins tab
Section titled “Veins tab”Position
Section titled “Position”This setting will control the offset of the veins normal to the leaf surface.
Remove Intersections
Section titled “Remove Intersections”This will clip veins so that they have no intersections, choosing to clip the ‘newer’ veins.
Add Layer
Section titled “Add Layer”There are two types of Vein Layers, that can be selected: Midvein and Lateral Vein.
Midvein
Section titled “Midvein”The Midvein is the main central vein (or veins if using the parallel mode) that all subsequent veins stem from.
Lateral Vein
Section titled “Lateral Vein”The Lateral Vein setting gives the branches that form from their parent vein layer, via a number of different branching structures.
Options tab - Midvein settings
Section titled “Options tab - Midvein settings”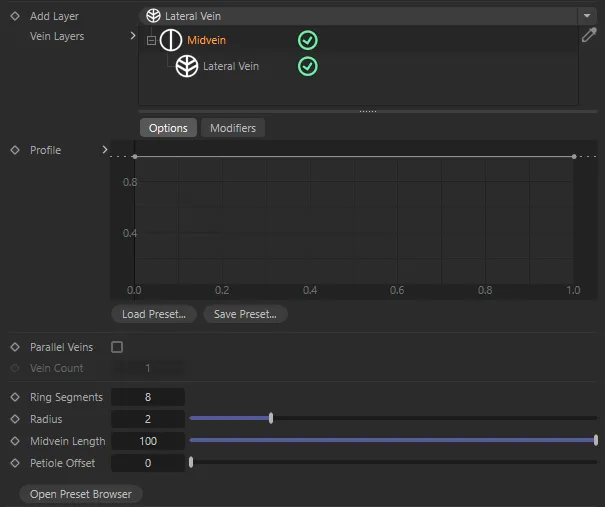
Midvein layer menu settings.
Profile
Section titled “Profile”The spline controlling the shape of the vein.
The spline height acts as a multiplier of the radius along the vein’s length.
Parallel Veins
Section titled “Parallel Veins”This enables the Vein Count option to generate more than one parallel midvein.
Vein Count
Section titled “Vein Count”Controls the number of parallel midveins to generate.
Ring Segments
Section titled “Ring Segments”The number of radial segments to generate for the polygon mesh.
Radius
Section titled “Radius”The radius of the vein.
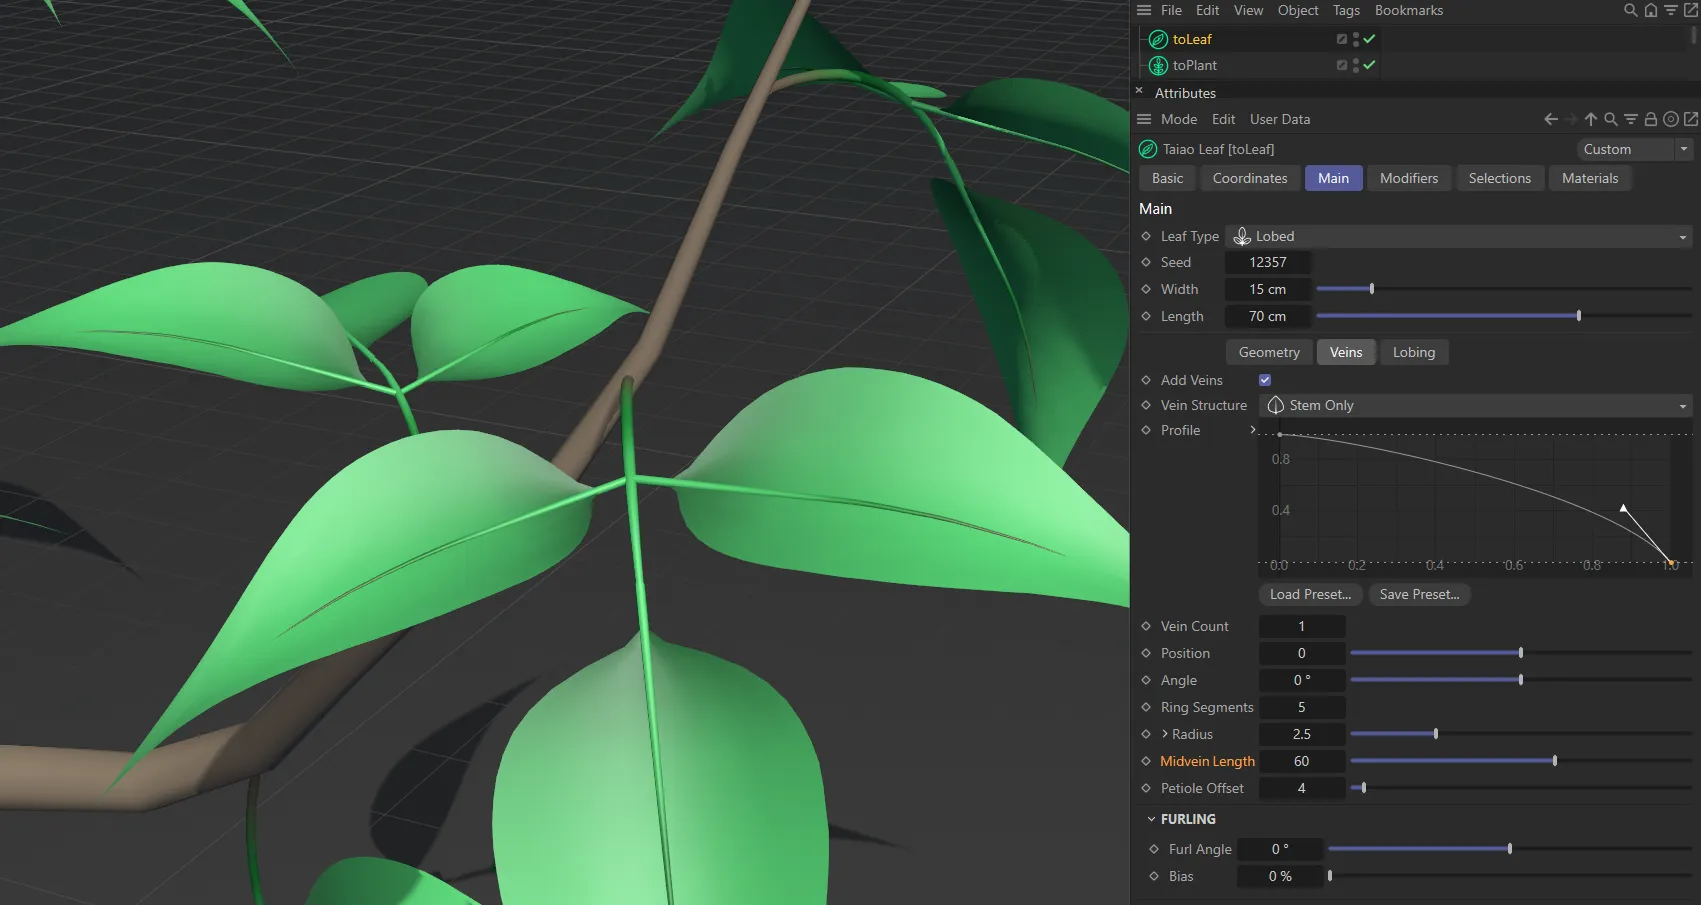
Midvein Length
Section titled “Midvein Length”A value 0 (zero) to 100 that controls the length of the vein.
A value of 100 is the full length of the leaf.
Midvein Length value of 100.
Midvein Length decreased to 60.
Petiole Offset
Section titled “Petiole Offset”The length of petiole to generate.
This is the base stem of a leaf that will join it to the plant.
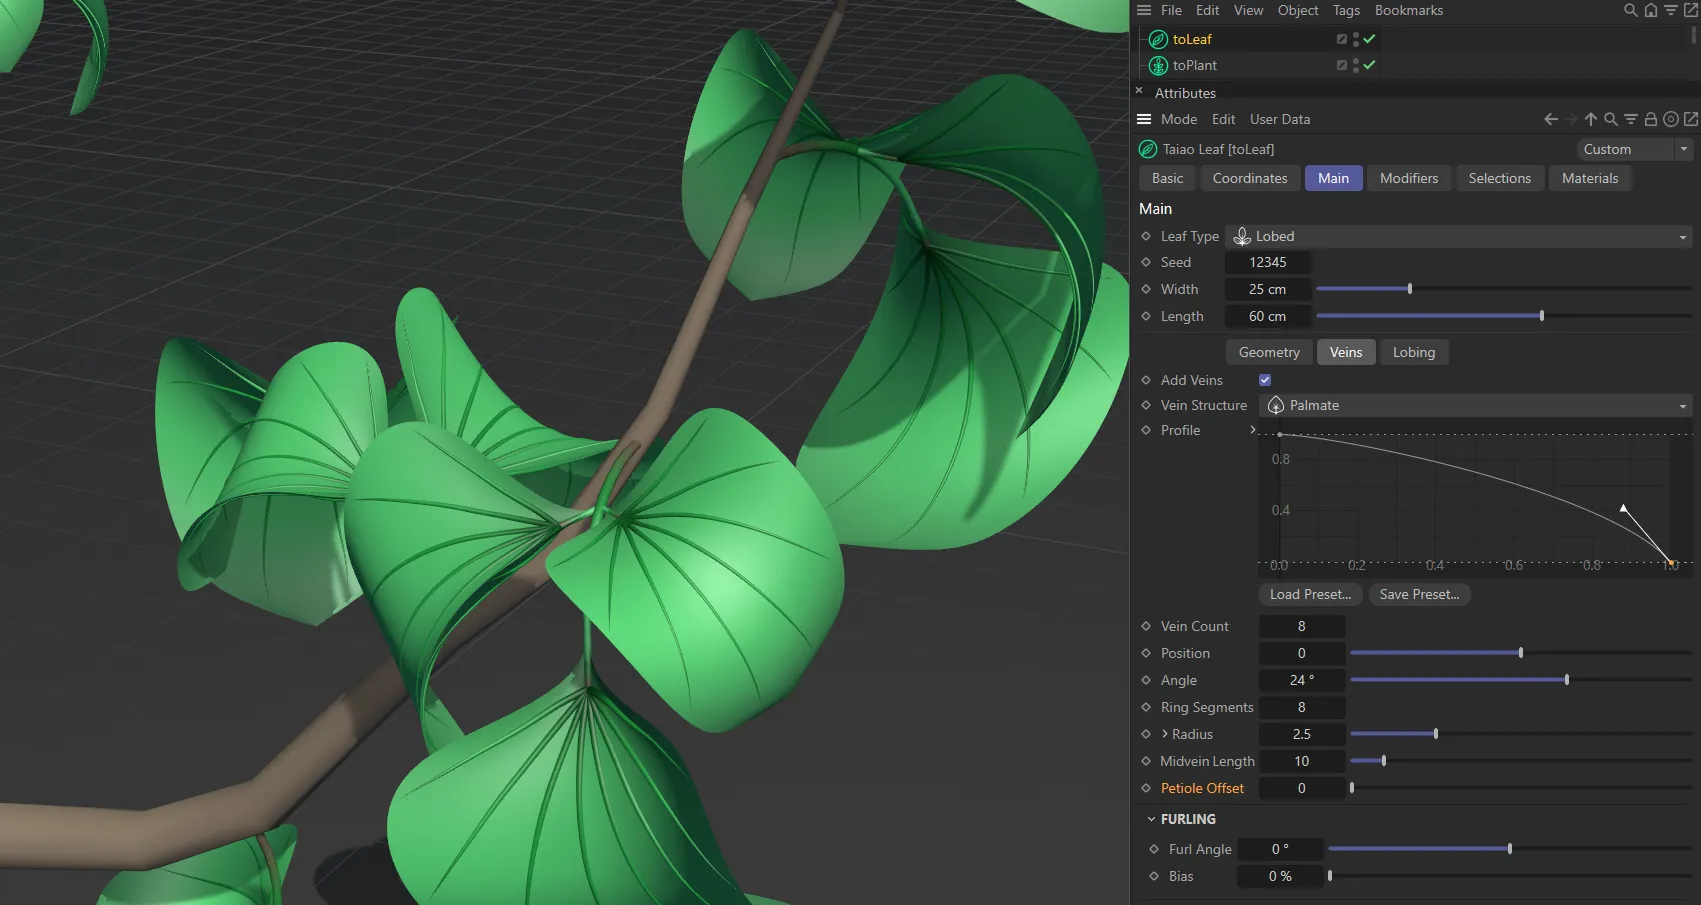
There is no (zero) Petiole Offset here.
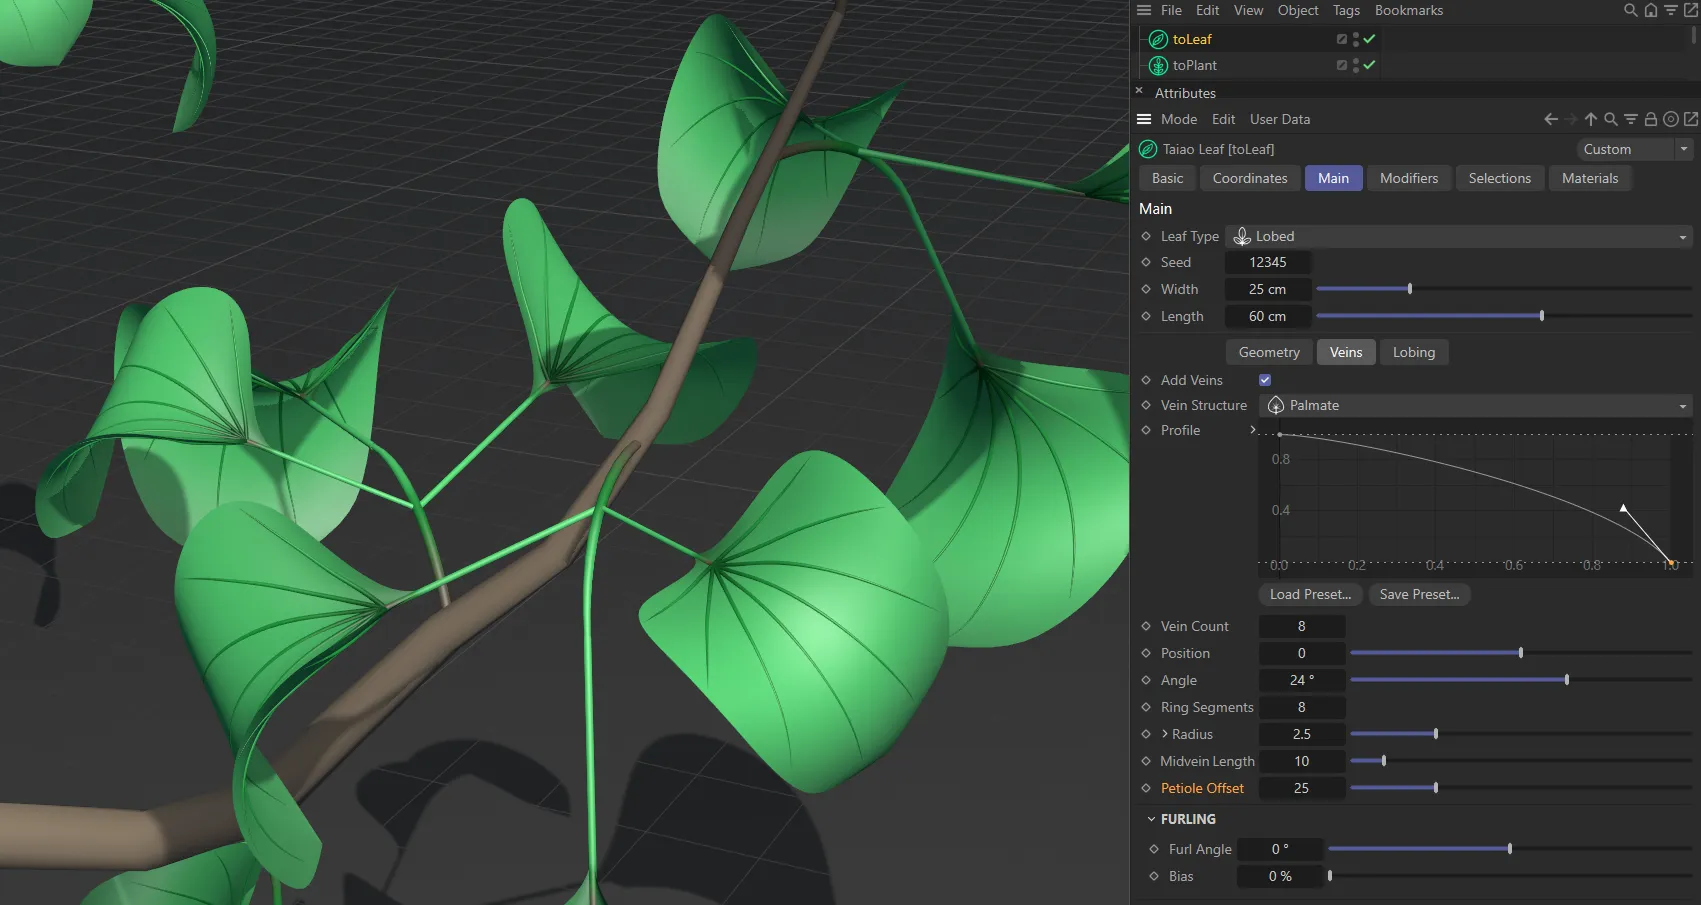
Petiole Offset raised to 25.
Options tab - Lateral Vein settings
Section titled “Options tab - Lateral Vein settings”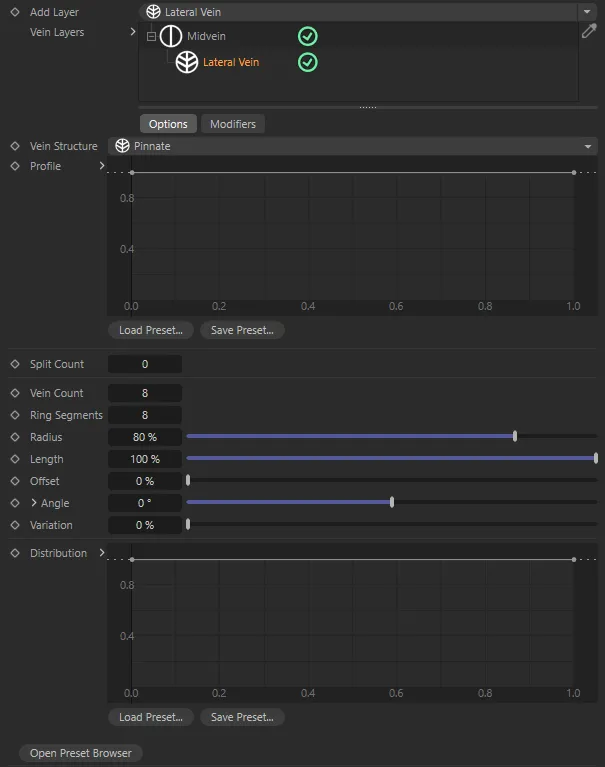
Lateral Vein layer menu settings.
Vein Structure
Section titled “Vein Structure”Set as Pinnate, by default, this is the branching structure of the layer.
The alternatives are: Palmate, Arcuate and Dichotomous.
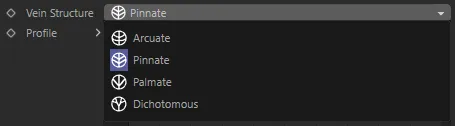
Vein Structure menu.
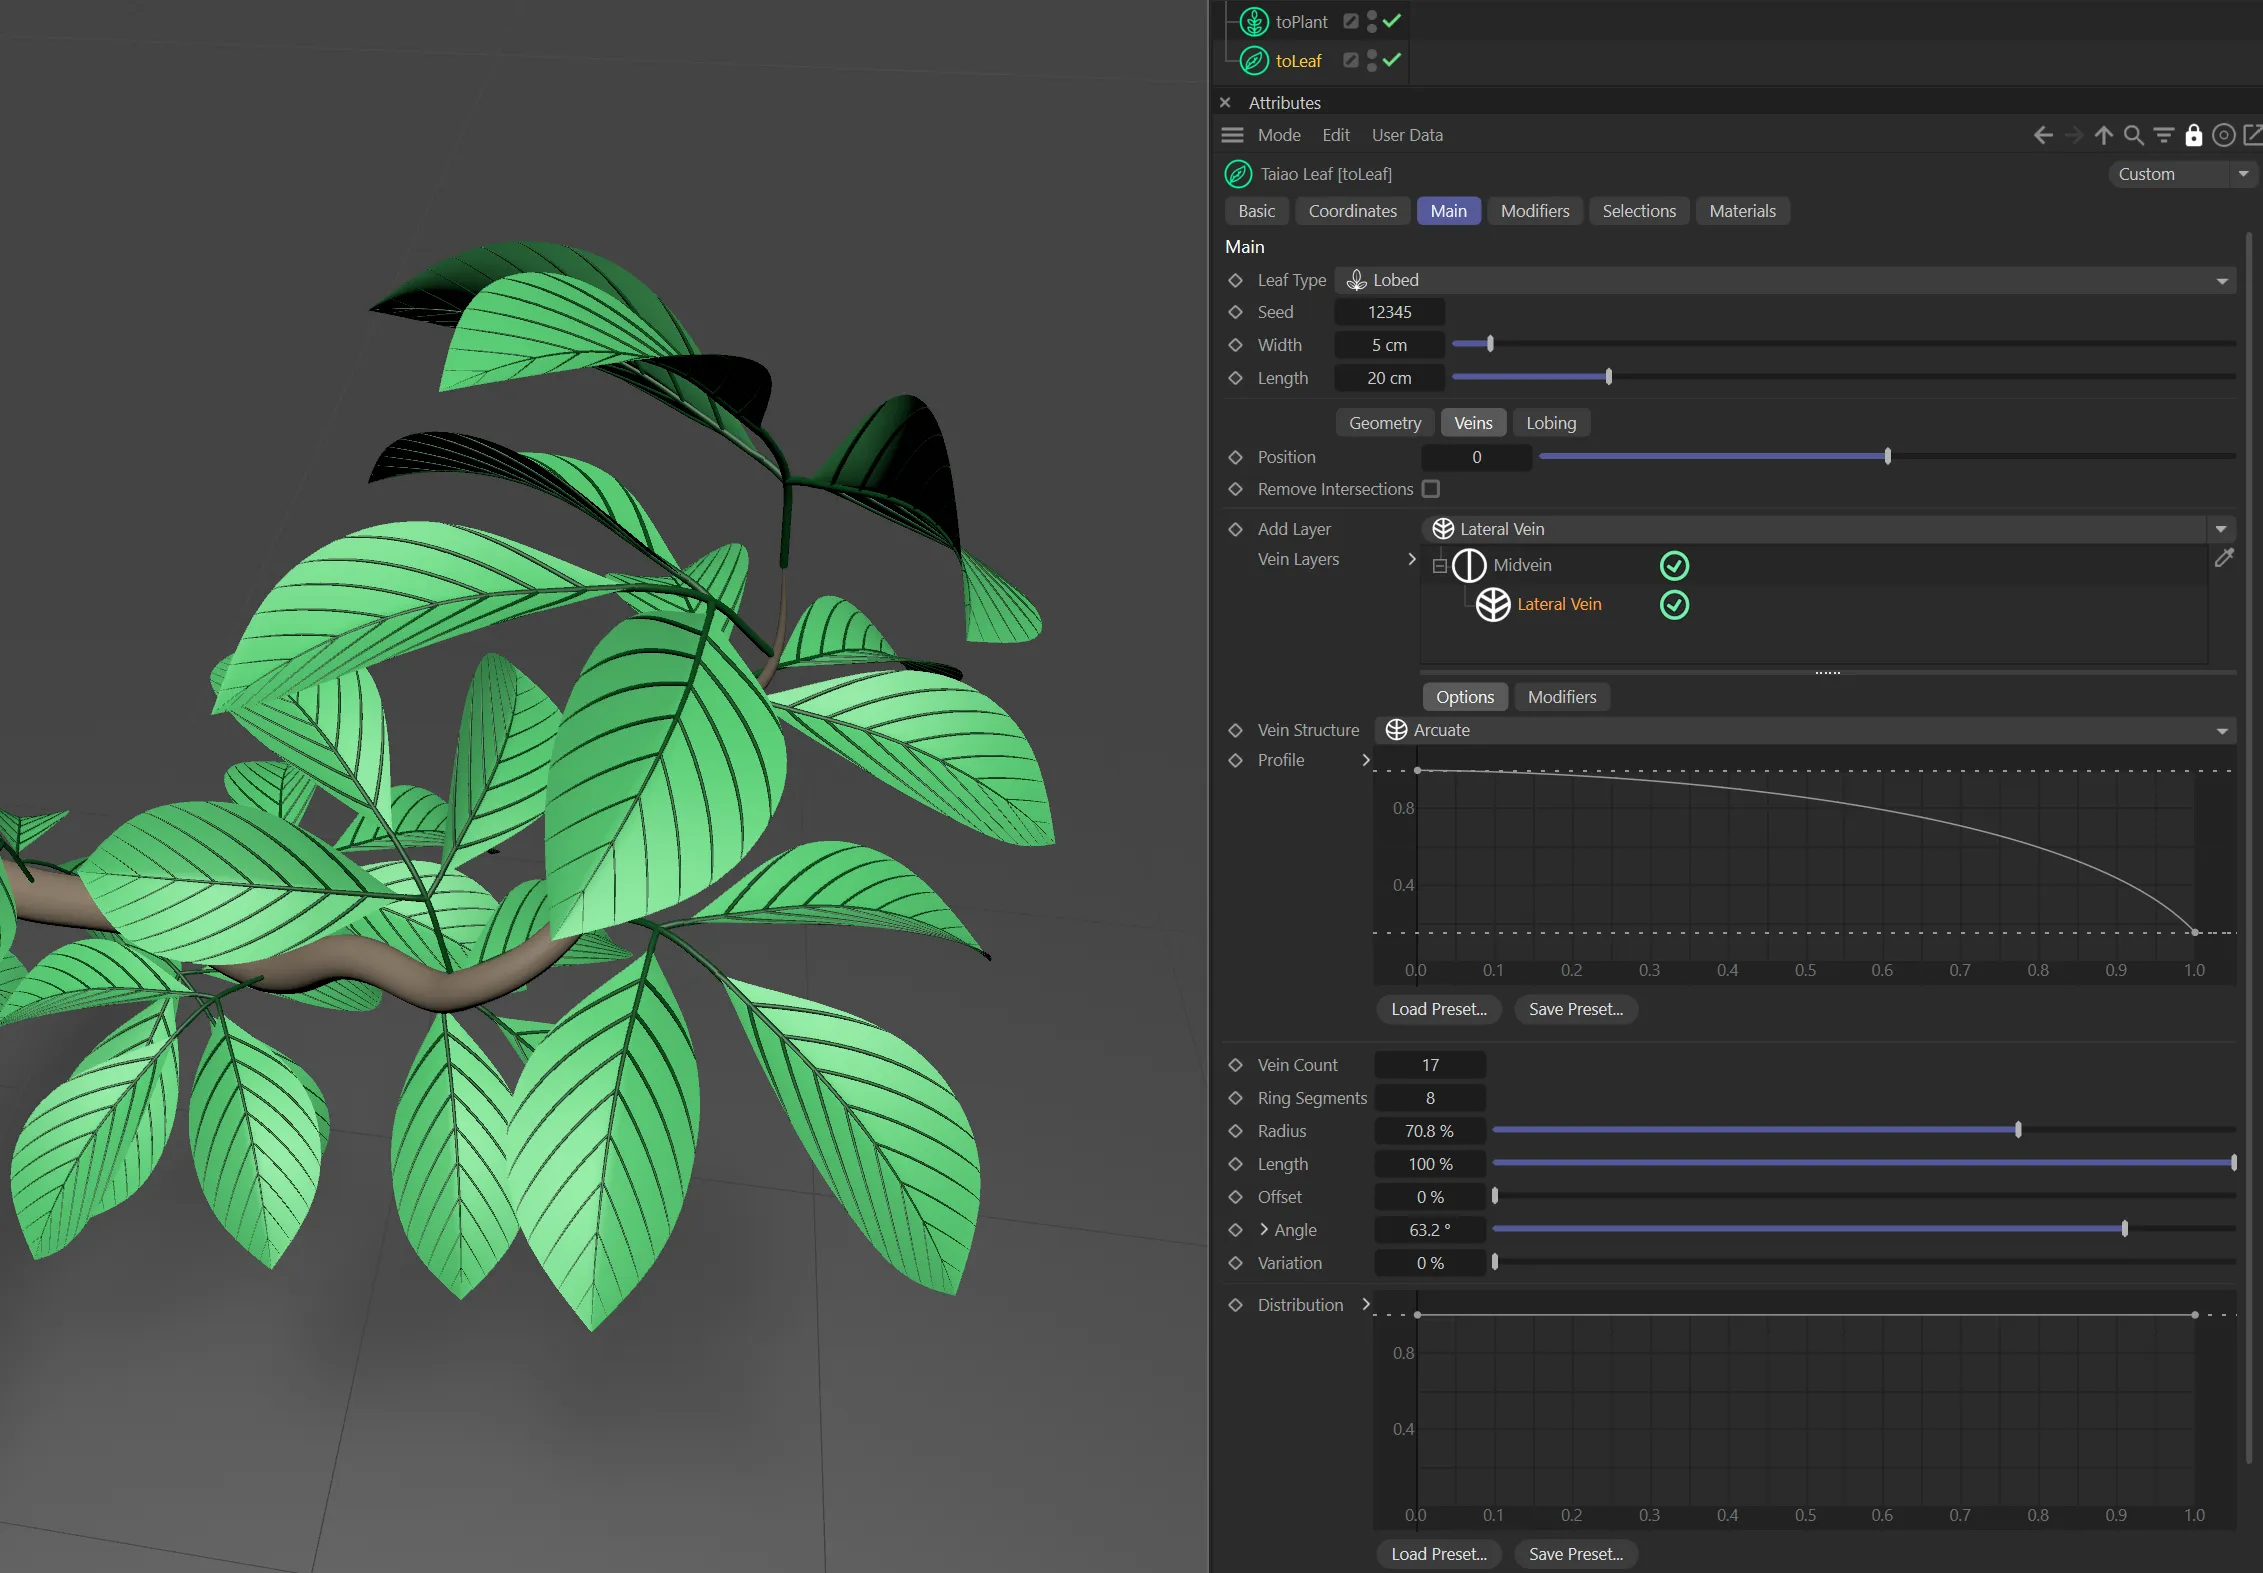
Vein Structure set to Arcuate.
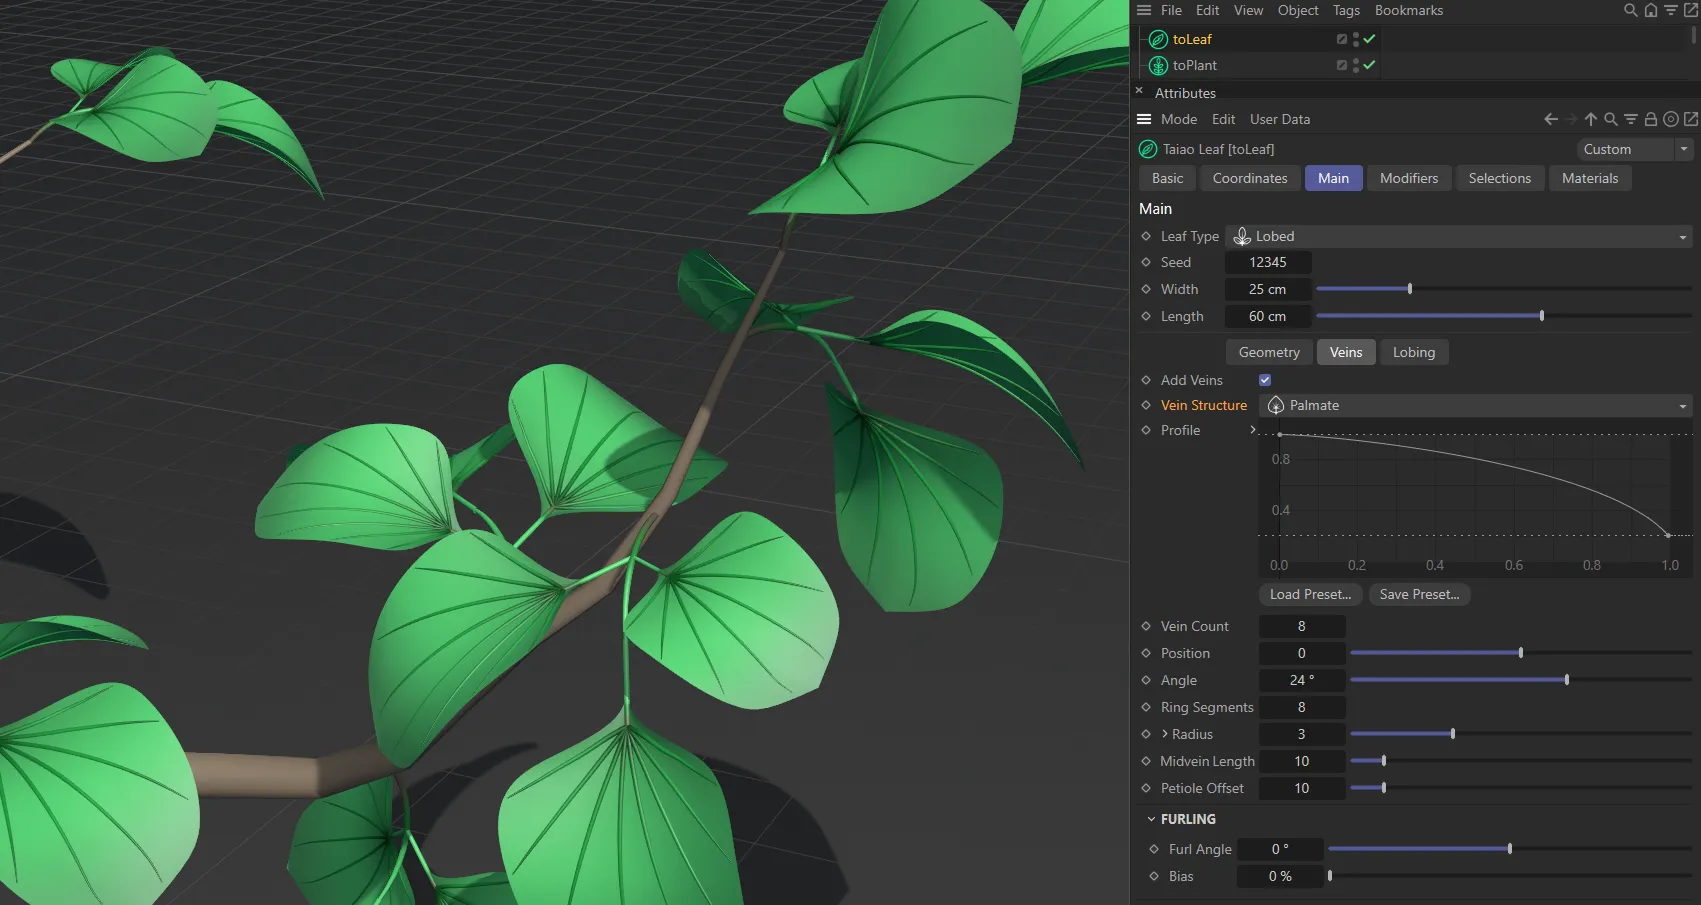
The Palmate option.
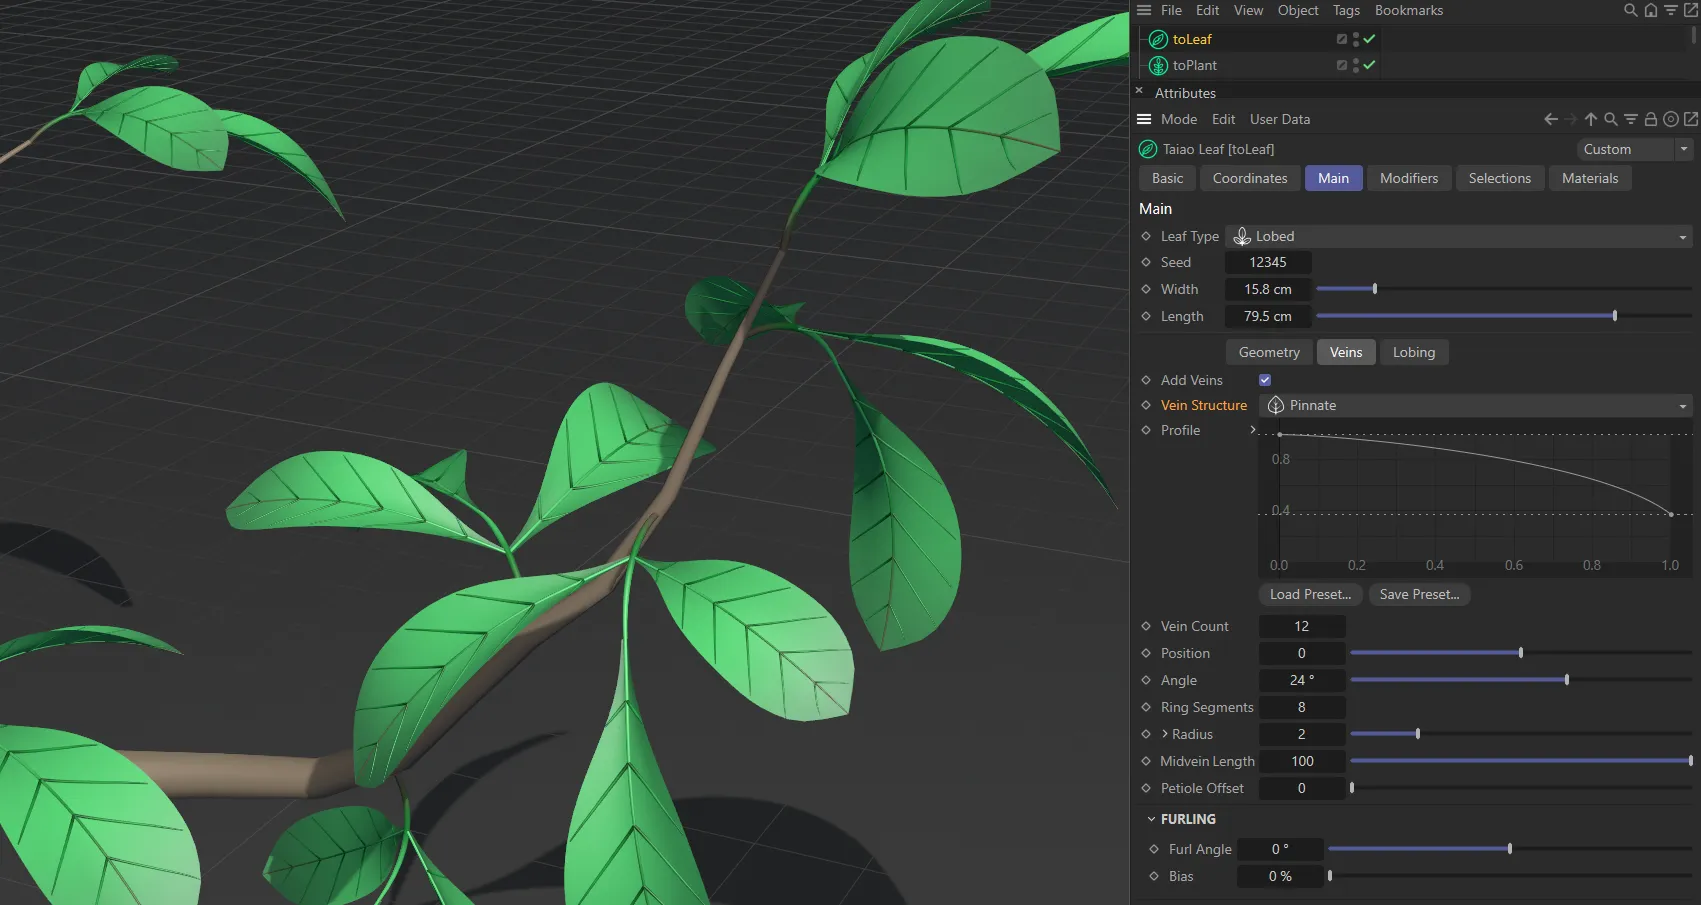
Vein Structure set to Pinnate.
Vein Structure set to Dichotomous.
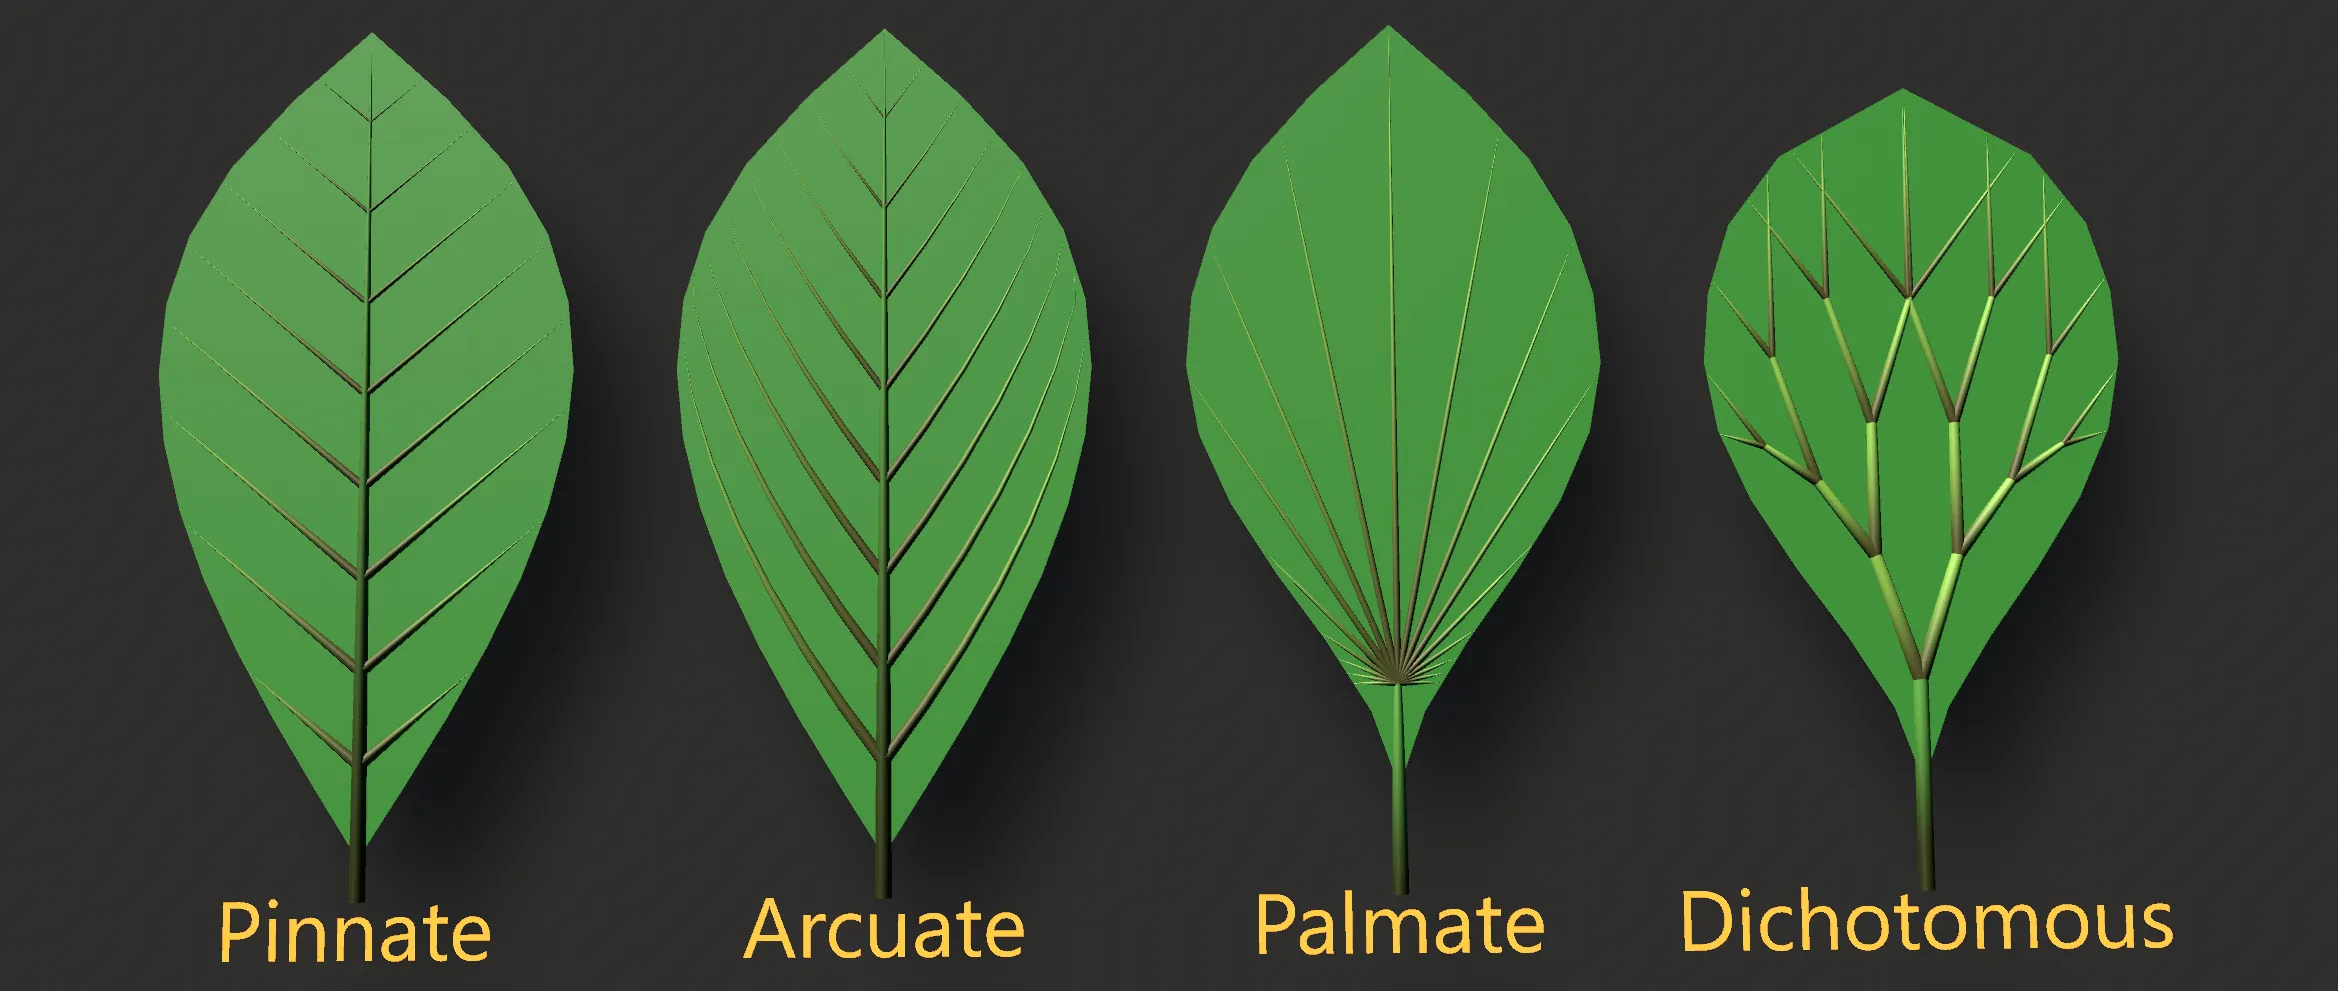
All four venation lateral Vein Structure modes.
Pinnate
Section titled “Pinnate”Generates straight veins either side of the parent.
Palmate
Section titled “Palmate”Generates veins in a fan structure from the tip of the parent.
Arcuate
Section titled “Arcuate”Generates veins the same as Pinnate but they bend up towards the top of the leaf.
Dichotomous
Section titled “Dichotomous”Generates forking vein structures from the tip of the parent.
In Dichotomous mode, Vein Count (below) will be replaced by Split Count, which will determine how many forks to generate along the parent.
The Distribution spline will also be replaced by a Split Bias spline, controlling the distribution of the vein forks along the length of the parent.
The changed UI, when Vein Structure is in the Dichotomous mode, with Split Count and Split Bias parameters now available.
Profile
Section titled “Profile”The spline controlling the shape of the vein.
The spline height acts as a multiplier of the radius along the vein’s length.
Vein Count/Split Count
Section titled “Vein Count/Split Count”The number of veins to generate.
Split Count replaces Vein Count when the Vein Structure is set to Dichotomous, which will determine how many forks to generate along the parent.
Ring Segments
Section titled “Ring Segments”The number of radial segments to generate for the polygon mesh.
Radius
Section titled “Radius”The radius of the vein.
Length
Section titled “Length”A percentage value that controls the length of the vein as a percentage of its parent’s length.
Offset
Section titled “Offset”Only applicable to Pinnate and Arcuate modes.
This offsets one side of the veins so the veins no longer originate from the same position
The angle that veins make to the parent, or the angle of spread for Palmate and Dichotomous modes.
The bias of the angle along the length of the parent, or around the fan of veins in Palmate mode.
This scales the angle by the spline’s value.
Variation
Section titled “Variation”A variation of 0 (zero) to 100% that is applied to the angle.
It will vary the angle between plus/minus the variation percentage of the angle value.
Distribution/Split Bias
Section titled “Distribution/Split Bias”This parameter gives you the ability to move pairs of leaves up and down the stem length.
When the Vein Structure is in Dichotomous mode, this will be replaced by a Split Bias spline, controlling the distribution of the vein forks along the length of the parent.
Modifiers tab
Section titled “Modifiers tab”Both vein layers also have a Modifiers tab with a modifier stack similar to that in the main leaf options and throughout Taiao.
There are three available modifiers: Bend, Turbulence and Furling (Petiole).
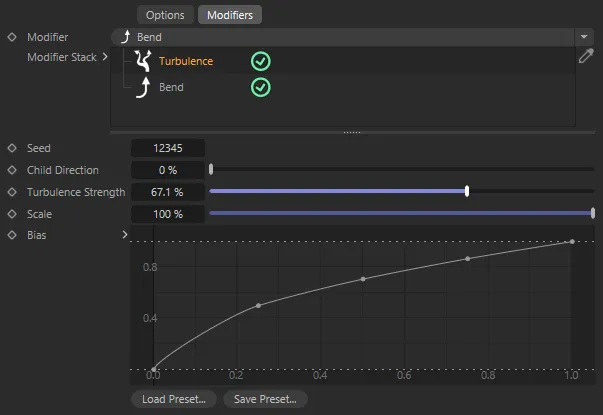
Modifiers tab, with the Turbulence options.
Bend options
Section titled “Bend options”The bend modifier has the following parameters:
The angle to bend the vein by.
This bending is applied progressively over the length of the vein.
A percentage of 0 (zero) to 100% for where to start the bending from.
Turbulence options
Section titled “Turbulence options”The turbulence modifier applies a noise to the vein to give a more natural look.
It has the following parameters:
The seed value for generating the noise.
Turbulence Strength
Section titled “Turbulence Strength”The strength of the applied noise.
Child Direction
Section titled “Child Direction”Uses the parents direction normal for the angle of the lateral vein at 0 the lateral veins will remain parallel.
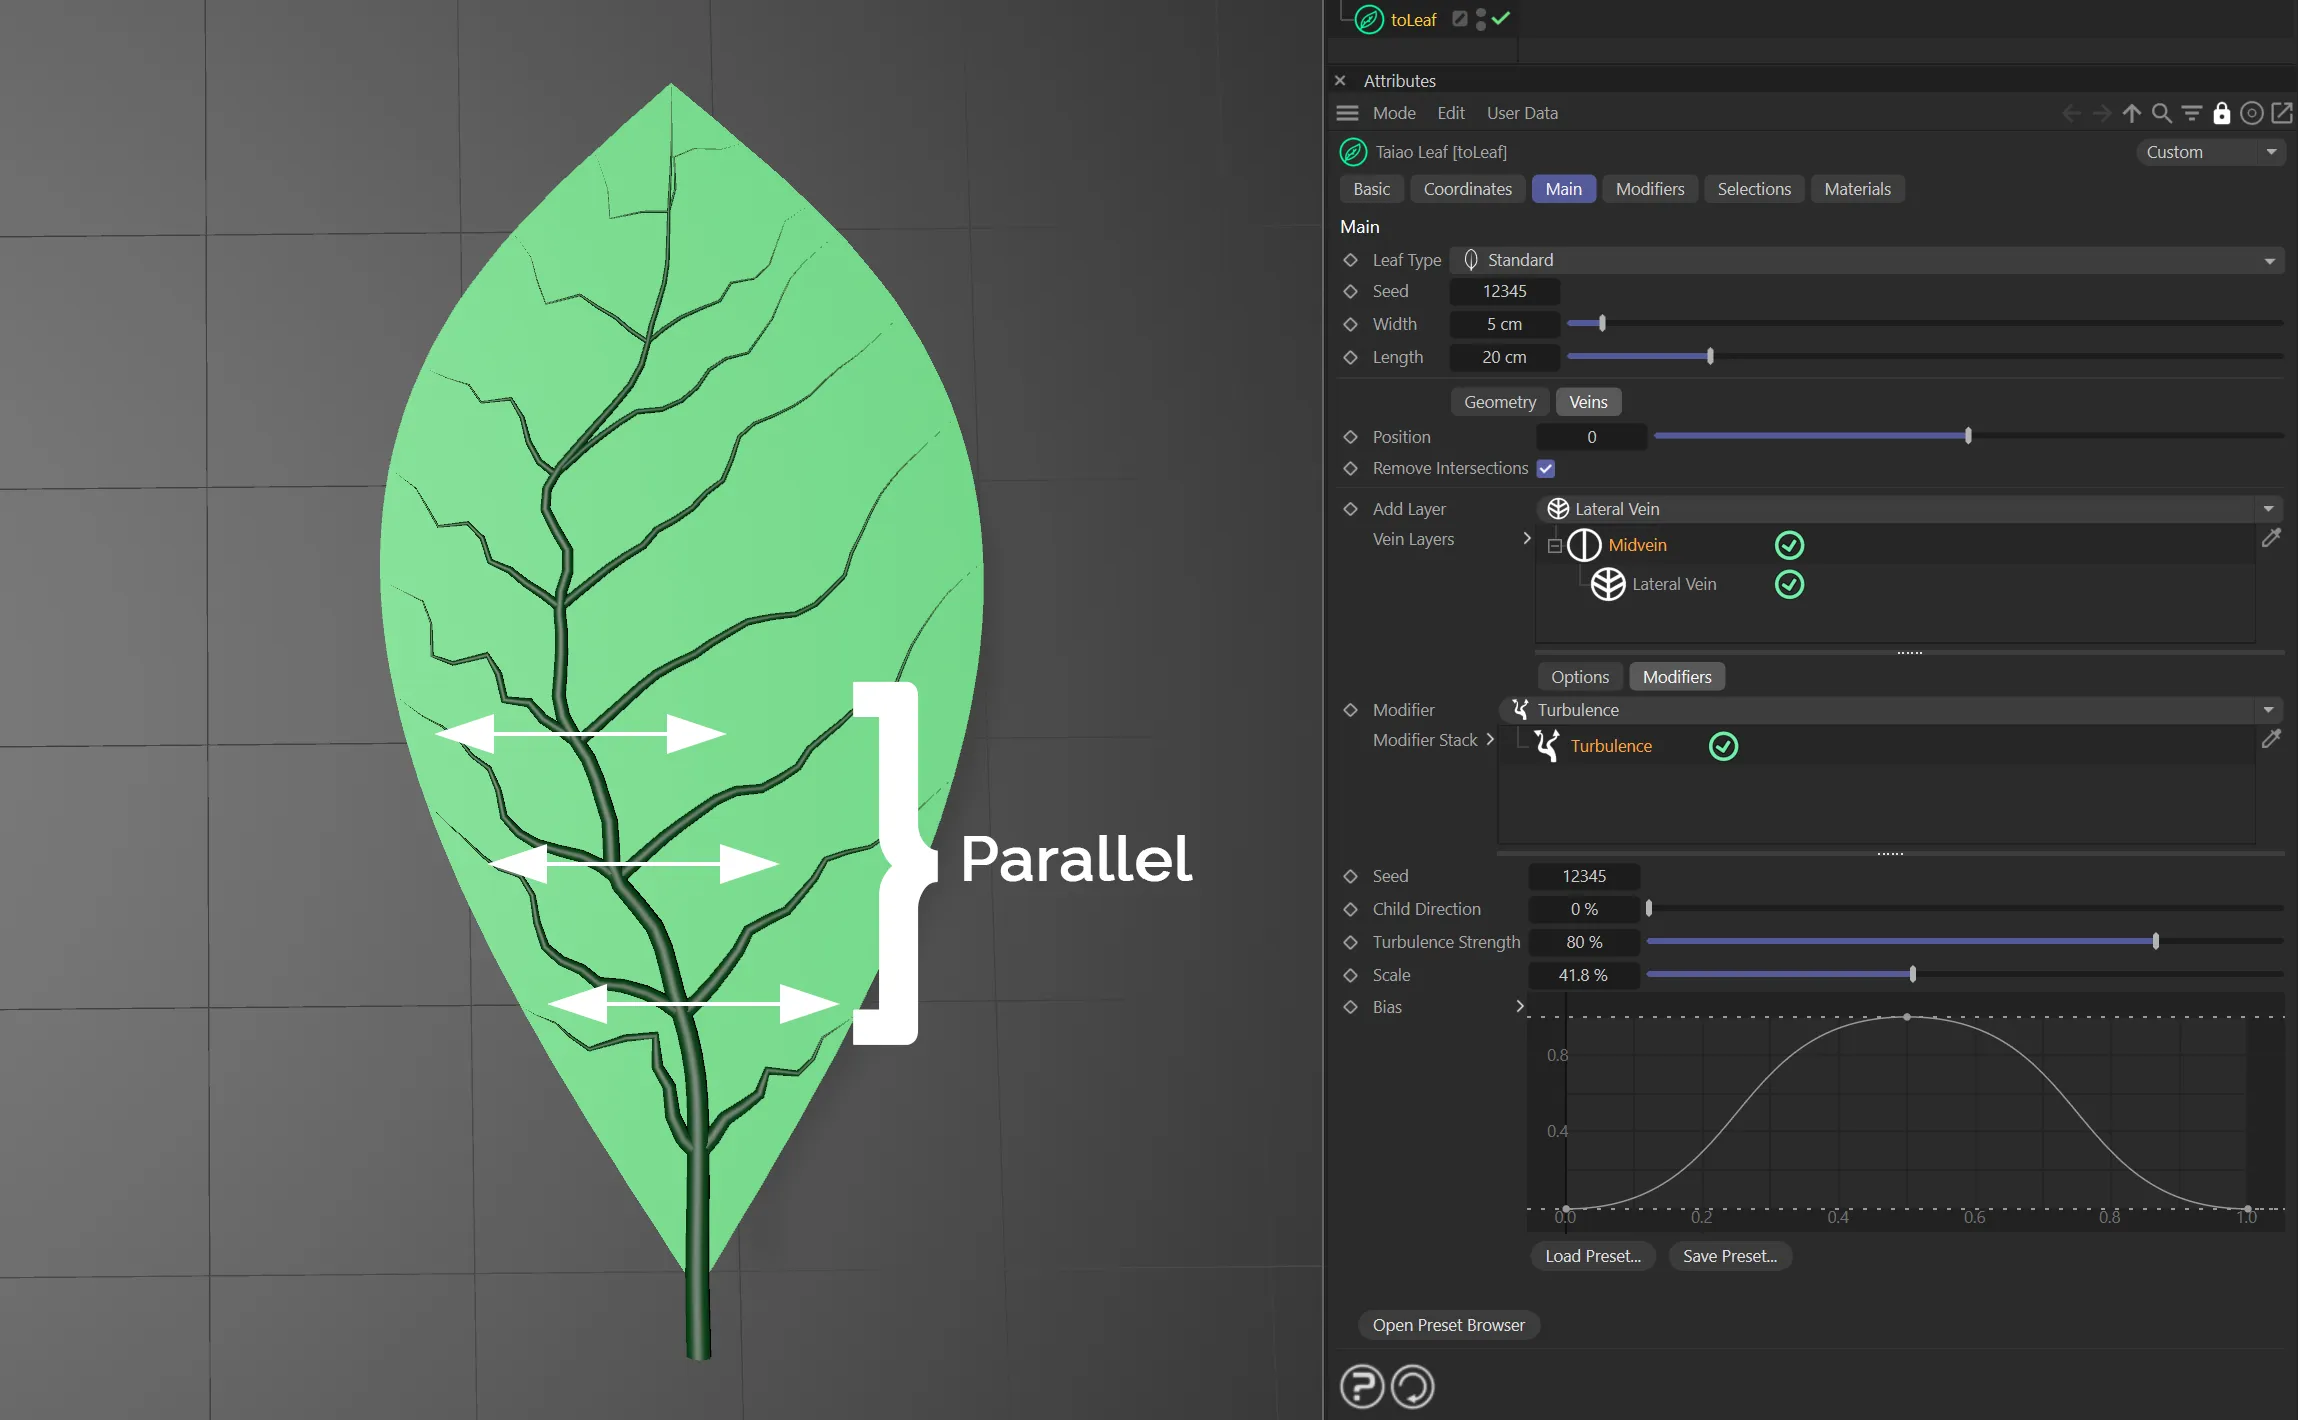
Child Direction set to 0 (zero) %; lateral veins remain parallel.
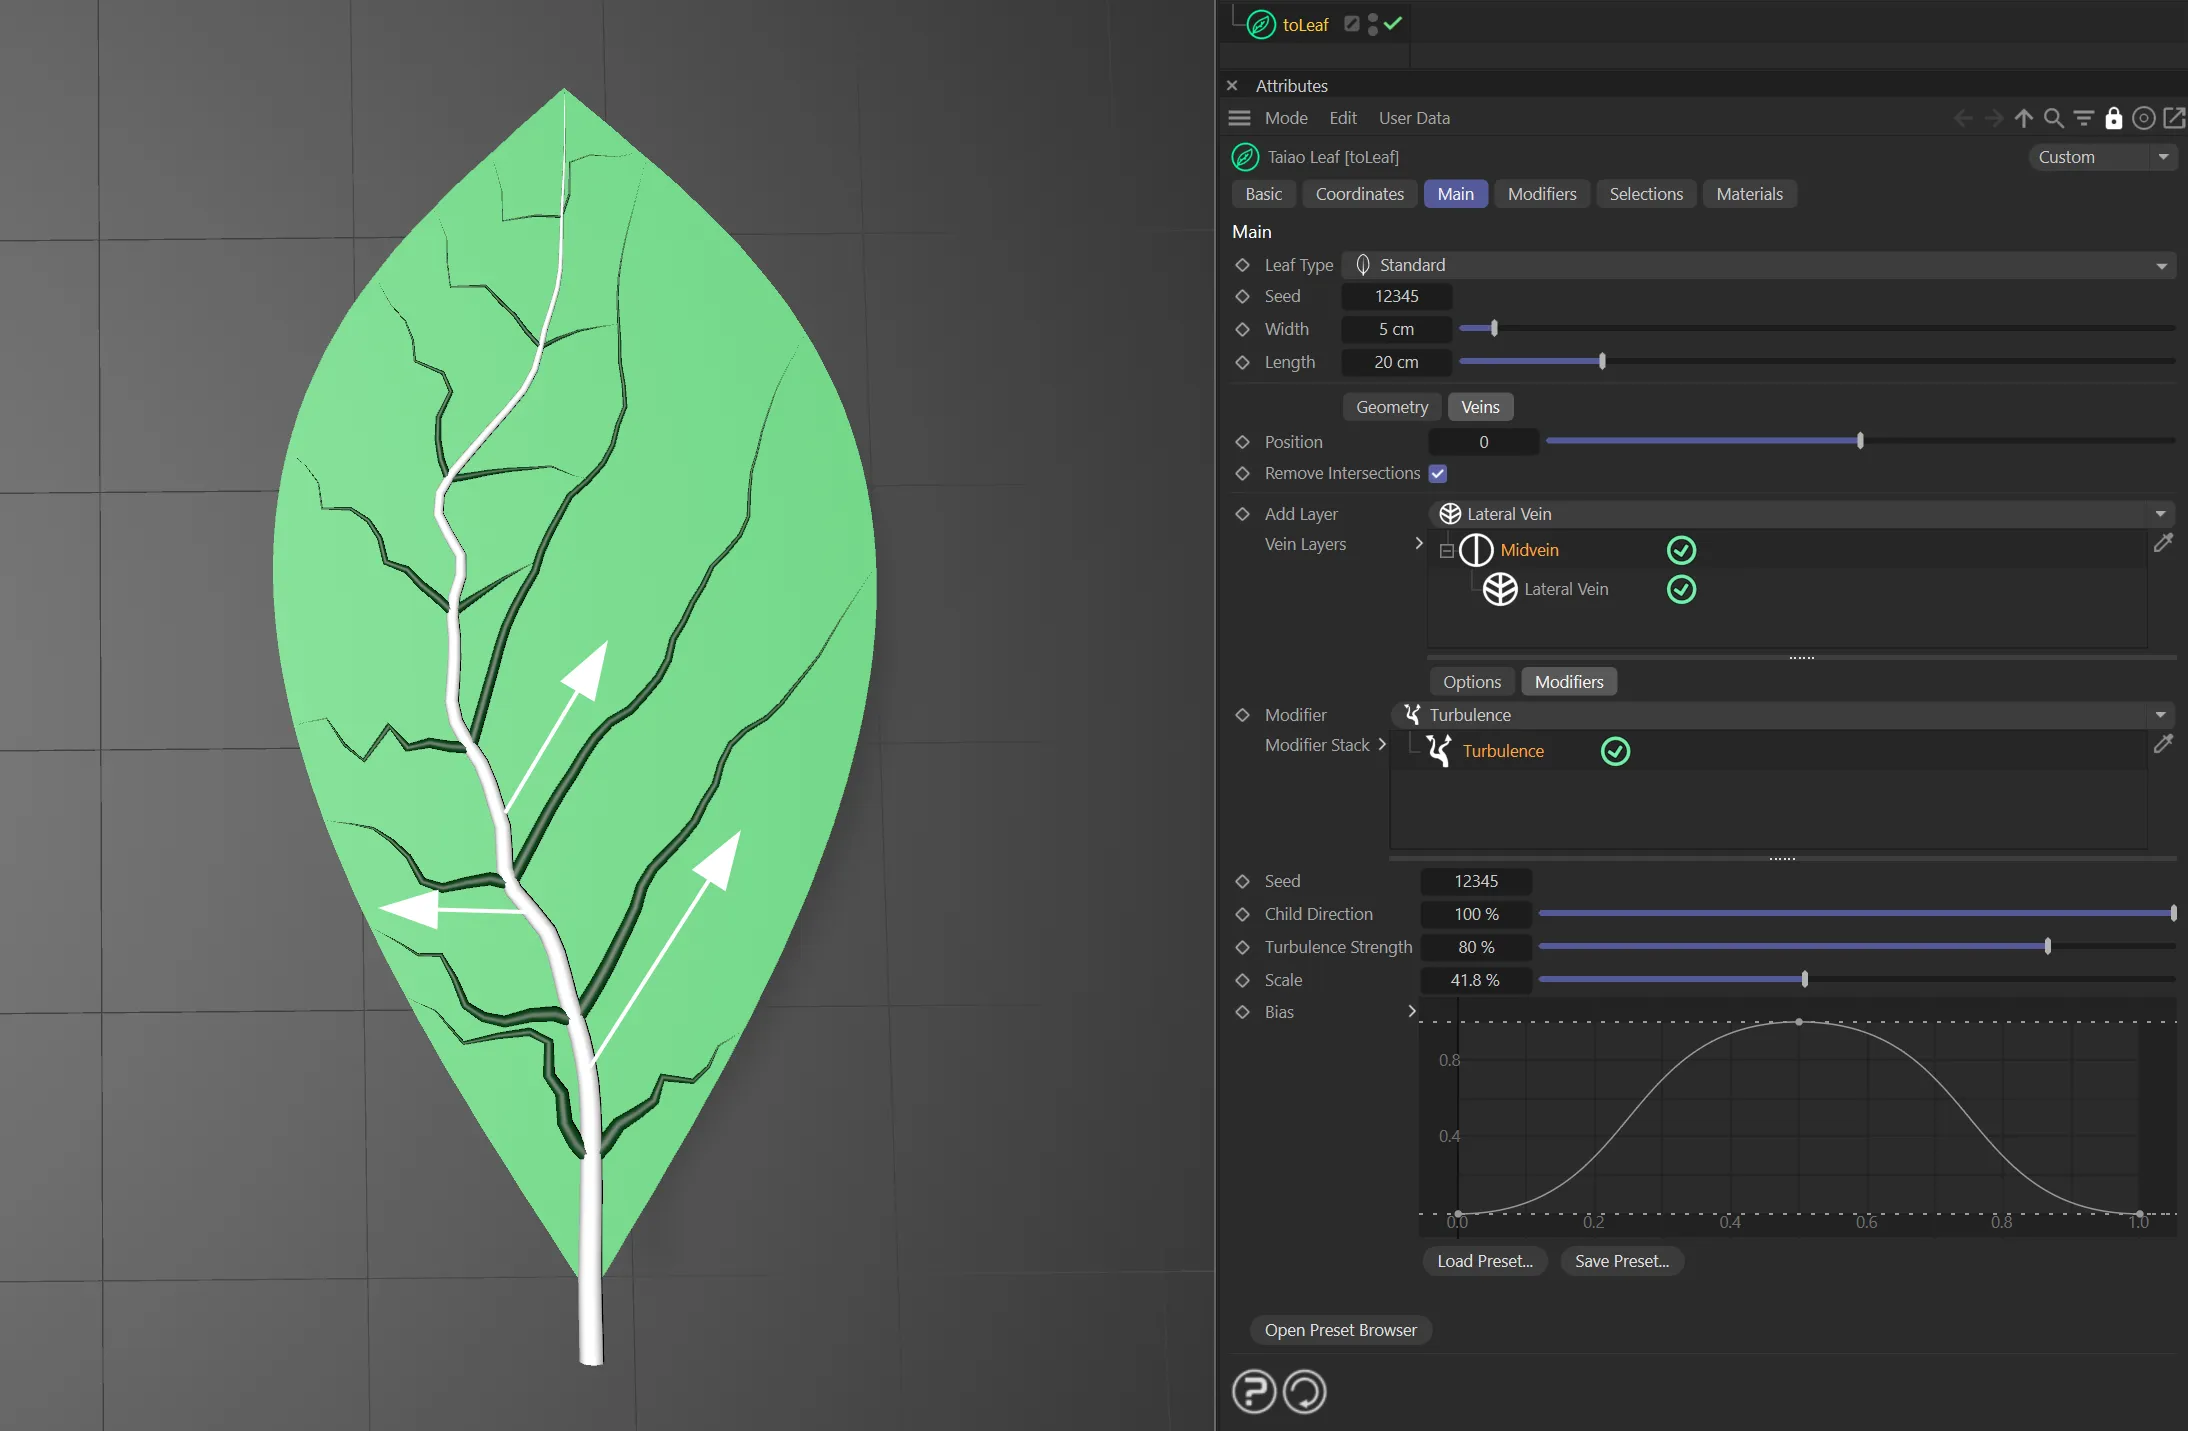
Child Direction set to 100%; lateral veins use the normal direction of the parent.
The noise scale.
A lower value gives a more rapidly changing noise, whereas a higher value gives a smoother slower changing noise.
A spline to control the strength of the turbulence up the length of the vein.
Furling (Petiole) options
Section titled “Furling (Petiole) options”The angle to furl the petiole by.
A percentage of 0 (zero) to 100% for where to start the furling from.
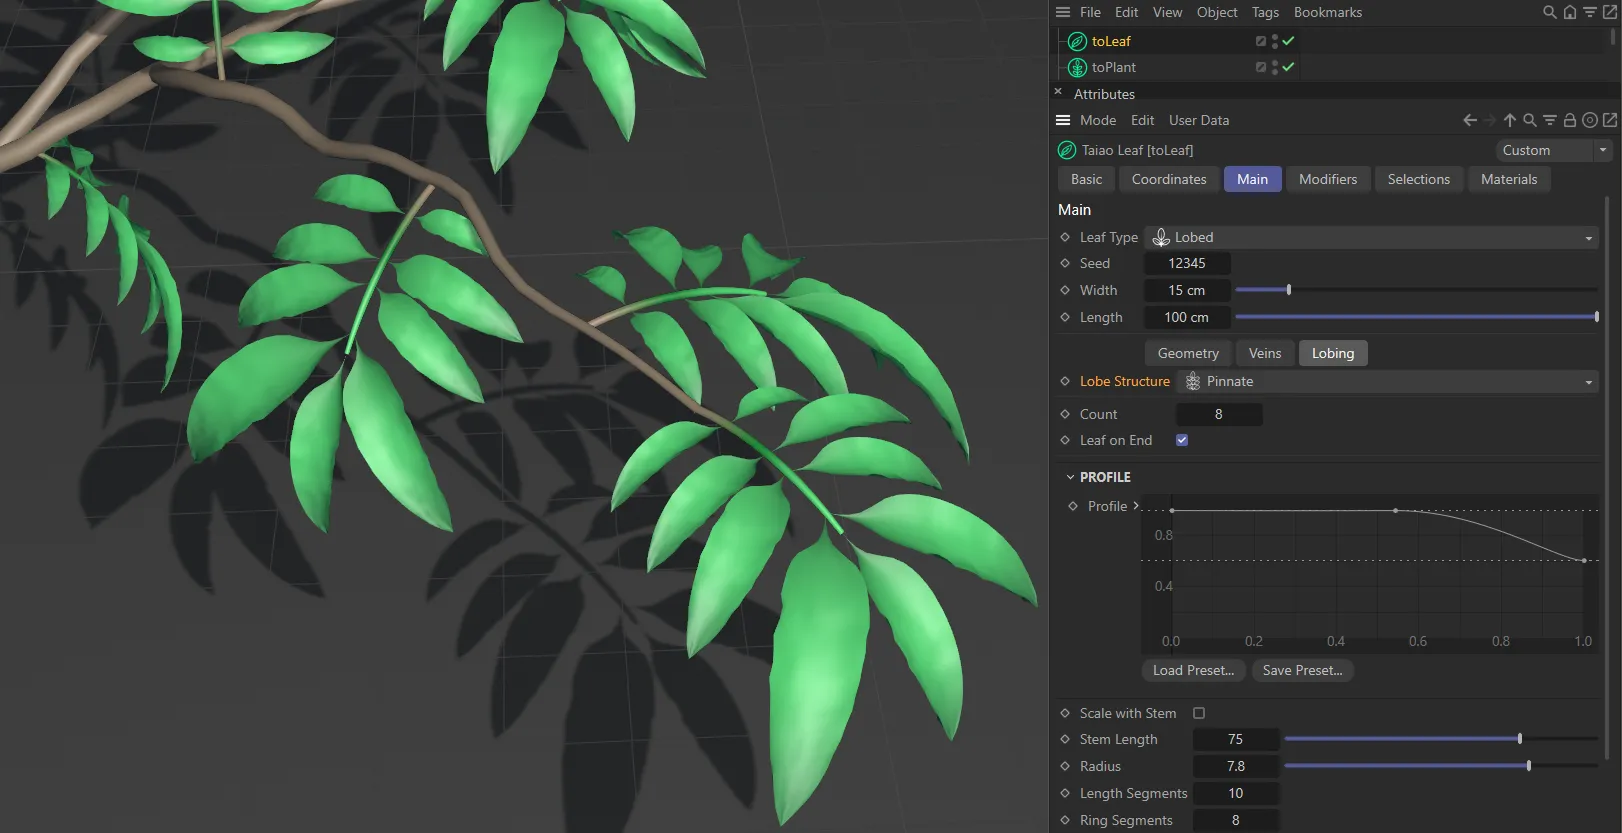
Lobing tab
Section titled “Lobing tab”This is only available when Leaf Type is set to Lobed.
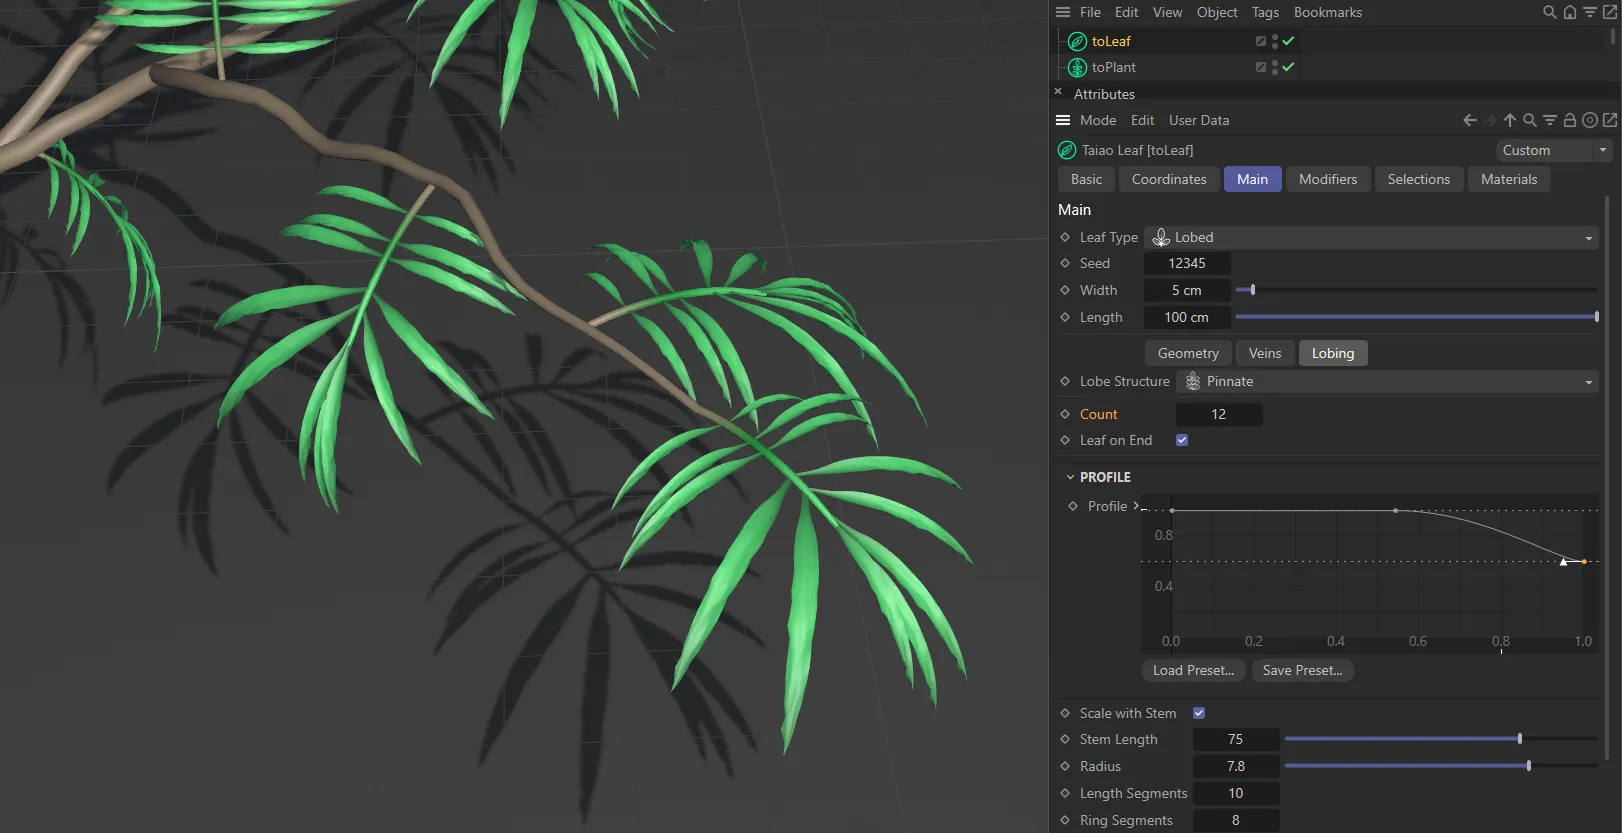
Lobe Structure
Section titled “Lobe Structure”Set as Pinnate, by default.
The alternative is Palmate.
Lobe Structure type of Pinnate.
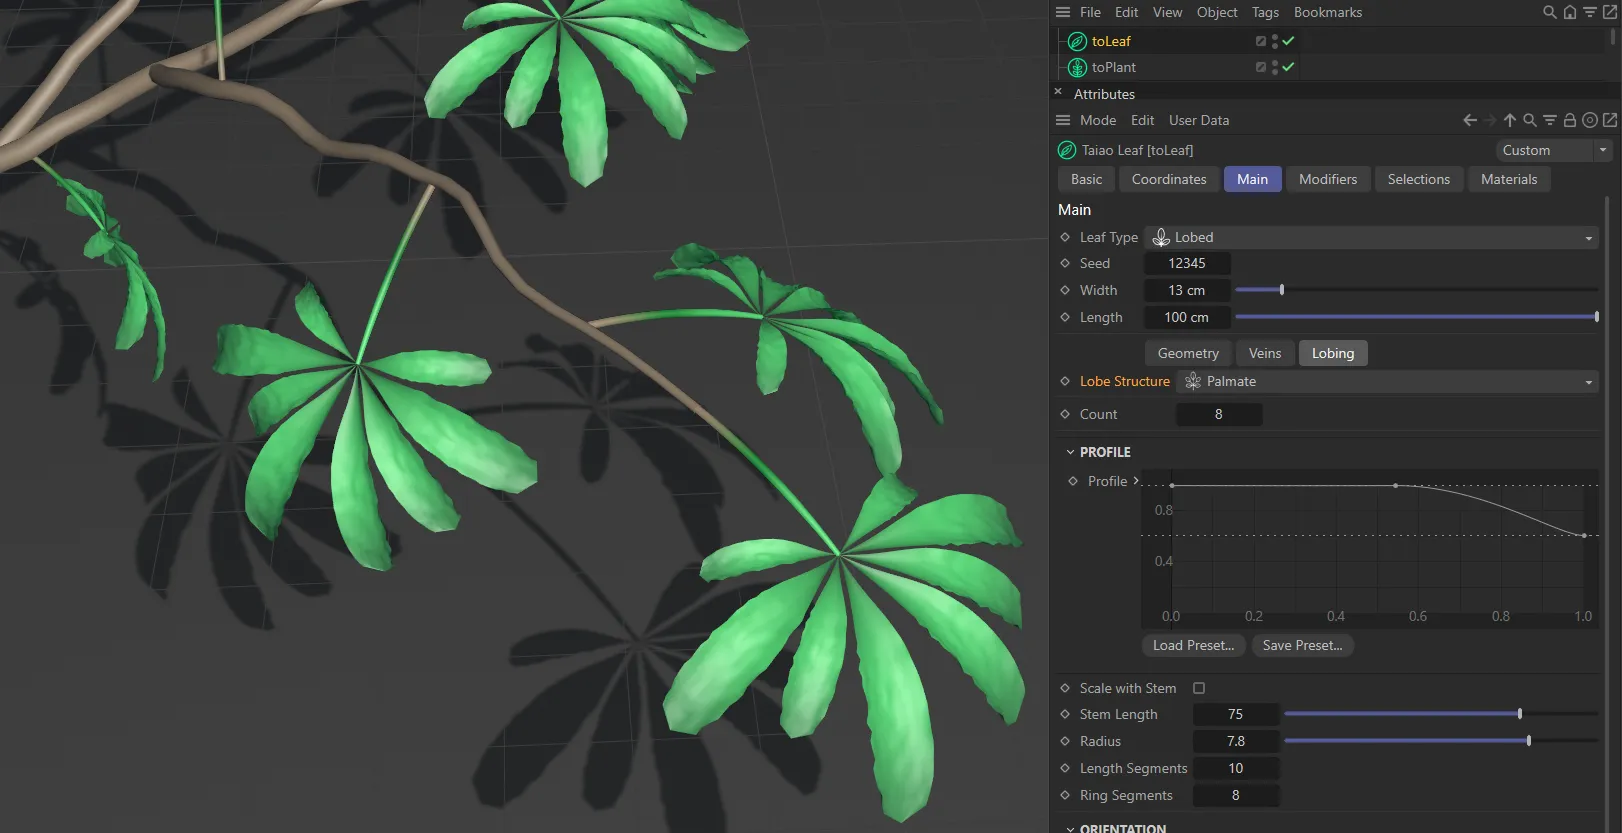
The Lobe Structure is the Palmate setting, here.
The number of leaves on the lobe.
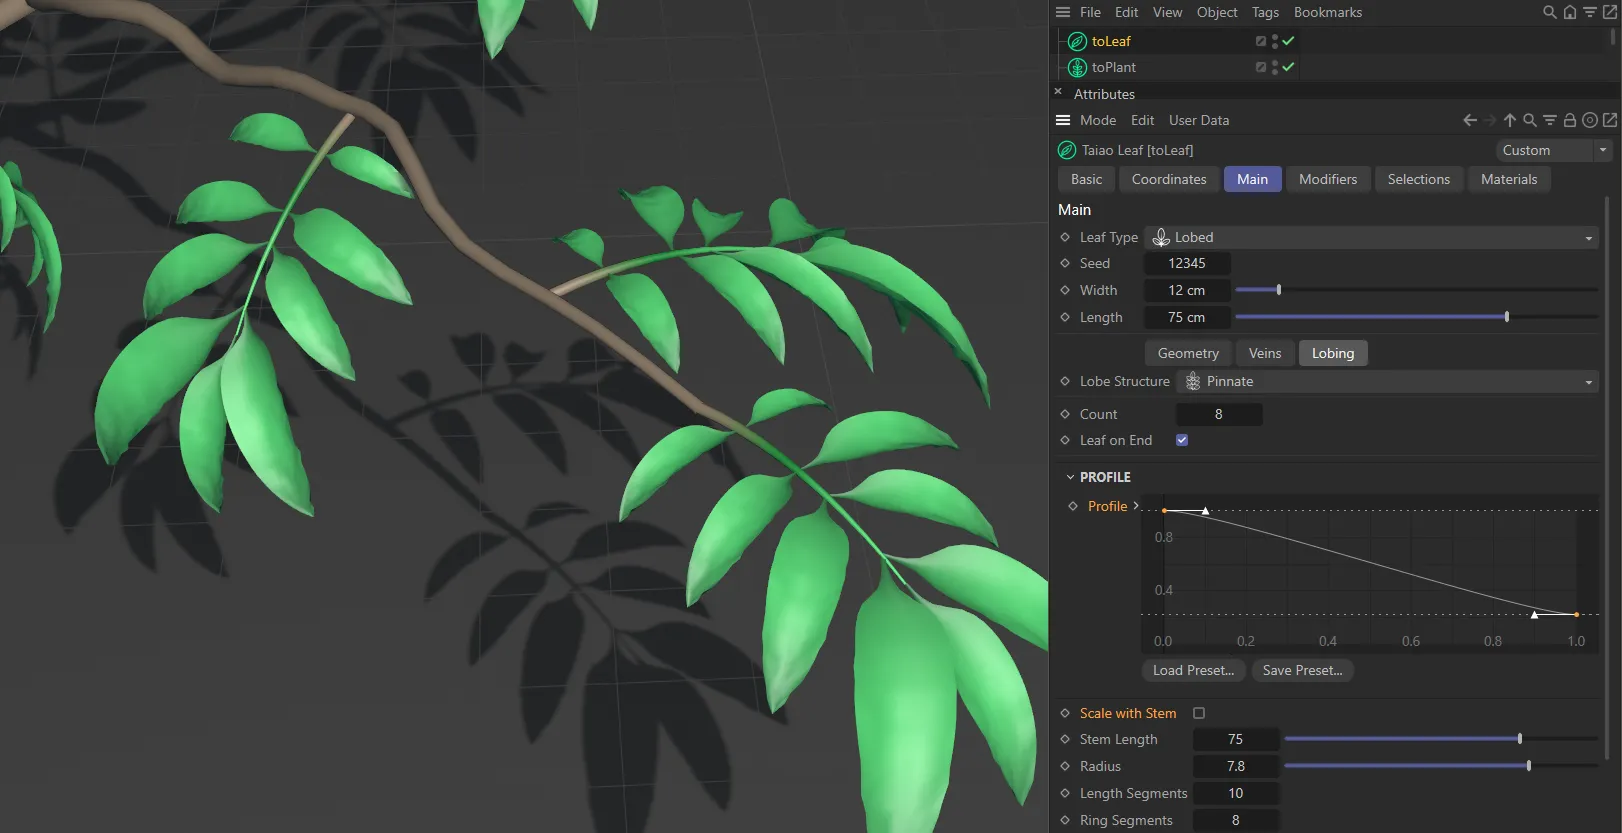
The leaf Count is 12, in this image.
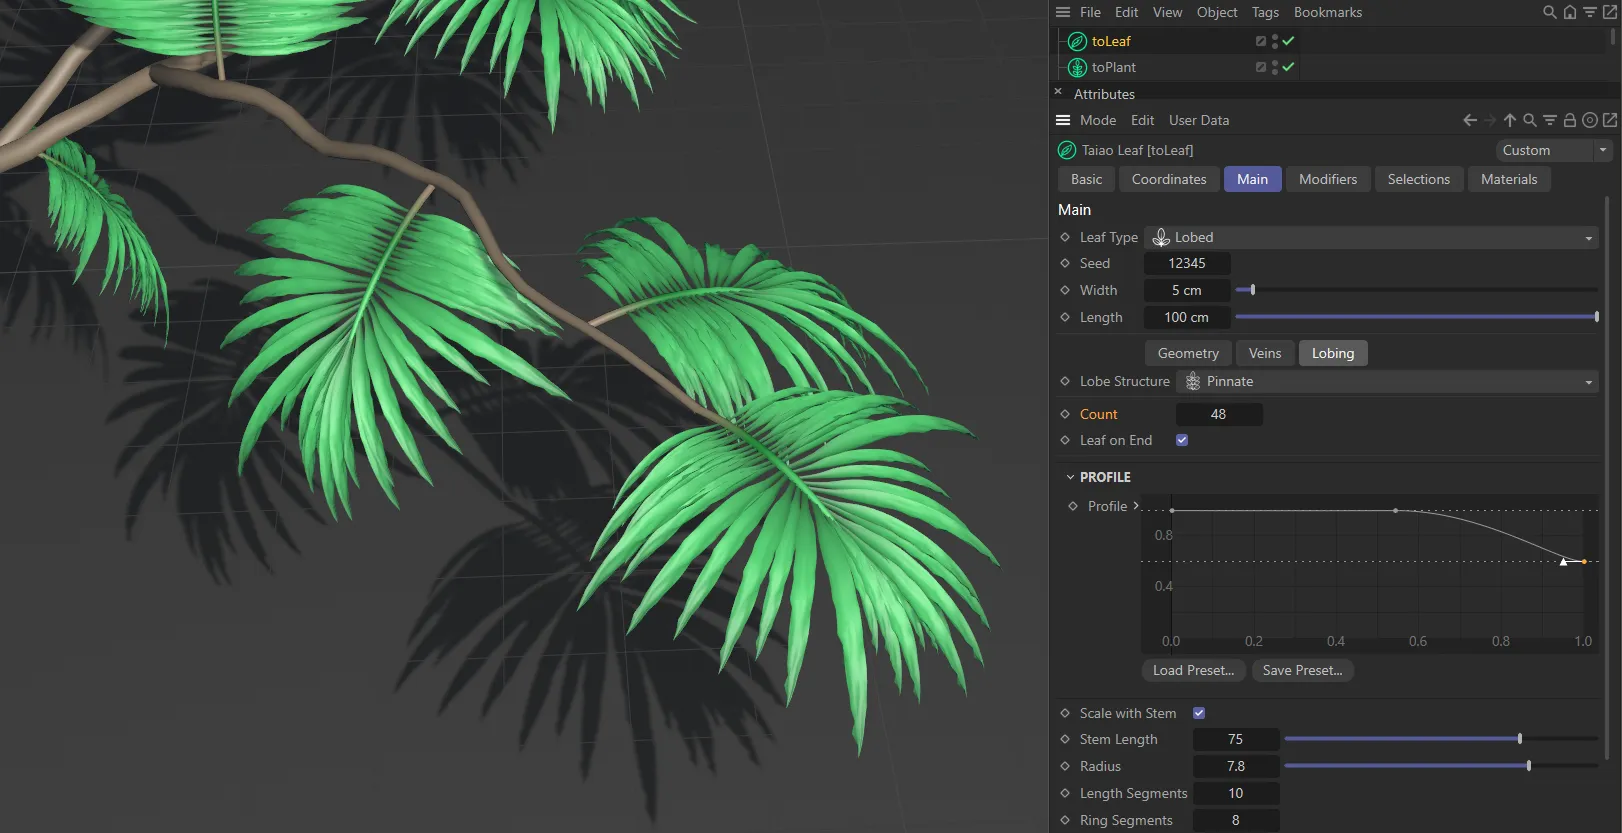
Count raised to 48, here.
Leaf on End
Section titled “Leaf on End”When this box is checked, there is a leaf on the end of each branch.
To turn this off, simply uncheck the box.
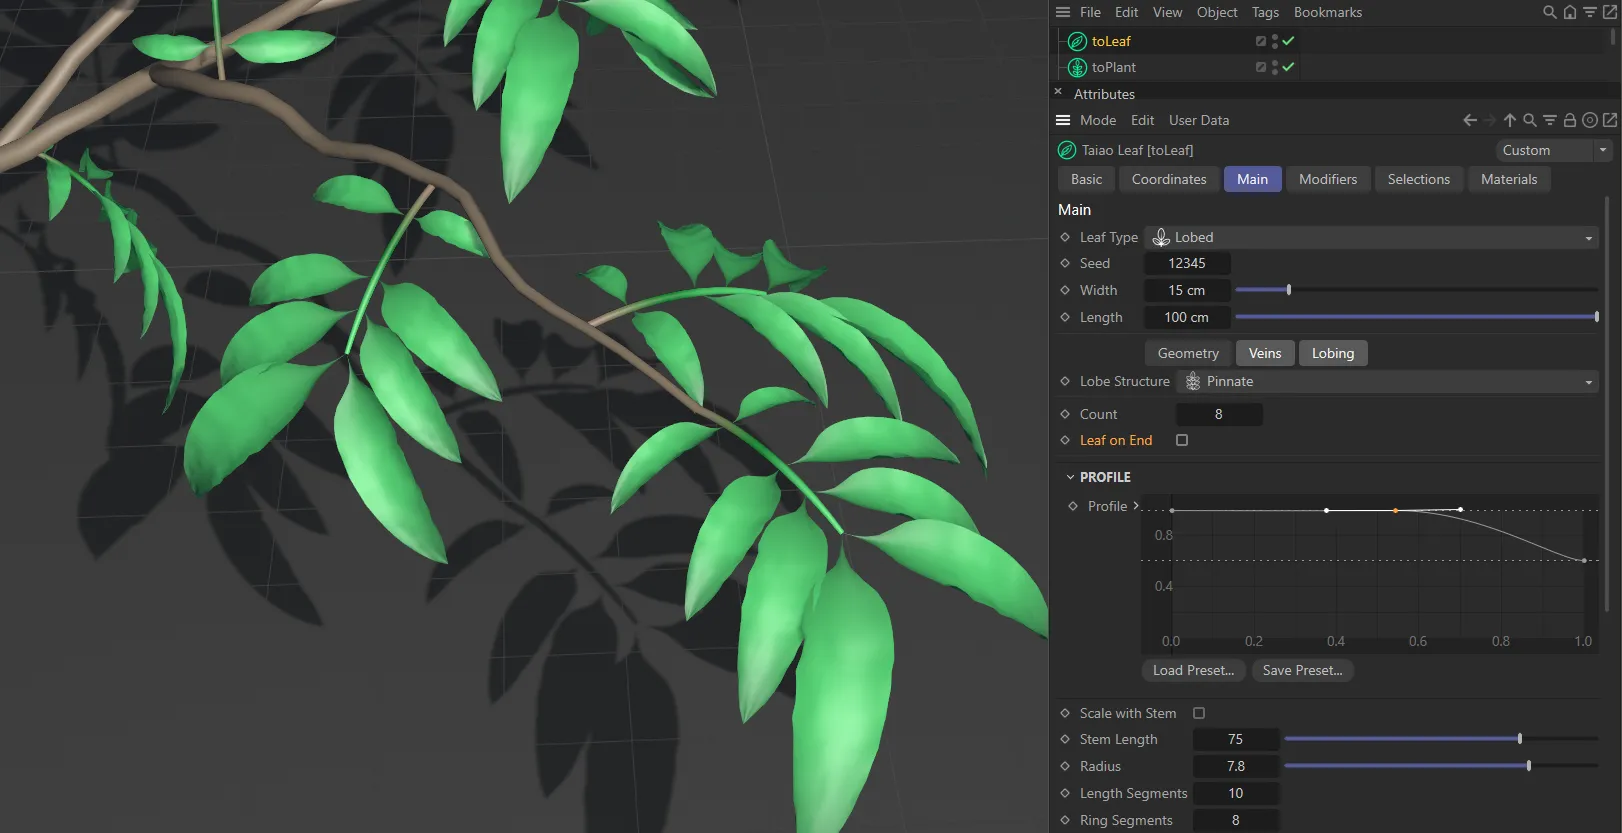
Unlike the two images above (where Leaf on End is enabled), the Leaf on End parameter is disabled in this image.
Profile
Section titled “Profile”Profile
Section titled “Profile”This spline curve allows you to customize the stem of the lobe.
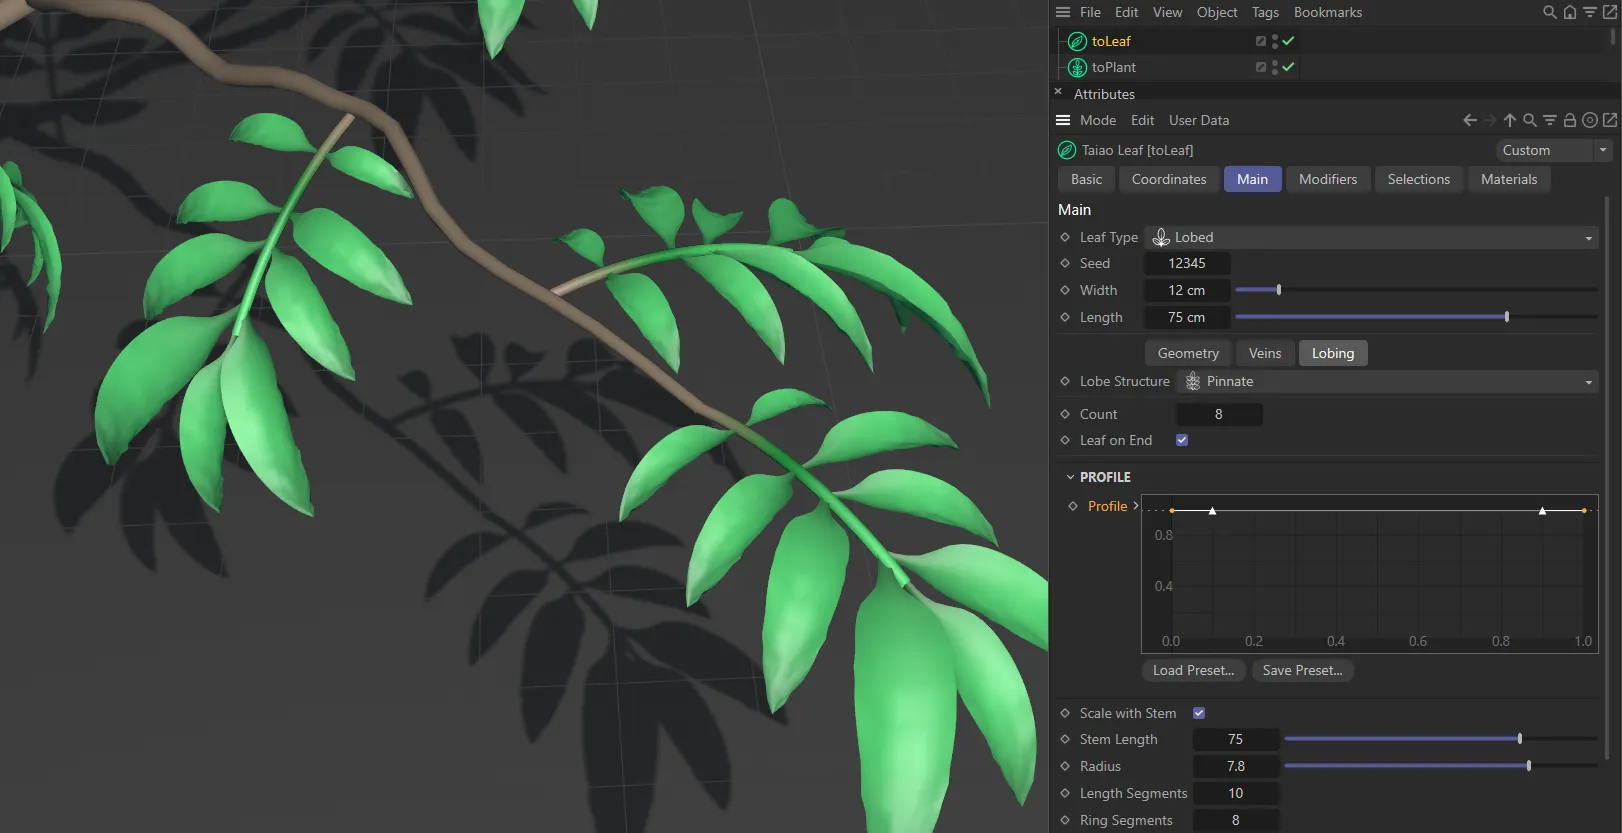
With Scale with Stem enabled, the lobe stem size adapts according to the Profile setting. Here, the Profile is at full strength so the stem remains at the same thickness.
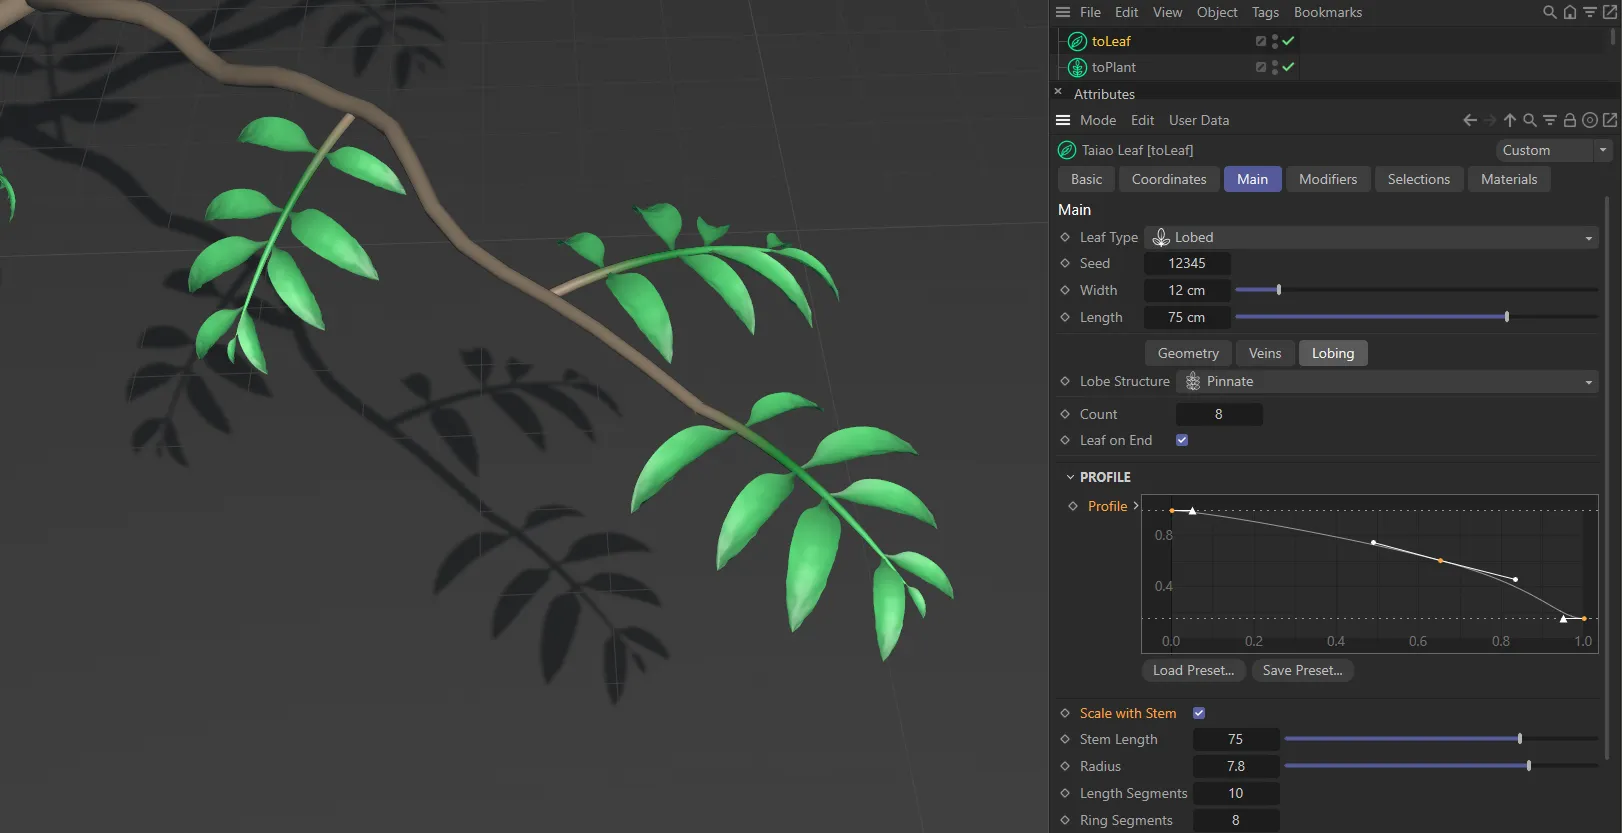
Again, Scale with Stem is enabled, and the downward Profile setting thins the stem towards the end of the lobe.
Scale with Stem
Section titled “Scale with Stem”Enabling this parameter will result in a scaling of the leaves to match the thickness of the stem, which you can set in the Profile.
By comparison to the two images above, Scale with Stem is disabled here, so the leaves don’t shrink where the stem gets thinner.
Stem Length
Section titled “Stem Length”This sets the length of the leaf stem.
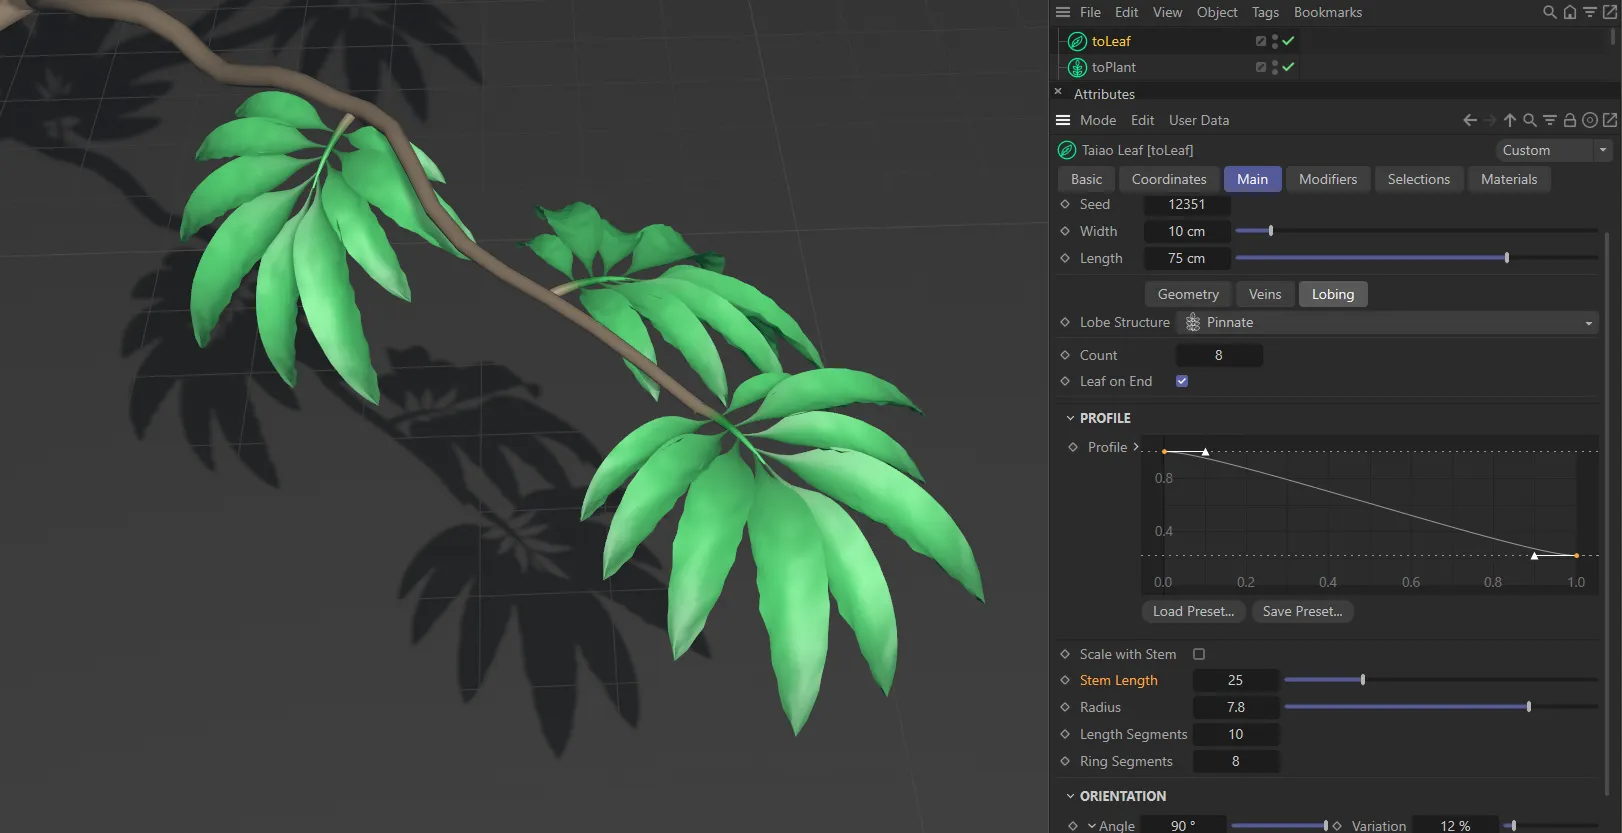
Stem Length value of 25.
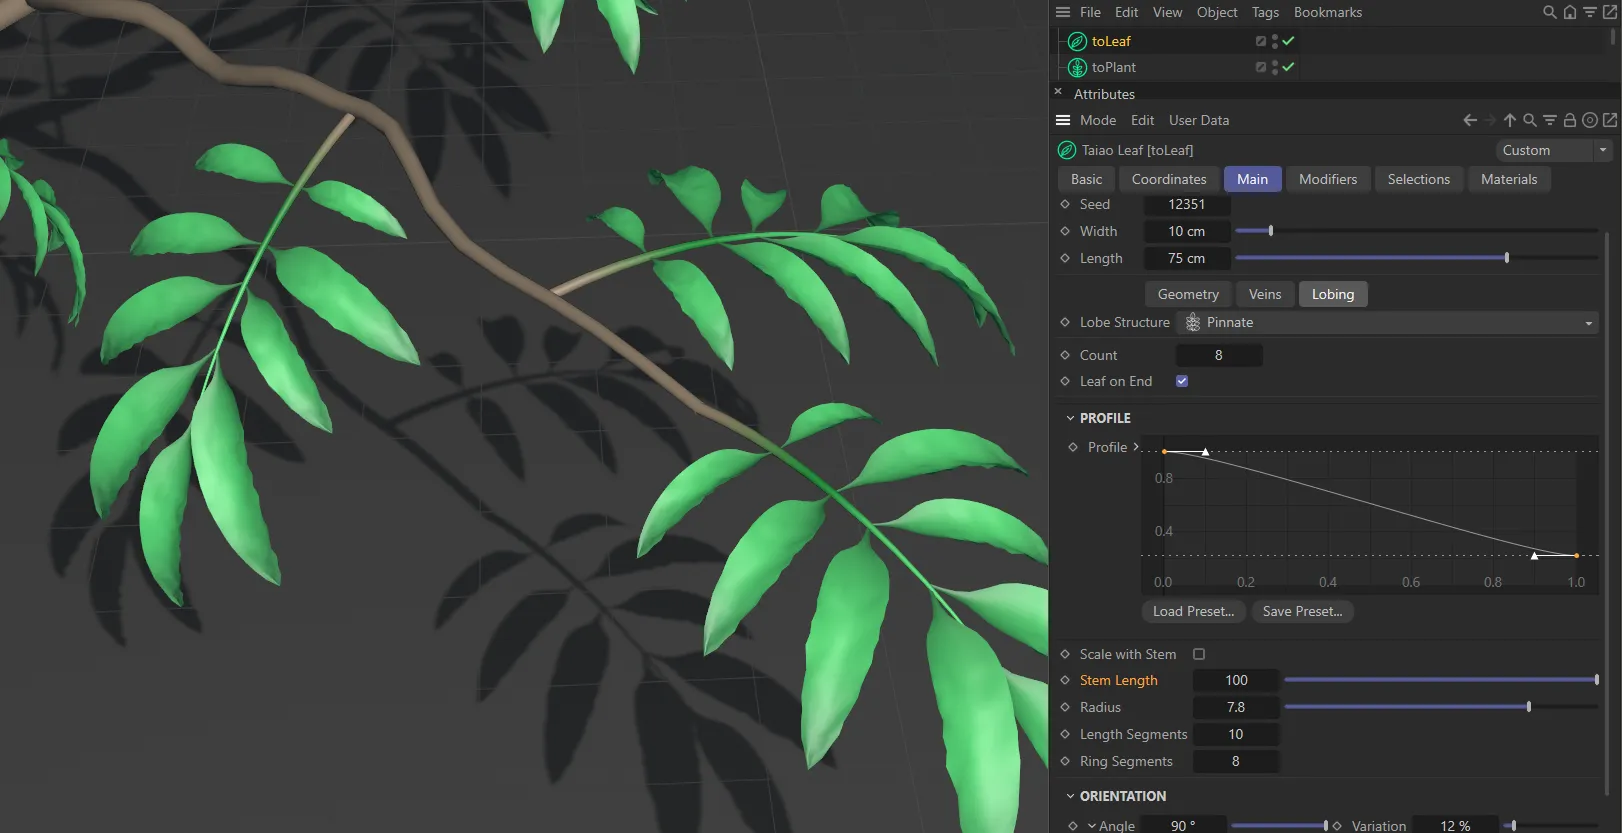
Stem Length raised to 100.
Radius
Section titled “Radius”Sets the radius of the lobe stem.
Length Segments
Section titled “Length Segments”To add to the geometry of the lobe stem, you can increase the segments.
Ring Segments
Section titled “Ring Segments”Similarly, increasing this will aid the geometry of the lobe stem.
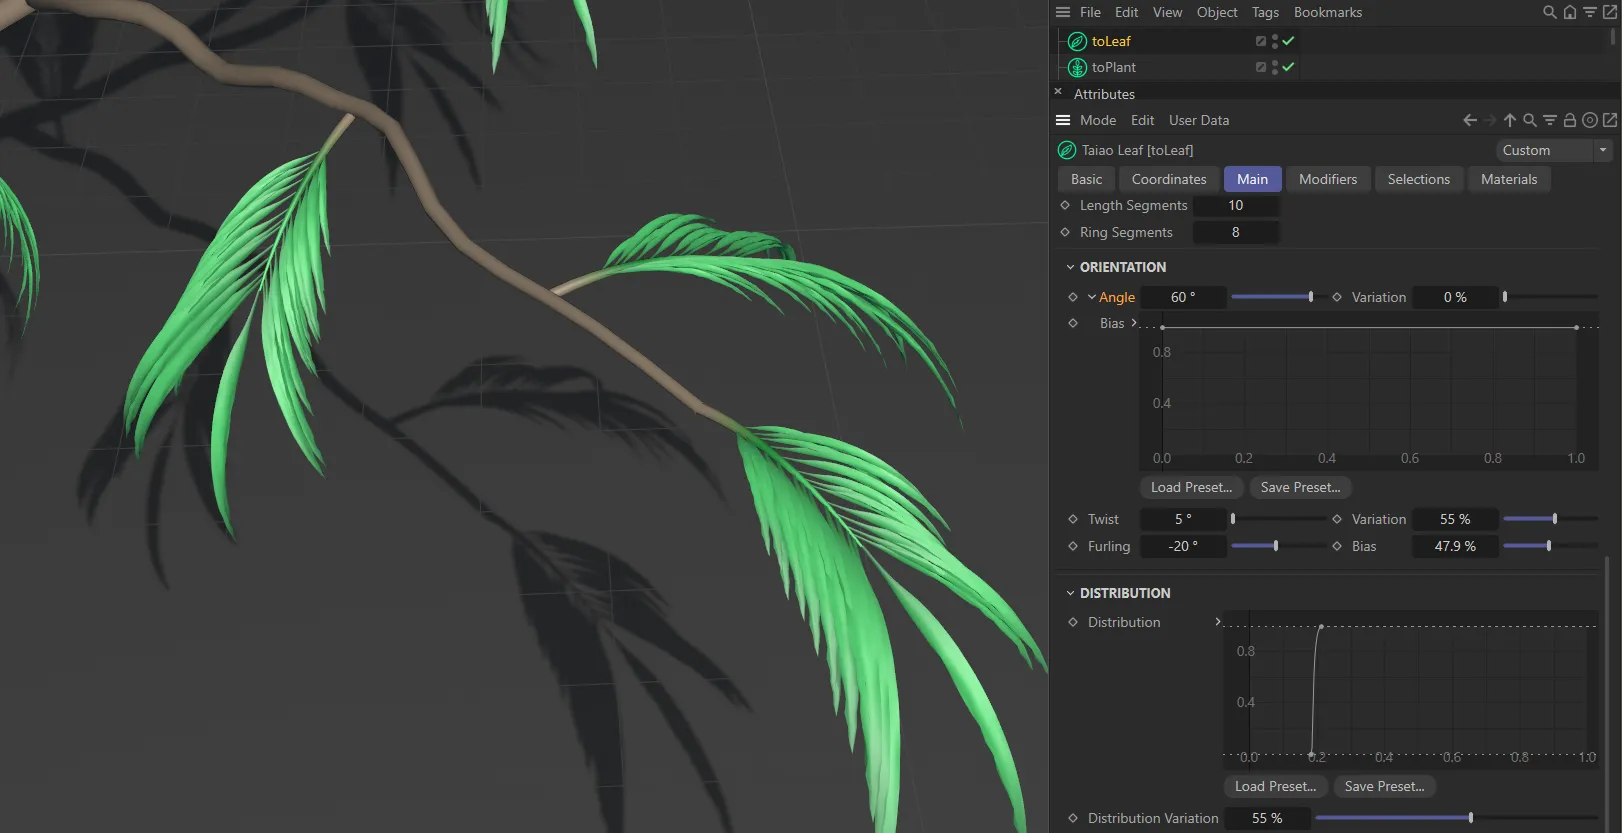
Orientation
Section titled “Orientation”Angle, Variation
Section titled “Angle, Variation”This sets the angle that the pair(s) of leaves come off the lobe stem to the side.
You can apply a variation between the leaves, to avoid perfect symmetry.
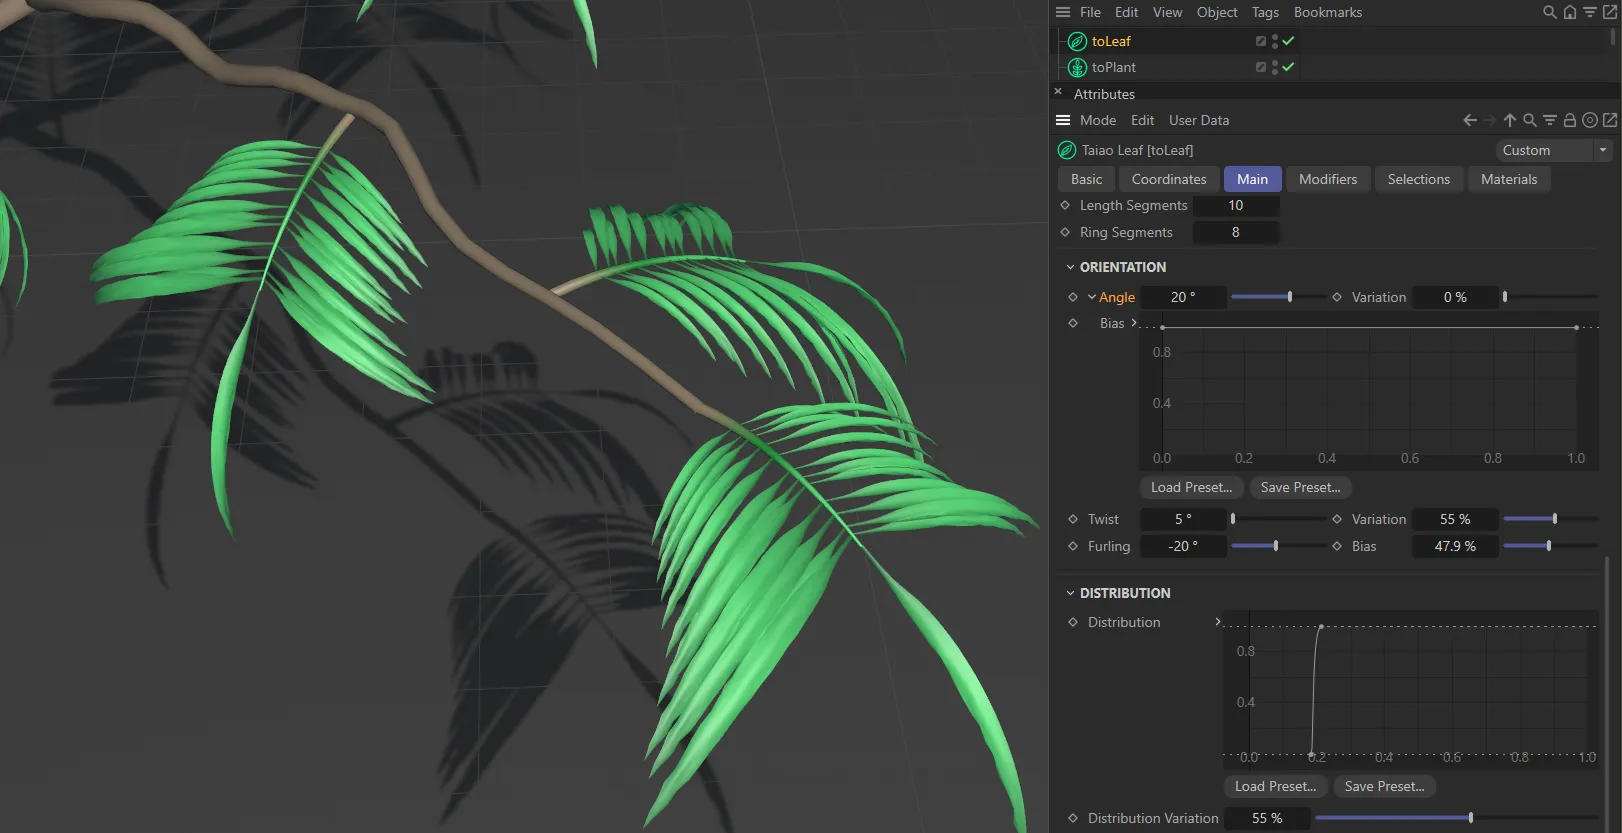
The Angle setting is 20 degrees, in this image.
Angle raised to 60 degrees.
Clicking the drop-down arrow, next to the Angle parameter reveals the Bias setting.
Here, you can further customize the Angle settings along the length of the lobe.
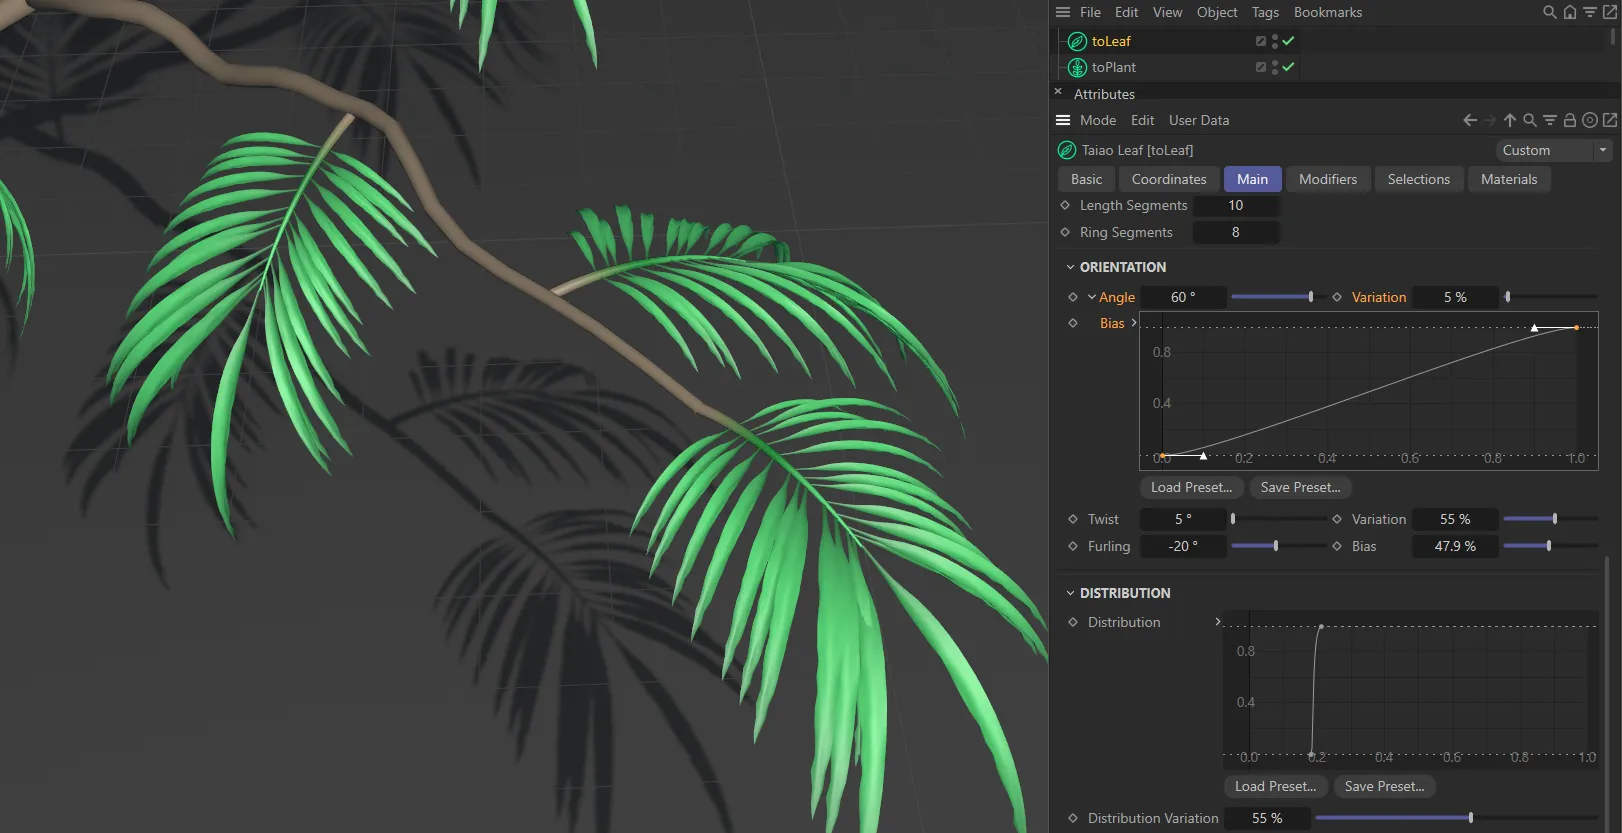
The linear Bias spline curve setting is increasing the angle of the leaves along the length of the lobe.
Twist, Variation
Section titled “Twist, Variation”Twists the pair(s) of leaves up, by degrees, around the lobe stem.
The Variation setting gives a variation between the individual leaf twists.
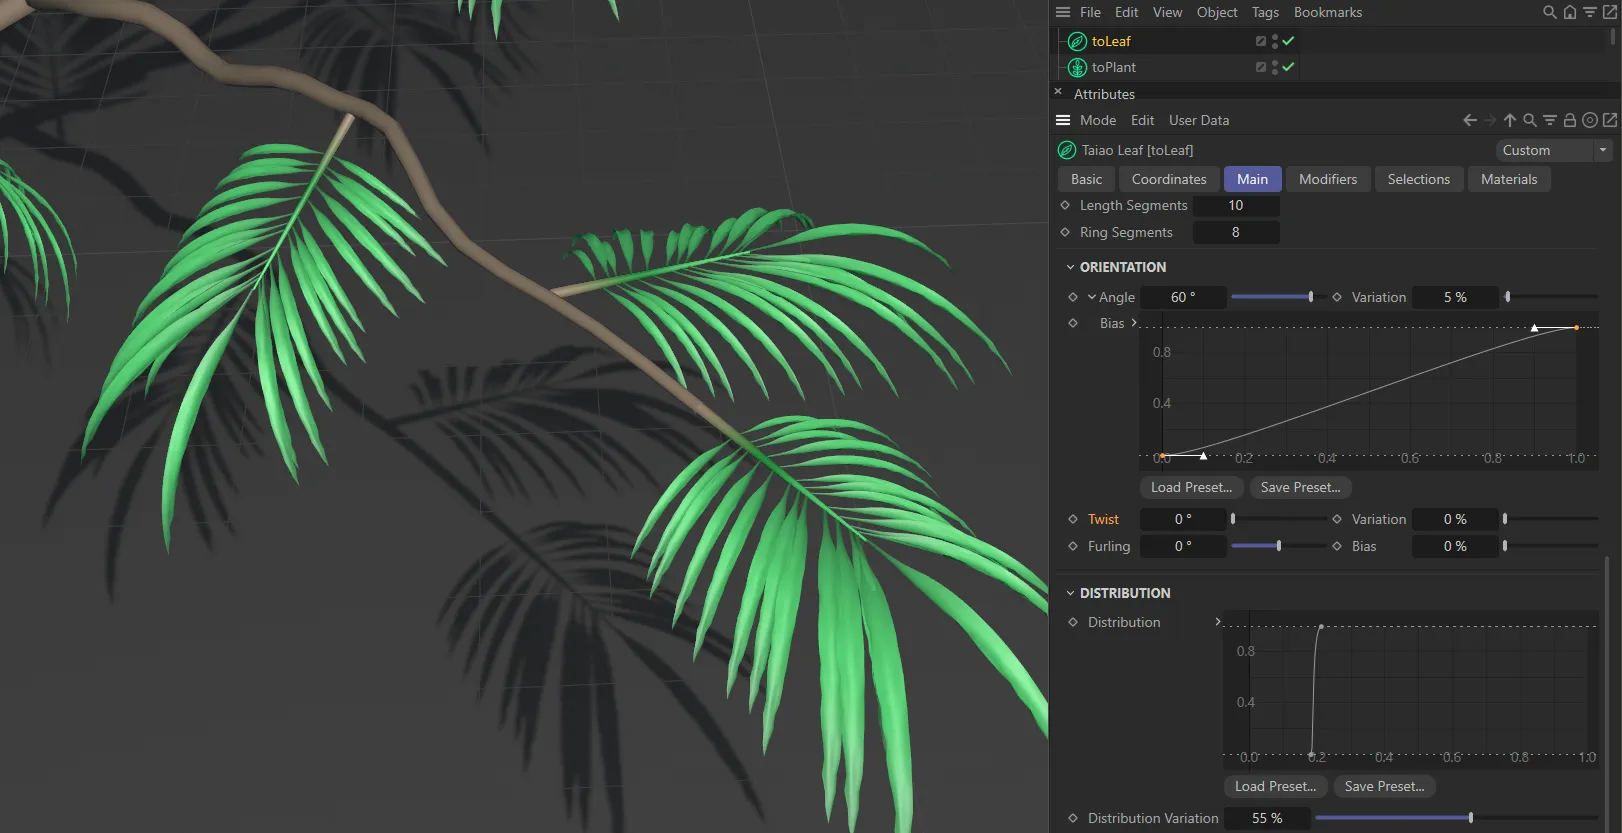
There is no (zero) Twist set here.
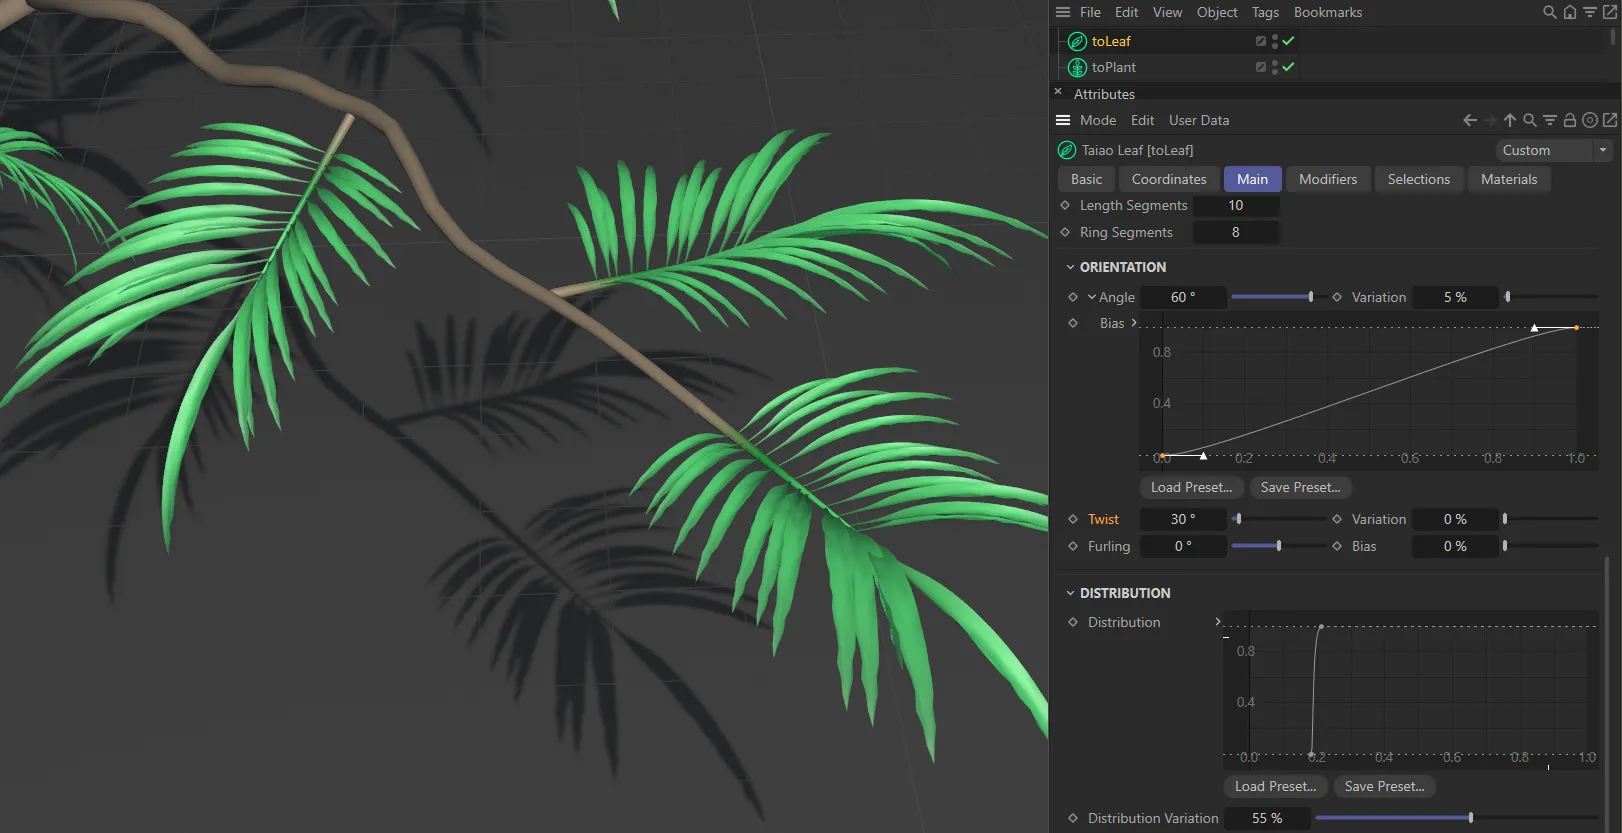
In this image, the Twist setting is 30 degrees.
Distribution
Section titled “Distribution”Distribution
Section titled “Distribution”This parameter gives you the ability to move pairs of leaves up and down the stem length (in Pinnate mode).
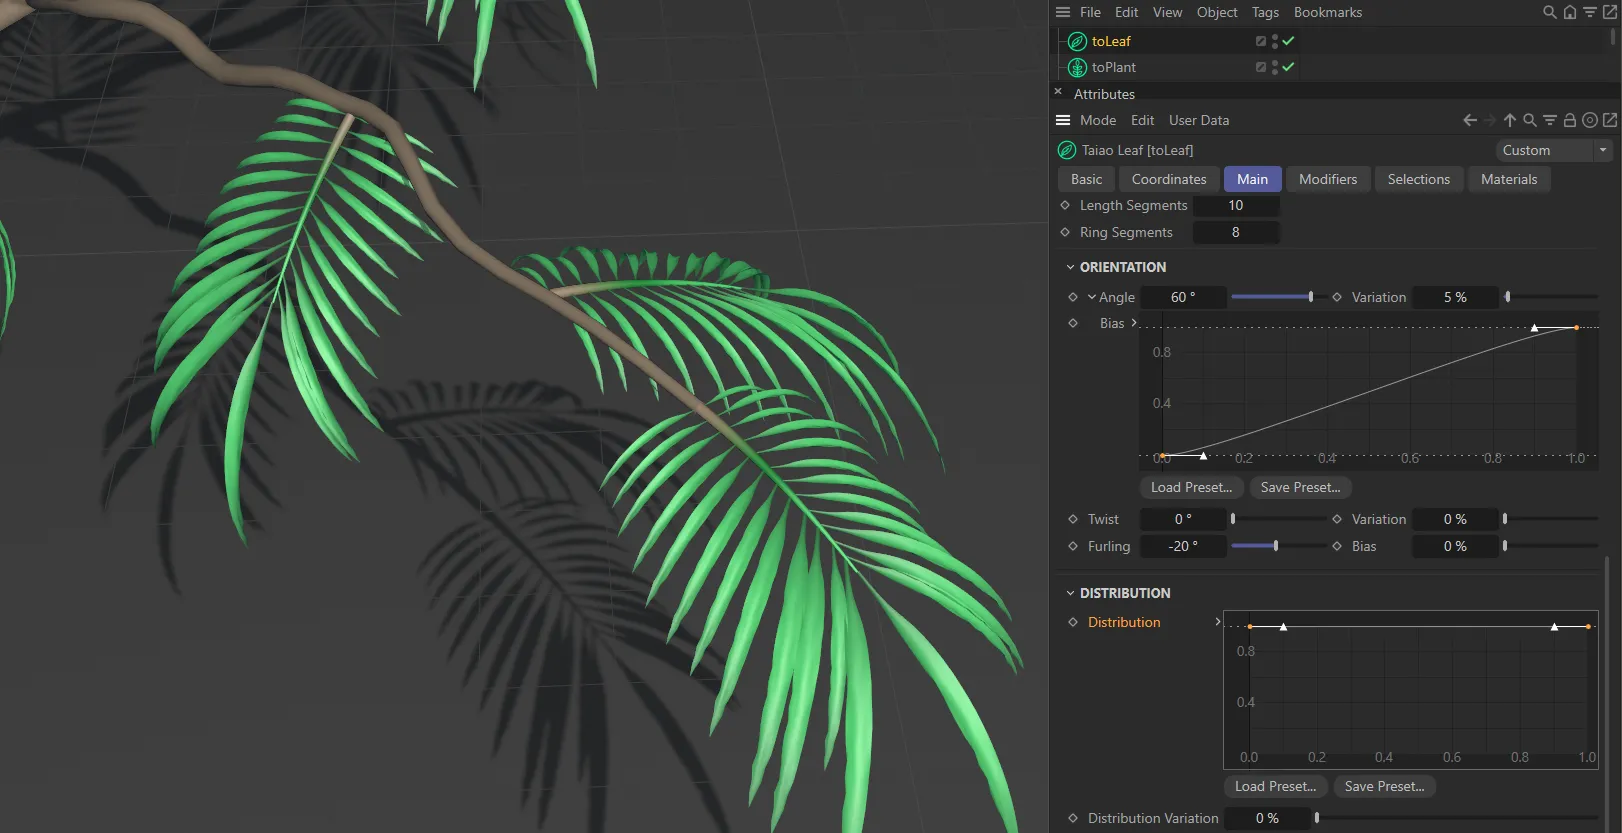
With the Distribution curve set at full strength, there is an even distribution all along the length of the stem.
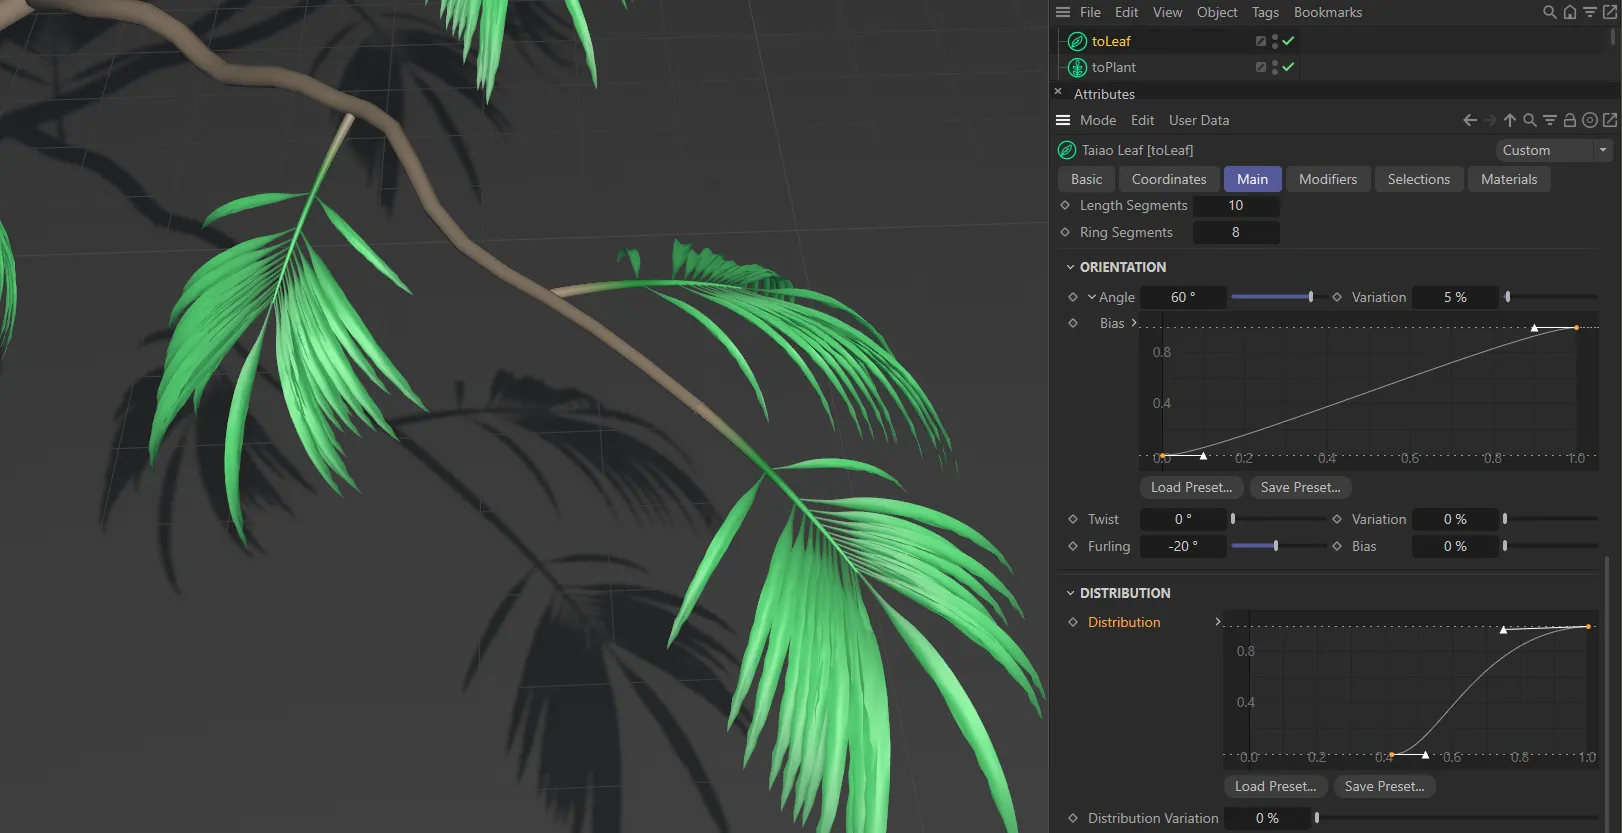
This second Distribution setting is giving increased distribution towards the end of the stem.
Distribution Variation
Section titled “Distribution Variation”Allows you to apply some variation to the Distribution set, in order to achieve a more organic look.
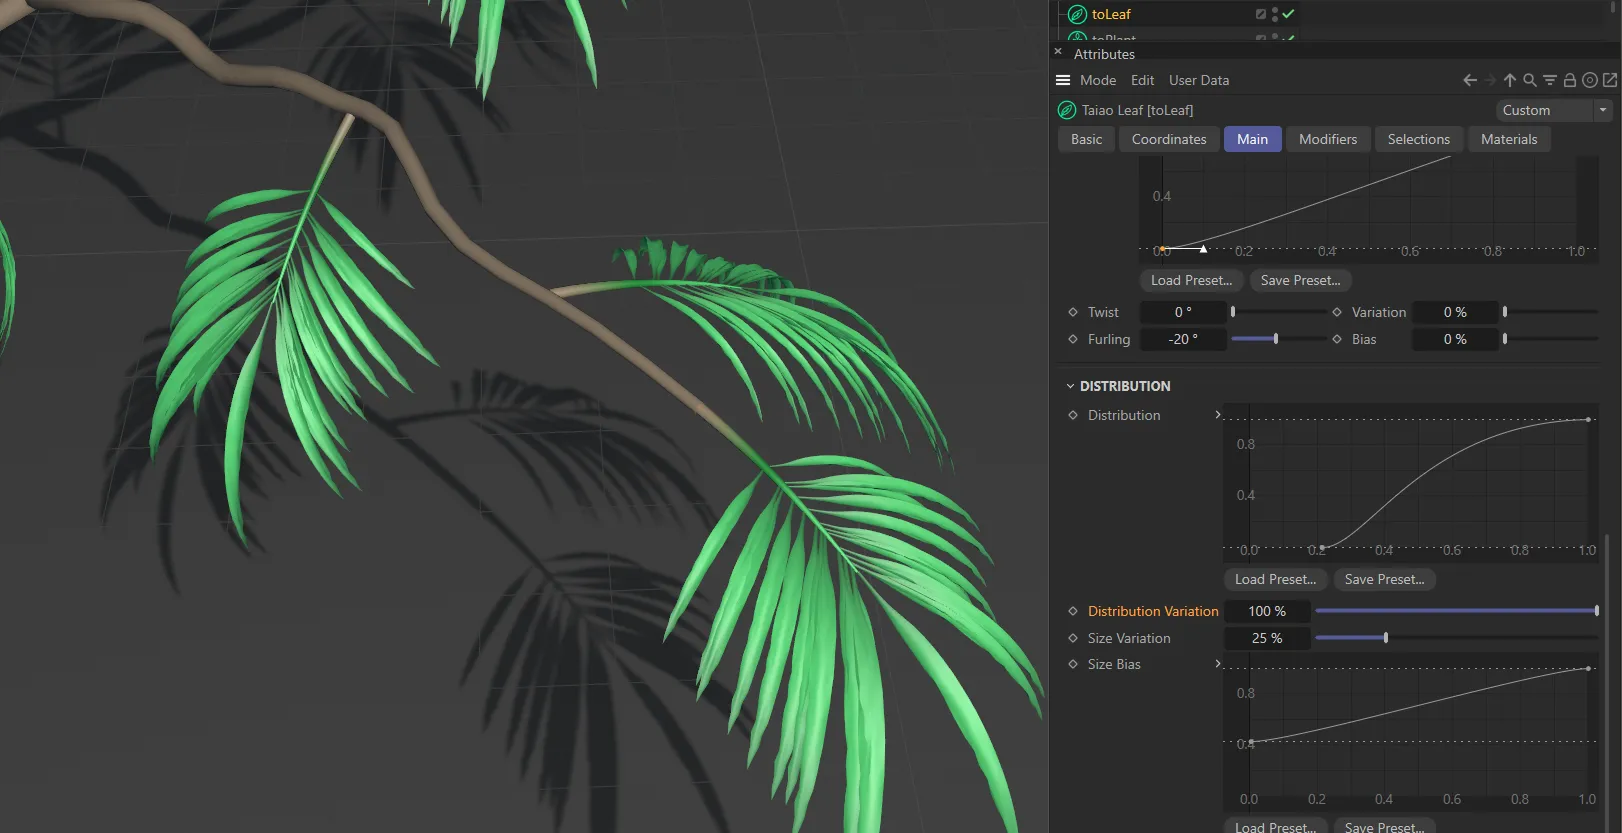
The Distribution Variation is set at 100% here, giving maximum variation.
Size Variation
Section titled “Size Variation”Applies a variation in size between the different leaves of the lobe.
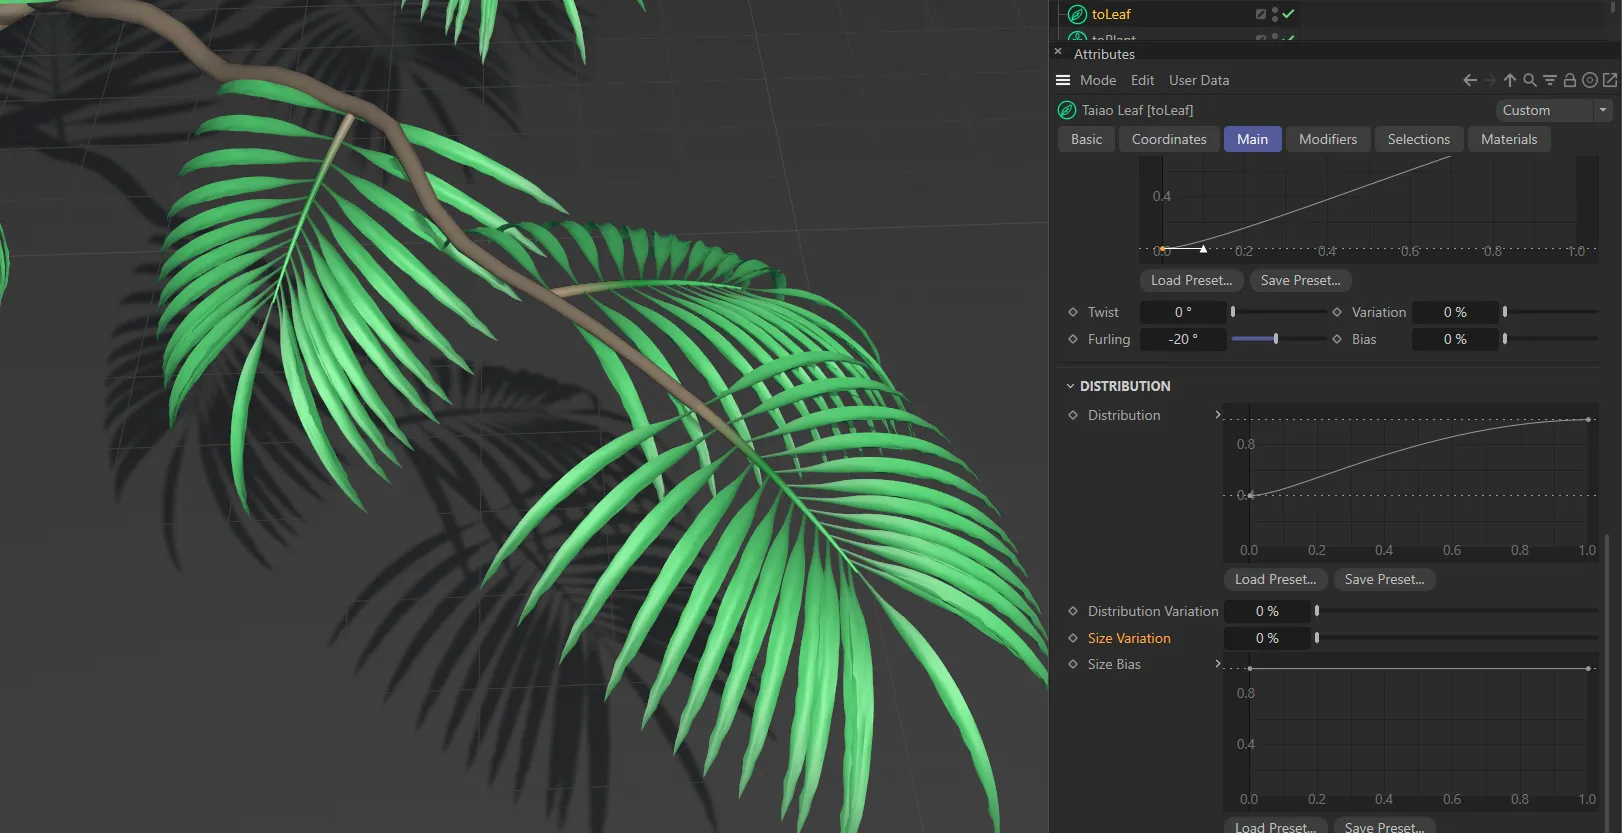
There is no (zero) Size Variation applied here.
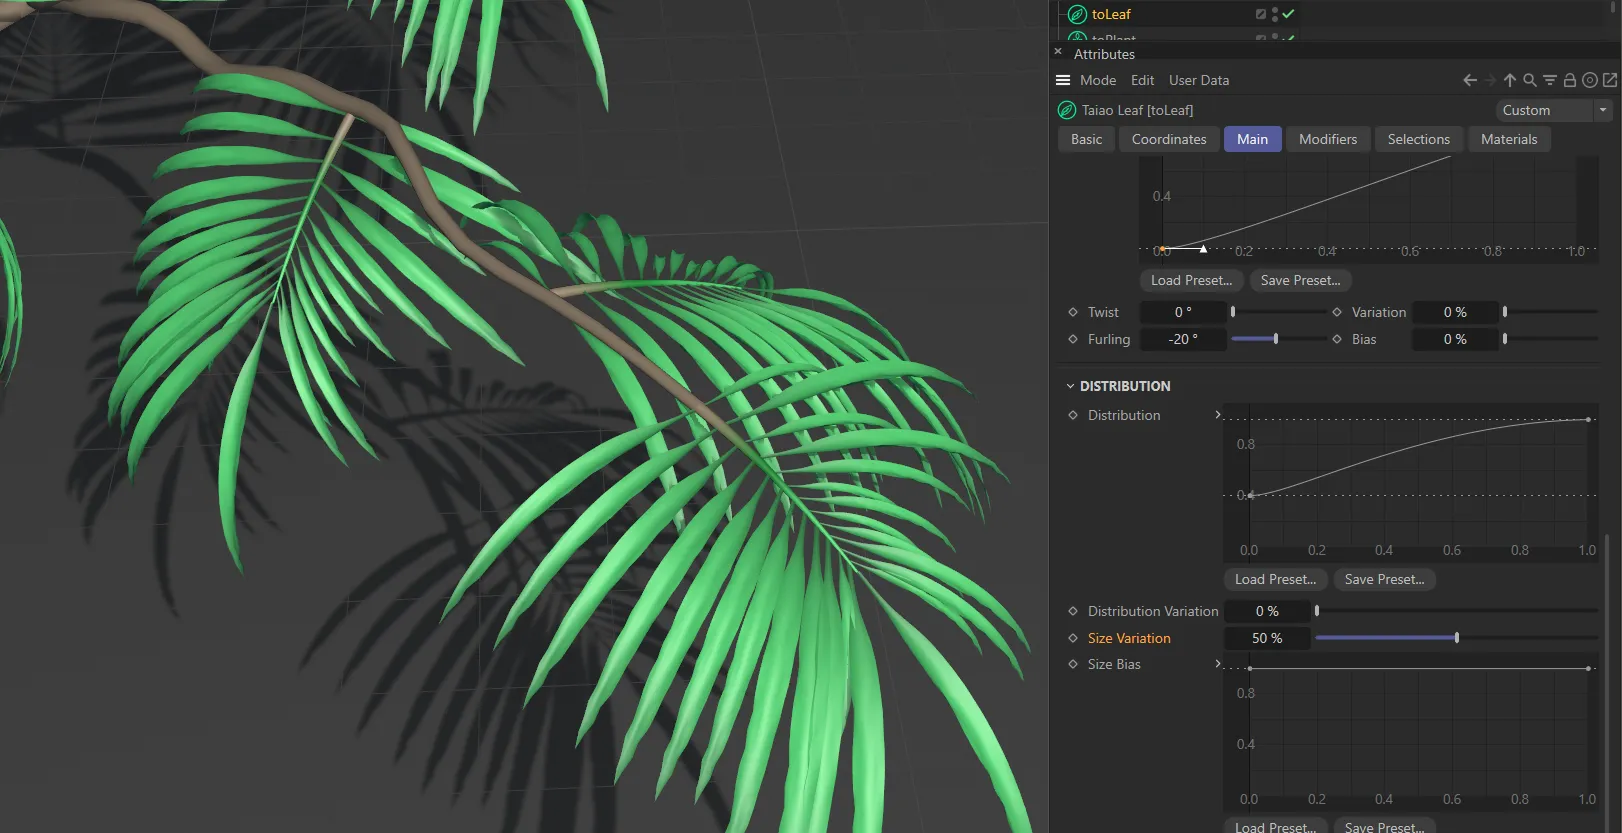
In this second image, the Size Variation is 50%.
Size Bias
Section titled “Size Bias”You have even more control over the size of the leaves across the whole lobe, with this spline curve.

The Size Bias spline curve is at full strength, in this first image, giving no bias at all.
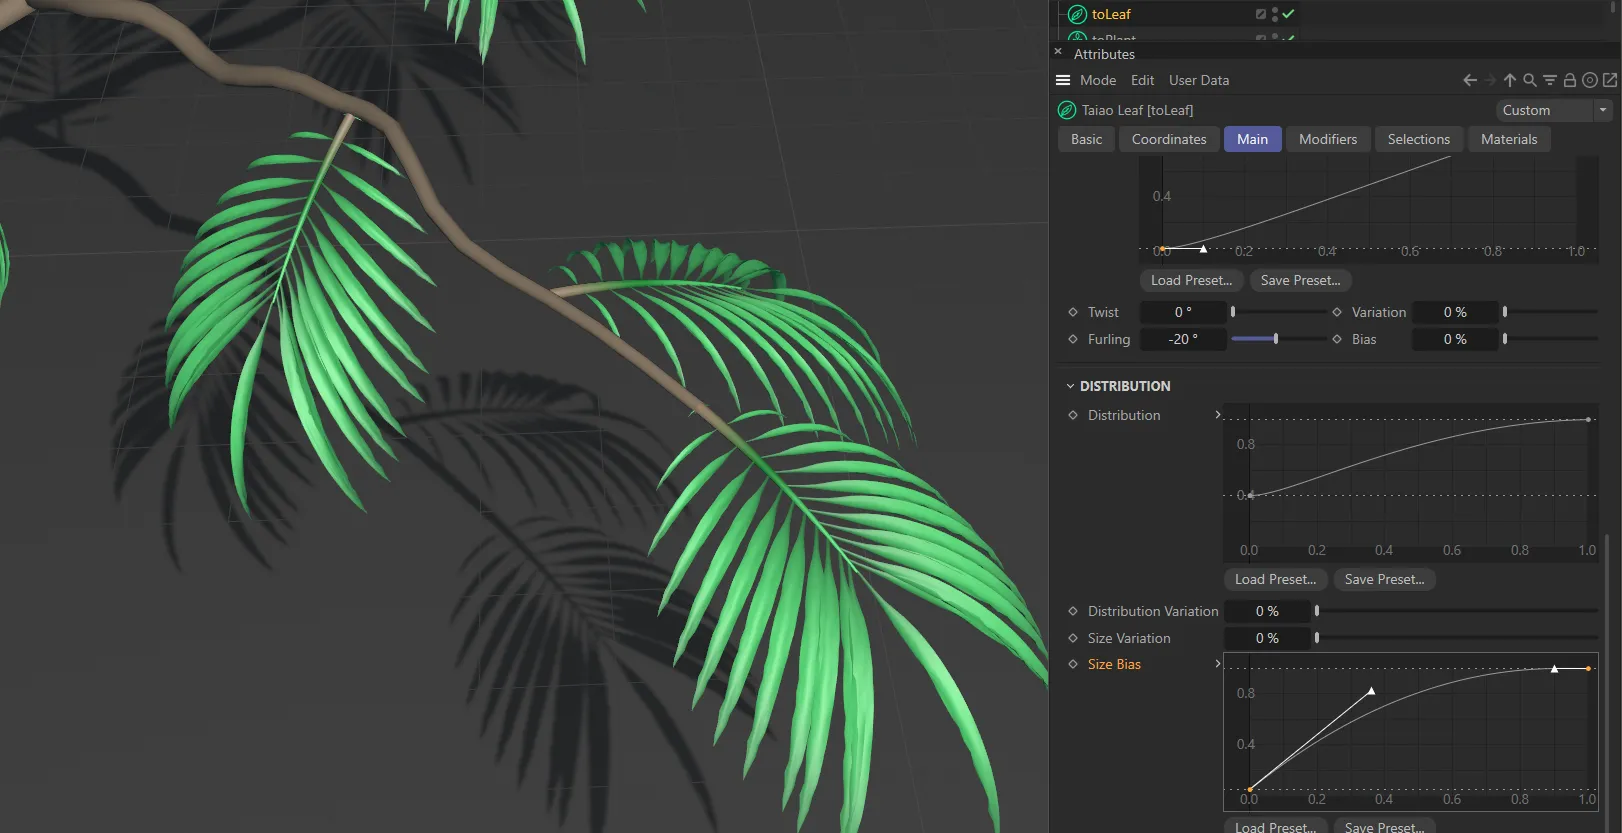
This setting is increasing the size towards the tips of the stem.
Open Preset Browser
Section titled “Open Preset Browser”All objects now have an Open Preset Browser button to complement the menu option.
This will open the preset browser if it is not already open.
For further information on the Preset Browser, click the link below.
Copyright © 2026 INSYDIUM LTD. All rights reserved.