Sphere
Overview Video
Section titled “Overview Video”Sphere Options
Section titled “Sphere Options”This fractal shape focuses on different ways of distributing points around a center.
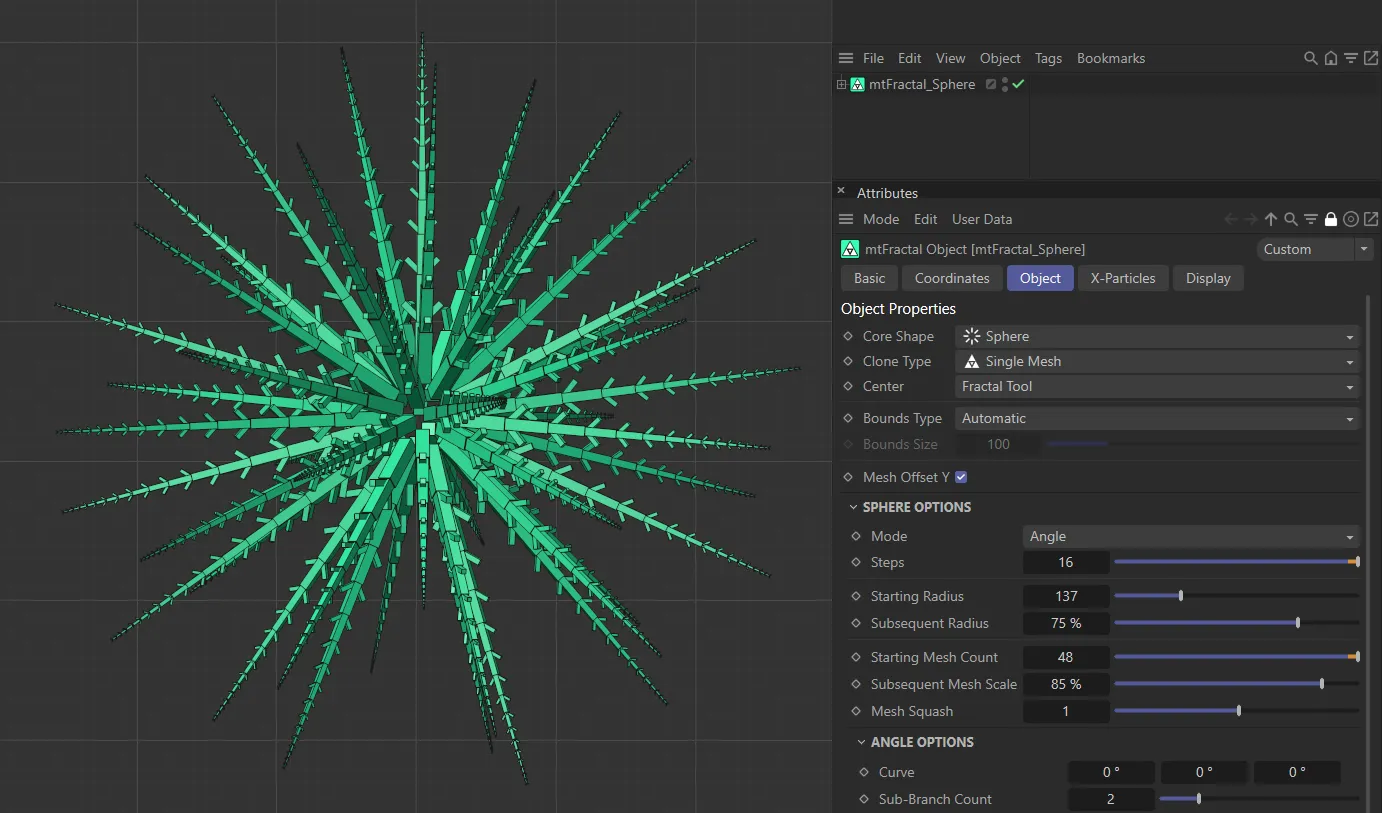
mtFractal Core Shape set as Sphere.
Set at Angle, by default. The other options are: Linear and Shrubs.
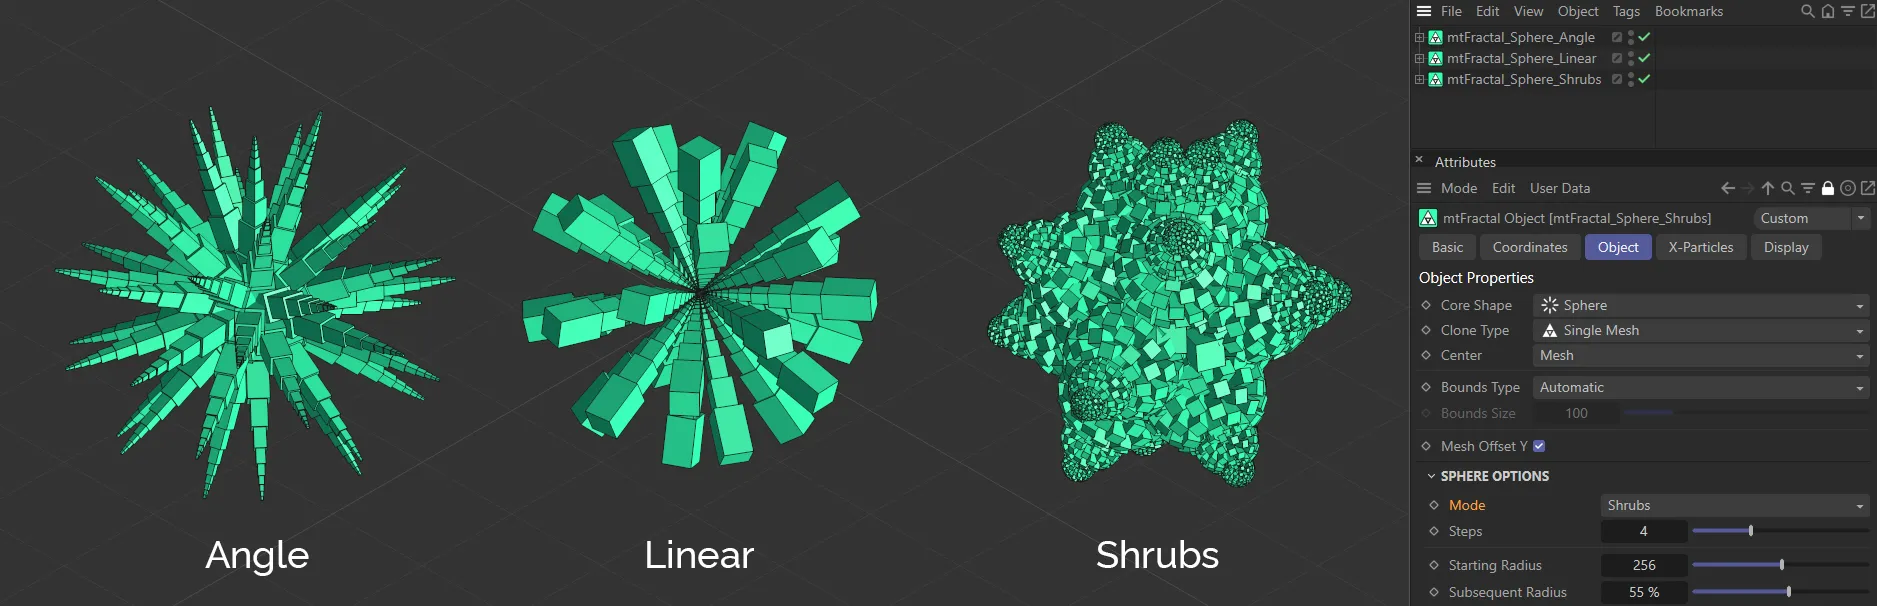
The three Mode settings: Angle, Linear and Shrubs in the Core Shape mode of Sphere.
Angle mode
Section titled “Angle mode”This distributes nodes (clones) spherically, with tendrils close together.
Linear mode
Section titled “Linear mode”Like the angle mode, with spherical distribution, duplicated outward by the step count (without tendrils).
Shrubs mode
Section titled “Shrubs mode”This shape focuses on creating multiple spheres. The first iteration distributes clones around the center, equally. Further shrubs will be created, extending in a tendril like fashion.
In both the Angle and Linear modes, this setting determines how many layers there are to the sphere. In the Angle mode, the steps go outwards and in the Linear mode, the steps go inwards, towards the center of the sphere. In the Shrubs mode, it determines how many spheres are generated from each shrub.
Animation to demonstrate the increase in the Steps value.
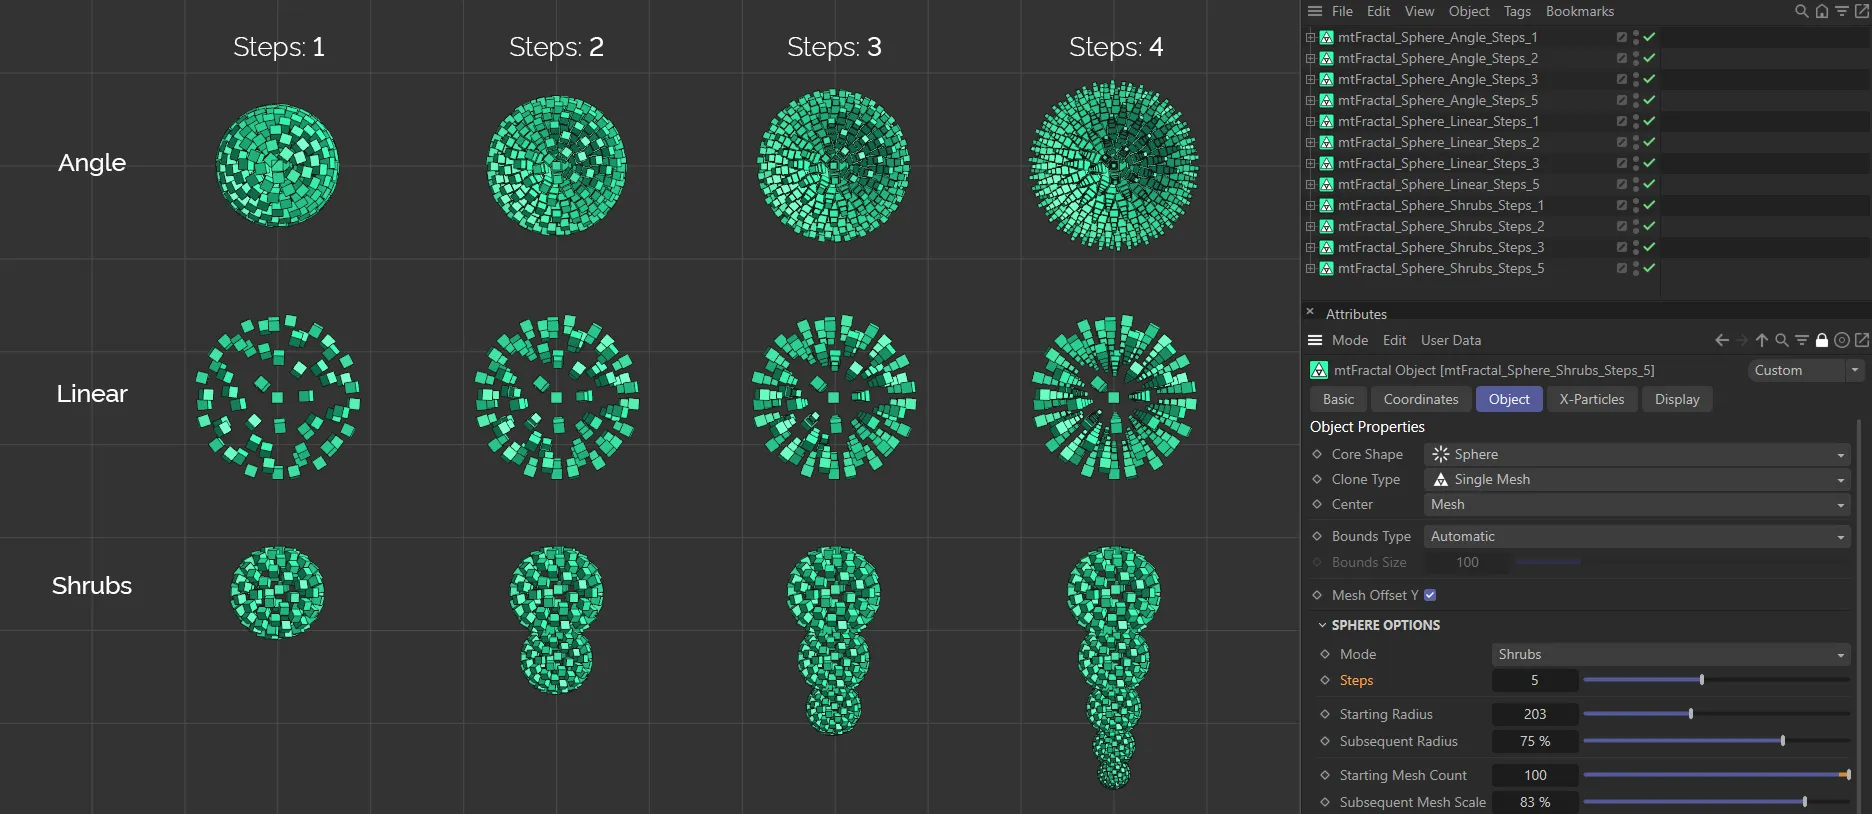
This image clearly demonstrates the effect of the Steps parameter in all three Mode settings: Angle, Linear and Shrubs, starting at a value of 1 and moving up to 4.
Starting Radius
Section titled “Starting Radius”Sets the radius for the first step, increasing or decreasing the size of the sphere.
Subsequent Radius
Section titled “Subsequent Radius”Used only in Shrubs and Linear modes.
In Shrubs mode, this is the scaled radius of shrubs at each step.
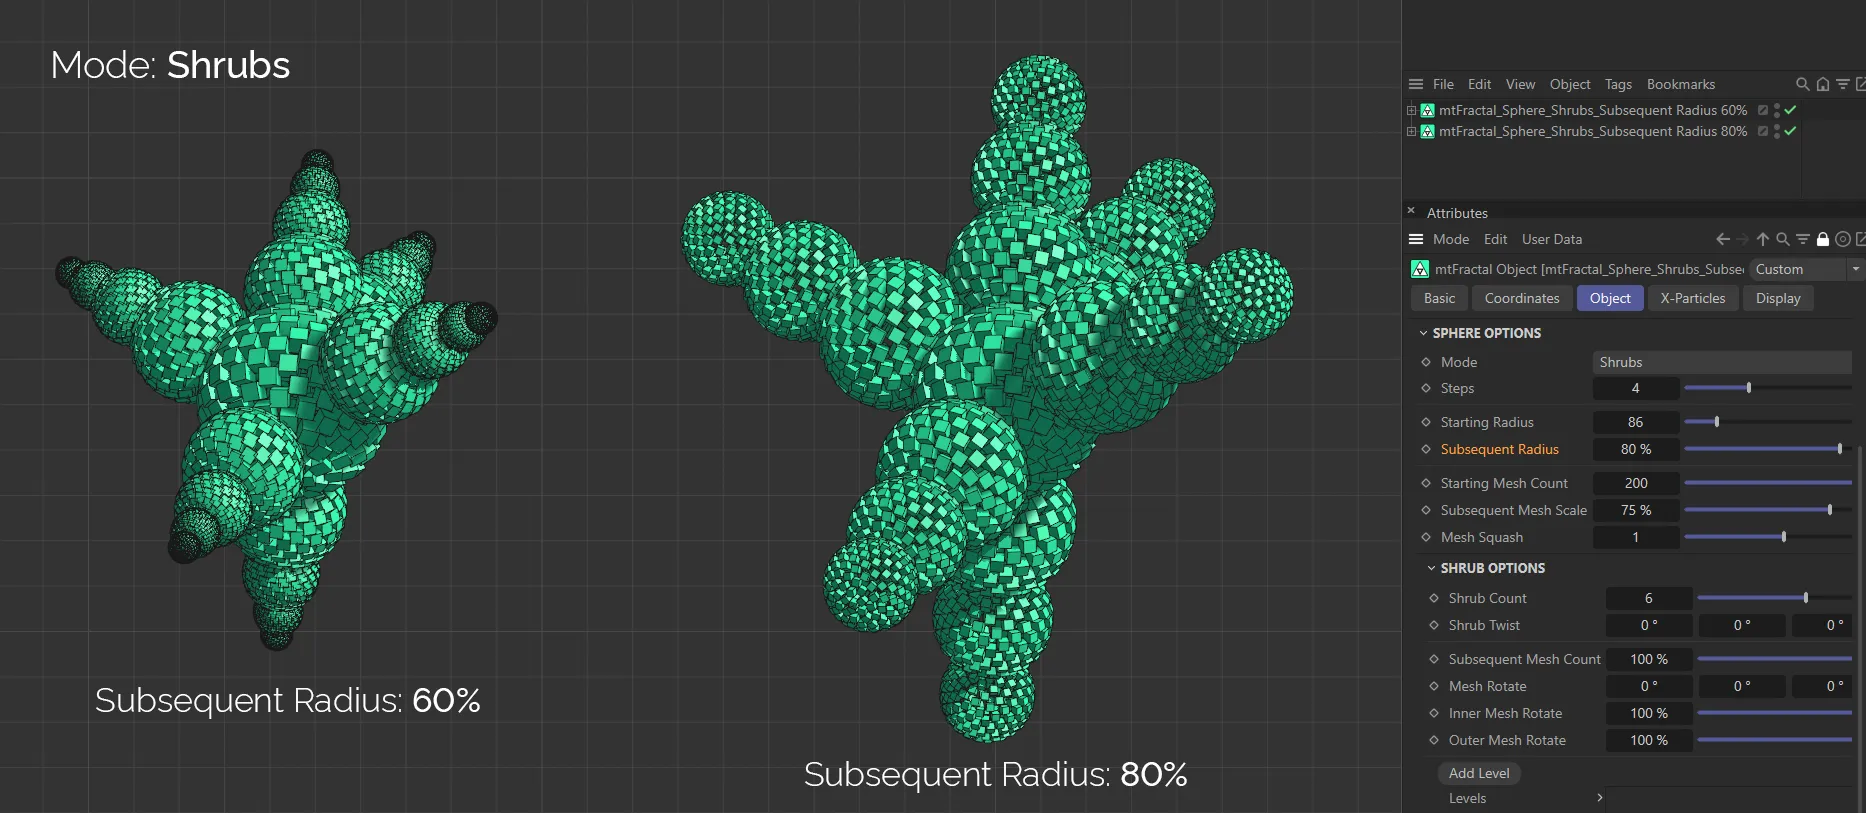
The Subsequent Radius setting is 60% on the left and 80% on the right, in the Shrubs mode.
In Linear mode, this is the scaled radius of each layer, how far towards the center of the sphere the steps can extrude.
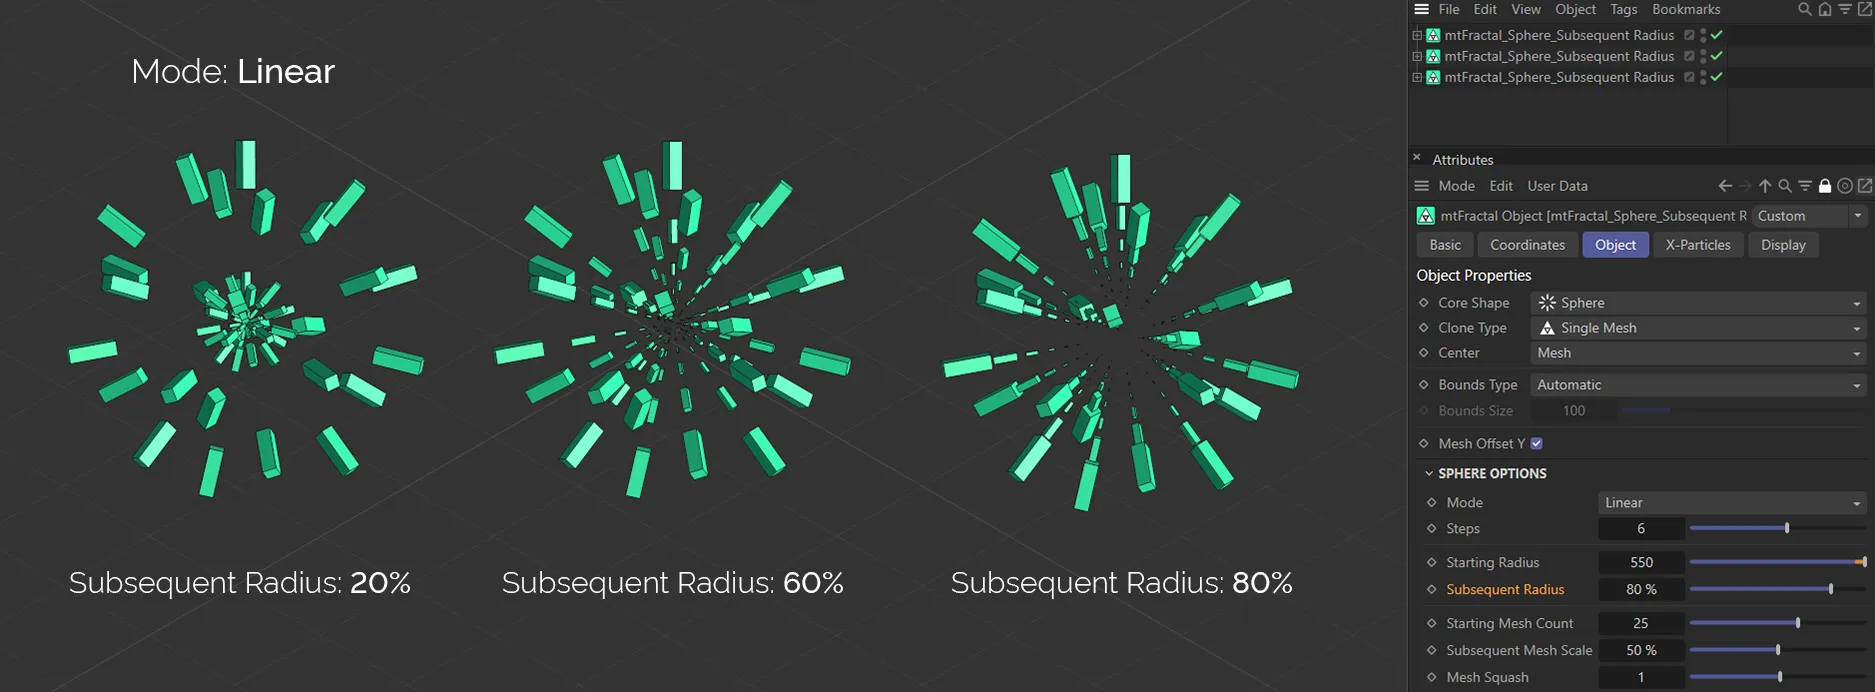
Here, in the Linear mode, the Subsequent Radius setting is 20% on the left, 60% in the center and 80% on the right.
Starting Mesh Count
Section titled “Starting Mesh Count”How many clones are set around the primary sphere.
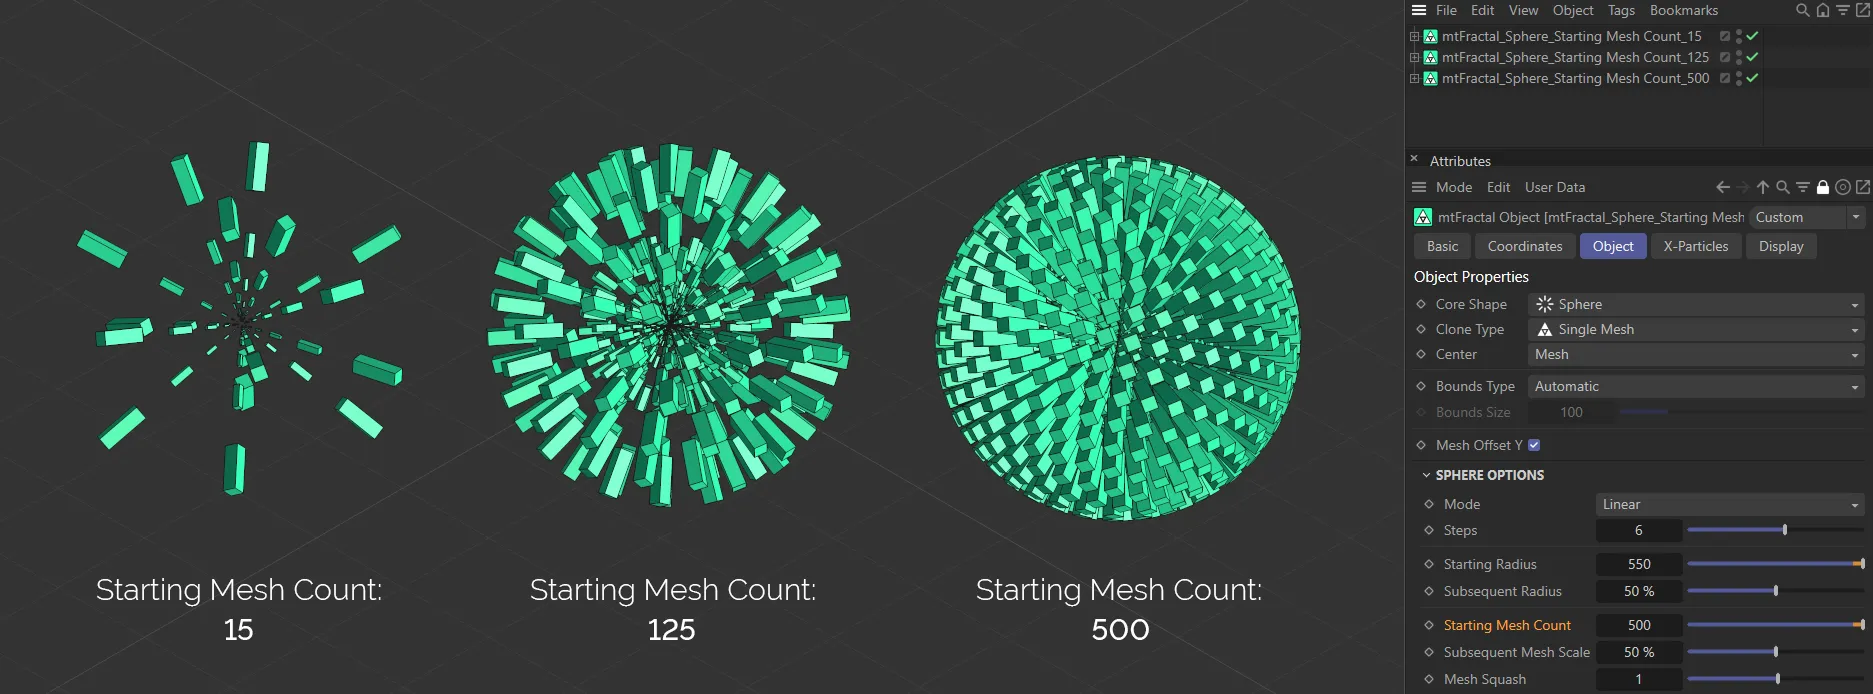
In this image, the Starting Mesh Count is 15 on the left, increased to 125 in the center and 500 on the right.
Subsequent Mesh Scale
Section titled “Subsequent Mesh Scale”The percentage slider adjusts the scale of clones at each step, by the percentage set in the slider.
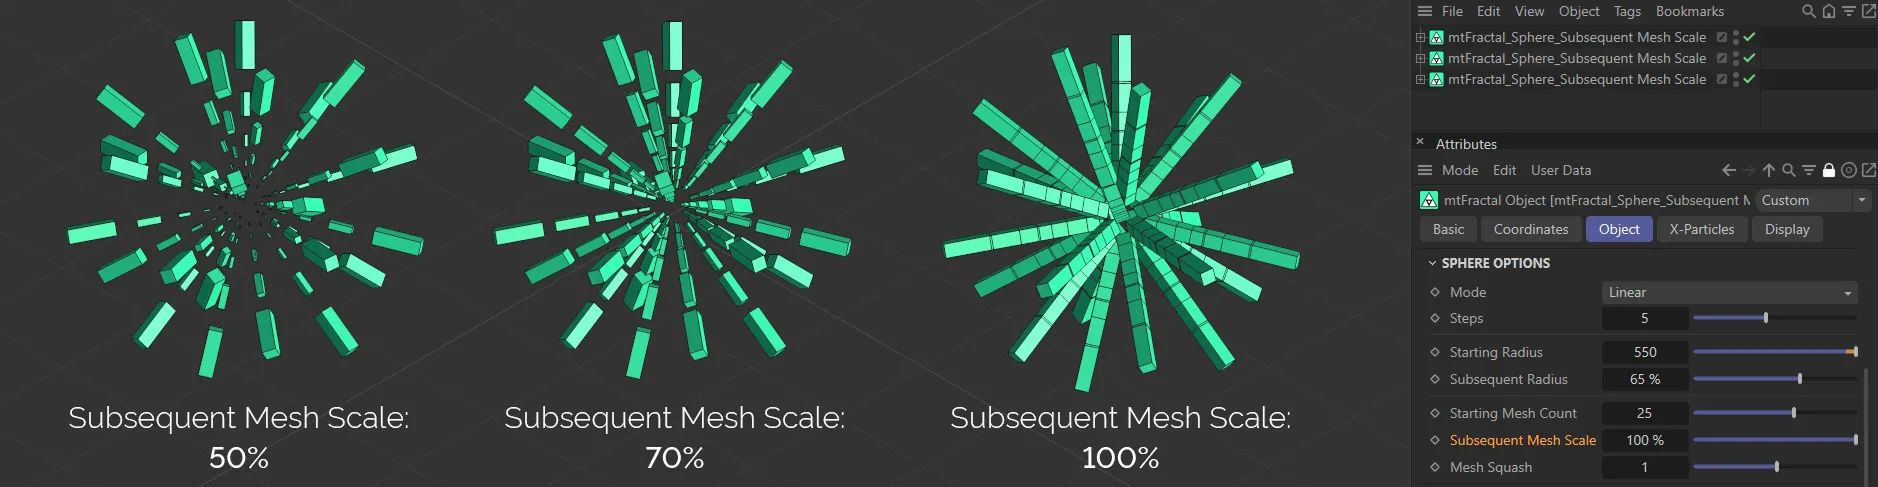
This image shows the Subsequent Mesh Scale settings of 50%, 70% and 100%, from left to right.
Mesh Squash
Section titled “Mesh Squash”This slider will distribute the clones along the sphere, removing any as they reach the top or bottom of the sphere.

An image to demonstrate the effect of the Mesh Squash slider, with values rising from -0.5 to 2.5.
Angle Options
Section titled “Angle Options”This angle is applied to each clone along the step, which will produce a twisting appearance as further clones are rotated along the different axes.
Animation to demonstrate the Curve sliders in each of the three axes.
Sub-Branch Count
Section titled “Sub-Branch Count”Adds additional sub-branch layers to each step.
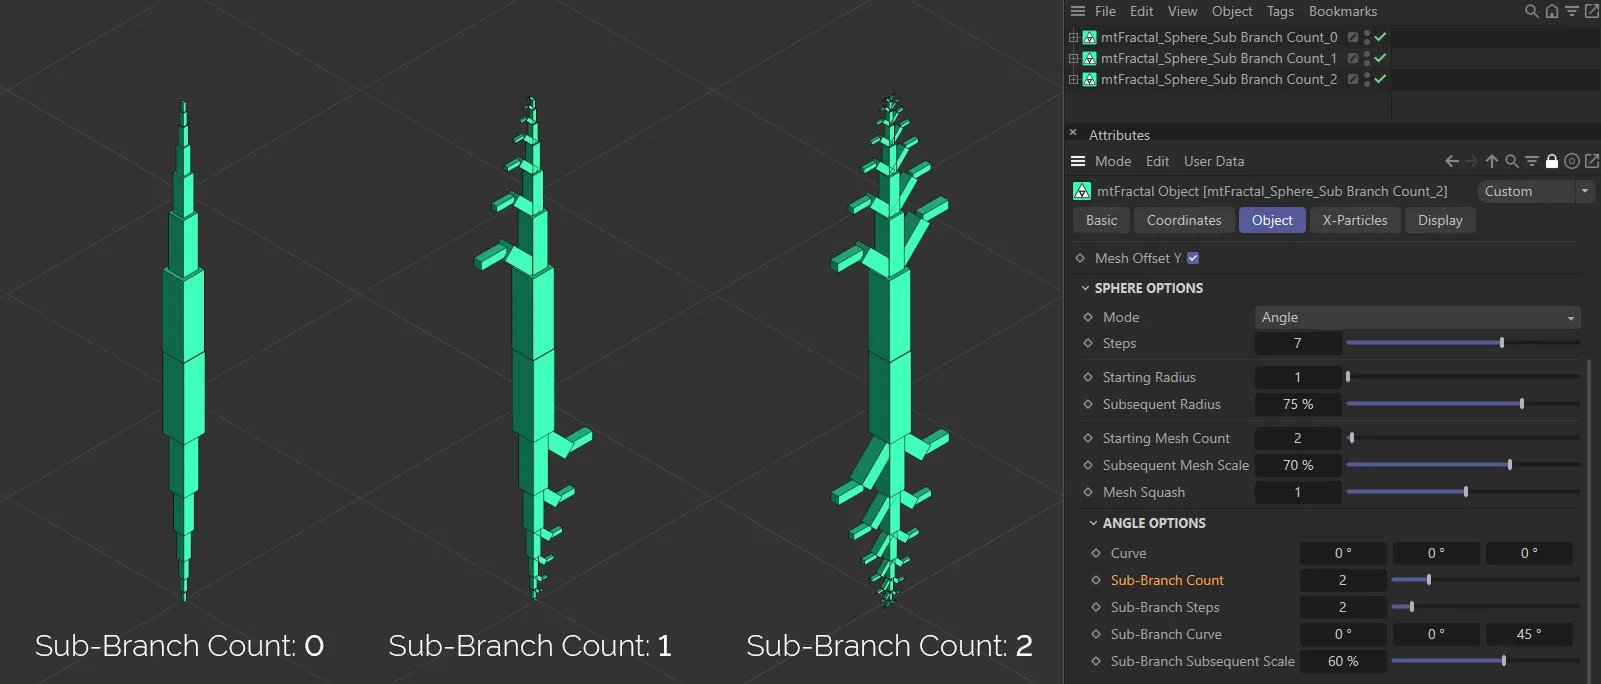
This image shows the effect of increasing the Sub-Branch Count, with 0 (zero), 1 and 2 shown, from left to right.
Sub-Branch Steps
Section titled “Sub-Branch Steps”The length of each sub-branch.
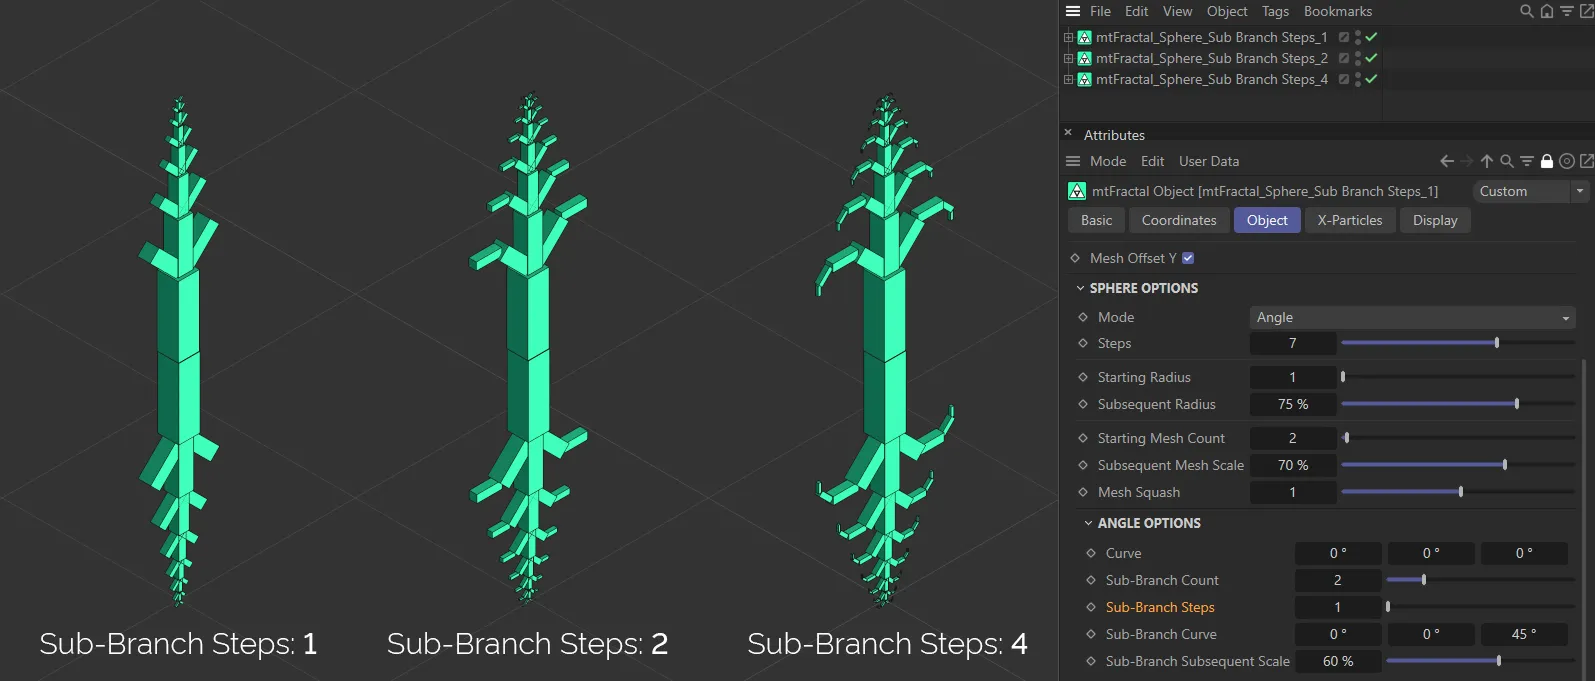
Here, there are Sub-Branch Steps values of 1, 2 and 4, from left to right.
Sub-Branch Curve
Section titled “Sub-Branch Curve”These settings will twist consecutive clones in the sub-branch.
Animation to show the effect of the Sub-Branch Curve slider, in each of the three axes.
Sub-Branch Subsequent Scale
Section titled “Sub-Branch Subsequent Scale”Clone sizes in each step in a sub-branch will be adjusted by the percentage set in this slider.
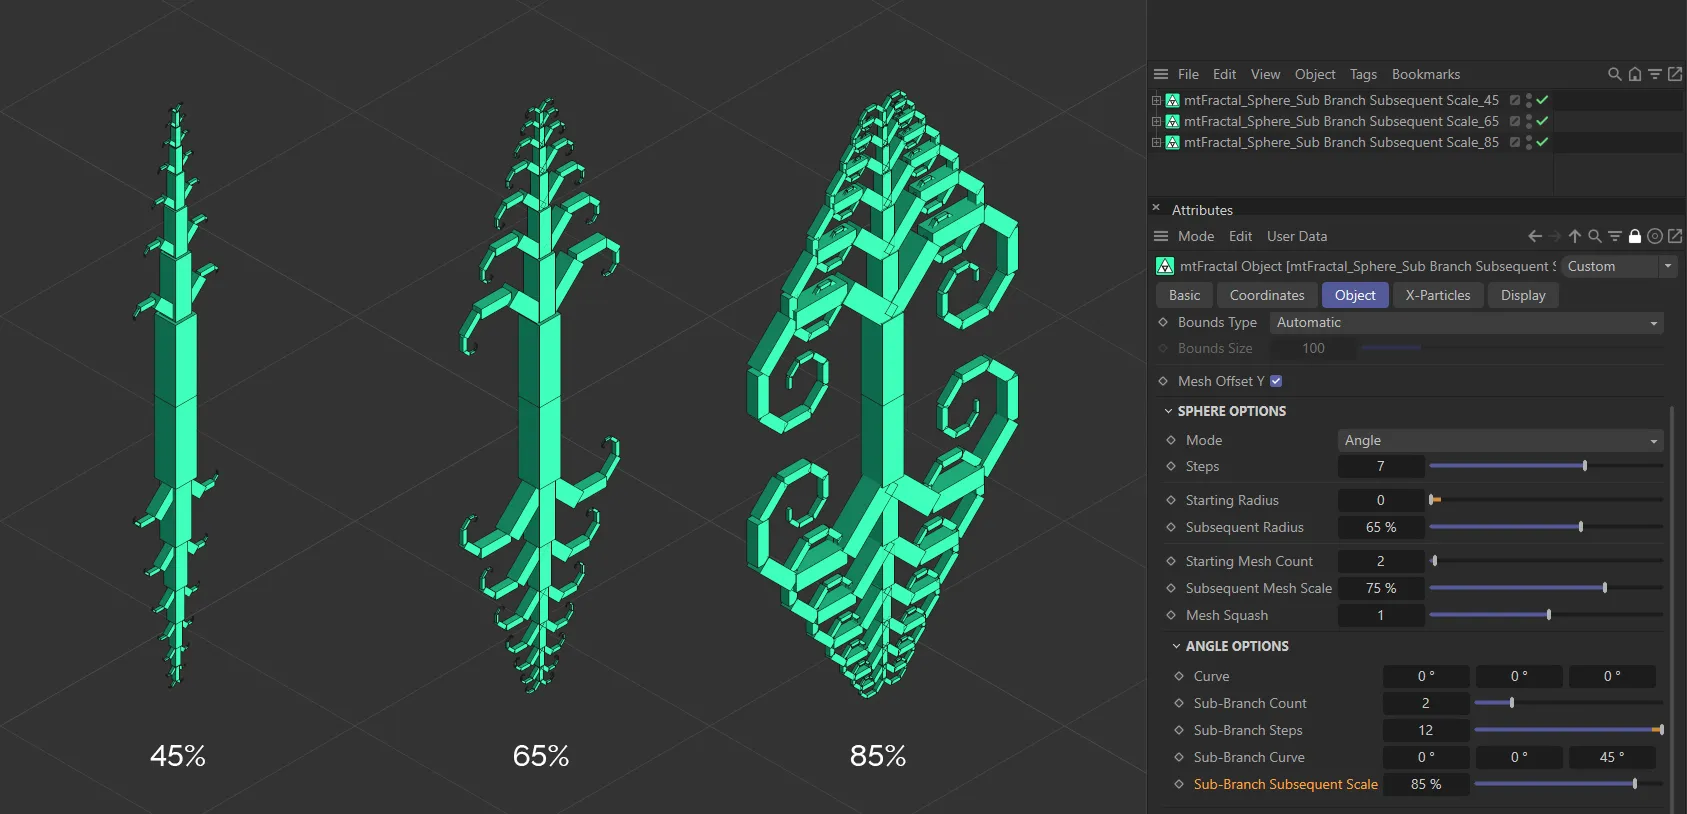
The above image shows the effect of increasing the Sub-Branch Subsequent Scale, with 45% on the left, an increase to 65% in the middle and 85% on the right.
Linear Options
Section titled “Linear Options”Linear Angle
Section titled “Linear Angle”This setting simply adjusts the rotation of each mesh, without affecting the position of subsequent clones.
Animation to demonstrate the Linear Angle sliders in all three axes.
Shrub Options
Section titled “Shrub Options”Shrub Count
Section titled “Shrub Count”How many shrubs are generated around the primary sphere. Each shrub would then be the basis of a tendril.
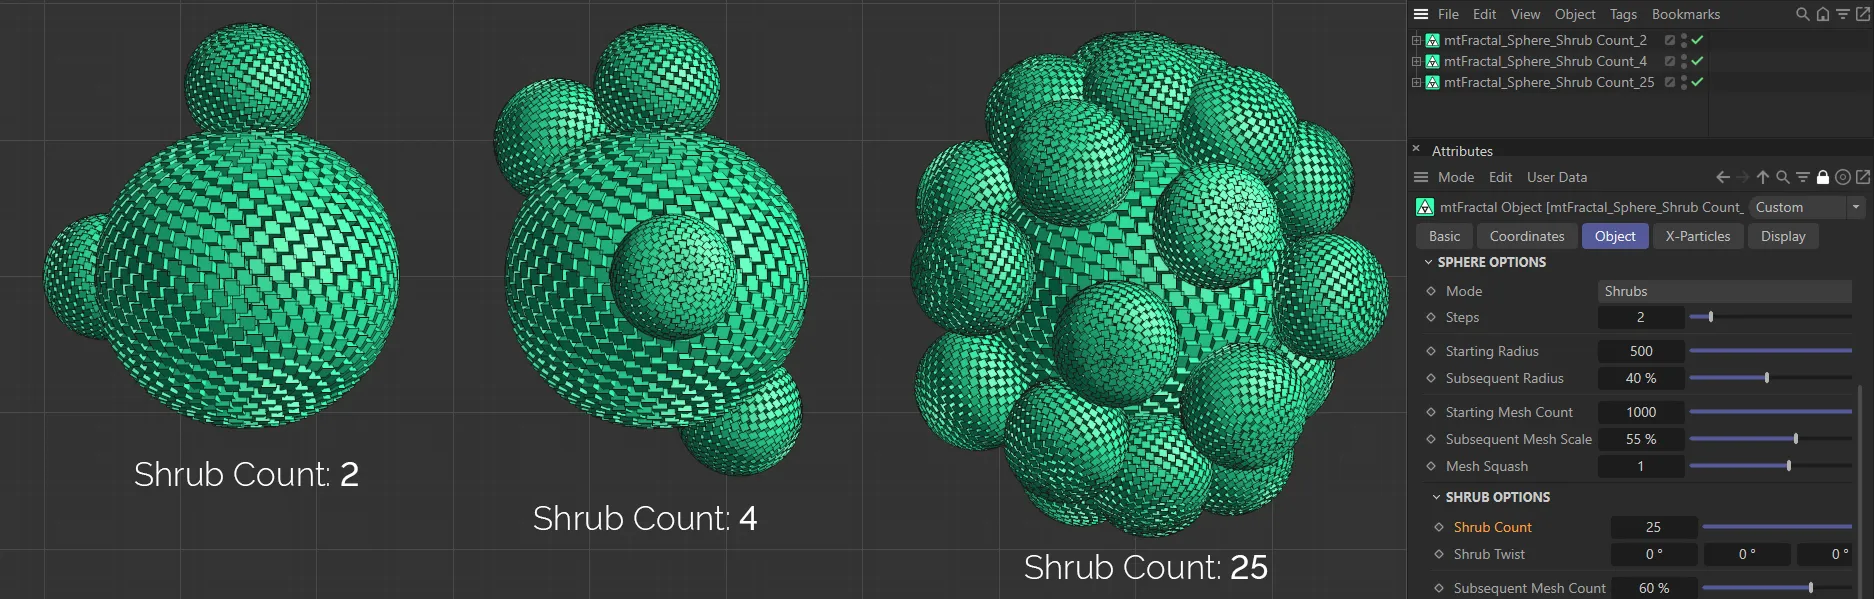
This image shows a Shrub Count of 2, then 4 and, finally, 25.
Shrub Twist
Section titled “Shrub Twist”An angle that is applied to each new shrub at each step, which will shift the position around the previous sphere.
Animation to demonstrate the effects of the Shrub Twist sliders in the three axes.
Subsequent Mesh Count
Section titled “Subsequent Mesh Count”Each consecutive shrub will have its clone count scaled by the percentage on this slider.
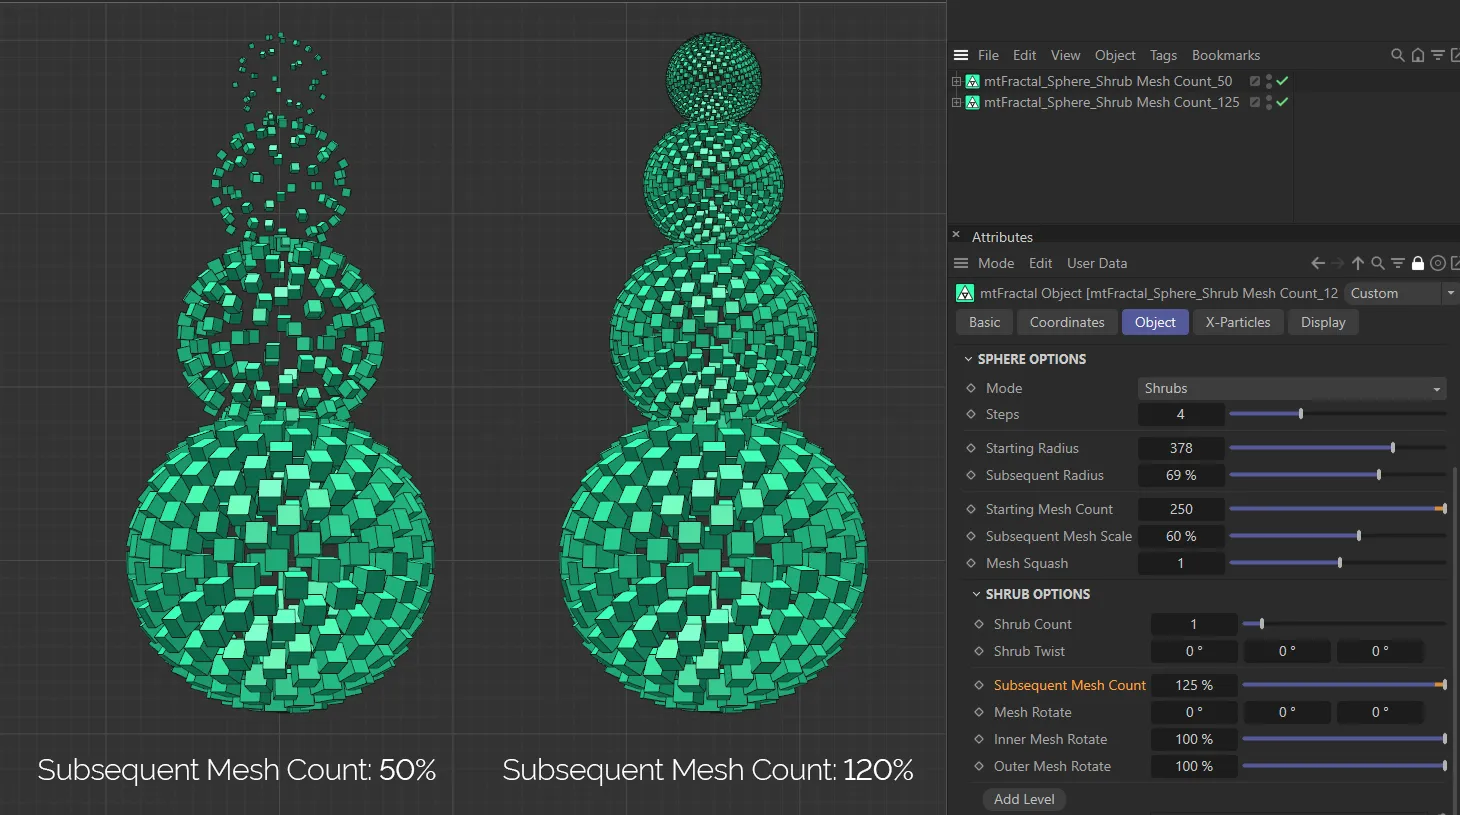
Here the Subsequent Mesh Count is at 50% on the left and 125% on the right.
Mesh Rotate
Section titled “Mesh Rotate”An angle that adjusts the rotation of each individual clone, not the shrub.
Inner Mesh Rotate / Outer Mesh Rotate
Section titled “Inner Mesh Rotate / Outer Mesh Rotate”These values adjust the strength of Mesh Rotate, based on the step.
Inner Mesh Rotate will have a stronger effect on shrubs closer to the primary sphere, while Outer Mesh Rotate will have a stronger effect on the last shrubs in the tendril.
Levels & Nodes
Section titled “Levels & Nodes”The above steps all affect the fractal shape globally. In order to apply targeted adjustments to an individual step of the shape, we can work with the Level Nodes controls.
Add Level
Section titled “Add Level”Clicking this button will add a level in the Levels link field.
Highlighting this level will give further Node Options parameters.
These additional features give the increased, detailed control over each individual step of the fractal shape, bypassing the global settings from the Object tab.
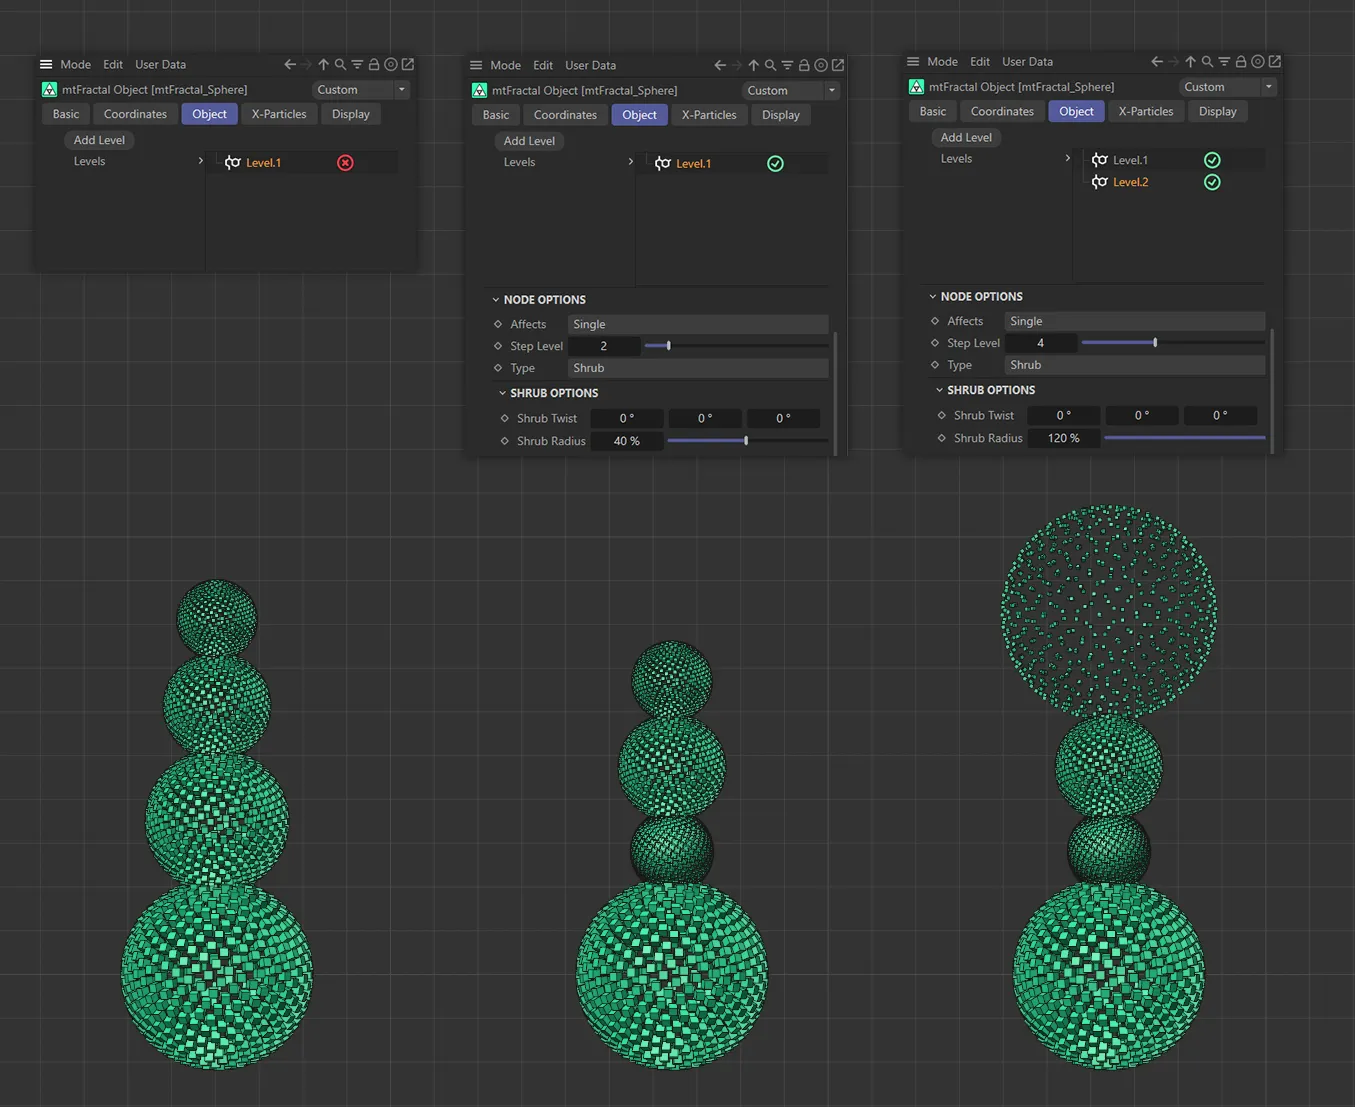
In the left-hand image, the additional Level.1 level is disabled, leaving all steps to be controlled by the global settings.
The Step Level 2 is being driven by the Level.1 level in the central fractal, with a reduced Shrub Radius value of 40% demonstrated above.
In the right-hand fractal, Step Level 4 is being controlled by the Level.2 level, showing an increased Shrub Radius setting of 120%.
Affects
Section titled “Affects”When adding a level, the user can choose which step the other options in the node affect. Set as Single, by default. The other options are: Odd, Even, Range and Multiple Of.
In this animation on the left-hand fractal the Shrub Radius slider is being manipulated on Step Level 3 only, followed by a demonstration of the effect of the Mesh Count slider on the right, with the Affects set as Odd affecting alternating steps.
Single
Section titled “Single”By specifying the number in the Step Level slider, this node will only affect the Type setting choice of Angle or Branch at this step.
Odd/Even
Section titled “Odd/Even”Alternating steps are affected.
Similar to Single, the user specifies a Range Start and Range End of steps to affect, in the additional parameters available.
Multiple Of
Section titled “Multiple Of”By specifying the number in the Multiple Of slider, this node will only affect the Type setting choice of Angle or Branch at this step.
Step Level
Section titled “Step Level”This specifies the step of the fractal which you wish to change.
This parameter allows a choice of sub-groups that this entry can affect. Either Mesh, Mesh Rotation or Shrub.
Each Type setting will give different parameter options.
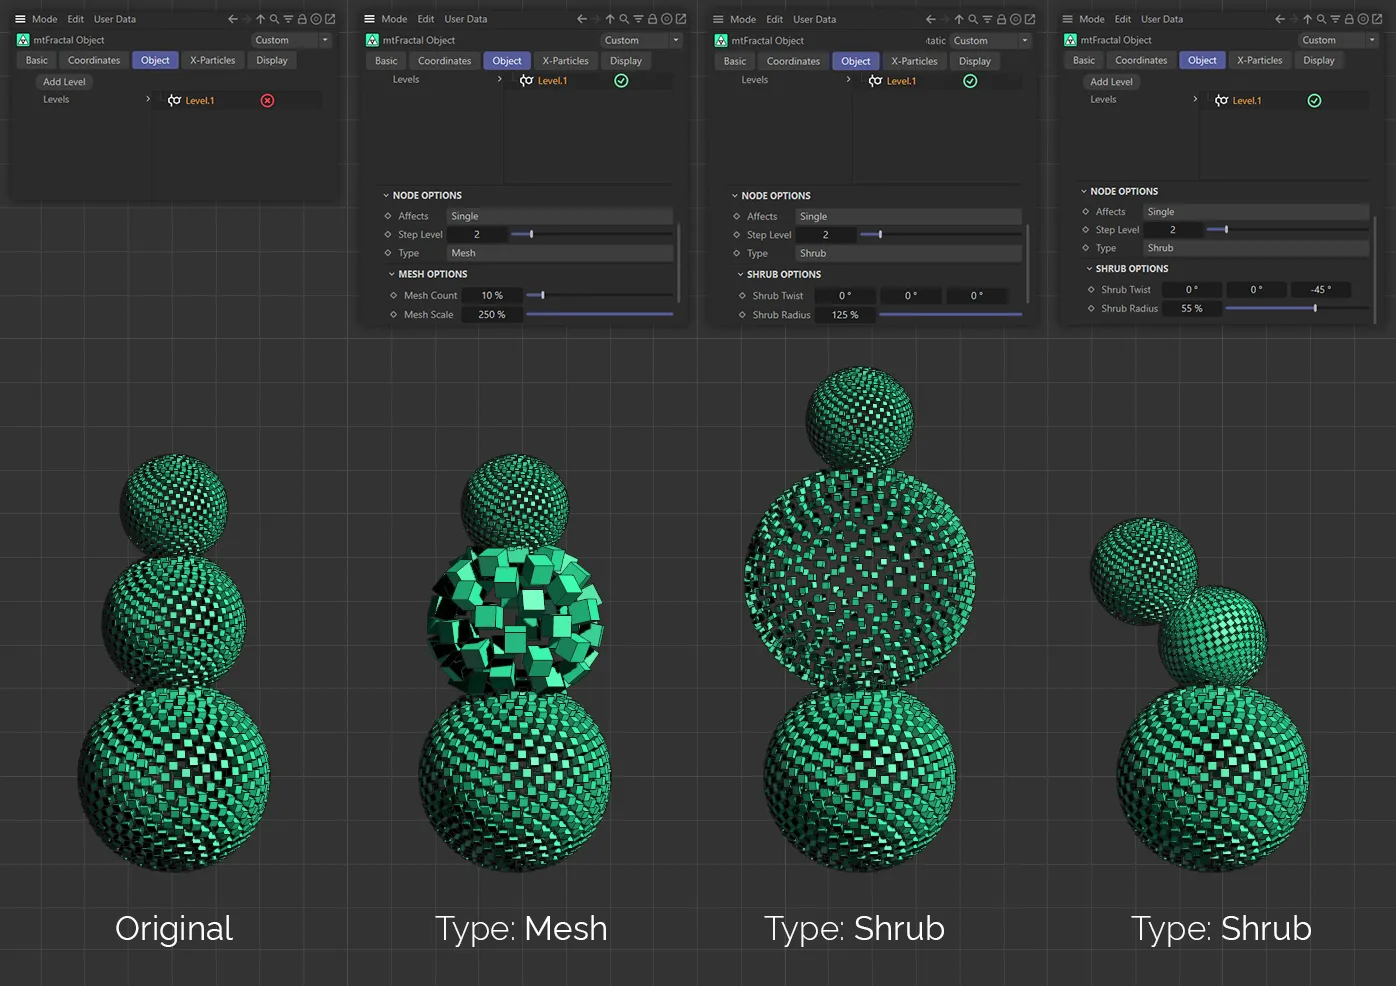
In the left-hand image, the additional Level.1 level is disabled, leaving all steps to be controlled by the global settings.
The second fractal has Level.1 enabled and Step Level 2 being controlled, with Type set to Mesh, a Mesh Count of 25% and a Mesh Scale of 150%.
The Type is Mesh Rotation in the third fractal. With Step Level 2, again, being controlled and the Mesh Rotation settings being altered from the global setting of the other two steps.
Finally, in the right-hand image, the Type is set to Shrub and Step Level 2 has a Shrub Radius of 55%.
Mesh Options
Section titled “Mesh Options”Mesh Count
Section titled “Mesh Count”Gives fewer or more copies on the step chosen.
Mesh Scale
Section titled “Mesh Scale”Adjusts the scale of the mesh on the step chosen.
Mesh Rotation Options
Section titled “Mesh Rotation Options”Mesh Rotation
Section titled “Mesh Rotation”Rotates the copies for the step chosen on each individual axis.
Shrub Options
Section titled “Shrub Options”Shrub Twist
Section titled “Shrub Twist”Twists the shrubs on the step selected on each individual axis.
Shrub Radius
Section titled “Shrub Radius”Increases or decreases the radius of the shrubs on the step selected.
Copyright © 2026 INSYDIUM LTD. All rights reserved.