

Preferences
The NeXus add-on preferences control licensing, software updates, privacy, GPU memory, viewport acceleration, time display, the cache location and the Quill AI models.
Open them from Edit ▸ Preferences ▸ Add-ons, find INSYDIUM NeXus in the list and click the arrow to expand its panel. These settings apply to every NeXus scene, not to a single object.
Until your license is active, only the Licensing and Updates sections are shown. The rest of the preferences appear once NeXus is registered.
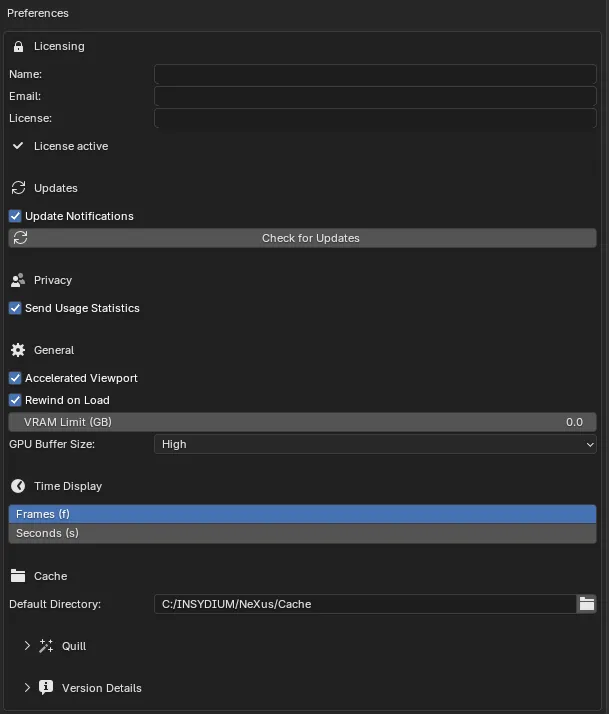
The NeXus add-on preferences, expanded in Edit ▸ Preferences ▸ Add-ons, with the Licensing, Updates, Privacy, General, Time Display, Cache, Quill and Version Details sections.
Licensing
Section titled “Licensing”Enter your INSYDIUM details here to activate NeXus.
Your registered name. Type it exactly as it appears on your INSYDIUM account.
Your registered email address.
License
Section titled “License”Your INSYDIUM license key. NeXus checks the details with the license server automatically as soon as all three fields are filled, so there is no separate Apply button. Once the key validates it is masked in the field, hiding the middle blocks.
A status line under the fields reports progress: Checking license… while it contacts the server, License active when NeXus is registered, or an error message if the details are rejected. If a new key fails but you already have a working license, the previous one stays active.
When your license is active, a License Type line below the status reports your plan tier. The same tier is shown in the About dialog.
Run Diagnostics
Section titled “Run Diagnostics”If NeXus cannot reach the license server, a Run Diagnostics button appears. It steps through a connectivity and security check (internet reachability, DNS lookup, TCP port 443, the TLS certificate and the license server itself) and reports where the connection fails, which helps you or support pinpoint a firewall or network problem. Re-run it after changing your network setup.
Updates
Section titled “Updates”NeXus can tell you when a newer release is available. When there is one, a banner appears here, in the sidebar and in the status bar, with buttons to Install Update or Dismiss it. While an update runs the banner shows its progress, then the result: NeXus updated to the new version, or an error message with a Retry button. When you are already current it reads NeXus is up to date.
Update Notifications
Section titled “Update Notifications”Shows the update notice in the sidebar, status bar and preferences when a newer NeXus release is out. On by default. Untick it to stop the notices.
Check for Updates
Section titled “Check for Updates”Checks the INSYDIUM server for a newer release straight away, rather than waiting for the next automatic check.
Privacy
Section titled “Privacy”Send Usage Statistics
Section titled “Send Usage Statistics”Sends anonymous usage statistics to INSYDIUM to help improve NeXus. On by default. No personal data, file contents or scene data is sent. Untick it to opt out.
Some license plans require usage statistics. On those plans the option is shown but locked on, with a note that your plan requires it.
General
Section titled “General”GPU memory and viewport settings.
Accelerated Viewport
Section titled “Accelerated Viewport”Uses the platform’s accelerated zero-copy renderer (Vulkan or OpenGL on Windows and Linux, Metal on macOS) to draw particles, with automatic fallback to the Basic path if it is not available. Enabled by default. Untick it to force the Basic CPU upload for all emitters.
If your GPU driver does not support external memory, or the accelerated path fails during a session, NeXus falls back to Basic and shows a note in this section. To retry the accelerated path after a failure, untick and re-tick the option.
Rewind on Load
Section titled “Rewind on Load”Resets the timeline to the scene’s start frame when you open a file that contains NeXus objects, so simulations always play from the beginning. On by default.
VRAM Limit (GB)
Section titled “VRAM Limit (GB)”The maximum GPU memory NeXus may use, in gigabytes. Defaults to 0, which lets NeXus use all available VRAM. Set a value to cap usage and leave headroom for other GPU tasks such as rendering and viewport display.
GPU Buffer Size
Section titled “GPU Buffer Size”How much GPU memory NeXus reserves for its fixed buffers. Set as High, by default. The other options are Balanced and Custom.
- High: larger buffers for heavy simulations.
- Balanced: smaller default buffer sizes.
- Custom: set each buffer size manually. This reveals the three controls below.
Work Buffer Size (GB)
Section titled “Work Buffer Size (GB)”GPU memory reserved for the work buffer, in gigabytes. Defaults to 2.0. Shown only when GPU Buffer Size is Custom.
Geometry Buffer Size (GB)
Section titled “Geometry Buffer Size (GB)”GPU memory reserved for geometry data, in gigabytes. Defaults to 1.0. Shown only when GPU Buffer Size is Custom.
Max New Particles
Section titled “Max New Particles”The maximum number of new particles that may be created per frame. Defaults to 32768. Shown only when GPU Buffer Size is Custom.
Time Display
Section titled “Time Display”Default Time Display
Section titled “Default Time Display”Sets how time properties are shown across NeXus. Set as Frames (f), by default, where values are frame counts such as 90. The other option is Seconds (s), where values are in seconds such as 3.75.
Switching mode converts every existing time value that still matches the old default. You can also toggle an individual time property between frames and seconds by clicking its label.
Default Directory
Section titled “Default Directory”The directory used for new cache objects. It defaults to a per-user location inside your system’s application data folder (on Windows, INSYDIUM\NeXus\Cache under Local AppData). Change it to point new caches at a faster drive or a shared project location. Existing cache objects keep their own paths.
Quill is the AI assistant that authors nxQuestion scripts. This collapsible panel is where you configure the models it can use. It is closed by default. Add at least one model before using Quill.
The model list
Section titled “The model list”The list shows every model you have configured, with its display name and type. Use the + and - buttons beside the list to add and remove models. Selecting a model in the list opens its settings below.
The display name for the model, used when you pick a model on an nxQuestion node. NeXus fills in a sensible name based on the type, which you can rename.
How the model is reached. The options are:
- Anthropic API: Claude through the Anthropic Messages API, using an API token.
- Claude CLI: the installed
claudecommand, using its own login (no token needed). - Command-line Tool: another local CLI such as
llmoraichat. - Gemini: Google Gemini through an API key, using Google’s OpenAI-compatible endpoint.
- Ollama: a local or remote Ollama server.
- OpenAI Codex: the installed
codexcommand, using its own login (no token needed). - OpenAI-compatible: any OpenAI chat-completions endpoint, using an API token.
The remaining fields change to suit the type you pick.
Host / Base URL
Section titled “Host / Base URL”The server address for the model. For Ollama it is the server URL, for OpenAI-compatible it is the base URL including /v1 and for Anthropic you can leave it blank to use the default. Gemini and Ollama are filled with their standard address automatically.
Command and Arguments
Section titled “Command and Arguments”For the Command-line Tool, Claude CLI and OpenAI Codex types, set the path or name of the CLI executable. The Command-line Tool type also offers a Tool preset (llm, aichat or Custom) that fills the command and arguments for you, plus an editable Arguments field where {model} is replaced with the model id and the prompt is sent on the tool’s standard input.
The model id, for example claude-opus-4-8, gpt-4o or qwen3-coder:480b. Click the magnifier beside it to list the models the provider offers and pick one, or type the id by hand.
API Token / OAuth Token
Section titled “API Token / OAuth Token”The API token for providers that need one (Anthropic API, Gemini and OpenAI-compatible). It is masked once entered. The Claude CLI type shows an optional OAuth Token field instead: leave it blank to use your local claude login, or paste a token from claude setup-token to select a specific subscription account. Ollama, Codex and the plain command-line tool need no token.
Test Connection
Section titled “Test Connection”Sends a minimal request to confirm the selected model is reachable and configured correctly, then reports success or the error it hit. API models must have a model name set before you can test them.
The controls below the model box apply to Quill as a whole.
Max Attempts
Section titled “Max Attempts”How many compile-and-fix rounds the model may take per generation. Defaults to 5, with a range of 1 to 10. Raise it to give the model more tries to produce a working script.
Conversation Memory
Section titled “Conversation Memory”How many earlier prompt-and-result turns Quill remembers and sends as context, so follow-up requests like “go back to that” work. Defaults to 8, with a range of 0 to 50. Set it to 0 to disable memory.
Effort
Section titled “Effort”The reasoning effort for models that support it (Claude, Codex and OpenAI or Gemini reasoning models). Set as High, by default, which is the recommended setting. The other options, from lightest to heaviest, are Low, Medium, Extra High and Max. Models without a reasoning control ignore this.
Self Check
Section titled “Self Check”After building a script, Quill reviews its own result against your request and fixes or reports it. Off by default. It is more reliable but slower and uses more of the model.
Troubleshooting Log
Section titled “Troubleshooting Log”Writes a detailed Quill log to disk. Off by default. Turn it on to reproduce an issue, then send the log file to support. While it is on, NeXus shows the log file location and an Open Log Folder button.
Version Details
Section titled “Version Details”A collapsible panel, closed by default, that reports the installed versions for support: the add-on version, the core (engine) version, the build type and the build date.
Copyright © 2026 INSYDIUM LTD. All Rights Reserved.