

nxScale
nxScale changes the scale, radius or mass of your NeXus particles. It works as a stack of layers, so you can combine several scaling operations and blend them together.
Add it from Add ▸ INSYDIUM NeXus ▸ nxScale. It arrives as an empty. Add one or more scale layers, set each to an operation and a target, then blend them. All of its settings live in Properties ▸ Physics.
Each layer targets one particle attribute, Particle Scale, Particle Radius or Particle Mass, so a single nxScale can grow a particle’s geometry while also driving its mass, for example.
A stream of instanced shapes grown from small to large over their age by a Range layer, as they break over Suzanne.
Object Properties
Section titled “Object Properties”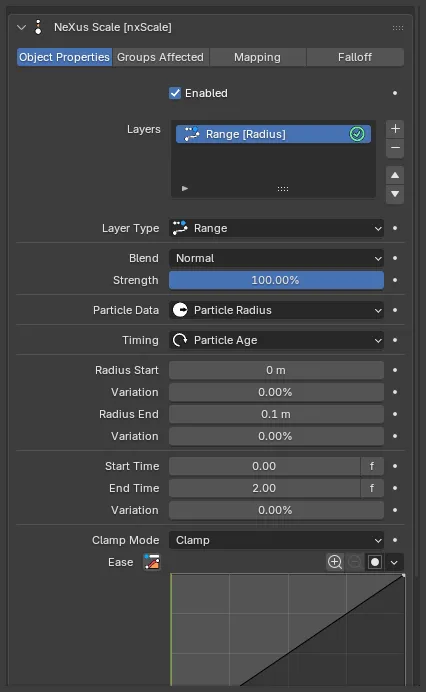
The nxScale panel in Properties ▸ Physics, on the Object Properties tab, showing the seeded Range layer.
Enabled
Section titled “Enabled”Turns nxScale on or off. Disable it to switch off its scaling without deleting it.
Layers
Section titled “Layers”The stack of scale layers. Use the + button to add a layer, choosing its operation from the menu that appears, and the - button to remove the selected one. The arrows reorder the selected layer. Each layer has an enable toggle on the right of its row, so you can switch a layer on or off without removing it.
Layers are processed from the top of the stack down, each blending with the result of the layers above it. Select a layer to show its settings underneath.
A new nxScale starts with one Range layer, targeting Particle Radius.
Layer Settings
Section titled “Layer Settings”These settings apply to the layer selected in the Layers list. The top block is shared by every layer. The controls below it change with the Layer Type.
Layer Type
Section titled “Layer Type”Sets the operation this layer performs. Set as Range, by default. The other options are Noise, Change Value Over Time (Absolute), Change Value Over Time (Relative), Set Value, Set by Falloff, Scale by Speed, Scale by Acceleration and Scale by Map. Each is described below.
Sets how this layer combines with the layers above it. Set as Normal, by default. The other options are Min, Subtract, Multiply, Overlay, Max, Add, Screen and Difference.
Strength
Section titled “Strength”Sets how strongly this layer contributes to the blend. Defaults to 100%.
Particle Data
Section titled “Particle Data”Sets which particle attribute this layer scales. Set as Particle Radius, by default. The other options are Particle Scale and Particle Mass.
- Particle Scale: scales the particle’s geometry. This is a vector, so each axis (X, Y, Z) can be set independently, and it is what drives the size of geometry instanced onto the particles by nxGenerator.
- Particle Radius: scales the particle’s radius, the size NeXus uses for the particle itself.
- Particle Mass: scales the particle’s mass, changing how it responds to forces such as nxGravity and nxDrag.
The value labels below (Start / End / Change / Value and the limits) rename themselves to match the selected target, for example Radius Start or Scale Value.
The default operation. It transitions the target from a start value to an end value over a time window.
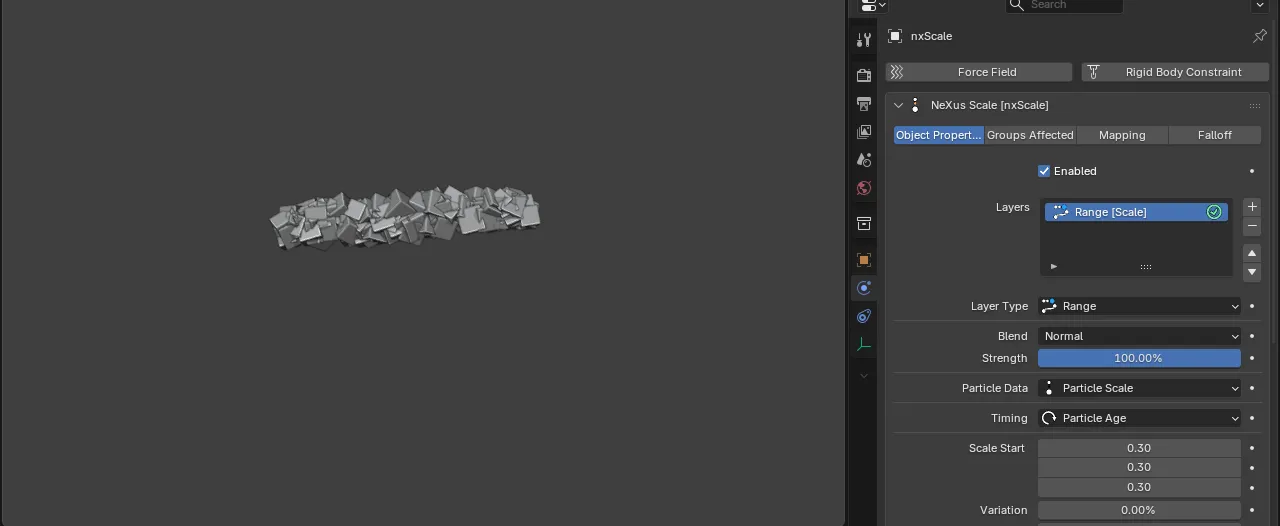
A Range layer on Particle Scale, growing each instanced cube from small (young, near the emitter) to large (old, downstream) over its age.
Timing
Section titled “Timing”Sets how the transition is timed. Set as Particle Age, by default. The other options are On Birth, Frame Time and Falloff.
- On Birth: the value is set once, at the particle’s birth. Only the end value is used.
- Particle Age: the transition is measured against each particle’s age.
- Frame Time: the transition is measured against the scene frame.
- Falloff: the transition is driven by the modifier’s falloff value.
Start value
Section titled “Start value”The value the target begins at, labeled Scale Start, Radius Start or Mass Start. Shown when Timing is not On Birth. For Particle Scale, each axis (X, Y, Z) can be set independently.
End value
Section titled “End value”The value the target reaches, labeled Scale End, Radius End or Mass End.
Variation
Section titled “Variation”Adds a random spread to the start and end values, so the particles do not all transition between the same two values.
Start Time / End Time
Section titled “Start Time / End Time”The window over which the transition happens. Shown when Timing is Particle Age or Frame Time. Each has an f/s button to switch between frames and seconds.
A curve for easing the interpolation between the start and end values, with a Clamp Mode setting. See Shared layer controls below.
Drives the target from a procedural noise field, for varied per-particle sizes.
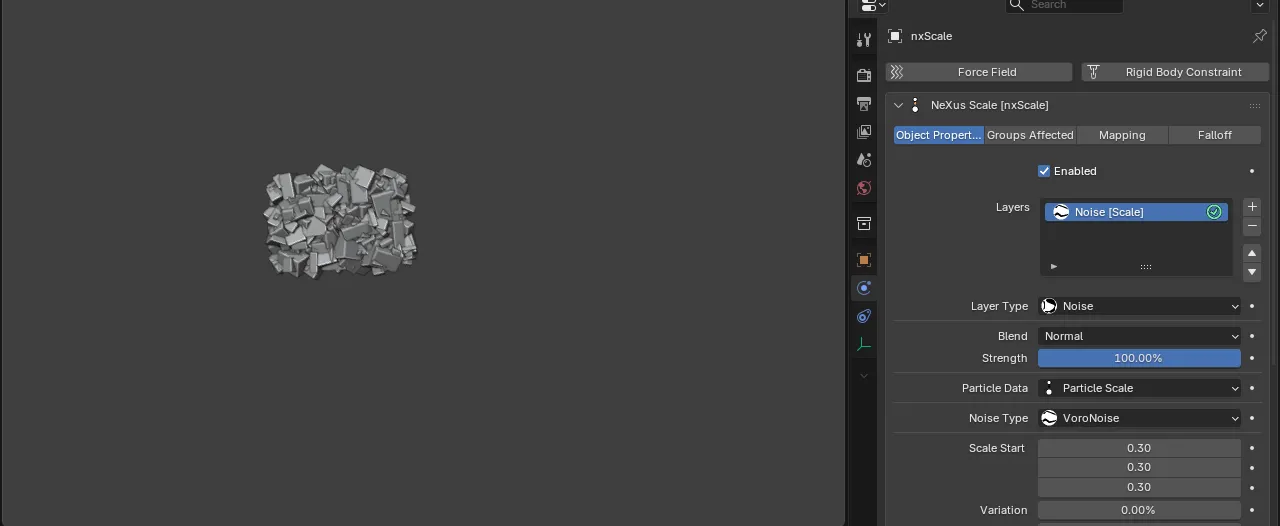
A Noise layer on Particle Scale, sizing each cube from the noise field, for a spread of large and small instances.
Noise Type
Section titled “Noise Type”The noise algorithm used. Set as VoroNoise, by default. The other options are Simplex, Curl, Turbulence, Wavy Turbulence, FBM and Cubic.
Start value / End value
Section titled “Start value / End value”The output range the noise maps to, labeled per target (Scale Start / Scale End and so on), each with a Variation.
The random seed for the noise. Changing it gives a different pattern. Each target keeps its own seed.
Contrast
Section titled “Contrast”A gradient that remaps the noise output, adjusting its contrast.
The spatial scale of the noise field. Defaults to 100%.
Persistence
Section titled “Persistence”How much each successive octave contributes. Defaults to 100%.
Lacunarity
Section titled “Lacunarity”The frequency multiplier between successive octaves. Defaults to 1.
Frequency
Section titled “Frequency”The base frequency of the noise. Defaults to 100%.
Octaves
Section titled “Octaves”The number of noise layers stacked together. Defaults to 1.
Change Value Over Time (Absolute)
Section titled “Change Value Over Time (Absolute)”Changes the target by a fixed amount each step, so particles grow or shrink continuously.
A positive Change grows the instanced shapes over time, on the left. A negative Change shrinks them, on the right.
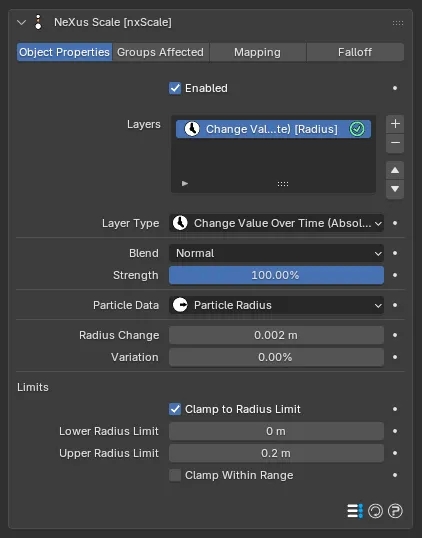
The Change Value Over Time (Absolute) controls: a Change added each step, a Variation and the Limits.
Change
Section titled “Change”The amount to add to the target each step, labeled Scale Change, Radius Change or Mass Change. Positive values increase the target, negative values decrease it. For Particle Scale, each axis can be changed independently.
Variation
Section titled “Variation”Adds a random spread to the Change, so each particle changes at a different rate.
The Limits controls also apply. See Shared layer controls.
Change Value Over Time (Relative)
Section titled “Change Value Over Time (Relative)”Changes the target by a percentage of its own current value each step, so the change compounds as the particle grows or shrinks.
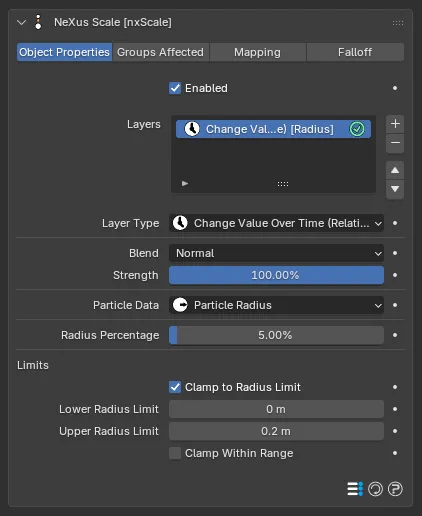
The Change Value Over Time (Relative) controls: a Percentage change each step and the Limits.
Percentage
Section titled “Percentage”The percentage to change the target by each step, labeled Scale Percentage, Radius Percentage or Mass Percentage. Defaults to 5%.
The Limits controls also apply.
Set Value
Section titled “Set Value”Sets the target to a fixed value, rather than changing it over time.
A small Value sets a fixed small size, on the left, and a large Value a fixed large size, on the right.
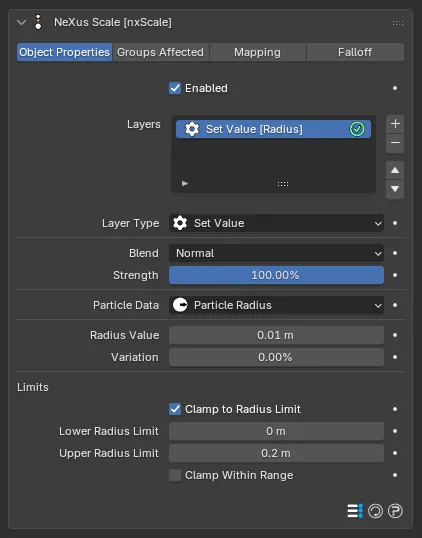
The Set Value controls: a fixed Value, a Variation and the Limits.
The value to set the target to, labeled Scale Value, Radius Value or Mass Value.
Variation
Section titled “Variation”Adds a random spread to the value.
The Limits controls also apply.
Set by Falloff
Section titled “Set by Falloff”Scales the target up or down by the modifier’s falloff value, so particles change size as they pass through the falloff region set on the Falloff tab.
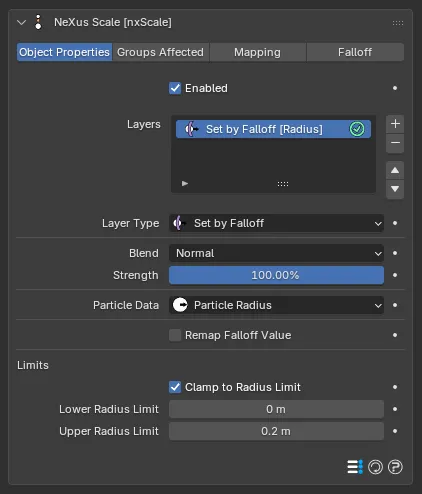
The Set by Falloff controls: a Remap Falloff Value toggle and the Limits, without Clamp Within Range.
Remap Falloff Value
Section titled “Remap Falloff Value”When on, the falloff value is remapped to a -1 to 1 range, so particles shrink outside the falloff region as well as growing inside it. Off by default.
The Limits controls also apply, except Clamp Within Range.
Scale by Speed
Section titled “Scale by Speed”Uses the particle’s speed as a multiplier for the change, so faster particles change more. The faster a particle moves, the greater the change to its scale, radius or mass.
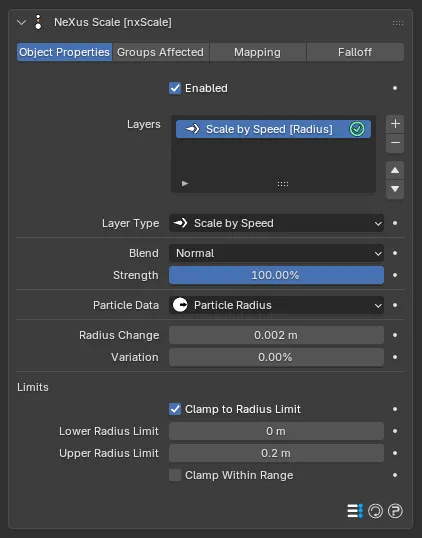
The Scale by Speed controls: a Change multiplied by speed, a Variation and the Limits.
Change
Section titled “Change”The base amount to change the target by, before it is multiplied by speed, labeled per target.
Variation
Section titled “Variation”Adds a random spread to the Change.
The Limits controls also apply.
Scale by Acceleration
Section titled “Scale by Acceleration”Like Scale by Speed, but the particle’s acceleration, the change in speed between frames, is the multiplier. The more a particle speeds up or slows down, the greater the change. It uses the same Change, Variation and Limits controls.
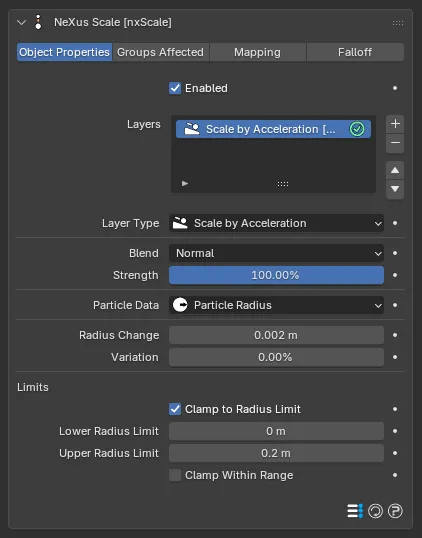
The Scale by Acceleration controls, the same Change, Variation and Limits as Scale by Speed.
Scale by Map
Section titled “Scale by Map”Drives the target from a mesh object’s vertex group, sampling the weight nearest each particle’s position.
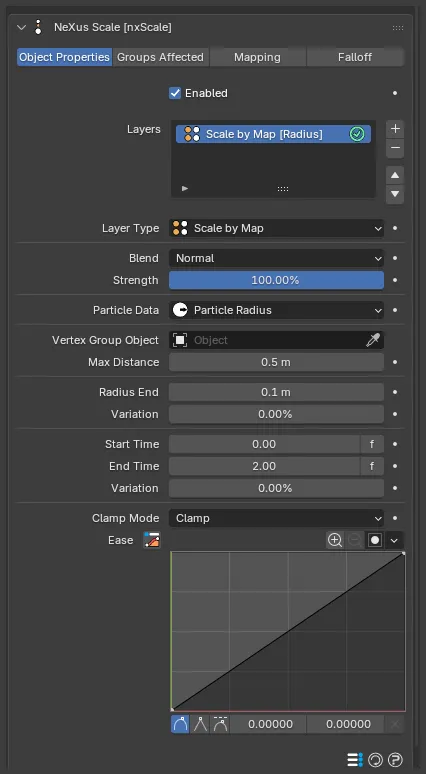
The Scale by Map controls: a Vertex Group Object and Vertex Group, a Max Distance, an End value with Variation and the timing controls.
Vertex Group Object
Section titled “Vertex Group Object”The mesh (or curve) object whose vertex group weights drive the scaling.
Vertex Group
Section titled “Vertex Group”The vertex group on that object to read. Shown once an object is set.
Max Distance
Section titled “Max Distance”The maximum distance used when sampling the object. Defaults to 0.5m.
End value
Section titled “End value”The target value the weight maps to, labeled per target, with a Variation.
A Map layer also shows Start Time / End Time, a Variation and an Ease curve, the same timing controls as the Range operation. See Shared layer controls.
Shared layer controls
Section titled “Shared layer controls”These controls appear on several of the operations above.
Limits
Section titled “Limits”Range, Noise and Scale by Map aside, the operations can clamp the target to a range.
- Clamp to Limit: when on, the target is held between the Lower Limit and Upper Limit. On by default. Labeled per target, for example Clamp to Radius Limit.
- Lower Limit / Upper Limit: the minimum and maximum allowed value. Neither can go below zero.
- Clamp Within Range: when on, instead of clamping every particle to the same upper or lower limit, each particle is clamped to its own random value between the two limits, giving a spread of final sizes. Off by default. Not available for Set by Falloff.
Start Time / End Time / Variation
Section titled “Start Time / End Time / Variation”For the timed operations, the window the operation runs over and a random spread on it. Each time field has an f/s button to switch between frames and seconds.
Clamp Mode
Section titled “Clamp Mode”Sets what happens outside the time window. Set as Clamp, by default. The other options are Clamp In Range, Repeat and Continue.
- Clamp: hold the start value before the window and the end value after it.
- Clamp In Range: only active within the window; outside it the layer has no effect.
- Repeat: repeat the curve.
- Continue: continue past the boundaries.
A curve for shaping the interpolation across the time window.
Groups Affected
Section titled “Groups Affected”Use the Groups Affected tab to restrict nxScale to particles in specific nxGroup groups, rather than affecting every particle.
Mapping
Section titled “Mapping”Use the Mapping tab to drive nxScale’s settings from particle data instead of fixed values, so a particle’s own attributes can change the scaling it feels. See Mapping for how this works.
Falloff
Section titled “Falloff”Use the Falloff tab to limit where nxScale acts. Add one or more nxFalloff objects to the list and blend them, so the scaling only affects particles inside the falloff region. The Set by Falloff operation reads this value directly.
Copyright © 2026 INSYDIUM LTD. All Rights Reserved.