

The NeXus Panel
Every NeXus object is configured from a single tabbed panel in the Properties editor’s Physics tab.
NeXus objects are Empty objects you add from Add ▸ INSYDIUM NeXus, not entries in Blender’s modifier stack. When one is selected, its settings appear in the Physics properties as a panel that follows the same layout for every object. This page covers that shared panel. The individual object pages cover the specific controls each one draws.
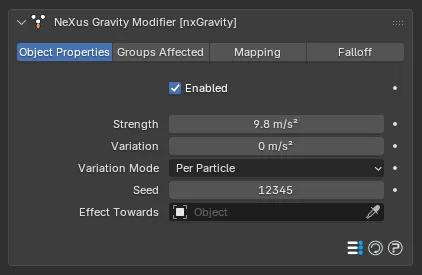
The NeXus panel for an nxGravity object, in the Properties editor ▸ Physics tab. The layout is the same for every NeXus object: a tab row, the Enabled toggle, that object’s controls and a row of buttons at the bottom.
Finding the panel
Section titled “Finding the panel”- Select a NeXus object in the viewport or the Outliner.
- Open the Properties editor and click the Physics tab (the bouncing-ball icon).
The NeXus panel appears there. It is drawn only when the selected object is a NeXus object, so if the Physics tab looks empty, check that a NeXus object is the active selection.
The panel title reads NeXus , where is the object’s type. A Gravity modifier named nxGravity shows as NeXus Gravity Modifier [nxGravity], while an nxCache object shows as NeXus Cache [nxCache]. The bracketed part is the object’s own name in the scene, which is handy when you have several of the same type.
The tab row
Section titled “The tab row”Objects with more than one section show a row of tabs across the top. Click a tab to switch the body of the panel to that section. An object with only one section shows no tab row, just its controls.
Which tabs appear depends on the type of object:
- Object Properties: always present. This is the object’s main settings.
- Groups Affected: present on full modifiers, and on a few object types that opt in (such as nxCollider and nxGenerator).
- Mapping and Falloff: present only on full modifiers, the objects that act on particles over a region.
Some objects add their own extra tabs alongside these. For example nxExplode and nxEmitter each add a Display tab, and nxFoam adds Foam, Spray and Bubble tabs. Those custom tabs are documented on the object’s own page.
Simpler object types expose only Object Properties, sometimes with Groups Affected. Forces and other full modifiers expose all four: Object Properties, Groups Affected, Mapping and Falloff.
Object Properties
Section titled “Object Properties”The Object Properties tab holds the controls that define what the object does. Its contents are unique to each object type and are covered on the individual pages.
Enabled
Section titled “Enabled”At the top of Object Properties, every object has an Enabled toggle. Turn it off to switch the object’s effect off without deleting it, then turn it back on to restore it. Everything below the toggle is the object’s own settings.
Groups Affected
Section titled “Groups Affected”The Groups Affected tab restricts the object to particles in specific nxGroup groups, rather than affecting every particle. Add one or more groups to the list to limit the object to those particles. See a force page such as nxGravity for how this reads in practice.
Mapping
Section titled “Mapping”The Mapping tab drives an object’s settings from particle data instead of fixed values, so a particle’s own attributes can change how the object acts on it. See Mapping for how this works.
Falloff
Section titled “Falloff”The Falloff tab limits where the object acts. Add one or more nxFalloff objects to the list and blend them, so the object only affects particles inside the falloff region.
List controls
Section titled “List controls”Several tabs use a list widget, including Groups Affected, Falloff and the object lists inside many forces. They all work the same way.
The list sits on the left with a column of buttons on its right:
- + (Add): adds an item. On some lists this opens a menu to pick the type, or creates and adds a new helper object such as an nxGroup or nxFalloff.
- - (Remove): removes the selected item.
- Up and Down arrows: reorder the selected item. Order matters where items are processed in sequence, such as stacked falloffs.
Each row carries its own enable icon on the right, so you can mute a single item without removing it. Object lists also show a picker field above the list: click into it and choose an object, use the eyedropper to pick one continuously or drag an object or a whole collection onto it to add it.
Select a row and its per-item settings appear below the list.
Panel buttons
Section titled “Panel buttons”At the bottom right of the panel most objects show a small row of buttons:
- Preset: save and load presets for this object type.
- Reset: return the object’s settings to their defaults.
- Help: open this documentation, on the page for the selected object.
A few objects show the preset and reset buttons without a help button. These buttons act on the whole object, not just the tab you are looking at.
Licensing
Section titled “Licensing”NeXus runs on a valid INSYDIUM license. Without one the panel shows a No valid license message and its controls are grayed out. Enter your license in Edit ▸ Preferences ▸ Add-ons ▸ INSYDIUM NeXus to activate it. See Installation and Licensing for the full setup.
Copyright © 2026 INSYDIUM LTD. All Rights Reserved.