

nxFollowGeo
nxFollowGeo makes your NeXus particles follow the surface or edges of objects in your scene, so they crawl across a mesh or run along a spline instead of flying free.
Add it from Add ▸ INSYDIUM NeXus ▸ nxFollowGeo. It arrives as an empty. Build a list of objects for the particles to follow in the Objects list, then set how they lock to each one. All of its settings live in Properties ▸ Physics.
The settings you see depend on the kind of object you add. A Mesh or Curves object offers Surface and Edge following. A Curve (a spline) switches to a dedicated spline-following mode with its own settings.
A stream of particles caught by Suzanne, added to the Objects list. Instead of passing over her, the particles drop onto her surface and crawl across it, tracing her shape.
Object Properties
Section titled “Object Properties”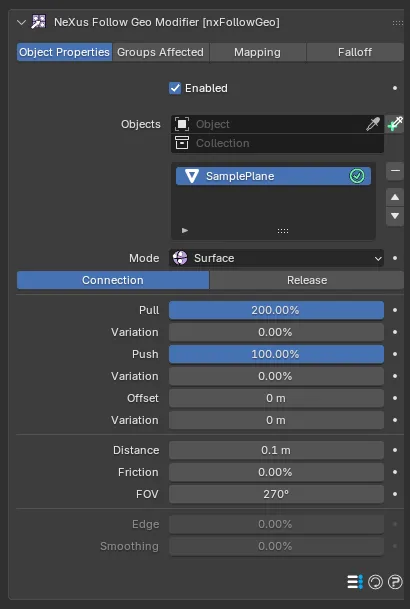
The nxFollowGeo panel in Properties ▸ Physics, with a mesh object added to the list.
Enabled
Section titled “Enabled”Turns the whole nxFollowGeo on or off. Disable it to release its particles without deleting the modifier.
Objects
Section titled “Objects”The list of objects the particles follow.
Add objects to the list, then select an entry to reveal its settings below. Each entry has an enable toggle on the right of its row, so you can switch individual objects on or off without removing them from the list.
You can add Mesh, Curve and Curves objects.
For a mesh or a Curves object, sets whether the particles follow the object’s surface or its edges. Set as Surface, by default. The alternative is Edge.
- Surface: the particles spread across the faces of the mesh and crawl over the surface.
- Edge: the particles run along the mesh edges instead.
The per-object settings are split into two sections, Connection and Release, selected with the buttons below the Mode.
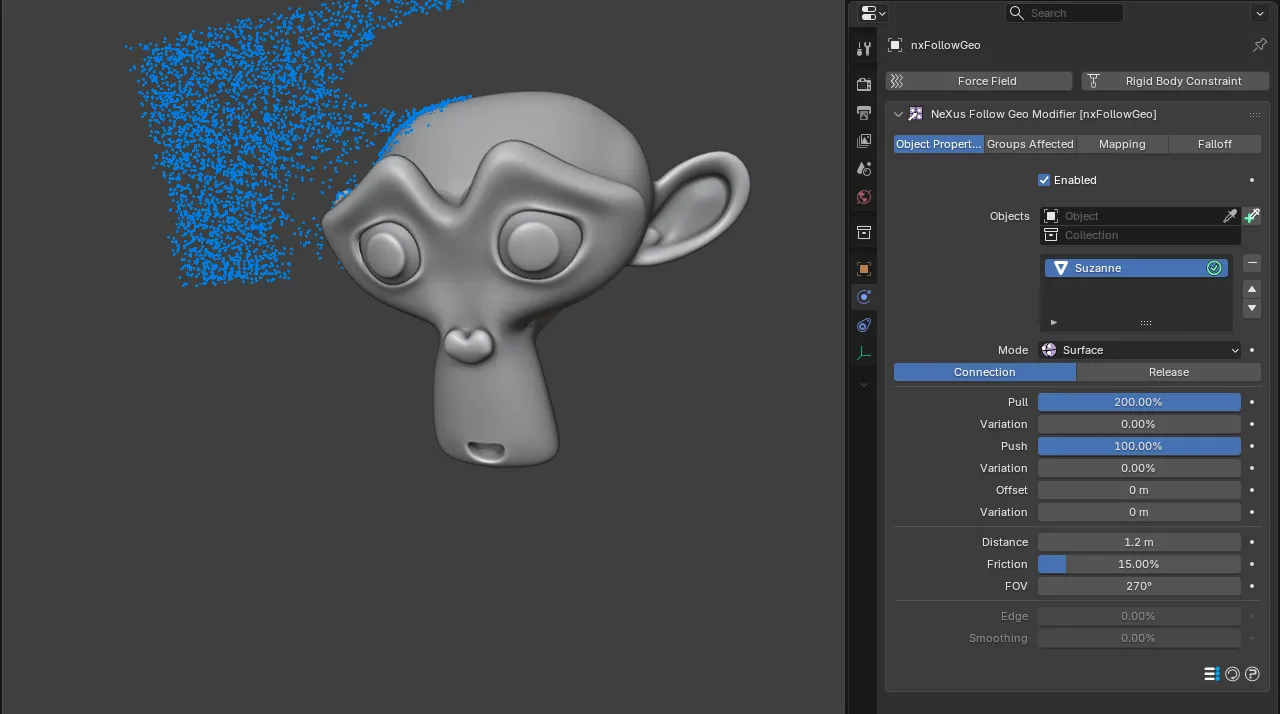
A mesh item in the Objects list. The Mode dropdown and the Connection and Release buttons sit above the surface-following controls, here catching a stream onto Suzanne.
Connection
Section titled “Connection”Sets how a particle locks onto the object and moves across it.
A force that pulls the particles onto the surface from up to the Distance away, holding them to it. Defaults to 200%. Its Variation adds a random amount per particle, so they do not all pull in equally. Defaults to 0%.
40%
400%
At a low Pull the particles barely cling to Suzanne and drift off her surface. At a high one they are held down firmly and hug her shape.
A force that pushes the particles away from the surface, out to the Offset. Defaults to 100%. Its Variation adds a random amount per particle. Defaults to 0%.
Offset
Section titled “Offset”The distance from the surface the particles settle at, once pulled and pushed into balance. Defaults to 0 m. Its Variation adds a random amount per particle, so they sit at varied heights. Defaults to 0 m.
Distance
Section titled “Distance”The distance from the object at which the Pull starts to act on a particle. Defaults to 0.1 m. Particles further away than this are left alone.
Friction
Section titled “Friction”A force that slows the particles down as they travel across the surface. Defaults to 0%. Raise it to make the particles crawl rather than slide.
0%
60%
At 0% Friction the particles keep their speed and slide freely across Suzanne. At a high value they are slowed as they travel, so they settle and crawl over her surface.
The field of view a particle uses to find a polygon to follow. Defaults to 270°. A wider angle lets a particle lock onto surfaces further to its sides.
Available when Mode is set to Edge. Sets how strongly the particles are drawn onto the mesh edges, for a tighter path along them. Defaults to 0%.
Smoothing
Section titled “Smoothing”Available when Mode is set to Edge. Adds a tangential component to the edge force, for a smoother path along the edges. Defaults to 0%.
Release
Section titled “Release”Sets whether and when the particles let go of the surface and return to normal motion.
Release Mode
Section titled “Release Mode”Sets the condition that releases the particles. Set as None, by default. The alternative is Time.
- None: the particles follow the surface indefinitely.
- Time: the particles are released after a set time.
Time Mode
Section titled “Time Mode”Available when Release Mode is set to Time. Sets how the release time is measured. Set as Particle Age, by default. The alternative is Frame Time.
- Particle Age: the time is counted from each particle’s birth.
- Frame Time: the time is counted in scene frames.
Release Time
Section titled “Release Time”Available when Release Mode is set to Time. Sets how long a particle follows the surface before it is released. Defaults to 30 frames. You can click the f label beside the value to switch it between frames and seconds. Its Variation adds a random amount per particle, so they do not all release together. Defaults to 0.
Following a spline
Section titled “Following a spline”When the object you add is a Curve, nxFollowGeo follows the spline instead of a surface, and the per-object settings change to four sections, selected with the buttons at the top: Connection, Extended Data, Release and Spline Data.
A stream crossing a curve is caught by it and runs along the spline, tracing the loop. Here the Mode is Guide with a high Attract Strength, so the particles lock onto the ring as they pass and follow it around.
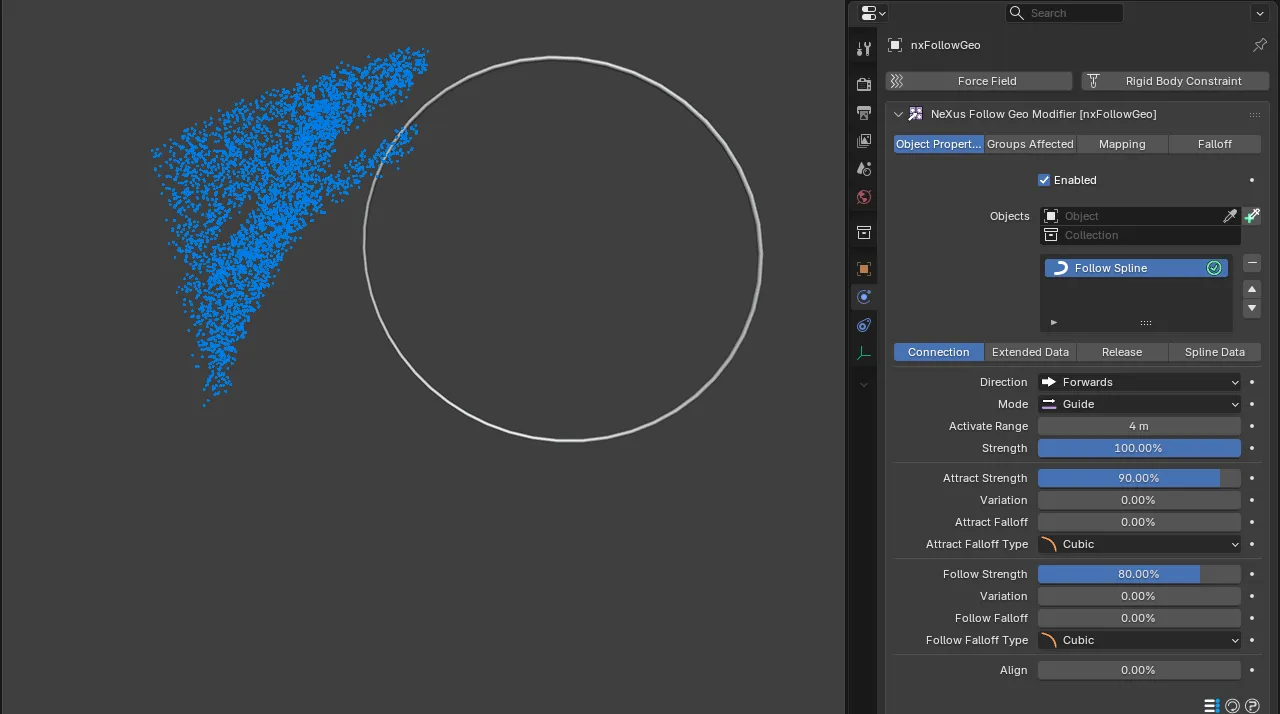
A Curve item in the Objects list. The four spline sections, Connection, Extended Data, Release and Spline Data, replace the mesh Mode and its two sections.
Spline Connection
Section titled “Spline Connection”Direction
Section titled “Direction”The direction the particles travel along the spline. Set as Forwards, by default. The alternative is Backwards.
How the spline acts on the particles. Set as Guide, by default. The alternative is Force.
- Guide: the spline steers the particles directly, as percentages of control.
- Force: the spline pulls on the particles as a physical force, set in distance.
Activate Range
Section titled “Activate Range”The distance from the spline at which it starts to affect the particles. Defaults to 2 m.
Strength
Section titled “Strength”The overall influence the spline has on the particles. Defaults to 100%.
Attract Strength
Section titled “Attract Strength”How strongly the particles are drawn toward the spline. In Guide mode it is a percentage, defaulting to 10%. In Force mode it is a distance, defaulting to 0.5 m. Its Variation adds a random amount per particle, defaulting to 0%.
Attract Falloff
Section titled “Attract Falloff”Eases the attraction off with distance from the spline. Defaults to 0%. The Attract Falloff Type sets the shape of that easing. Set as Cubic, by default. The other options are Flat, Linear and Quadratic.
Follow Strength
Section titled “Follow Strength”How strongly the particles are driven along the spline. In Guide mode it is a percentage, defaulting to 40%. In Force mode it is a distance, defaulting to 1 m. Its Variation adds a random amount per particle, defaulting to 0%.
Follow Falloff
Section titled “Follow Falloff”Eases the following force off with distance. Defaults to 0%. The Follow Falloff Type sets the shape of that easing. Set as Cubic, by default. The other options are Flat, Linear and Quadratic.
Aligns each particle’s direction to the spline’s tangent as it travels. Defaults to 0%.
Extended Data
Section titled “Extended Data”Adds optional Offset and Twist layers that shape the path around the spline. Add a layer with the + button and choose its type. A curve gets a default Offset layer added for you.
Offset
Section titled “Offset”Offsets the path sideways from the spline. Offset Value sets the distance, defaulting to 0.2 m, and Offset Blend mixes between the two sideways axes, defaulting to 50%. An Offset Along Length curve shapes the offset over the spline’s length.
Spirals the path around the spline. Twist Direction sets which way it winds, Clockwise by default, with Anti-clockwise the alternative. Twists sets the number of loops, defaulting to 0, and Twist Radius sets how wide the spiral is, defaulting to 0.1 m. A Radius Along Length curve shapes the radius over the spline’s length.
Spline Release
Section titled “Spline Release”Release Mode
Section titled “Release Mode”The condition that releases the particles from the spline. Set as Spline End, by default. The other options are Falloff, Time and Selection.
On Release
Section titled “On Release”What a particle does once released. Set as Do Nothing, by default. The other options are Loop, Reverse, Kill and Change Group.
- Do Nothing: the particle carries on with its normal motion.
- Loop: the particle jumps back to the start of the spline.
- Reverse: the particle turns around and travels back along the spline.
- Kill: the particle is killed.
- Change Group: the particle moves to a different group.
Distance
Section titled “Distance”How far along the spline, as a percentage of its length, a particle travels before it is released. Defaults to 100%.
Time Mode
Section titled “Time Mode”Available when Release Mode is set to Time. Sets how the release time is measured, Particle Age by default, with Frame Time the alternative. Release Time sets the duration, and its Variation adds a random amount per particle.
Spline Data
Section titled “Spline Data”Multi Segment
Section titled “Multi Segment”How the particles handle a spline with more than one segment. Set as Any Segment, by default. The other options are Specific Segment, Segments In Sequence and Nearest Segment. With Specific Segment, a Segment value picks which one.
Starting Mode
Section titled “Starting Mode”Where a particle joins the spline. Set as Nearest Point, by default. The other options are Nearest Vertex, Specific Vertex and Position Along Spline. Position Along Spline reveals a Position percentage and its Variation, and Specific Vertex reveals an Index value.
Groups Affected
Section titled “Groups Affected”Use the Groups Affected tab to restrict nxFollowGeo to particles in specific nxGroup groups, rather than affecting every particle.
Mapping
Section titled “Mapping”Use the Mapping tab to drive nxFollowGeo’s settings from particle data instead of fixed values, so a particle’s own attributes can change how it follows. See Mapping for how this works.
Falloff
Section titled “Falloff”Use the Falloff tab to limit where nxFollowGeo acts. Add one or more nxFalloff objects to the list and blend them, so only particles inside the falloff region follow the object.
Copyright © 2026 INSYDIUM LTD. All Rights Reserved.