

NeXus Hierarchy
The NeXus Hierarchy is the central place to organize your NeXus setup: it lists every NeXus object in the scene, sets the order they evaluate in and lets you build the relationships between them.
In Cinema 4D these relationships are handled in the object manager, by parenting objects and ordering the tree. Blender has no equivalent for NeXus objects, so the NeXus Hierarchy provides it. This is where you decide which objects belong together, which order they run in and which are active.
Opening the NeXus Hierarchy
Section titled “Opening the NeXus Hierarchy”The NeXus Hierarchy lives in the 3D viewport sidebar. Press N in the viewport to open the sidebar, then click the NeXus tab down the right-hand edge.
The tab only appears once NeXus is licensed and initialized. If you do not see it, check that the add-on is enabled and your license is active.
The panel has three sub-tabs across the top: Hierarchy, HUD and Document. Hierarchy is selected by default.
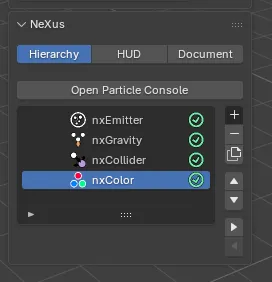
The NeXus sidebar tab on its Hierarchy page, with the Open Particle Console button and the list of NeXus objects in the scene. The row of buttons on the right adds, removes, duplicates and reorders entries.
Hierarchy
Section titled “Hierarchy”The Hierarchy tab is the object list. It shows every NeXus object in the scene as a tree, in the order NeXus evaluates them.
At the top is an Open Particle Console button, which opens the standalone Particle Console for inspecting the running simulation.
Below that is the list itself, with a column of buttons down its right-hand side.
The list
Section titled “The list”Each row is one NeXus object. From left to right a row shows:
- A collapse triangle, if the item has children. Click it to fold or unfold its branch.
- A cache indicator, shown when the object’s particles are cached. A partial icon means some frames are cached, a full icon means the whole range is cached.
- The object’s icon and its name. Click the name to rename the object in place.
- An enable toggle on the far right. Click it to switch that object on or off without removing it from the list.
Selecting a row selects that object in the viewport and switches the Properties editor to its Physics tab, so you can edit it straight away.
An object whose parent is disabled is grayed out in the list, since a disabled branch is inactive as a whole.
If the scene has no NeXus objects, the list shows No NeXus modifiers in scene.
Evaluation order and hierarchy
Section titled “Evaluation order and hierarchy”The top-to-bottom order of the list is the order NeXus evaluates the objects in. Reordering the list changes which object runs first. This matters when one object depends on another, for example a force that should act before a generator reads the result.
Items can also be nested. Indenting an object makes it a child of the item above it, which is how you express that objects belong together and how you group a set of related objects under one parent. A parent and its children move and enable as a unit.
List buttons
Section titled “List buttons”The column of buttons beside the list manages its contents:
- Add (
+): opens a menu to add a new object to the hierarchy. It offers a Folder plus the full set of NeXus objects, the same list as the viewport’s Add ▸ INSYDIUM NeXus menu, with a Search field at the top. - Remove (
-): deletes the selected item from the hierarchy. Removing an item also removes its children, and deletes the underlying objects from the scene. - Duplicate: creates a copy of the selected object, including all of its settings.
- Move Up / Move Down: reorder the selected item among its siblings, carrying any children with it.
- Indent: parents the selected item to the item directly above it, moving it one level deeper in the tree.
- Outdent: moves the selected item up one level in the tree, out of its current parent.
Folders
Section titled “Folders”A folder is an organizational container with no simulation behavior of its own. Use folders to group related objects and keep a complex setup readable.
Add a folder from the Add menu, then drag other items under it by indenting them. Click the folder’s icon to open a small popup where you set its Name and Color. The color is used for the folder’s icon in the list.
A folder has its own enable toggle. Disabling a folder cascades down and disables everything inside it. Re-enabling it restores the children to the state they were in before.
The HUD tab controls the viewport heads-up display, an overlay that reports live simulation stats while you play back.
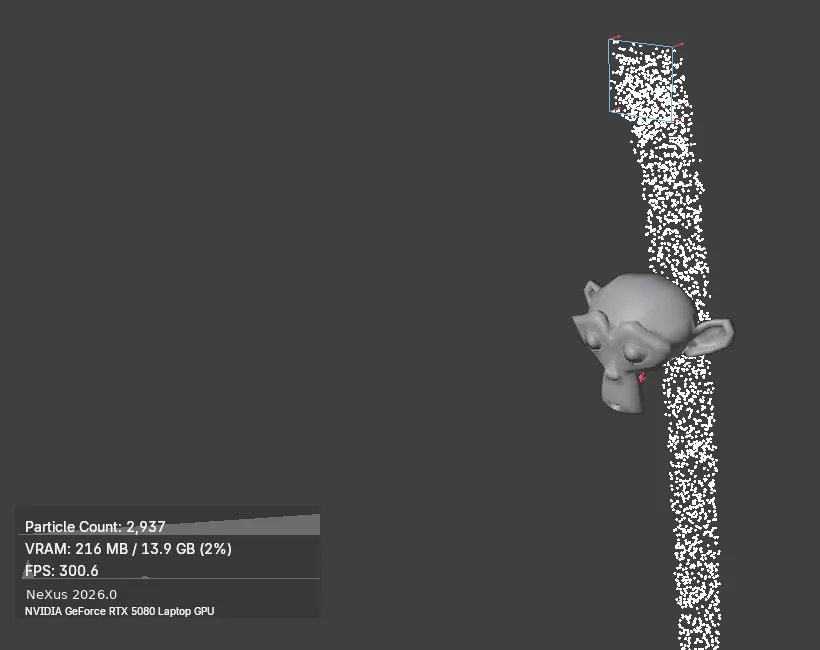
The HUD overlay in the viewport during playback. It draws the enabled stats, here the particle count, VRAM use and frame rate, along with the NeXus version and GPU name, in the corner over your simulation.
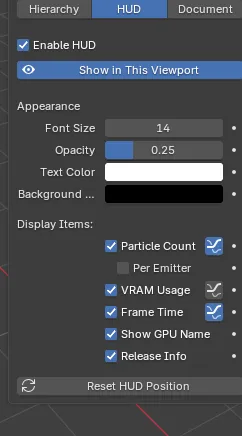
The HUD sub-tab, with the Enable HUD toggle, the per-viewport Show in This Viewport button, the Appearance settings and the Display Items list. The settings below are grayed until the HUD is enabled. New in 2026.0.1: Per Emitter
Enable HUD
Section titled “Enable HUD”Turns the overlay on or off. It is off by default. All of the settings below are only active while the HUD is enabled.
Show in this viewport
Section titled “Show in this viewport”Beside Enable HUD is a per-viewport visibility toggle, marked with an eye icon. It shows or hides the HUD in the current 3D viewport only. Enable HUD switches the overlay on across NeXus, while this toggle lets you keep it visible in one viewport and hidden in another.
Appearance
Section titled “Appearance”Font Size
Section titled “Font Size”The size of the HUD text, from 8 to 48. Defaults to 14.
Opacity
Section titled “Opacity”The opacity of the HUD’s background panel. Defaults to 0.25.
Text Color
Section titled “Text Color”The color of the HUD text. Defaults to white.
Background Color
Section titled “Background Color”The color of the HUD’s background panel. Defaults to black.
Display Items
Section titled “Display Items”Each of these toggles a readout on or off. Where a stat can be graphed, a small graph button beside it toggles a sparkline, a compact history plot drawn next to the value.
Particle Count
Section titled “Particle Count”The total number of live particles. Has a sparkline, on by default.
When this is enabled, a Per Emitter toggle appears indented beneath it. Turn it on to break the total down per emitter, listing each emitter by name with its own particle count below the total. Off by default. New in 2026.0.1
VRAM Usage
Section titled “VRAM Usage”GPU memory in use, shown as used against total with a percentage. Has a sparkline, off by default.
Frame Time
Section titled “Frame Time”How quickly NeXus evaluates the NeXus scene for the current frame, shown as frames per second (FPS). Has a sparkline, on by default.
Show GPU Name
Section titled “Show GPU Name”The name of the active GPU. On by default.
Release Info
Section titled “Release Info”The add-on version and build date. On by default.
Reset HUD Position
Section titled “Reset HUD Position”You can drag the HUD to reposition it directly in the viewport. The Reset HUD Position button returns it to its default corner.
Document
Section titled “Document”The Document tab holds scene-wide simulation settings.
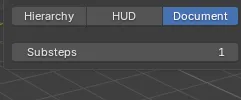
The Document sub-tab, with its single Substeps setting.
Substeps
Section titled “Substeps”The number of simulation substeps calculated per frame, from 1 to 100. Defaults to 1. Higher values divide each frame into more calculation steps, which improves stability for fast motion or stiff setups at the cost of speed.
Copyright © 2026 INSYDIUM LTD. All Rights Reserved.