

nxGenerator
nxGenerator instances a mesh at every active particle position, so your particles are drawn as real objects instead of points.
It works like Blender’s own instancing or a cloner: pick a source mesh and nxGenerator places a copy of it on each particle, following that particle’s scale, rotation and color. You can stack several meshes as weighted layers, so a share of the particles gets each one. All of its settings live in Properties ▸ Physics.
A single mesh instanced on every particle in the stream. The instances ride the particles as they arc across the scene, so the point cloud reads as a flow of solid objects.
Object Properties
Section titled “Object Properties”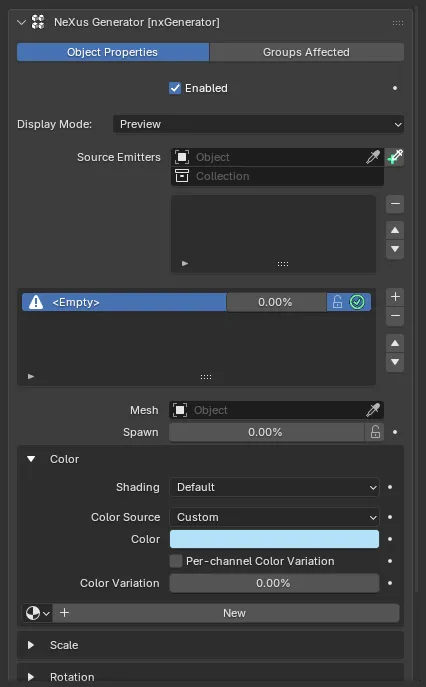
The nxGenerator panel in Properties ▸ Physics, on the Object Properties tab.
Enabled
Section titled “Enabled”Turns nxGenerator on or off. Disable it to stop instancing without deleting the object or losing its layer setup.
Display Mode
Section titled “Display Mode”Sets how the instances are drawn. Set as Preview, by default.
- Preview: a fast GPU-only viewport preview. The instances show in the viewport but are not visible to colliders, modifiers or render engines.
- Geometry: materializes the instances as real Blender geometry, using Instance on Points. The instances are then visible to colliders, other modifiers and the render engines, so you need this mode to render them.
Preview
Geometry
The same stream in each mode. Preview draws a fast, lightweight viewport preview of the instances. Geometry builds them as solid, shaded geometry that renders and takes part in collisions.
In Geometry mode the instances also pick up native motion blur in EEVEE and Cycles, following each particle’s velocity across the shutter so fast-moving instances render with proper blur. It applies automatically at render time and leaves the viewport and still frames unchanged. New in 2026.0.1
Source Emitters
Section titled “Source Emitters”Restricts nxGenerator to particles from specific emitters. Leave the list empty to instance on the particles of every emitter in the scene. Add one or more emitters to instance only on theirs.
Each entry has an enable toggle, so you can switch an emitter on or off in the list without removing it.
Layers
Section titled “Layers”The list of source meshes to instance. Each layer holds its own mesh and its own scale, color, rotation and animation settings.
Use the + and - buttons to add and remove layers, and the arrows to reorder them. Select a layer to reveal its settings below.
Every layer has a Spawn share, and the shares of all enabled layers always add up to 100%. This lets you mix meshes across the particles, for example 70% rocks and 30% pebbles. A layer also has an enable toggle and a lock, both on its list row.
Layer settings
Section titled “Layer settings”These settings apply to the layer currently selected in the list.
The mesh object to instance for particles assigned to this layer. Only mesh objects can be picked.
This layer’s share of the particles, as a percentage. Dragging one layer’s Spawn redistributes the remainder across the other enabled, unlocked layers so the total stays at 100%. With a single layer it holds at 100%.
Preserves this layer’s Spawn value when other layers’ sliders are dragged. You can still change a locked layer by dragging its own slider. Locked layers keep their share and only the unlocked layers rebalance.
Controls the shading and color of this layer’s instances.
Shading
Section titled “Shading”Sets how the instanced mesh is shaded. Set as Default, by default.
- Default: use the source mesh’s own per-face smooth and flat shading.
- Flat: force flat shading on every face.
- Smooth: force smooth shading by averaging the vertex normals.
Color Source
Section titled “Color Source”Sets where each instance’s color comes from. Set as Custom, by default.
- Custom: use the Color set on this layer.
- Mesh: use the source object’s viewport color.
- Particle: use the per-particle color from the simulation, so a modifier like nxColor can drive it.
The per-layer color, used when Color Source is Custom. Defaults to a blue.
Color Variation
Section titled “Color Variation”Adds a random per-particle shift to the color, so the instances are not all identical. Defaults to 0%, which applies the same color to every instance. Turn on Per-channel Color Variation to set independent amounts for the red, green and blue channels instead of one overall amount.
Instance Material
Section titled “Instance Material”The material applied to this layer’s instances. Leave it empty to use the source mesh’s material as-is. Use the + button to create a starter material already wired to the per-instance attributes, such as the particle color, so Color Source and Color Variation show up in a render.
Controls the size of this layer’s instances.
Scale Source
Section titled “Scale Source”Sets where each instance’s scale comes from. Set as Particle Radius, by default.
- Custom: use the Scale set on this layer.
- Mesh Scale: use the source object’s own transform scale.
- Particle Radius: use each particle’s radius, applied uniformly on all axes.
- Particle Scale: use each particle’s own per-axis scale from the simulation.
The per-layer scale, used when Scale Source is Custom. Defaults to 1.0. Turn on Per-axis Scale to set independent X, Y and Z values instead of one uniform value.
Scale Variation
Section titled “Scale Variation”Adds a random per-particle amount to the scale, so the instances vary in size. Defaults to 0%. Turn on Per-axis Scale Variation to set independent X, Y and Z amounts instead of one overall amount.
0%
80%
At 0% every instance is the same size. Raising it gives each instance its own random size, so the stream reads as a natural mix of large and small objects.
Rotation
Section titled “Rotation”Controls the orientation of this layer’s instances.
Rotation Source
Section titled “Rotation Source”Sets where each instance’s rotation comes from. Set as Particle, by default.
- Custom: use the Rotation set on this layer.
- Mesh: use the source object’s own transform rotation.
- Particle: use each particle’s rotation from the simulation, so the instances turn to follow the flow.
Forward Axis
Section titled “Forward Axis”Sets which local axis of the mesh points along the particle’s direction of travel. Shown when Rotation Source is Particle. Set as +Y, by default. The other options are +X, -X, -Y, +Z and -Z. Use it to line a model up with the flow, for example to make an arrow or a fish face the way it is heading.
Rotation
Section titled “Rotation”The per-layer rotation, used when Rotation Source is Custom. Turn on Per-axis Rotation to set independent X, Y and Z angles instead of one uniform angle.
Rotation Variation
Section titled “Rotation Variation”Adds a random per-particle turn to the rotation, so the instances do not all face the same way. Defaults to 0%, measured as a share of a full turn. Turn on Per-axis Rotation Variation to set independent amounts for pitch, heading and bank.
Animation
Section titled “Animation”Freeze Animation
Section titled “Freeze Animation”Locks the instances to the source mesh’s pose at the moment you turn this on, so an animated or deforming source stops updating and every instance holds that frozen shape. The captured frame is shown alongside, and the refresh button re-captures the current frame. Off by default.
Groups Affected
Section titled “Groups Affected”Use the Groups Affected tab to restrict nxGenerator to particles in specific nxGroup groups, rather than instancing on every particle. Leave it empty to affect all particles.
Copyright © 2026 INSYDIUM LTD. All Rights Reserved.