

nxEmitter
nxEmitter is the source of your particles. It is where particles are born, and it sets their starting shape, speed, radius, mass and lifespan.
Add it from Add ▸ INSYDIUM NeXus ▸ nxEmitter. It arrives as an empty carrying the emitter, and it is usually the first NeXus object you add to a scene. Every other NeXus modifier acts on the particles that this emitter produces. All of its settings live in Properties ▸ Physics.
A wide rectangular emitter raining a steady shower of particles down onto Suzanne. The rectangle is the birth source: particles appear across its area and flow away at their initial speed, breaking over her surface below.
The emitter panel has five tabs: Object Properties, Display, Export, Groups and Modifiers.
Object Properties
Section titled “Object Properties”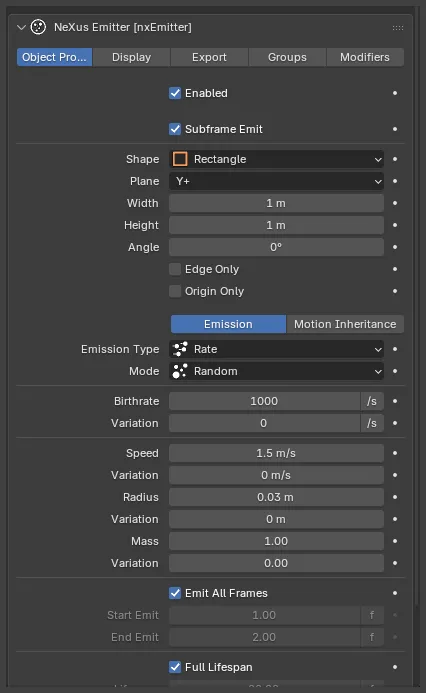
The nxEmitter panel in Properties ▸ Physics, on the Object Properties tab. This tab sets the emission shape and, on the nested Emission and Motion Inheritance tabs, how and when particles are born.
Enabled
Section titled “Enabled”Turns nxEmitter on or off. Disable it to stop it producing particles without deleting it.
Subframe Emit
Section titled “Subframe Emit”Emits particles randomly distributed across each frame’s time interval, rather than all at the start of the frame. On by default. This smooths out the visible bands that can appear along a fast stream, and it matters most when the emitter itself is animated. Normally you should leave it on.
Sets the shape of the emission area, which is where particles are born. Set as Rectangle, by default. The other options are Disc, Sphere, Box and Object.
- Rectangle: a flat rectangular area.
- Disc: a flat circular area.
- Sphere: a spherical volume.
- Box: a box volume.
- Object: emit from the surface or volume of one or more mesh, curve or curves objects or from an nxFluids domain used as a volume source.
The controls below the Shape menu change with the shape you pick.
Rectangle
Sphere
The same settings, on two shapes. The Rectangle is born as a flat sheet that streams away along its Plane, on the left. The Sphere is a volume that fires particles radially outward along its surface normals, on the right.
Sets the direction particles are initially emitted, along one of the emitter’s axes. Set as Y+, by default. The other options are X+, X-, Y-, Z+ and Z-. This control is shown for every shape except Object.
Width, Height
Section titled “Width, Height”The size of the Rectangle emission area. Both default to 1m. You can also drag the yellow handles in the viewport to resize it.
Radius
Section titled “Radius”The radius of the Disc or Sphere emission area. Defaults to 0.5m. You can also drag the yellow handle in the viewport.
The X, Y and Z size of the Box emission volume. Defaults to 1m on each axis. You can also drag the yellow handles in the viewport.
Objects
Section titled “Objects”Shown when Shape is set to Object. Add the mesh, curve or curves objects you want to emit from to this list. You can also add an nxFluids domain as a volume source. Each object in the list has its own settings:
- Selection: choose whether to weight emission by a Vertex Group or by a point float Attribute, then pick the group or attribute. Particles are then born only where the weight is high enough.
- Region: whether this object emits particles or carves them out. Include emits from the object, Exclude removes any particles that fall inside it. Set as Include, by default.
- Emit From: where on the object particles are born. The options are Polygon Center, Polygon Area, Points, Edges and Volume. Polygon Area weights emission by polygon size, so larger polygons emit more. In Regular and Hexagonal mode this collapses to Volume only.
- One per Element: shown for Polygon Center, Points and Edges. Emits one particle per polygon, vertex or edge.
- Threshold: the cutoff for the vertex group or attribute weight. Particles are born only where the weight is above this value.
- Direction: the direction particles leave the surface. Set as Normal, by default. The alternatives are Random, Phong Normal and the six axis directions.
Shown for the Rectangle and Disc shapes. Spreads the emission direction into a cone, in degrees. Defaults to 0, which fires particles straight along the Plane direction. Raise it to broaden the spread.
Direction
Section titled “Direction”Shown for the Sphere and Box shapes, where particles are emitted in 3D rather than along a plane. Set as Normal, by default, so particles fire outward from the surface. The other options are Random and the six axis directions.
Edge Only
Section titled “Edge Only”Shown for the Rectangle and Disc shapes. Emits particles only from the edge of the shape rather than across its whole area. Available in Random mode when Origin Only is off.
Origin Only
Section titled “Origin Only”Shown for the Rectangle and Disc shapes. Emits all particles from the emitter’s origin point. Available in Random mode when Edge Only is off.
Surface Only
Section titled “Surface Only”Shown for the Sphere and Box shapes. Emits particles only from the surface of the volume rather than throughout its interior. Available in Random mode.
Emission
Section titled “Emission”The Emission tab, nested inside Object Properties, controls how many particles are born, when they are born and the values they start life with.
Emission Type
Section titled “Emission Type”How particles are emitted over time. Set as Rate, by default. The other options are Pulse, Shot, Liquid Fill and Liquid Flow.
- Rate: continuous emission every frame at the Birthrate.
- Pulse: repeating bursts of emission separated by a gap.
- Shot: a single burst of a set number of particles.
- Liquid Fill: fill a volume with liquid in one pass at the start, for a body of liquid that then settles under gravity.
- Liquid Flow: pour liquid in continuously as an inflow.
The two liquid types emit densely packed particles for a fluid simulation and replace the normal birthrate controls with the Liquid controls below.
Rate
Shot
Rate, on the left, emits a steady stream every frame, so the curtain keeps flowing. Shot, on the right, releases its whole Count in one burst that falls away as a single clump.
Liquid
Section titled “Liquid”Shown when Emission Type is Liquid Fill or Liquid Flow. These controls set up the liquid this emitter feeds into a FLIP fluid.
- Fluid: the nxFluids domain this emitter feeds. The domain is the volume the liquid is simulated in.
- Solver: shown when the Fluid target is an nxFluids domain. It sets that domain’s fluid solver (FLIP, APIC, PBD or SPH) here, so you can pick the solver without selecting the domain. See nxLiquid for what each solver does.
- Resolution: the number of voxels along the longest side of the fluid domain. Defaults to 50. Higher values give a finer, more detailed simulation.
- Fill Level: fills the lower portion of the volume with liquid, as a percentage. Defaults to 30%. Shown for Liquid Fill only.
- Show Fill Level: draws the fill surface in the viewport, so you can see the liquid level before you solve. Shown for Liquid Fill only.
- Speed: the speed the liquid is poured in at. Shown for Liquid Flow only.
Both liquid types also keep the Full Lifespan, Lifespan and Variation lifespan controls below. In Liquid Flow mode the emitter additionally shows the Emit All Frames, Start Emit and End Emit timing controls, which set when the pour runs.
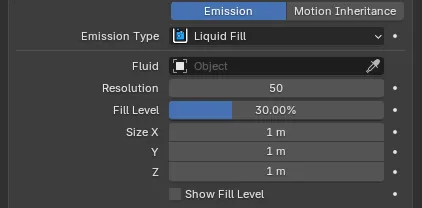
The Emission controls with Emission Type set to Liquid Fill, exposing the Fluid target, Resolution and Fill Level.
You rarely build a liquid setup by hand. The nxLiquid Fill and nxLiquid Flow entries in Add ▸ INSYDIUM NeXus build a full FLIP setup in one click: an nxEmitter set to the liquid type, a FLIP nxFluids domain, an optional nxMesher render surface, optional nxFoam whitewater driven through an nxGroup and gravity, all parented under one empty. A Water, Thick Viscous or Thin Viscous preset sets the starting viscosity and surface tension. See nxLiquid for the full workflow.
Shown for the Rate and Shot types. Sets how emitted particles are distributed across the shape. Set as Random, by default. The other options are Regular and Hexagonal.
- Random: particles are placed at random positions.
- Regular: particles are packed onto a regular grid with no overlap.
- Hexagonal: particles are packed hexagonally, fitting more into the same volume than Regular.
Regular and Hexagonal pack particles so they do not overlap at birth, which is useful for fluid simulations where overlapping particles can be unstable. In these two modes the Birthrate and Count are replaced by the packing controls below, and for the primitive shapes the panel shows an estimate of how many particles each emission will produce.
The same emission, held in place at birth, in each of the three modes. Notice how the panel changes with the mode.
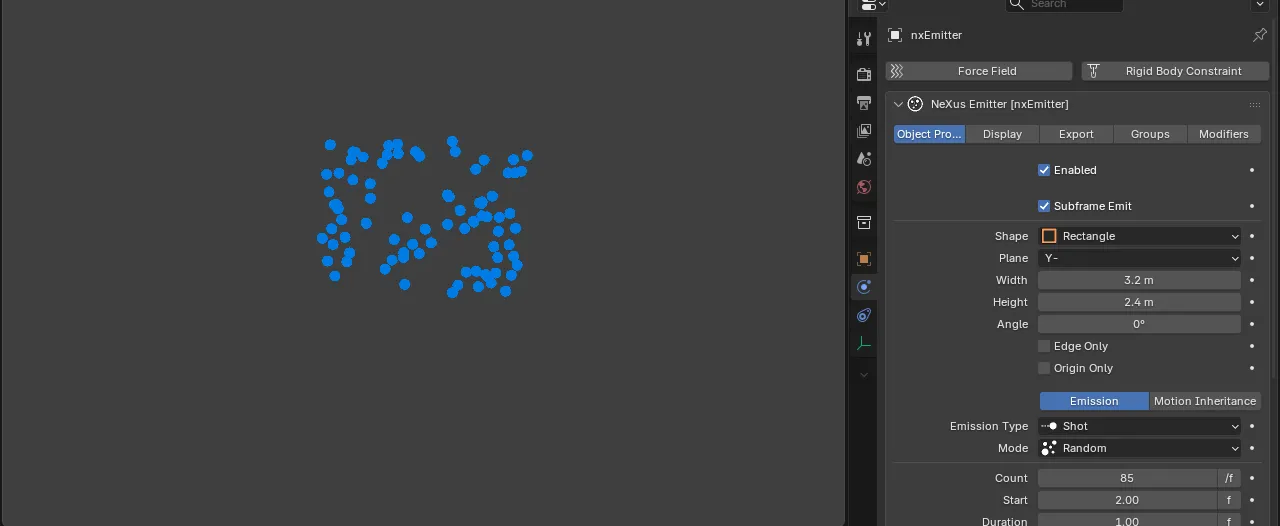
Random scatters the particles, so they clump in some places and leave gaps in others. The shot is set by a Count.
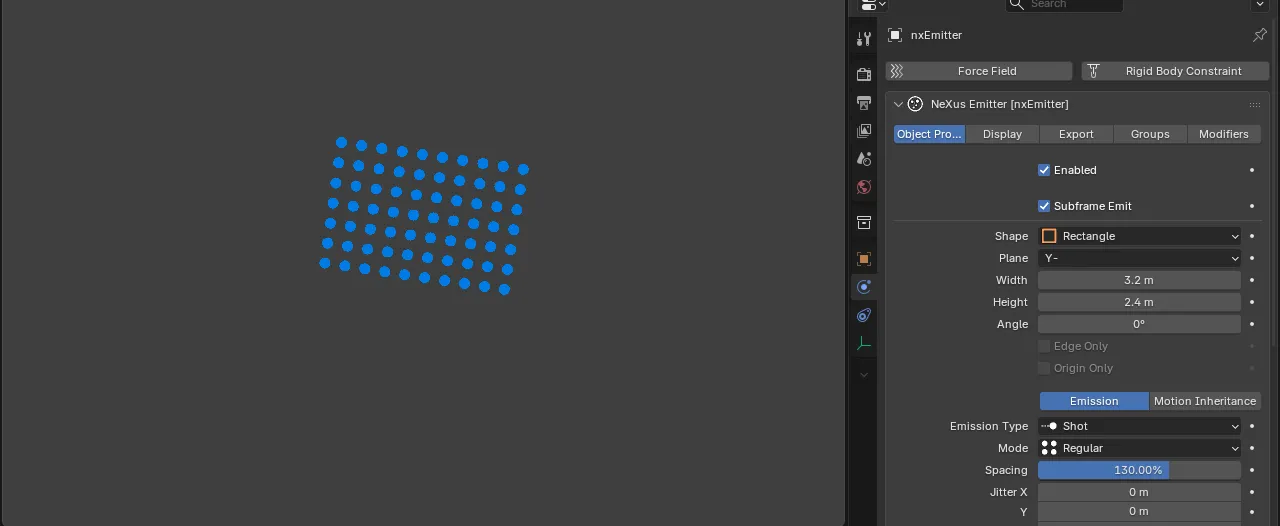
Regular packs them onto an even, aligned grid with no overlap, and replaces Count with a Spacing.
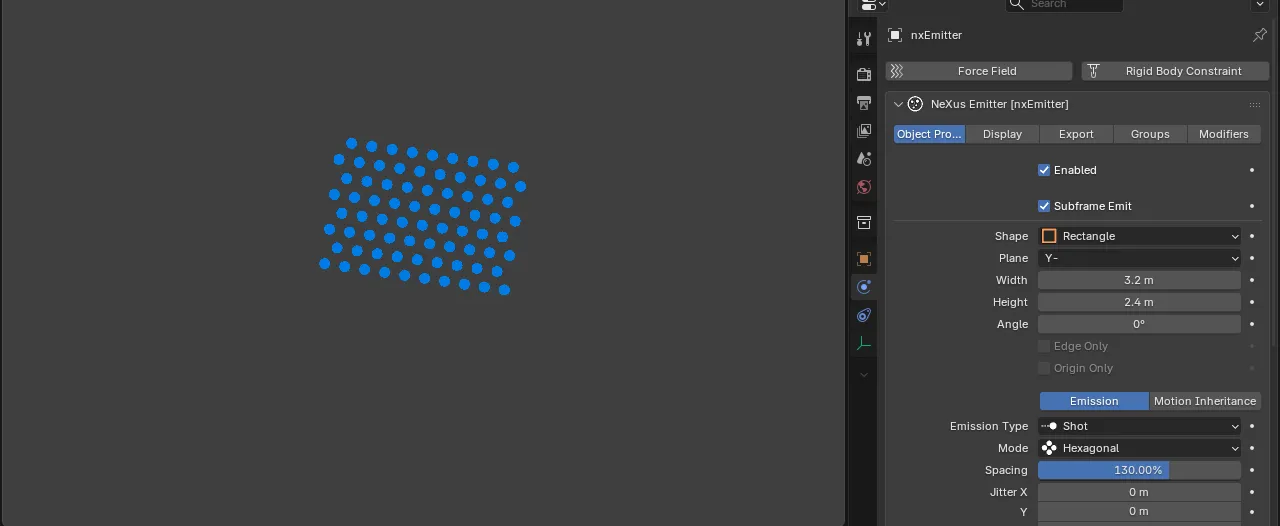
Hexagonal packs them in staggered rows, fitting more into the same area than Regular. It uses the same Spacing control.
Spacing
Section titled “Spacing”Shown in Regular and Hexagonal modes. The spacing between packed particles, as a percentage of the particle diameter. Defaults to 100%. Larger values leave more space between particles, so fewer are emitted.
Jitter
Section titled “Jitter”Shown in Regular and Hexagonal modes. A per-axis random offset added to each particle position at birth, to break up the regularity of the grid. Defaults to 0 on each axis.
Shown for the Shot type in Random mode. The number of particles in the shot. Defaults to 100.
Shown for the Shot type. The frame at which the shot begins. Defaults to frame 2.
Duration
Section titled “Duration”Shown for the Shot type. How long the shot lasts. Defaults to 1. Set it to 1 to release the whole shot on a single frame.
Pulse Start, Length, Interval
Section titled “Pulse Start, Length, Interval”Shown for the Pulse type. Start is the frame the pulse cycle begins (default 0), Length is how long each pulse lasts (default 10) and Interval is the gap between pulses (default 10). For a single pulse, set Interval higher than the length of your scene.
Birthrate
Section titled “Birthrate”The number of particles emitted, per second or per frame. Defaults to 1000. Shown for the Rate and Pulse types in Random mode, where it sets the rate per frame or the count per pulse. In Regular and Hexagonal mode it is replaced by the packing controls, and the Shot type uses Count instead. Click the f/s toggle beside the field to switch between per-second and per-frame.
Variation (Birthrate)
Section titled “Variation (Birthrate)”Adds a random amount to the Birthrate so the emission rate is not perfectly steady. Defaults to 0.
The initial speed each particle is born with, in the Plane or Direction direction. Defaults to 1.5 m/s. Set it to 0 to have particles hold their birth position, which is useful for filling a volume or for one-shot static setups.
Variation (Speed)
Section titled “Variation (Speed)”Adds a random amount to the Speed, so particles are not all born at the same speed. Defaults to 0. Raising it spreads the stream out.
Radius
Section titled “Radius”The physical radius of each particle. Defaults to 0.03m. This is used by collisions and by other modifiers, and it sets the particle size in the viewport for the solid display shapes.
Variation (Radius)
Section titled “Variation (Radius)”Adds a random amount to the Radius, so particles are born at a range of sizes. Defaults to 0.
The mass of each particle. Defaults to 1. Heavier particles carry more momentum, so forces such as nxDrag and nxWind take longer to change their motion.
Variation (Mass)
Section titled “Variation (Mass)”Adds a random amount to the Mass, so particles are born with a range of masses. Defaults to 0.
Emit All Frames
Section titled “Emit All Frames”Emits particles on every frame, from the start of the scene onward. On by default. Turn it off to set an emission window with Start Emit and End Emit.
Start Emit, End Emit
Section titled “Start Emit, End Emit”Enabled when Emit All Frames is off. The frames at which emission starts and stops. Start Emit defaults to frame 1 and End Emit to frame 2.
Full Lifespan
Section titled “Full Lifespan”Particles live for the entire simulation and are never removed by age. On by default. Turn it off to give particles a set lifespan.
Lifespan
Section titled “Lifespan”Enabled when Full Lifespan is off. The lifetime of each particle. Once a particle’s age passes this value it is removed from the scene. Defaults to 90.
Variation (Lifespan)
Section titled “Variation (Lifespan)”Adds a random amount to the Lifespan, so particles do not all die at the same age. Defaults to 0.
Motion Inheritance
Section titled “Motion Inheritance”The Motion Inheritance tab, nested inside Object Properties, lets particles inherit the emitter’s own motion at birth. It has no effect if the emitter is static.
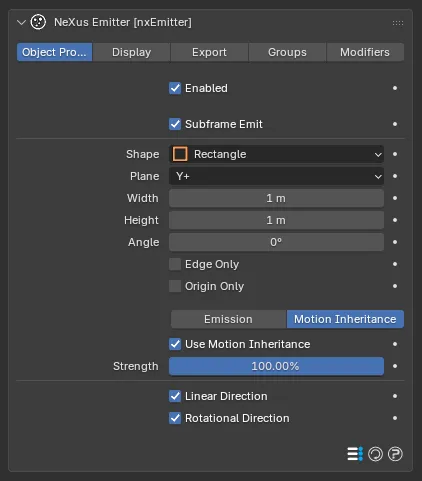
The Motion Inheritance sub-tab, with Use Motion Inheritance on so the Strength, Linear Direction and Rotational Direction controls are active.
Use Motion Inheritance
Section titled “Use Motion Inheritance”Turns motion inheritance on. Off by default. The Strength, Linear Direction and Rotational Direction controls below are grayed out until it is on.
Strength
Section titled “Strength”How much of the emitter’s motion is added to each particle’s starting velocity. Defaults to 100%. At 0% it behaves as if inheritance were off.
Linear Direction
Section titled “Linear Direction”Inherit velocity from the emitter’s linear (positional) motion. On by default.
Rotational Direction
Section titled “Rotational Direction”Inherit velocity from the emitter’s rotational motion. On by default.
Display
Section titled “Display”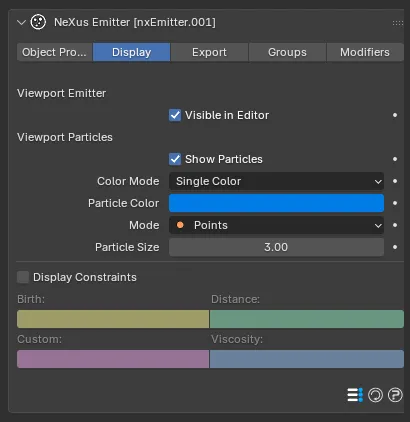
The Display tab controls how the emitter and its particles are drawn in the viewport. It does not change the simulation.
Visible in Editor
Section titled “Visible in Editor”Shows or hides the emitter’s shape gizmo in the viewport, under the Viewport Emitter heading. Turn it off to keep the emitter shape from cluttering the view.
Show Particles
Section titled “Show Particles”Shows or hides the particles in the viewport, under the Viewport Particles heading. On by default.
Color Mode
Section titled “Color Mode”How particles are colored in the viewport. Set as Single Color, by default. The other options are Gradient, Noise, Texture and Material.
- Single Color: one Particle Color for all particles.
- Gradient: color particles along a gradient driven by a particle attribute (the Parameter), such as speed, age or radius, with an auto-scaled or manual value range. When the Parameter is Direction or Rotation a Direction Axis selector (Heading, Pitch, Bank or the three combined) picks which component drives the gradient.
- Noise: color particles at birth from a noise pattern, with a full set of noise controls (type, seed, scale, octaves and more).
- Texture: sample color from an image at the particle’s birth point, using a UV map.
- Material: sample the source object’s own material at the birth point.
Particle Color
Section titled “Particle Color”Shown when Color Mode is Single Color. The display color of all particles. Defaults to a mid blue.
How each particle is drawn. Set as Points, by default. The other options are Square, Line, Box 3D, Box 3D Filled, Circle, Circle Filled, Pyramid, Pyramid Filled, Arrow, Arrow Filled, Axis, Sphere, Screen Space Fluid and None.
The point and shape modes draw fast, lightweight markers. Screen Space Fluid renders the particles as a fluid surface and is only available with the accelerated viewport. None hides the particle drawing.
Some modes reveal extra controls: Points has a Particle Size in pixels, the line and arrow modes add length controls, the 3D shape modes add particle rotation controls and Screen Space Fluid adds a set of fluid rendering presets and controls.
Display Constraints
Section titled “Display Constraints”Draws the inter-particle constraint lines (from nxConstraints) in the viewport. Off by default. When on, four color swatches set the line color for Birth, Distance, Custom and Viscosity connections.
Export
Section titled “Export”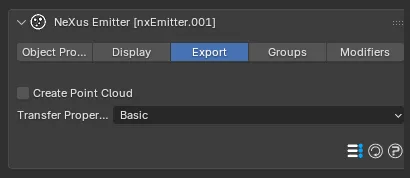
The Export tab turns the live particles into a Blender point cloud, so you can render them and drive geometry or shader nodes from their data.
Create Point Cloud
Section titled “Create Point Cloud”Creates a Blender point cloud object from the particle data, rebuilt every frame. Off by default. The point cloud is the bridge to Blender’s renderer and to the Particle Info node.
Transfer Properties
Section titled “Transfer Properties”Which particle properties are written onto the point cloud. Set as Basic, by default. The other options are All and Custom.
- Basic: transfers Velocity, Color, Radius and Rotation.
- All: transfers every available channel.
- Custom: shows a grid of per-channel toggles so you can pick exactly what to transfer.
The full set of channels is Velocity, Color, Radius, Rotation, Mass, Age, Display Mode, Group, Emitter Index, Scale, Life, ID, Distance, Granular, Fluid Surface, Density, Smoke, Temperature and Fuel. The transferred channels are surfaced on the point cloud through the Particle Info node, ready for use in geometry and shader node trees.
Groups
Section titled “Groups”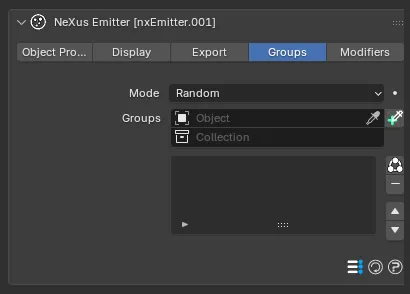
The Groups tab assigns the particles this emitter produces to one or more nxGroup groups, so other modifiers can act on just those groups.
How particles are assigned to the groups in the list. The options are Random, Sequential and First Group Only.
- Random: each particle is put in a random group from the list.
- Sequential: particles are put in the groups in turn.
- First Group Only: all particles go into the first group.
Groups
Section titled “Groups”The list of nxGroup objects the particles are assigned to. Add existing groups to the list, or use the button beside it to create a new nxGroup and add it in one step.
Modifiers
Section titled “Modifiers”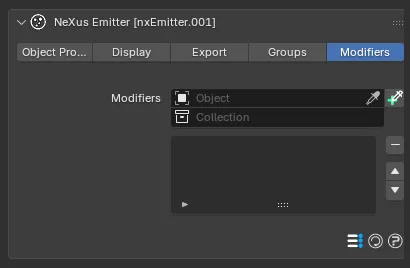
The Modifiers tab holds a list that scopes which NeXus modifiers affect this emitter’s particles. Use it when you want a modifier to act on some emitters but not others, rather than on every particle in the scene. Add the modifier objects to the list to control their effect on this emitter.
Copyright © 2026 INSYDIUM LTD. All Rights Reserved.