

nxSpin
nxSpin spins and orients your individual NeXus particles, from a steady tumble to aiming each particle along its path or at the camera. It works as a stack of layers, so you can combine several operations and blend them together.
nxSpin turns each particle on its own axes rather than moving it through the scene. The effect shows on particles that carry geometry, such as instances built with nxGenerator; on plain particle points there is nothing to see turning.
Add it from Add ▸ INSYDIUM NeXus ▸ nxSpin. It arrives as an empty. Add one or more layers, set each to an operation, then blend them. All of its settings live in Properties ▸ Physics.
A cloud of instanced cubes raining onto Suzanne, tumbling as a Spin layer turns each particle on its own axes. The cubes carry the particle rotation, so the spin is visible.
Object Properties
Section titled “Object Properties”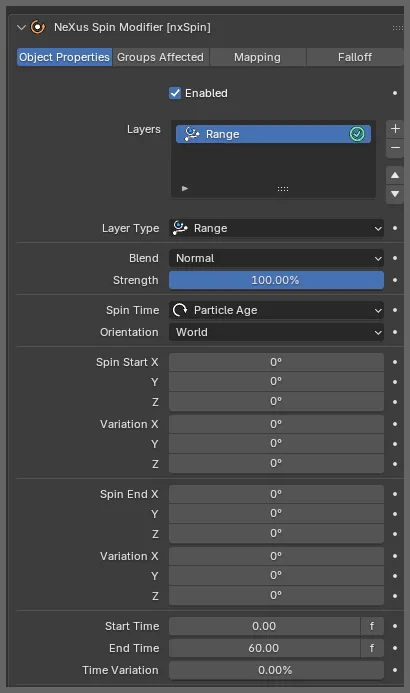
The nxSpin panel in Properties ▸ Physics, on the Object Properties tab, showing a Range layer.
Enabled
Section titled “Enabled”Turns nxSpin on or off. Disable it to switch off its effect without deleting it.
Layers
Section titled “Layers”The stack of spin layers. Use the + button to add a layer, choosing its operation from the menu that appears, and the - button to remove the selected one. Each layer has an enable toggle on the right of its row, so you can switch a layer on or off without removing it.
Layers are processed from the top of the stack down, each blending with the result of the layers above it. Select a layer to show its settings underneath.
Layer Settings
Section titled “Layer Settings”These settings apply to the layer selected in the Layers list.
Layer Type
Section titled “Layer Type”Sets the operation this layer performs. A new nxSpin starts with a Range layer. The layer types are Spin, Incremental Spin, Rotate, Tangential, Facing, Roll and Range, each described below.
Sets how this layer combines with the layers above it. Set as Normal, by default. The other options are Add, Subtract, Multiply, Difference, Screen, Overlay, Min and Max.
Strength
Section titled “Strength”Sets how strongly this layer contributes to the blend. Defaults to 100%.
Turns each particle by a set amount, over and over, for a continuous tumble.
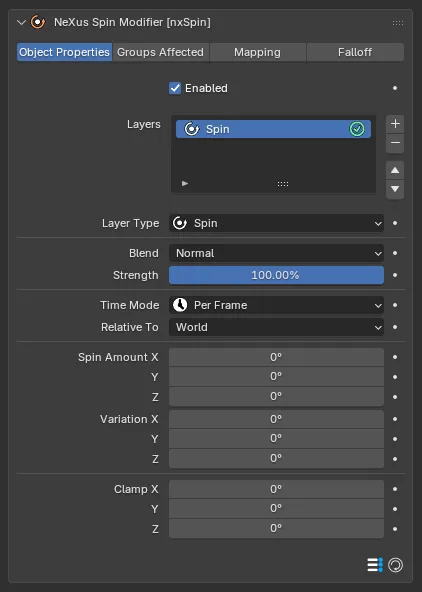
The Spin layer settings.
Time Mode
Section titled “Time Mode”Sets how the spin is timed. Set as Per Frame, by default. The other options are Per Second and On Birth.
- Per Frame: the Spin Amount is applied each frame.
- Per Second: the Spin Amount is scaled to apply per second, allowing for the frame rate.
- On Birth: the spin is applied once, when the particle is born.
Relative To
Section titled “Relative To”Sets the space the spin is applied in. Set as World, by default. The alternative is Particle.
- World: the spin is applied around the world axes.
- Particle: the spin is applied around the particle’s own local axes.
Spin Amount
Section titled “Spin Amount”The rotation applied on each of the X, Y and Z axes, in degrees. Negative values spin the other way.
Low
High
A held cloud of instanced cubes, so only the spin moves them. At a low Spin Amount, on the left, the cubes barely turn. At a high one, on the right, they tumble quickly on their own axes.
Variation
Section titled “Variation”Adds a random amount to the Spin Amount on each axis, so the particles do not all spin alike.
Limits the total spin that can build up on each axis, in degrees.
Incremental Spin
Section titled “Incremental Spin”Builds the spin speed up over time, adding to it each step rather than applying a fixed amount, so the particles spin faster the longer they are affected.
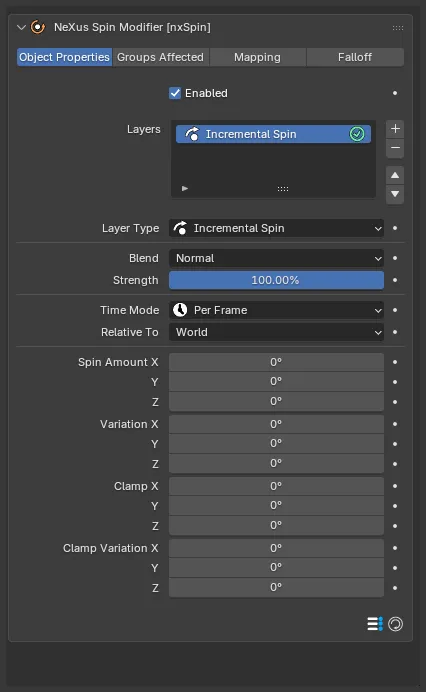
The Incremental Spin layer settings.
Time Mode
Section titled “Time Mode”Set as Per Frame, by default. The alternative is Per Second. It works as it does for the Spin operation.
Relative To
Section titled “Relative To”World or Particle, as for the Spin operation. Set as World, by default.
Spin Amount
Section titled “Spin Amount”The amount added to the spin speed each frame, on each axis.
Variation
Section titled “Variation”Adds a random amount to the Spin Amount on each axis.
Limits the spin speed each axis can build up to, in degrees, with its own Clamp Variation for a per-particle spread.
Rotate
Section titled “Rotate”Sets each particle to a specific rotation, rather than spinning it continuously.
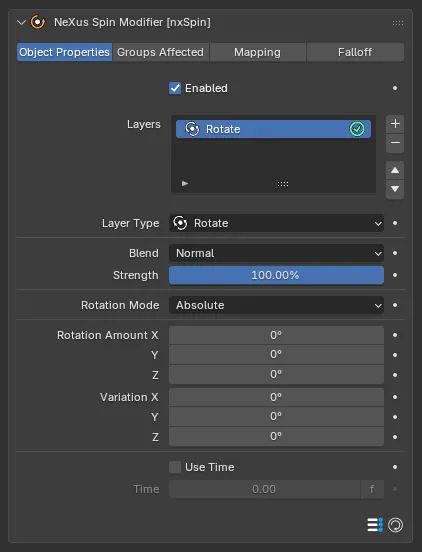
The Rotate layer settings.
Rotation Mode
Section titled “Rotation Mode”Sets how the rotation is applied. Set as Absolute, by default. The alternative is Relative.
- Absolute: the particle is set to the Rotation Amount value.
- Relative: the Rotation Amount value is added to the particle’s current rotation.
Rotation Amount
Section titled “Rotation Amount”The target rotation, in degrees on each axis.
Variation
Section titled “Variation”Adds a random amount to the Rotation on each axis.
Use Time
Section titled “Use Time”When on, the particle turns to the rotation over the time set in Time, rather than snapping to it at once. Off by default.
The time the rotation change takes. Available only when Use Time is on. A value of 0 makes the change immediate.
Tangential
Section titled “Tangential”Turns each particle to point along its direction of travel.
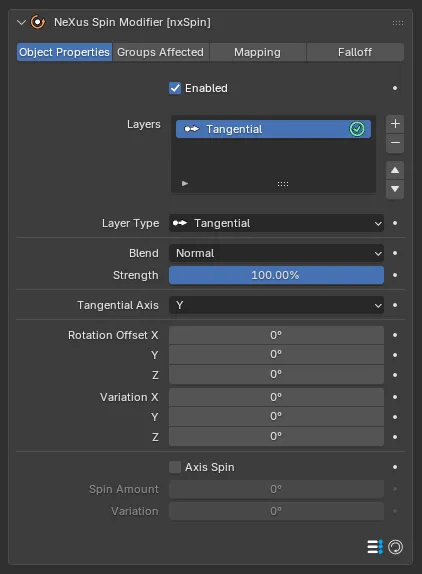
The Tangential layer settings.
Tangential Axis
Section titled “Tangential Axis”Sets which of the particle’s axes points along its direction of travel. Set as Y, by default. The alternatives are X and Z.
Rotation Offset
Section titled “Rotation Offset”Adds a fixed rotation on each axis on top of the tangential alignment.
Variation
Section titled “Variation”Adds a random amount to the Rotation Offset on each axis.
Axis Spin
Section titled “Axis Spin”When on, the particle also spins around the tangential axis. Off by default.
Spin Amount
Section titled “Spin Amount”The rotation around the tangential axis each frame. Available only when Axis Spin is on.
Variation
Section titled “Variation”Adds a random amount to the Spin Amount.
Facing
Section titled “Facing”Turns each particle to face a target, updated every frame so it keeps facing as it moves.
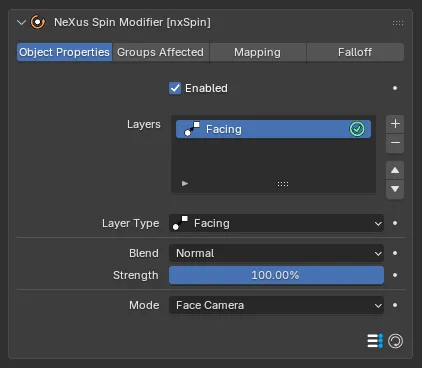
The Facing layer settings, with Mode set to Face Camera.
Sets what the particle faces. Set as Face Camera, by default. The other options are Face Object and Face Screen.
- Face Camera: the particle points at the active camera.
- Face Object: the particle points at the object set in Target.
- Face Screen: the particle stays face-on to the screen, regardless of camera movement.
Target
Section titled “Target”The object to face. Available only when Mode is set to Face Object.
Rolls each particle based on its motion, as if it were rolling along a surface. It has no settings of its own, so its layer panel shows only the shared Layer Type, Blend and Strength controls.
Interpolates each particle’s rotation from a Spin Start to a Spin End over a time window. This is the operation the modifier’s first layer uses, so its layer settings are the ones shown in the Object Properties panel near the top of this page.
Spin Time
Section titled “Spin Time”Sets what the transition is timed against. Set as Particle Age, by default. The other options are On Birth and Frame Time.
- On Birth: the Spin End is applied once at birth. The Start Time, End Time, Time Variation, Clamp Mode and Ease controls are then hidden.
- Particle Age: timed by how old each particle is.
- Frame Time: timed by scene frames.
Orientation
Section titled “Orientation”World or Particle, as for the Spin operation. Set as World, by default.
Spin Start
Section titled “Spin Start”The rotation to transition from, in degrees on each axis, with its own Variation for a per-particle spread.
Spin End
Section titled “Spin End”The rotation to transition to, in degrees on each axis, with its own Variation.
Start Time / End Time
Section titled “Start Time / End Time”The window over which the transition happens.
Time Variation
Section titled “Time Variation”Adds a random spread to the transition timing. Defaults to 0%.
Clamp Mode
Section titled “Clamp Mode”Sets how the transition behaves outside the time window. Set as Clamp, by default. The other options are Clamp In Range, Repeat and Continue.
A curve that eases the transition between Spin Start and Spin End.
Groups Affected
Section titled “Groups Affected”Use the Groups Affected tab to restrict nxSpin to particles in specific nxGroup groups, rather than affecting every particle.
Mapping
Section titled “Mapping”Use the Mapping tab to drive nxSpin’s settings from particle data instead of fixed values, so a particle’s own attributes can change the spin it feels. See Mapping for how this works.
Falloff
Section titled “Falloff”Use the Falloff tab to limit where nxSpin acts. Add one or more nxFalloff objects to the list and blend them, so the spin only affects particles inside the falloff region.
Copyright © 2026 INSYDIUM LTD. All Rights Reserved.