

Installation and Licensing
Install NeXus for Blender from INSYDIUM’s extension repository, then activate it with your INSYDIUM license.
NeXus is delivered as a Blender extension. Installing it takes two things from your INSYDIUM account: an access token to download the extension from the repository and a license to activate it once installed.
Requirements
Section titled “Requirements”- Blender 4.3 or later. NeXus is a Blender extension and will not appear in older versions.
- An INSYDIUM account at insydium.ltd, with an active NeXus license. Your account holds both your access token and your license details.
- An internet connection, every session. NeXus uses online licensing: it verifies your license with INSYDIUM’s license server each time it starts, not only on first activation. Blender’s Allow Online Access (Edit ▸ Preferences ▸ System) must be enabled. NeXus does not run offline.
Your access token and license are separate. The access token authorizes the download. The license activates the add-on after it is installed.
Installing the extension
Section titled “Installing the extension”You add INSYDIUM’s repository to Blender once, then install the extension from it. You can update from the same repository later.
-
In Blender, open Edit ▸ Preferences ▸ Get Extensions.
-
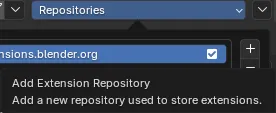
Open the Repositories dropdown at the top right and choose + ▸ Add Extension Repository.
-
Enter the URL
https://extensions.insydium.ltd, enable Requires Access Token, paste your access token into the Secret field, then click Create.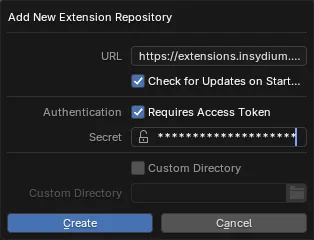
-
Back in Get Extensions, search for INSYDIUM and click Install on INSYDIUM NeXus.
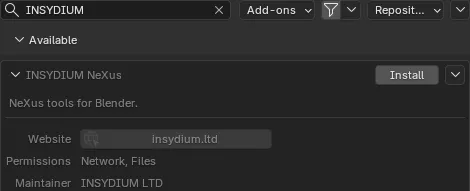
Blender downloads and installs the extension. It is now listed under Edit ▸ Preferences ▸ Add-ons, ready to activate.
Entering your license
Section titled “Entering your license”The add-on stays inactive until you enter your license. Until then, only the Licensing and Updates sections of its preferences are shown. The rest of the preferences appear once NeXus is registered.
-
Open Edit ▸ Preferences ▸ Add-ons, find INSYDIUM NeXus in the list and click the arrow to expand it.
-
In the Licensing section, fill in three fields:
- Name: your registered name, typed exactly as it appears on your INSYDIUM account.
- Email: your registered email address.
- License: your INSYDIUM license key.
NeXus checks the details with the license server automatically as soon as all three fields are filled, so there is no separate Apply button. Once the key validates it is masked in the field, hiding the middle blocks.
When activation succeeds the rest of the preferences appear (Privacy, General, Time Display, Cache, Quill and Version Details), and you can add your first object from Add ▸ INSYDIUM NeXus in the 3D viewport.
License status
Section titled “License status”A status line under the license fields reports what NeXus is doing:
- Checking license…: NeXus is contacting the license server. This shows while the three fields are being verified.
- License active: your license is valid and NeXus is registered.
- An error message: the details were rejected, or the server could not be reached. The message describes the problem.
If you enter a new key that fails while you already have a working license, the previous license stays active and the error notes that your existing license is still in use. Your current setup is never lost by a bad entry.
Run Diagnostics
Section titled “Run Diagnostics”If NeXus cannot reach the license server, a Run Diagnostics button appears under the status line. It is the first thing to try when activation fails with a connection error rather than a rejected key.
Diagnostics steps through a connectivity and security check and reports where the connection fails:
- Internet: whether the machine has any outbound connection at all.
- DNS: whether the license server’s address resolves.
- TCP port 443: whether an outbound HTTPS connection can be opened.
- TLS/SSL: whether the server’s security certificate is valid.
- License server: whether the full secure exchange with INSYDIUM’s license server completes.
Each step reports a checkmark or the point of failure, which helps you or INSYDIUM support pinpoint a firewall, DNS or network problem. A failing step is usually caused by a firewall, a proxy or antivirus software blocking HTTPS to license.insydium.net on port 443.
Fix the reported problem, then run the check again with Re-run Diagnostics. If every step passes, NeXus retries your license automatically.
Managing the license later
Section titled “Managing the license later”The Licensing section stays in the add-on preferences after activation, so you can update your details at any time from Edit ▸ Preferences ▸ Add-ons ▸ INSYDIUM NeXus. Clearing the License field deactivates NeXus and hides the rest of the preferences until a valid license is entered again.
For the full add-on preferences, including GPU memory, viewport acceleration, the cache location and the Quill AI models, see Preferences.
Updating NeXus
Section titled “Updating NeXus”Updates are delivered through the same INSYDIUM repository you added when installing. As long as Online Access is enabled in Blender’s preferences, NeXus checks the repository for a newer release each time Blender starts, so you do not have to look for updates yourself.
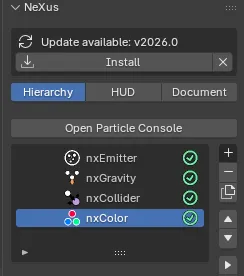
When a newer version is available, a notice appears in three places so it is hard to miss.
The NeXus tab of the sidebar (N-panel) in the 3D viewport:
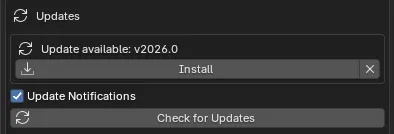
The Updates section of the add-on preferences (Edit ▸ Preferences ▸ Add-ons ▸ INSYDIUM NeXus):
And Blender’s status bar along the bottom of the window:

The notice reads Update available with the new version number and an Install button. Click Install and NeXus downloads and applies the update, showing an Updating NeXus progress message while it works, then NeXus updated with the new version once it finishes. If something goes wrong it reports the problem with a Retry button. When you are already on the latest version it reads NeXus is up to date.
To check by hand at any time, open the Updates section of the preferences and click Check for Updates. The same section has an Update Notifications toggle: turn it off to stop the automatic checks and hide the notices. Dismissing a notice with its X hides that one version until a newer release appears.
Copyright © 2026 INSYDIUM LTD. All Rights Reserved.