

Intro to NeXus for Blender
INSYDIUM NeXus for Blender is a GPU-accelerated particle and simulation system, bringing the NeXus toolset to Blender.
NeXus runs its simulation on the GPU through INSYDIUM’s Theron engine and draws particles directly in the viewport, so you can build and play detailed particle, fluid and volumetric effects in real time. It requires Blender 4.3 or later, a valid INSYDIUM license and an internet connection, since NeXus uses online licensing and checks it each time Blender starts.
How NeXus works in Blender
Section titled “How NeXus works in Blender”NeXus is built from objects you add to your scene, rather than entries in Blender’s modifier stack. Each NeXus object, such as an emitter, a force or a generator, is added from the Add ▸ INSYDIUM NeXus menu and configured in the Properties editor ▸ Physics tab. Relationships between objects, such as which emitters a modifier affects and the order things evaluate in, are managed from the NeXus Hierarchy in the 3D viewport’s N-panel ▸ NeXus tab.
If you have used NeXus in Cinema 4D, most of what you already know carries straight over. Both versions run on the same Theron engine, so the great majority of modifiers, forces and features are the same and behave the same way, and your existing NeXus experience and training transfer directly. The differences are mostly in how you add objects and wire them up in Blender, which the Getting Started pages below cover.
Installing NeXus for Blender
Section titled “Installing NeXus for Blender”NeXus for Blender is delivered as an extension from INSYDIUM’s repository. It needs Blender 4.3 or later, plus your access token and INSYDIUM license from your account at insydium.ltd.
-
In Blender, open Edit ▸ Preferences ▸ Get Extensions.
-
Open the Repositories dropdown at the top right and choose + ▸ Add Extension Repository.
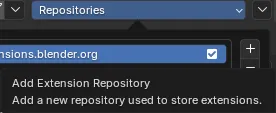
-
Enter the URL
https://extensions.insydium.ltd, enable Requires Access Token, paste your access token into the Secret field, then click Create.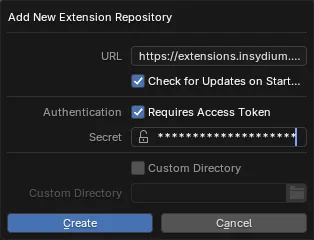
-
Back in Get Extensions, search for INSYDIUM and click Install on INSYDIUM NeXus.
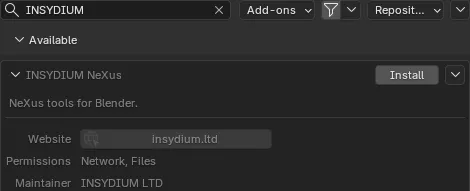
-
Open Edit ▸ Preferences ▸ Add-ons, expand INSYDIUM NeXus and enter your license to activate it.
Once it is active, add your first object from Add ▸ INSYDIUM NeXus in the 3D viewport.
Getting Started
Section titled “Getting Started”- Installation and Licensing: installing the add-on and entering your license.
- Adding NeXus Objects: the Add ▸ INSYDIUM NeXus menu and the object categories.
- The NeXus Panel: the Physics-tab panel and its Object Properties, Groups Affected, Mapping and Falloff tabs.
- NeXus Hierarchy: organizing your NeXus setup and its evaluation.
- Particle Console: inspecting the running simulation.
- Node Integration: reading particle data in shader and geometry nodes.
Tutorials and training
Section titled “Tutorials and training”Video tutorials made specifically for NeXus in Blender.
In this documentation
Section titled “In this documentation”NeXus objects are grouped by category, matching the Add ▸ INSYDIUM NeXus menu:
- Emitter: nxEmitter (the particle source), nxGroup, nxCache
- Objects: nxCollider
- Simulation: nxConstraints, nxExplosiaFX, nxFluids, nxFoam, nxSplash, nxWave, nxFlowField, nxSheeter, nxPPCollisions
- Generators: nxGenerator, nxMesher, nxTrail
- Logic: nxQuestion
- Particle: nxBlend, nxColor, nxKill, nxScale
- Force: nxAttract, nxAvoid, nxCover, nxDirection, nxDrag, nxExplode, nxFlock, nxFollowGeo, nxGravity, nxInfectio, nxLimit, nxPush, nxRotate, nxSpeed, nxSpin, nxSticky, nxTurbulence, nxVorticity, nxWind, nxDendrite
- Utility: nxUpres
- Falloff and Mapping: nxFalloff, Mapping
Copyright © 2026 INSYDIUM LTD. All Rights Reserved.