

nxMesher
nxMesher builds a polygon mesh surface from your NeXus particles.
It surfaces particle emitters (and nxExplosiaFX volumes) into a solid skin, the way a metaball or fluid mesher wraps a moving point cloud, so a stream of particles can render as liquid, slime or any continuous surface. The mesh is rebuilt on the GPU every frame.
Add it from Add ▸ INSYDIUM NeXus ▸ nxMesher. It arrives as an empty, and it also creates a child mesh object that receives the generated surface. Assign your materials to that child mesh, since it is the object that renders. All of nxMesher’s settings live in Properties ▸ Physics.
A dense particle shower surfaced into a liquid skin as it breaks over Suzanne. The individual particles are wrapped into one continuous mesh that pours and runs across her.
Object Properties
Section titled “Object Properties”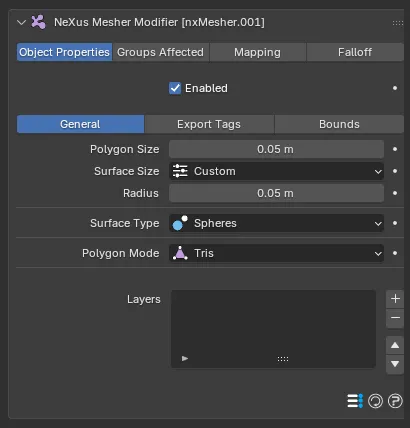
The nxMesher panel in Properties ▸ Physics, on the Object Properties tab, showing the General section. A button row near the top switches this tab between three sections: General, Export Tags and Bounds.
Enabled
Section titled “Enabled”Turns nxMesher on or off. Disable it to clear the generated mesh without deleting the modifier.
General
Section titled “General”The General section holds the core surfacing controls and the Layers list.
Polygon Size
Section titled “Polygon Size”Sets the resolution of the mesh, as the size of the voxel grid the surface is built on. Defaults to 0.05m. Smaller values produce a finer mesh with more polygons and more detail. Larger values produce a coarser, blockier mesh with fewer polygons and faster processing.
0.05m
0.15m
The same liquid pour at a Polygon Size of 0.05m, on the left, and 0.15m, on the right, with the mesh wireframe shown. The fine value packs many small polygons for crisp detail. The coarse value builds a chunky, low-polygon mesh from larger voxels.
Surface Size
Section titled “Surface Size”Sets how nxMesher sizes the surfacing radius of each particle. Set as Custom, by default. The alternative is Source.
- Custom: every particle uses the same radius, set with Radius below.
- Source: each particle uses its own particle radius, scaled by Scale.
Radius
Section titled “Radius”The surfacing radius of each particle, used to build the surface around it. Defaults to 0.05m. Available when Surface Size is set to Custom. Raise it so neighboring particles overlap and fuse into one continuous surface. Lower it so they stay as separate blobs.
Scales each particle’s own radius when Surface Size is set to Source. Defaults to 100%, which uses the particle radius as is.
Surface Type
Section titled “Surface Type”Sets the algorithm used to reconstruct the surface. Set as Spheres, by default. The alternatives are Zhu-Bridson and Anisotropic (Basic).
- Spheres: each particle is a sphere and the mesh is the union of them all. The simplest and fastest option, giving a lumpy, metaball-like surface.
- Zhu-Bridson: a smoothed liquid reconstruction that blends particles together for a more organic fluid surface.
- Anisotropic (Basic): stretches the surface along the direction the particles are moving, so fast-moving particles read as elongated streaks rather than round blobs.
The same particle pour surfaced with each Surface Type, at the same Polygon Size, so you can compare how each algorithm builds the skin.
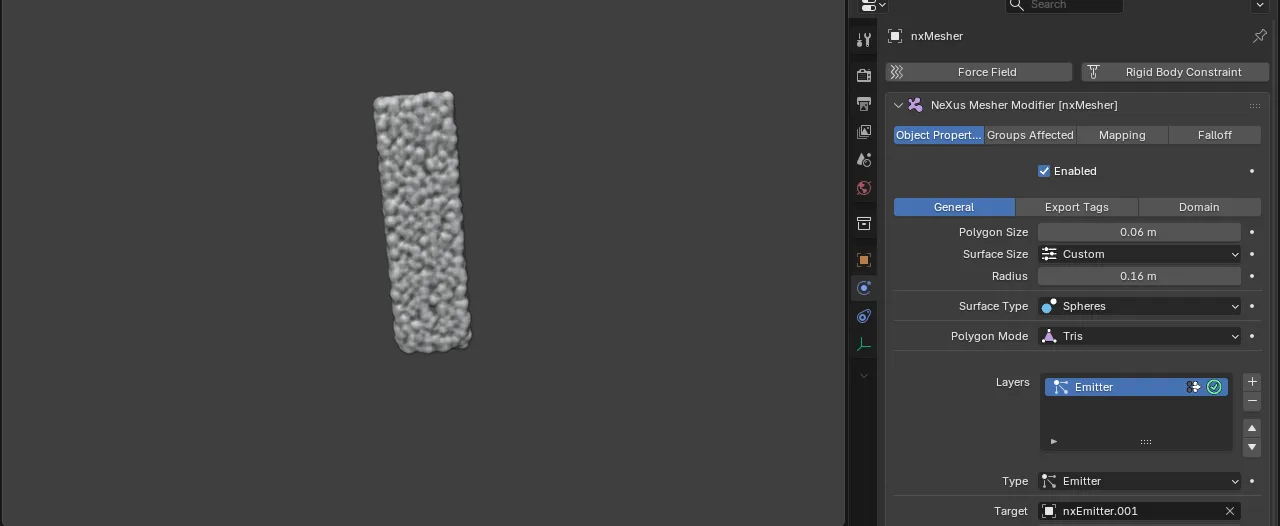
Spheres meshes each particle as a sphere and unions them, giving a lumpy, metaball-like skin.
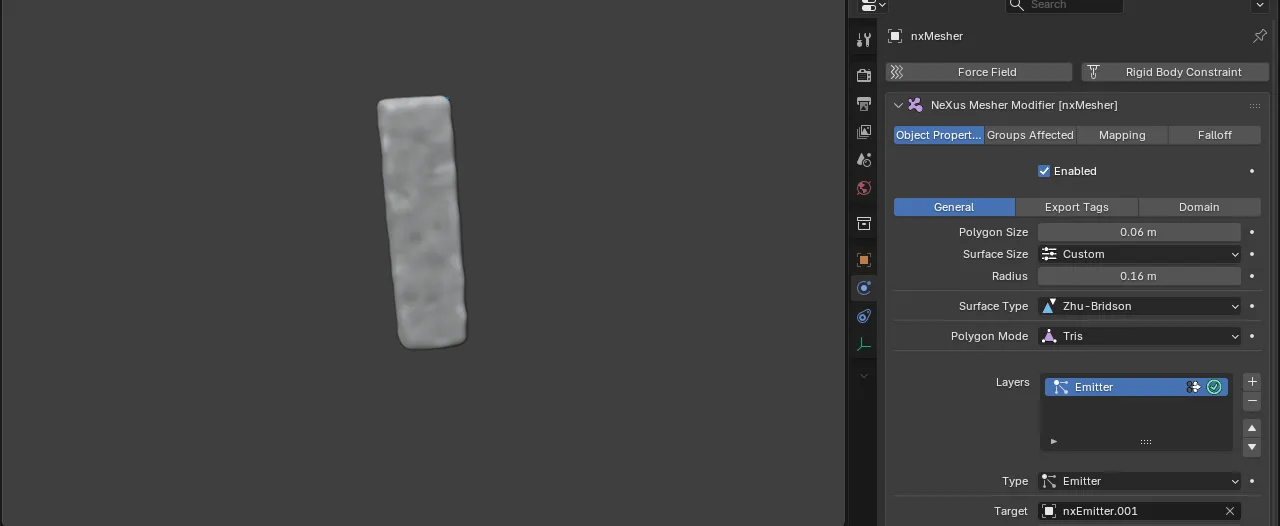
Zhu-Bridson blends the same particles into a smooth, organic liquid surface.
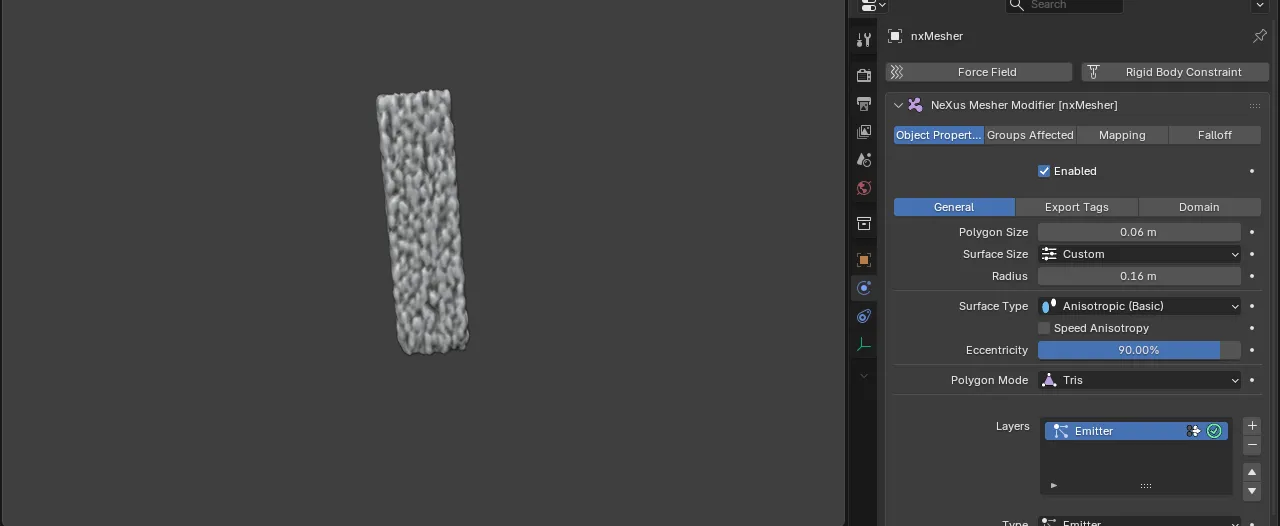
Anisotropic (Basic) stretches the surface along the direction of travel, so the falling stream reads as elongated streaks instead of round blobs. Shown here with Eccentricity raised to 90% so the stretch is clear.
Spheres
Zhu-Bridson
The same pour surfaced live, as Spheres on the left and Zhu-Bridson on the right. Spheres stays a lumpy skin of fused balls. Zhu-Bridson blends into a smooth liquid.
Speed Anisotropy
Section titled “Speed Anisotropy”Drives the amount of stretching from each particle’s speed, rather than a fixed amount. Off by default. Available only when Surface Type is Anisotropic (Basic).
Eccentricity
Section titled “Eccentricity”Sets how far the surface stretches along the direction of travel. Defaults to 30%. A value of 0% keeps the surface round. Higher values give a longer, more elongated stretch. Available when Surface Type is Anisotropic (Basic) and Speed Anisotropy is off.
Max Speed
Section titled “Max Speed”The particle speed at which the maximum stretch is reached. Defaults to 2m. Available when Surface Type is Anisotropic (Basic) and Speed Anisotropy is on.
Polygon Mode
Section titled “Polygon Mode”Sets the polygon type of the output mesh. Set as Tris, by default. The alternative is Quads.
Layers
Section titled “Layers”The Layers list is where you add the particle sources to surface, along with any smoothing.
Click the + button to add a layer and pick its type. The types are Emitter, Smoothing and ExplosiaFX. Add an Emitter or ExplosiaFX layer, then assign the source object in its Target field. Add a Smoothing layer to smooth the combined surface.
Each row has a toggle on the right to enable or disable that layer. Emitter rows also have a vertex-map toggle: turn it on to write a per-emitter weight onto the mesh (an attribute named after the emitter), so you can later mask or blend by which emitter a part of the surface came from.
Emitter layer
Section titled “Emitter layer”Surfaces the particles of the emitter set in Target.
Smoothing blends this emitter’s contribution into the surrounding surface, which helps where several emitters overlap. This field is available only when the emitter’s vertex-map toggle is on.
Smoothing layer
Section titled “Smoothing layer”Adds a smoothing pass over the generated surface to reduce noise and clean up the mesh.
- Mode: the smoothing algorithm. Set as Gaussian, by default. The alternatives are Laplacian and Mean Curvature. Gaussian blurs the surface field for a broad, even smoothing. Laplacian averages each vertex with its neighbors, a tighter smoothing that holds volume better. Mean Curvature smooths by surface curvature, easing off high-frequency noise while keeping the larger shapes.
- Strength: how strongly the smoothing is applied. Defaults to 50%.
- Influence Range: the radius sampled around each point when smoothing. Defaults to 0.05m. Available only when Mode is Gaussian.
- Iterations: the number of smoothing passes per frame. Defaults to 1. Higher values give a smoother result at the cost of more processing time.
ExplosiaFX layer
Section titled “ExplosiaFX layer”Surfaces an nxExplosiaFX simulation set in Target, so you can mesh smoke or fire volumes.
- Smoke: surface the smoke channel of the simulation. On by default.
- Iso-value: the smoke density above which the surface is generated. Defaults to 100.
- Temperature: surface the temperature channel of the simulation. Off by default.
- Iso-value: the temperature above which the surface is generated. Defaults to 50.
Export Tags
Section titled “Export Tags”The Export Tags section copies particle data onto the generated mesh as attributes, ready to use in a shader or for effects such as motion blur.
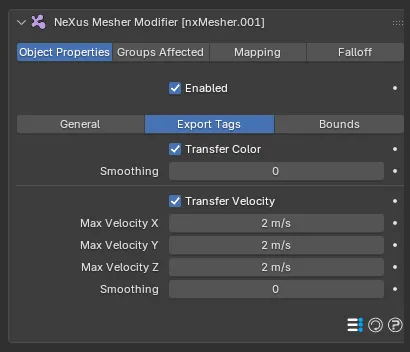
The Export Tags section, with both Transfer Color and Transfer Velocity turned on to reveal their full set of controls.
Transfer Color
Section titled “Transfer Color”Writes each particle’s color onto the mesh as a color attribute. Off by default.
Smoothing
Section titled “Smoothing”Blurs the transferred color across neighboring vertices. Defaults to 0. Available when Transfer Color is on.
Transfer Velocity
Section titled “Transfer Velocity”Writes each particle’s velocity onto the mesh as a vector attribute, which drives motion blur and can be read in a shader. Off by default. The velocity is normalized against the Max Velocity values below.
Max Velocity X
Section titled “Max Velocity X”The velocity on the X axis that maps to the maximum stored value. Defaults to 2m/s. Available when Transfer Velocity is on.
Max Velocity Y
Section titled “Max Velocity Y”The velocity on the Y axis that maps to the maximum stored value. Defaults to 2m/s. Available when Transfer Velocity is on.
Max Velocity Z
Section titled “Max Velocity Z”The velocity on the Z axis that maps to the maximum stored value. Defaults to 2m/s. Available when Transfer Velocity is on.
Smoothing
Section titled “Smoothing”Blurs the transferred velocity across neighboring vertices. Defaults to 0. Available when Transfer Velocity is on.
Bounds
Section titled “Bounds”The Bounds section controls the region of space the mesh is generated in, and adds several ways to shape and clean up the surface at its edges.
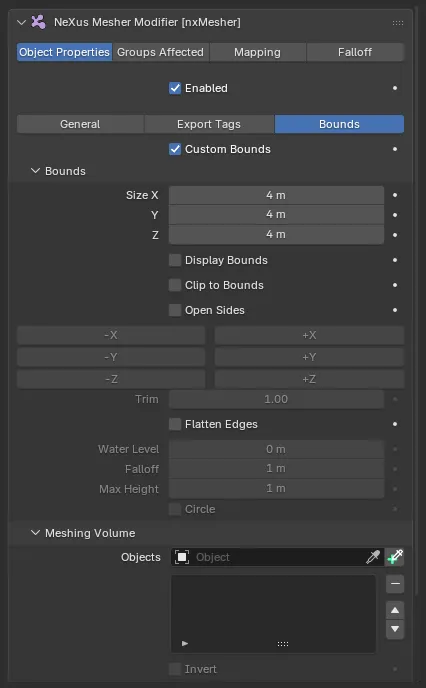
The Bounds section, with Custom Bounds on so the Bounds panel body is enabled.
Custom Bounds
Section titled “Custom Bounds”Sets a fixed bounds box instead of adapting to the particle extents. Off by default, so the bounds grow automatically to contain all of the particles. Turn it on to size the bounds by hand and to enable the Bounds panel below.
Bounds
Section titled “Bounds”The Bounds panel holds the fixed bounds controls, along with Open Sides and Flatten Edges below. The whole panel is enabled only when Custom Bounds is on.
- Size: the size of the bounds box on each axis. Defaults to 4m on X, Y and Z.
- Display Bounds: draws the bounds box and its resize handles in the viewport, so you can see and drag the bounds. Off by default.
- Clip to Bounds: cuts the surface cleanly at the bounds faces. Off by default.
Open Sides
Section titled “Open Sides”Leaves the surface open by trimming it near the chosen bounds faces. Off by default. Turn it on to reveal a grid of six face toggles, -X, +X, -Y, +Y, -Z and +Z, so you can pick which faces to open.
How far from an open face to trim the surface, in voxels. Defaults to 1.0. Available when Open Sides is on.
Flatten Edges
Section titled “Flatten Edges”Flattens the surface toward a water level near the bounds sides, useful for reading a particle sim as an open body of water. Off by default. Turn it on to reveal its controls.
- Water Level: the height the surface flattens to at the bounds sides. Defaults to 0.0.
- Falloff: the distance from the bounds sides over which to flatten the surface. Defaults to 1.0.
- Max Height: the height above water level the surface may reach near the falloff edge. Defaults to 1.0.
- Circle: tapers the flatten region radially from the bounds center, rather than from the box faces. Off by default.
Meshing Volume
Section titled “Meshing Volume”The Meshing Volume panel clips the surface to one or more mesh objects.
Add mesh objects to the Objects list to restrict meshing to inside those objects. The surface is only generated where it falls within them.
- Invert: meshes the fluid outside the objects instead. Off by default. Available only when the Objects list has at least one object.
Remove Small Parts
Section titled “Remove Small Parts”Deletes disconnected surface pieces smaller than the minimum size, to clean up stray blobs. Off by default.
Minimum Size
Section titled “Minimum Size”The smallest surface piece to keep, in polygons. Defaults to 50. Available only when Remove Small Parts is on.
Groups Affected
Section titled “Groups Affected”Use the Groups Affected tab to restrict nxMesher to particles in specific nxGroup groups, rather than surfacing every particle. This is useful for meshing only part of a simulation.
Mapping
Section titled “Mapping”Use the Mapping tab to drive nxMesher’s settings from particle data instead of fixed values, so a particle’s own attributes can change how it is surfaced. See Mapping for how this works.
Falloff
Section titled “Falloff”Use the Falloff tab to limit where nxMesher generates its surface. Add one or more nxFalloff objects to the list and blend them, so only particles inside the falloff region are meshed.
Copyright © 2026 INSYDIUM LTD. All Rights Reserved.