

nxFlowField
nxFlowField bakes a procedural velocity field into a box and uses it to steer your NeXus particles, building the flow from a stack of layers.
Each layer adds a piece of motion, a swirl, a push, a pull toward an object or a noise pattern, and the layers blend together into one field. That field is baked into a voxel grid inside a domain box, then sampled per particle to drive them. All of its settings live in Properties ▸ Physics.
Add it from Add ▸ INSYDIUM NeXus ▸ nxFlowField. It arrives as an empty with a resizable domain box drawn in the viewport, already set up with one starting Radial layer.
A Vortex layer centered on Suzanne. A shower of particles falls into the field and is wound around her as it descends, spiraling through the baked velocity field instead of dropping straight down.
Object Properties
Section titled “Object Properties”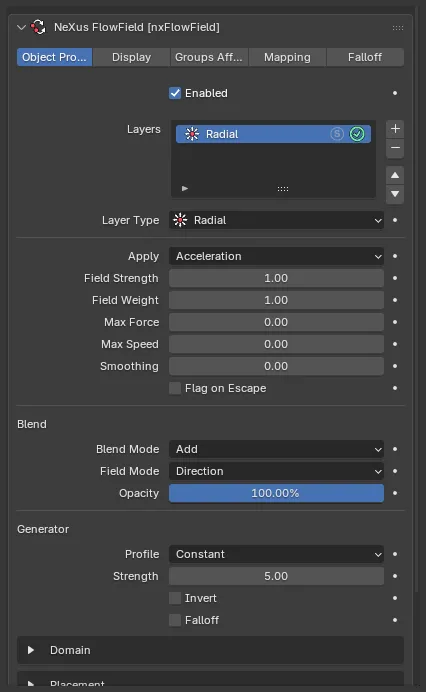
The nxFlowField panel in Properties ▸ Physics, on the Object Properties tab, showing the layer stack and the selected layer’s settings.
Enabled
Section titled “Enabled”Turns the whole nxFlowField on or off. Disable it to switch off the field without deleting the modifier or its layers.
Layers
Section titled “Layers”The stack of layers that builds the field.
Add layers with the + button. It opens a categorized menu, grouped into Fields, Targets & Surfaces, Sources, Modifiers and Operators (see Layer types below). The starting layer is a Radial field. Use the - button to remove a layer and the arrows to reorder the stack.
Layers combine from the bottom of the list upward: each layer blends into the result of the layers below it, using its own Blend Mode and Opacity. Reordering the stack changes how they compose.
Each row has an enable toggle and a Solo button. Soloing one or more layers bakes only the soloed layers, which is useful for isolating and tuning a single layer’s contribution.
Select a layer to reveal its settings below.
Layer Type
Section titled “Layer Type”Changes the selected layer’s type in place, so you can swap what a layer does without removing it. The same types are available here as in the + menu.
These settings apply to the whole combined field, not to a single layer.
Sets how the field drives particles. Set as Acceleration, by default.
- Acceleration: add the field as a force, so particles speed up in the direction of the flow.
- Set Velocity: set particle velocity directly to the field, so they move exactly as it dictates.
- Drag: ease particle velocity toward the field over time, for a softer, laggier follow.
- Steer: rotate a particle’s velocity toward the field while keeping its current speed, so paths curve without speeding up or slowing down.
Acceleration
Section titled “Acceleration”How quickly particles ease toward the field. Shown only in the Drag and Steer apply modes. Defaults to 10.
Field Strength
Section titled “Field Strength”A global multiplier on the whole combined field. Defaults to 1.0.
Field Weight
Section titled “Field Weight”A per-particle multiplier on the force the field applies. Defaults to 1.0 (full force). Map it to a particle property such as Age or Speed in the Mapping tab for per-particle control.
Max Force
Section titled “Max Force”Clamps the field strength so it cannot blow up. Defaults to 0, which is no limit.
Max Speed
Section titled “Max Speed”Clamps how fast the field can push particles, in meters per second. Defaults to 0, which is no limit.
Smoothing
Section titled “Smoothing”Eases the field toward its target over frames instead of snapping to it, which softens sudden changes as you animate the field or its inputs. Higher values lag more. Defaults to 0 (instant), and the maximum is 0.99.
Flag on Escape
Section titled “Flag on Escape”Marks particles that leave the domain box with the Escaped flag, so an nxQuestion can trigger actions on them. Off by default.
Layer settings
Section titled “Layer settings”These settings apply to the layer selected in the list. The Blend section is common to every layer. Below it, the Generator (or Operator) section shows the controls for the layer’s type.
Blend Mode
Section titled “Blend Mode”How this layer combines with the layers below it. Set as Add, by default, which superposes the forces. The other options are Over (replace the layers below, blended by Opacity), Subtract, Average and Max Magnitude (keep whichever force is stronger). Modifier and Operator layers do not show this control.
Field Mode
Section titled “Field Mode”How this layer’s field vector is interpreted. Set as Direction, by default. Not shown on Orbit, Particles, Modifier or Operator layers.
- Direction: use the vector as-is, keeping both its direction and its magnitude.
- Unit Speed: constant speed, the unit direction scaled by Strength.
- Attenuate: keep the direction but fade the magnitude with distance from the center.
Opacity
Section titled “Opacity”How strongly this layer contributes to the result. Defaults to 100%.
Common generator controls
Section titled “Common generator controls”Most generator layers share these controls.
Strength
Section titled “Strength”The force applied by this layer. A negative value reverses it. Defaults to 5.0. Some layer types relabel this control (for example Gain, Angular Speed or Influence).
Invert
Section titled “Invert”Reverses this layer’s direction: push becomes pull, and a vortex flips its spin.
Center Offset
Section titled “Center Offset”Moves this layer’s center away from the modifier origin, in the modifier’s local space. It lives in the Placement fold. Directional layers have no placement.
Layer Falloff
Section titled “Layer Falloff”Fades this layer’s effect with distance from its source, or from its center when it has none. A checkbox turns it on, then Distance sets the range the fade spans (defaults to 2m) and a curve shapes it. Invert Falloff flips it, so the effect is weakest at the source and stronger farther away, which is how you get a follow-along-a-spline look. Operator and Flow layers do not have a falloff.
Layer types
Section titled “Layer types”Layers are grouped in the + menu into five categories. Every layer also has the Blend and, where applicable, the Strength, Invert and Layer Falloff controls described above.
Fields
Section titled “Fields”Procedural fields that need no scene object. Each image below is the field’s Streamline preview from the Display tab, with no particles, so you can read the shape of the field itself.
Radial
Section titled “Radial”Push out from or pull in to the layer center. A Profile sets how it changes with distance: Constant, Inverse (1/r) or Inverse Square (1/r², like gravity).
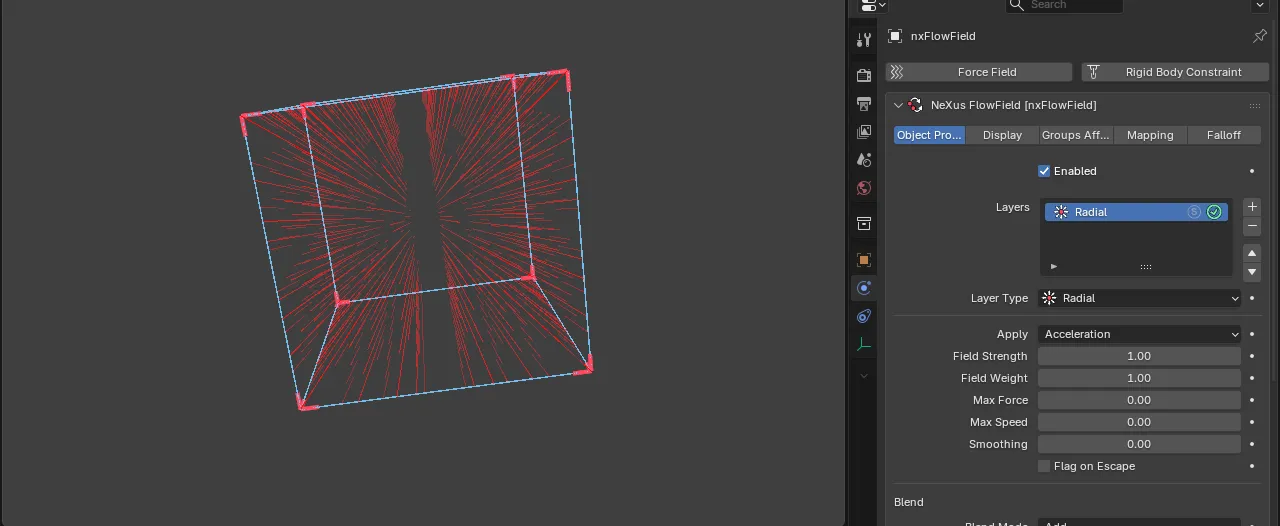
The streamlines radiate straight out from the center.
Directional
Section titled “Directional”A uniform push along a Direction vector in the modifier’s local space.
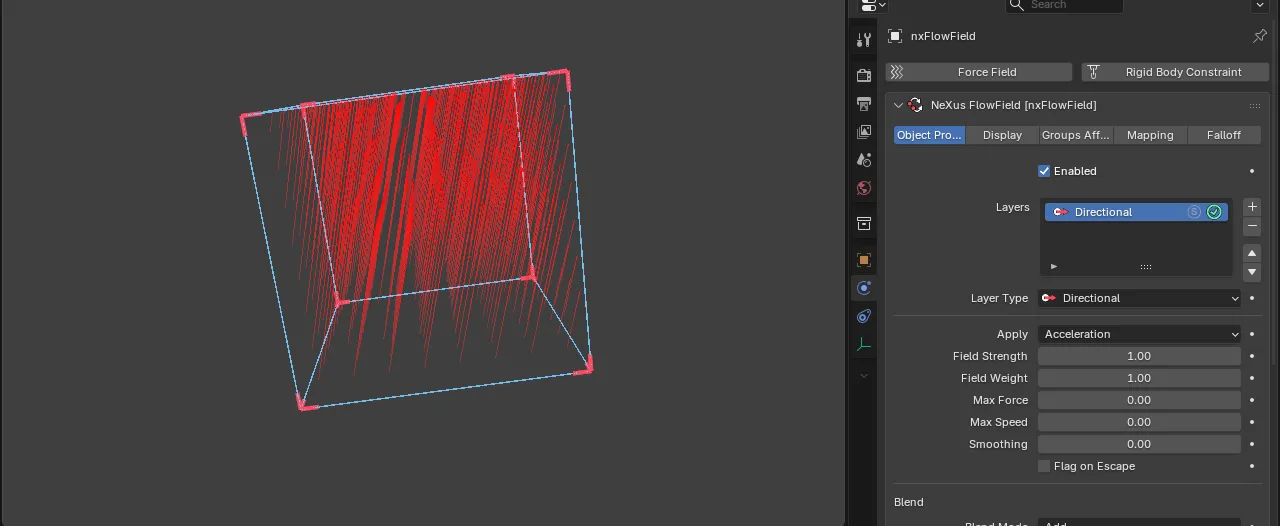
Parallel streamlines, all flowing the same way.
Vortex
Section titled “Vortex”Swirl around the layer’s axis. Core Radius sets the solid-body core, Axial Lift pushes along the axis to make a tornado or drain column, Radial pulls toward or pushes away from the axis and Rotation tilts the axis.
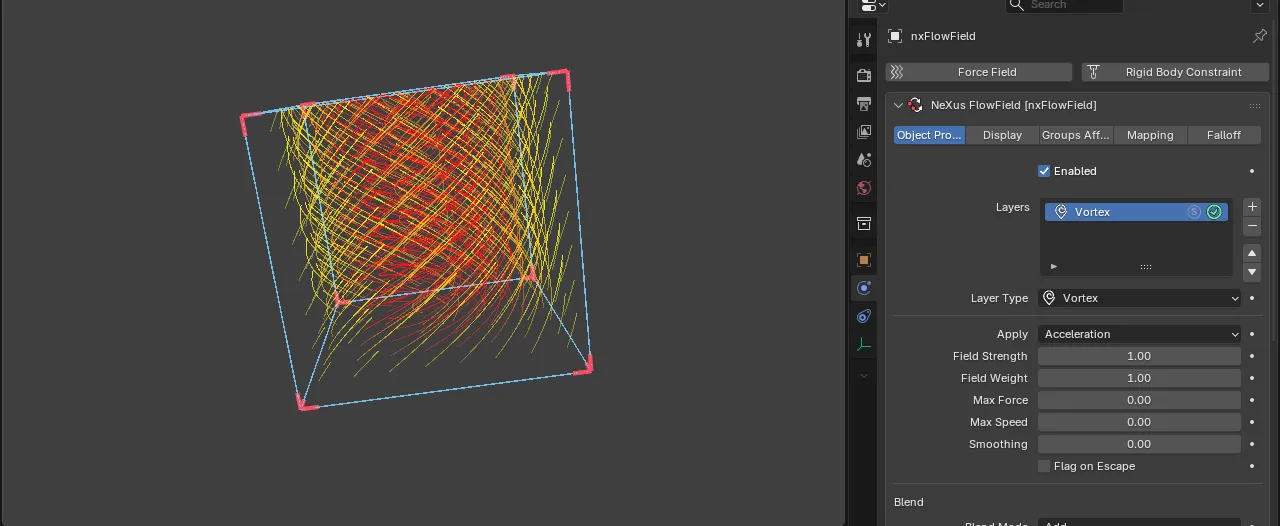
The streamlines wind around the axis and lift into a rising column.
Vortex Ring
Section titled “Vortex Ring”A smoke-ring flow that pushes through its center and loops back. Ring Radius sets its size and Rotation tilts it.
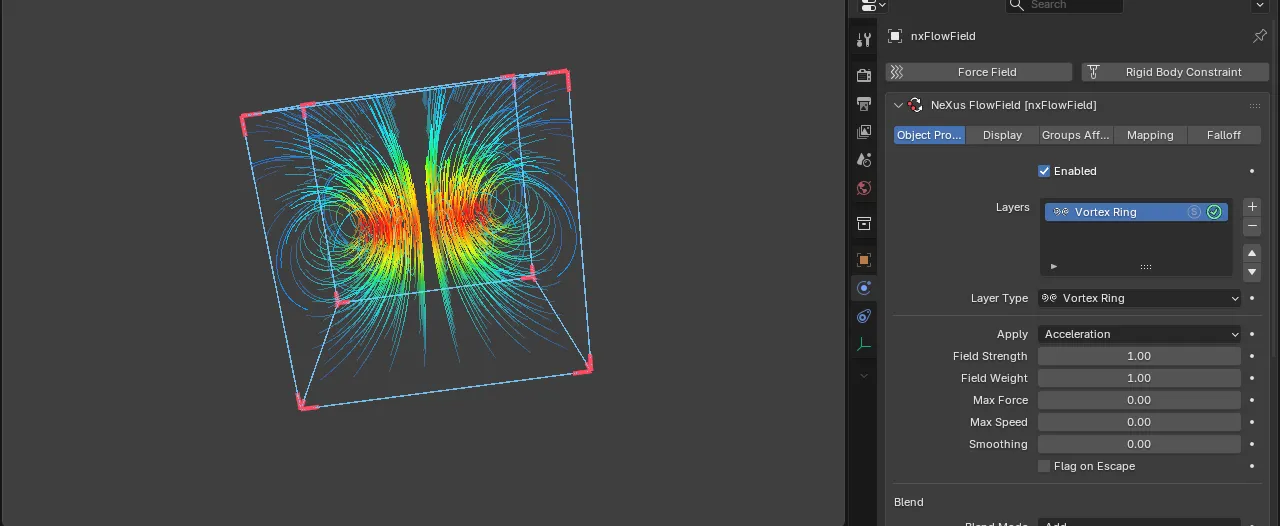
The streamlines shoot through the ring and fold back on themselves.
Rigid rotation about the center, correct at any radius. Angular Speed sets the rate and Rotation tilts the axis.
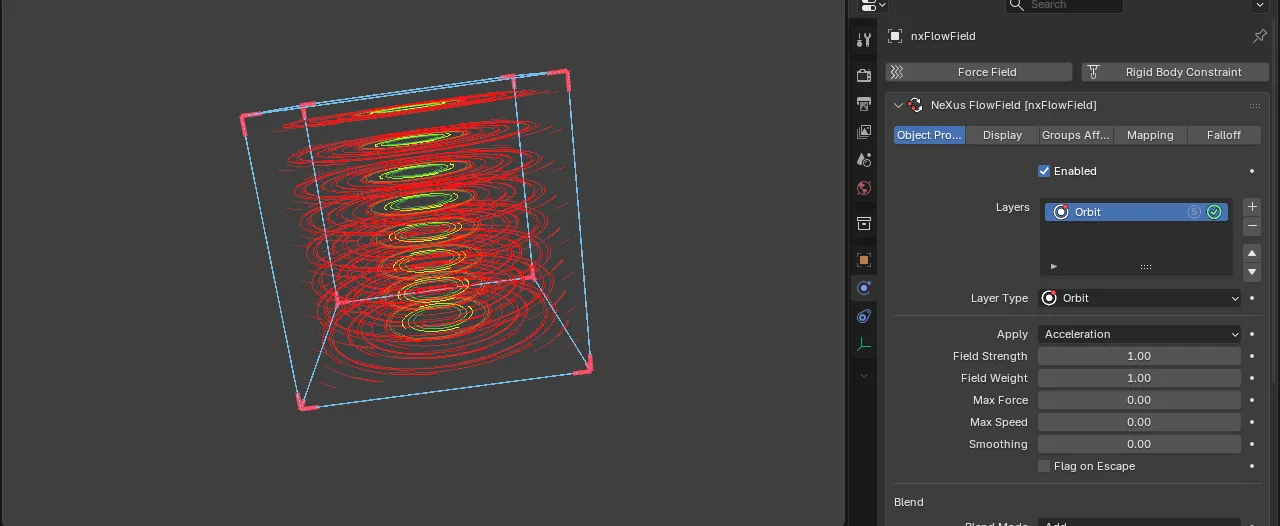
Concentric streamlines circle the center at every radius.
Curl Noise
Section titled “Curl Noise”Organic, swirling divergence-free turbulence. Noise Scale sets the swirl size, and Octaves, Lacunarity and Roughness add finer detail. Animation Speed scrolls the noise over time and Rotation tilts the pattern.
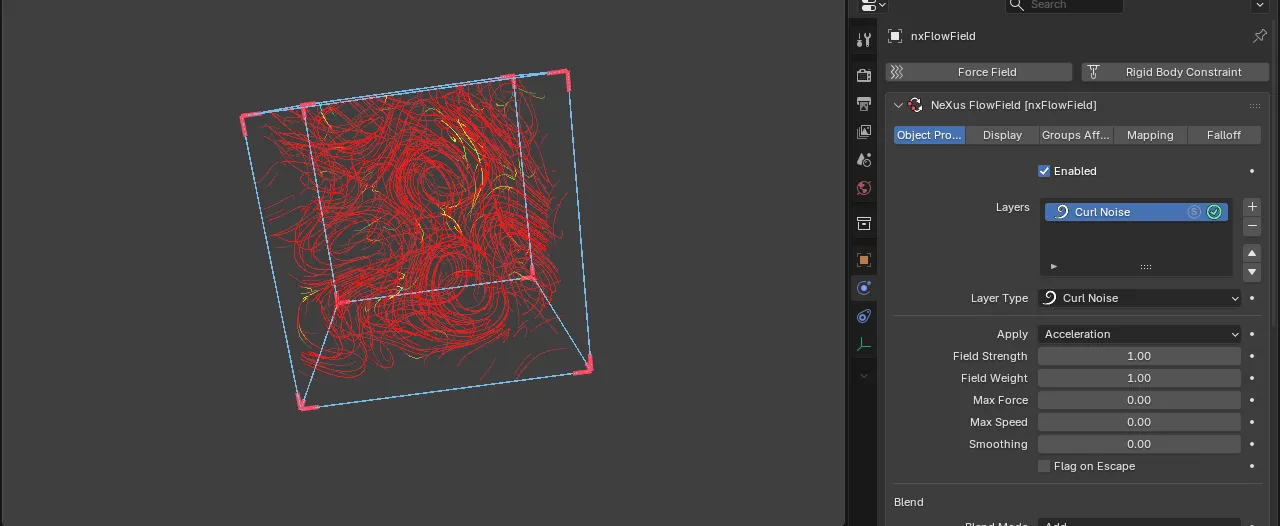
The streamlines swirl in organic, divergence-free eddies.
Turbulence
Section titled “Turbulence”Smooth fractal (fBm) noise flow, chaotic but coherent, with the same noise controls as Curl Noise.
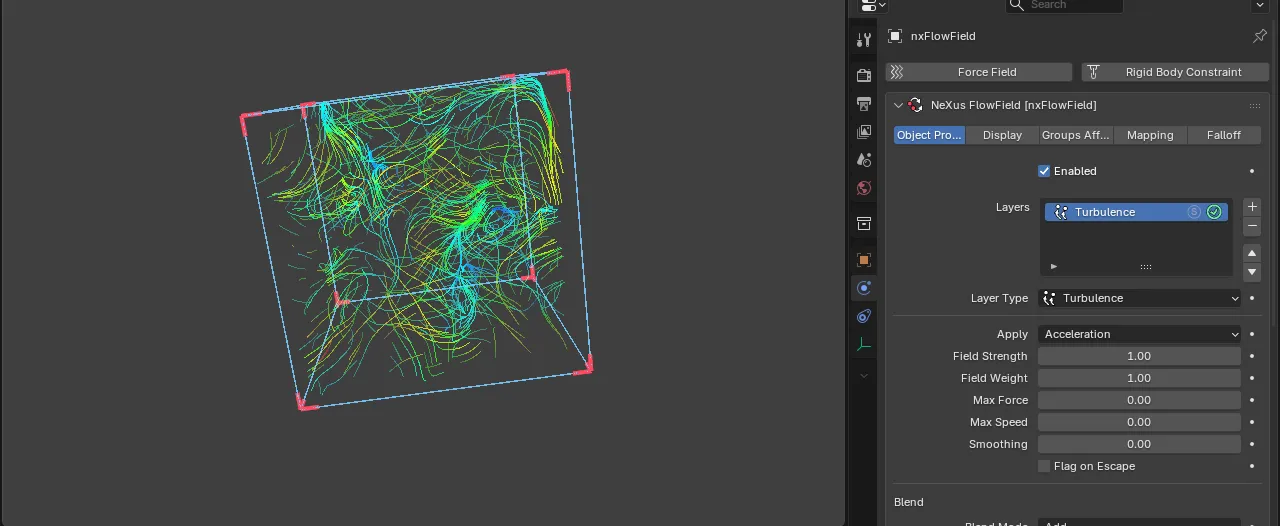
A chaotic but coherent fractal flow.
Random
Section titled “Random”A fixed random direction per cell, scattering particles. A Seed changes the pattern.
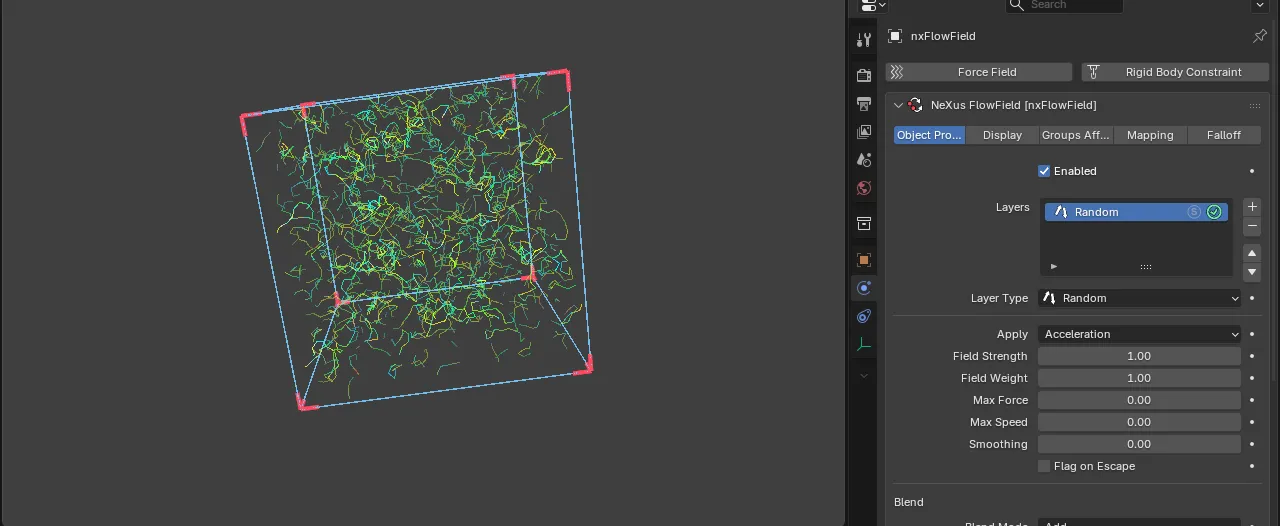
A separate random direction in every cell, so the streamlines scatter.
ABC Flow
Section titled “ABC Flow”Closed-form divergence-free structured turbulence. Cell Size sets the pattern scale, Animate evolves it and Rotation tilts the pattern.
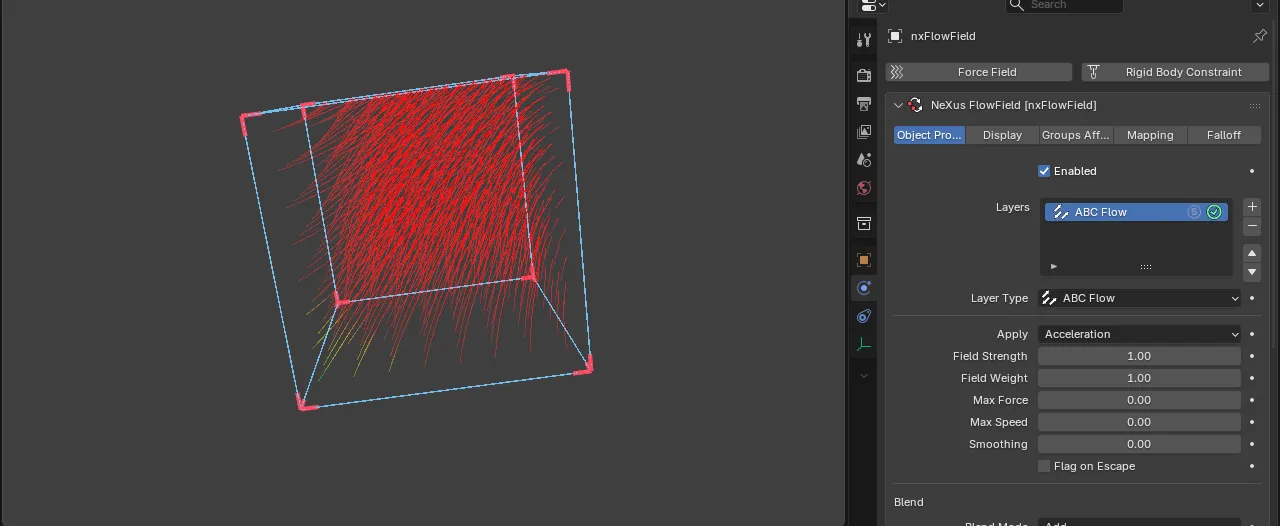
A repeating lattice of structured, divergence-free cells.
Targets & Surfaces
Section titled “Targets & Surfaces”Fields driven by a linked object, curve, mesh or image.
- Target: drive particles toward, or away from, one or more linked objects. A Profile sets the distance response. With no target it pulls toward the flow field itself.
- To Object: flow along a tube from the origin to each linked object, with an optional Swirl and Radial pull and a Tube Radius.
- Along Spline: flow along a linked curve, following its direction.
- To Spline: flow toward the nearest point on a linked curve.
- Surface Normal: push along the nearest surface normal of a linked mesh.
- To Surface: flow toward, and conform to, the nearest point on a linked mesh.
- Surface Tangent: flow across a linked mesh, with the Direction projected onto its surface.
- Texture: sample an image across the domain for direction. Read As maps the image Direction (RGB to XYZ) or drives a fixed Direction by image Brightness.
- Flow: wind-tunnel flow that streams in one Inflow Direction and diverts smoothly around the linked collider meshes. Quality sets the solve accuracy.
Sources
Section titled “Sources”Drive the field from another simulation or from footage.
- ExplosiaFX: drive the field from a linked nxExplosiaFX simulation’s velocity.
- Liquid: drive the field from a linked FLIP/APIC nxFluids liquid simulation’s velocity.
- Particles: flow along the local average velocity of nearby particles, for a flocking effect. A Sources list restricts it to one emitter or group’s particles. Influence sets its weight.
- Optical Flow: drive the field from the motion between a video’s frames. Flow Smoothing steadies it over frames.
- Snapshot: a frozen capture of the combined field. You normally create it with the Snapshot Field button (see Import / Export) rather than adding an empty one from the menu.
Modifiers
Section titled “Modifiers”These reshape the combined field from the layers below them, rather than adding new motion. They have no Blend Mode or Field Mode, only an Opacity.
- Gain: scale the field below by a Gain factor.
- Clamp: cap the field’s magnitude at a Max Magnitude.
- Invert: reverse the field below.
- Normalize: force a constant Speed on the field below.
- Threshold: remove the field below where it is weaker than a Threshold.
- Rangemap: remap the field’s speed from an Input Min/Max range to an Output Min/Max range.
- Quantize: snap the field’s speed to Step-sized bands, posterizing it.
- Curve: shape the field’s speed response with a curve. White Point sets the input speed that maps to the top of the curve.
Operators
Section titled “Operators”Spatial passes that run across the grid. They have an Iterations (or Quality) count and no Blend Mode, Field Mode or falloff.
- Smooth: blur the field to soften it.
- Sharpen: enhance detail and contrast.
- Dilate: grow the field’s influence outward into weaker cells.
- Erode: shrink the field’s influence, trimming weak fringes.
- Divergence Free: reproject the field to be incompressible so it swirls like a fluid. A Boundary of Open lets flow leave the domain, and Closed keeps it recirculating inside.
- Vorticity: vorticity confinement, which re-energizes swirls that smoothing or projection damp.
- Extrapolate: fill empty cells from nearby flow, spreading a sparse source.
- Advect: self-advect the field so it flows and streaks along itself.
Domain
Section titled “Domain”The Domain fold sets the box the field is baked into. You can also resize the box with the gizmo handles in the viewport.
Domain Size
Section titled “Domain Size”The size of the baked box, on each axis. Defaults to 4m on all three axes.
Voxel Size
Section titled “Voxel Size”The grid cell size. Smaller is a finer field but uses more memory. Defaults to 0.125m. Turn on Show Voxels in the Display tab to see the cell grid.
Precision
Section titled “Precision”The grid storage precision. Set as 16-bit, by default, which halves memory. 32-bit is exact and is preferable for fine or curl-heavy fields.
Import / Export
Section titled “Import / Export”The Import / Export fold holds tools for reusing a baked field.
Import Field loads a field from a file. Export Field writes the current field out, with a menu of file formats. Snapshot Field freezes the current combined field into a new Snapshot layer, so you can bake down an expensive stack of layers into a single static field.
Display
Section titled “Display”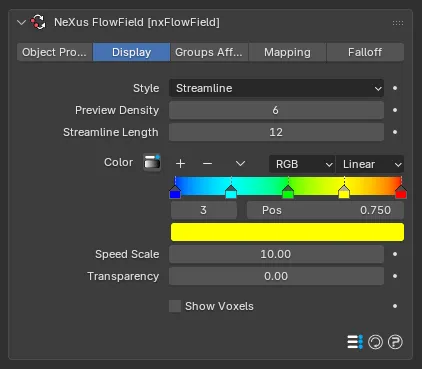
The Display tab controls the field preview drawn in the viewport. The preview is a visualization only and does not change the simulation.
How to draw the field. Set as Streamline, by default, which traces flow lines through the field. The other options are Off, Dot (a small cross at each sample point), Line (a direction line) and Arrow (a direction line with a head).
Preview Density
Section titled “Preview Density”The number of preview samples along each axis. Defaults to 6.
Streamline Length
Section titled “Streamline Length”The number of steps traced along each streamline. Shown in Streamline style. Defaults to 12.
Arrow Length
Section titled “Arrow Length”Scales the preview line or arrow length. Shown in Line and Arrow styles.
A gradient that colors the preview by field speed, from the slow end to the fast end.
Speed Scale
Section titled “Speed Scale”The field speed that maps to the fast end of the gradient. A lower value saturates the gradient sooner. Defaults to 10.
Transparency
Section titled “Transparency”Fades the preview. 0 is opaque and 1 is invisible.
Show Voxels
Section titled “Show Voxels”Draws the voxel cell grid on the back faces of the domain box, so you can gauge the cell size set by Voxel Size. Off by default.
Groups Affected
Section titled “Groups Affected”Use the Groups Affected tab to restrict nxFlowField to particles in specific nxGroup groups, rather than affecting every particle in the domain. Leave it empty to affect all particles.
Mapping
Section titled “Mapping”Use the Mapping tab to drive nxFlowField’s settings from particle data instead of fixed values, for example mapping Field Weight to particle Age so the field’s grip fades as particles age. See Mapping for how this works.
Falloff
Section titled “Falloff”Use the Falloff tab to limit where nxFlowField acts. Add one or more nxFalloff objects to the list and blend them, so only particles inside the falloff region are steered. This is separate from the per-layer Layer Falloff, which fades an individual layer by distance to its source.
Copyright © 2026 INSYDIUM LTD. All Rights Reserved.